• Skip to main content
  • Skip to primary sidebar
  • Home
  • Contributors
  • Resources
    • Q&A with Paul “Coach” Wade
  • Workshops
  • Products
  • Forums
  • Articles
  • Blogs
    • RKC Blog
    • Strong Medicine Blog
  • Archives

PCC Blog

Progressive Calisthenics - The Official Blog for the PCC Community

Archives for February 2014

The Missing Link to the One-Arm Push Up

February 18, 2014 By Todd Cambio 21 Comments

Al Kavadlo One Arm Push Ups

I love body weight exercises.  I think they should be the basis of any training program.  Body weight movements can be used for warming up, for cooling down, for flexibility and mobility.  Then, once you learn these movement patterns, they can be progressed to truly test one’s individual strength.  Things like pistol squats, pull-ups, handstand push-ups and one-arm push-ups are incredible exercises, which is one of the reasons I gravitated towards Convict Conditioning.   This book has been instrumental in bringing my skill set to the next level.  I use it to train myself as well as my clients.  It has helped me clearly structure a periodized workout plan for my clients with clear goals and progressions.

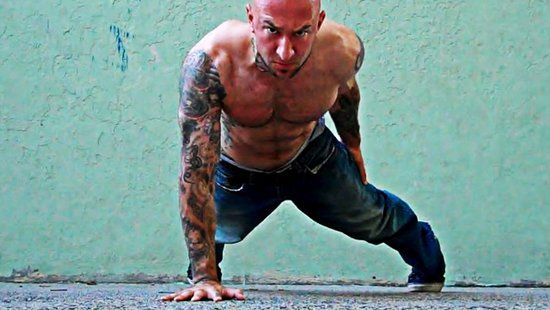
When I design my training programs, I train opposing muscles groups or movement patterns.  For every action – there is an equal and opposite reaction.  For example, we all know that the push up is a fantastic upper body strength exercise – but when overused, it can cause some issues.  The big muscle groups like the upper pectorals; shoulder and the internal rotators of the arm and shoulder can become shorter and tighter than the external rotators and scapula retractors.  This tightness can possibly cause a forward rounding posture and possible neck and shoulder injuries.  So to make sure I don’t cause these possible issues, I always have an opposite movement paired with the exercise, in this case, the body row.  This is my push/pull relationship method of training.

The body row is the sister exercise to the push up, however, it is much less utilized.  It also incorporates almost all the same muscle groups as the push up.  The exception is that the prime movers are the back of the body (posterior chain) as opposed to the front (anterior chain) of the body.  Most of the attention goes to the Pull Up as the ultimate body weight back exercise, which is of course an awesome exercise, but until my clients are strong enough to do them correctly, the Body Row rules the roost!

So, what is that missing link you may ask?  It’s the Body Row.  Actually, since we are talking about the One-Arm Push Up, it’s the One-Arm Body Row!

In fact, as I progress up the ten steps in Convict Conditioning Push Up Series, I progress up my own steps to a one-arm body row.

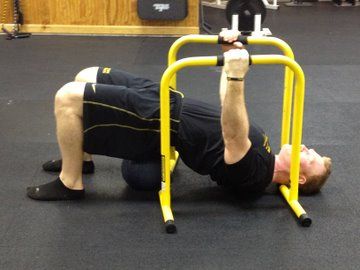
In Convict Conditioning, the horizontal pull is what I call a body row.  I use the Lebert Equalizers for my horizontal pulls because I can add some great variety to the pulls as well as bring them with me to where ever I want to train, inside or outside.  Always having a place to do a pull up is sometimes an issue.  So, if I am outside and want to add in some pulls, I can.

The Body Row is similar to Convict Conditioning’s Pull Up Series Step Two, but with a different tool.  Here is the point where I branch off from the Pull Up Series and add a few alternative steps with the Equalizers that translate to a better one-arm push up.

I will not go into great detail about each body row movement because I am sure if you are following Convict Conditioning, you get the main points on proper form.  I will point out the basics though, which are pretty straightforward.  When you get into your starting position with the Equalizers (EQ), dig your heels into the ground and fire your glutes to keep your hips locked and aligned.  Grab the black grips with a firm hold to fire the forearms.  Keep a neutral spine as you pull yourself off the ground.   When you progress to the single arm body rows, it is much like a single arm kettle bell swing in that your body will want to rotate on you.  Do your best to keep your shoulders parallel to the floor.  Your core will get quite a workout here too!

Convict Conditioning Push Up Steps with correlating Body Row Movements:

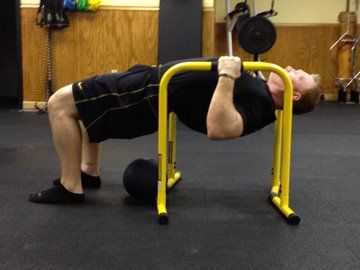
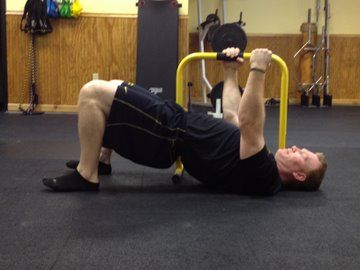
Step 4 – Half Body Row – Mirrors the Half Push Up (the ball under the glutes is to help cue you to keep your hips up)

Todd Cambio Half Body Row Todd Cambio Half Body Row

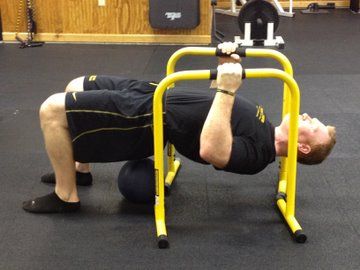
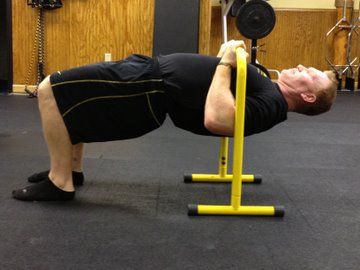
Step 5 – Full Body Row – Mirrors Full Push Up

Todd Cambio Half Body Row Todd Cambio Half Body Row

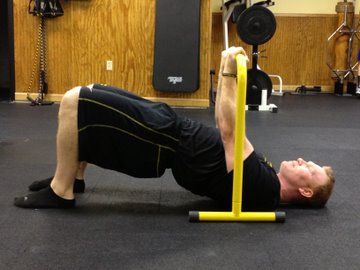
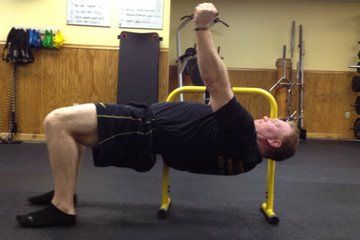
Step 6 –Single EQ Chin up – Mirrors Close Push Ups

Todd Cambio Half Body Row Todd Cambio Half Body Row

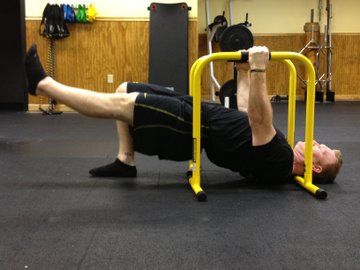
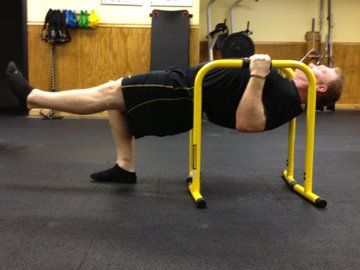
Step 7 –Single Leg EQ Body Row – Mirrors the Uneven Push Up

Todd Cambio Half Body Row Todd Cambio Half Body Row

Step 8 – One Arm Half EQ Body Row – Mirrors the One Arm Half Push Up

Todd Cambio Half Body Row Todd Cambio Half Body Row

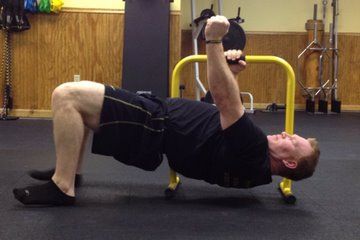
Step 9 – One Arm EQ Body Row – Mirrors the One Arm Push Up

Todd Cambio Half Body Row Todd Cambio Half Body Row

So there you have it, a push/pull relationship that not only enhances your one-arm push up but also increase your overall body weight strength.

Todd M. Cambio, CSCS, HKC is the owner of Precision Fitness in Westerly, RI. He is a strength and conditioning coach that specializes in sports performance and obstacle course race training. Todd is a Certified Strength and Conditioning Specialist, a Spartan Group X Obstacle Course Coach, a published author and Master Body Weight Trainer & Presenter for Lebert Fitness. See what Todd is up to by visiting www.ToddCambio.com.

Filed Under: Progressive Calisthenics Tagged With: bodyweight row, Convict Conditioning, core strength, one-arm push-ups, progressive calisthenics, push-pull, Todd Cambio

I Failed the Century… and What I Learned as a Result

February 11, 2014 By Marcus Santer 41 Comments

Al and Danny Kavadlo in NYC

“Nothing happens without hard work, time and discipline.”
Al Kavadlo

I know, it’s a real cliche. But like most cliches, it contains an element of truth—I hit 40, looked at myself and my life and thought, “Is this it? Is this all I’ve done?”  And because I couldn’t afford to buy a Porsche, I decided to do the other cliched thing men frequently do when they hit 40, I decided to get into the best shape of my life.  Not that I was in bad shape to start with, but I definitely had that ‘Skinny Fat’ thing going on.

I’d spent the last 10 years focusing solely on Qigong (think Chinese Yoga if you’ve never heard of Qigong) to take care of all my physical, emotional, mental and spiritual needs. But looking in the mirror at my 6 month pregnant belly, I had to accept that as good as Qigong had been for helping me say goodbye to depression and thrive in spite of the stresses and strains of modern 21st century living, when it came to keeping me physically strong and looking good, it simply wasn’t delivering the goods.

Something had to change.

Now there’s something you should know about me before we go any further.  When it comes to research I’m a bit OCD, because when I commit to something I go all in. But I won’t commit to anything until I’ve really done my homework. Know what I mean?

This formula has helped me to succeed in most things I do:

1) Work out what I want to achieve.
2) Find a Method that has a proven track record for delivering what I want to achieve.
3) Find a good teacher that teaches that Method
4) Work my arse off: Persistence, discipline, tracking progress.

Using this formula I discovered:

1) I wanted to get into the best shape of my life.
2) When it came to physical exercise, calisthenics was my preferred method because it could help me grow strong and I didn’t have to waste $1,000s on equipment, memberships and so on.
3) The best source I could access was something with the odd title: Convict Conditioning.
4) I was ready to invest the required hard work, time and discipline.

The 3 things I loved about Convict Conditioning which made it stand head and shoulders above any other information I could find back in 2011 were:

Paul ‘Coach’ Wade is direct with a no bullshit approach to getting strong.
The progressive, step by step nature of his system.
A focus on ‘The Big 6′.

I dived in and here are the results: I’m stronger now at age 42 than I was when I was 22.  I look and feel better too.  And it’s all thanks to ‘Coach’ Wade and the brilliant Convict Conditioning.

Why I Took the PCC in Sweden

“Welcome to the most advanced, evolved, engineered piece of fitness equipment in existence… Your own body!”
Danny Kavadlo

I’m always keen to offer the best to my own students, it’s important I’m doing everything I can to help them live a happier, healthier and longer life. And based on my own experience with Convict Conditioning I soon began encouraging them to pick up a copy and get practicing too.

But the majority of my students are as far away from the ‘ideal’ customer the Convict Conditioning sales page is targeted at as you can get. And unfortunately most were unable to get the benefits simply because they couldn’t get past the marketing.  So I began looking for a way to teach my Qigong students calisthenics but in a way they would find accessible.

Marcus Santer with the awesomely talented Kavadlo Brothers--two of the instructors from the epic Sweden PCC
Marcus Santer with the awesomely talented Kavadlo brothers at the epic Sweden PCC

Something else you should know about me—it’s important to me that I’m suitably qualified to safely teach somebody something before I start. But trying to find a suitable calisthenics based instructor training course was proving to be a bit of a non-starter.

I saw that Dragon Door started teaching PCC courses in the USA, but I couldn’t quite stretch to traveling to the USA from the UK for a 3 day course.  So you can imagine my delight when I saw there was going to be a PCC workshop put on in Sweden. I didn’t hesitate for a second. I signed up straight away and began working on:

‘The Century’.

The Century really bothered me because it’s the gateway between you and the right to call yourself a PCC instructor.

I knew I could do 40 body weight squats
I knew I could do 30 push ups
I knew I could do 20 hanging knee raises

But the 10 pull ups, hmm. Now I was worried.

On a really good day with a following breeze I could just about crank out 11. So how the hell was I going to crank out 10 after doing the 3 other exercises in The Century and under 8 minutes?  But before heading off to Sweden, I’d managed to do The Century twice and I was optimistic I’d be able to pull it off on the day.

Boy, how wrong was I!

After two and half days of awesome, mind blowing calisthenics tuition from Al, Danny and Adrienne I was exhausted.  So when it came time for The Century test, here’s what happened:

  • Squats – Pass
  • Push ups – Pass
  • Hanging knee raises – Pass
  • Pull ups – I got to 6 and I knew I was in trouble.

Hanging from the bar trying to get my 7th pull up was an experience I won’t forget in a hurry. Agonizing inch by agonizing inch I finally strained my chin over the pull up bar.  “7!″ my examiner, Adrienne shouted.

I could hear the other PCC students urging me on.  In spite of wanting to let go of the bar, the iron determination I’d forgotten I had simply refused to let go. I took a deep breath and pulled the bar…  Slowly I ascended, millimeter by millimeter as the support of the group gave me strength I didn’t have.   Ah, but this was no Rocky movie—I got 1/2 way and my arms simply stopped pulling.

It felt as if someone was setting fire to my muscles, and I had zero left in the bank—but still I wouldn’t let go!

I heard someone behind me shout, “Change your grip!”  At the time, I had an overhand grip on the bar, the ‘pull up’ position. The underhand, ‘chin up’ grip can, for some people, make life a little easier.  And somehow I managed to change my grip and gave it another go.

Nothing.

I hung there for what felt like an age and then it was ‘game over’ as my feet landed back on the floor with a heavy thud.

I’d failed The Century.

What Happened Next?

“There’s a lot of failure on the road to success and that’s good.”
Danny Kavadlo

After 3 days of full on calisthenics awesomeness (I did my first non-handed head stand and some other cool stuff) I simply didn’t have enough juice left in the tank.  And hey, what use is a test if everyone passes? It’d be a pretty poor test right? Because then the only requirement for success would be being able to afford the cost of the workshop. You’d literally be buying your qualification not earning it. And that doesn’t work for me.

Luckily the generous people at Dragon Door give you 90 days to submit video evidence of you completing The Century.  So the first thing I did was grab myself an accountability partner.  Because if there’s one thing I’ve learned about getting something done it’s this—having someone to hold me accountable increases the likelihood of me getting the job done. It’s amazing what I can do if I know I’ve made a promise to someone else I’m going to do it.

The second thing I did was grab Danny and ask him how I should practice to nail The Century. His advice was to practice The Century.

So twice a week for the following 4 weeks I did that.  And twice a week for the following 4 weeks I failed.  Again and again and again.  And then on 8th December, much to my amazement I finally did it.  The video’s here if you want to watch it.

One of the most valuable lessons I’ve learned on the road to passing The Century is that failure really is just a stepping stone to success, that you can only really fail something when you give up.

Summing Up

Group photo from the legendary PCC Sweden Workshop

I was a little nervous about traveling from the UK to Sweden on my own to attend a 3 day calisthenics workshop. Would I make a fool of myself? Would I be too old? That kinda crap.  But I was delighted to discover all my concerns were unfounded. A friendlier group of dedicated and friendly students you couldn’t wish to find.  And as for the instructors, well, awesome isn’t a big enough word to do them justice.

So, if you’re on the fence about attending a PCC workshop. Based on my experience I’d tell you to book your spot ASAP and take advantage of the generous early bird discounts Dragon Door offers.

Thanks for reading and I hope you’ve found something of value in this article.

Kindest regards,
Marcus

Marcus Santer helps people to live happier, healthier and longer lives through the practice of Qigong. He is the founder and chief instructor over at Qigong15. The author of 4 books covering all aspects of Qigong his mission is to make Qigong as popular as Yoga, Tai Chi and meditation, because he believes Qigong is quicker to learn, less physically demanding and gives greater benefits than Yoga, Tai Chi and meditation all put together.  You can find over 500 posts showing you how to live a happier, healthier and longer life through Qigong on his blog, Qigong15.com

Filed Under: Motivation and Goals, Workshop Experiences Tagged With: Century Test, Marcus Santer, PCC, Progressive Calisthenics Certification Workshop

Handstands Will Make You Better at Everything

February 4, 2014 By Mike Fitch 28 Comments

Mike Fitch Handstand

Yeah, it’s a bold statement, but hear me out. The mechanics of successfully performing a handstand will amp up all of your other exercise endeavors, making you stronger, more stable, and better coordinated, while the discipline required to master the move will make you a better human being overall. It will force you to take a long, hard look at the time you are willing to invest in reaching a specific goal.  It will also allow you to win money in a bar bet, steal the spotlight at any wedding and of course get the girl (or guy). Results may vary on the last three.

For thousands of years, athleticism has been demonstrated through feats of bodyweight strength and skill, with fit individuals judged not just by their bodies’ tone, but by how skillfully they could use their bodies.  Even in the golden age of bodybuilding, Arnie and the boys were known to challenge each other post workout with hand balancing and bodyweight strength contests.  We then saw a lull in these activities, with the popularization of the fixed-axis weight-lifting machine and single-plane isolation “robot training,”  but luckily for you and me (and the human race), the idea of skills practice and self-mastery is making its way back into fitness.

My favorite field, progressive bodyweight training, includes a multitude of exercises that are always sure to elicit an envious “I’ve always wanted to do that!”  Pistol squats, muscle-ups, human flags, HAND BALANCING – these moves are sure to catch the eye of any fitness enthusiast.  And the great thing is that any of these feats are possible to learn with the proper progression training, time commitment, and, most importantly, consistency.

Just as it takes a baby about 12 months of daily conditioning and practice to eventually stand on their own, it can take an adult months or years of repeated practice to build the neural grooves associated with a perfect handstand.  Are you willing to invest that kind of time?  I can guarantee that it will be one of the most humbling and gratifying journeys that you’ll experience.

While performing a great handstand is certainly a worthy goal unto itself, you’ll find that the skills you build in the process will transfer over into your other training, making you a better athlete and enhancing your quest toward a better body. Here are some examples of the tremendous carry-over you’ll see:

The Kinetic Chain

Let’s start with a simplified definition of the very complex concept of the kinetic chain: everything in our body is connected to everything else.   A handstand is a prime example of the connectivity of the kinetic chain, with each position, alignment, and movement requiring constant communication and neuromuscular efficiency in order to maintain that perfect balance. If just one thing changes during our hand balance, such as flexing our toes instead of extending them, then our body must immediately adjust to this new shift. 

Hand balancing is, obviously, performed on your hands, so that’s a great place to start thinking about how everything is connected.  Your fingers are some of the densest areas of nerve endings on the body, and have the best tactile feedback and positioning capability. Kicking up into your handstand initiates a sort of neuromuscular “super highway,” with all of those little finger receptors sending and receiving information throughout the body.  Your body’s communication must be perfectly orchestrated to keep you in balance, like a super effective emergency dispatcher taking calls, sending reinforcements, and keeping you safe (aka preventing you from crashing onto your head.)

The body has to adjust to the hand placement in relation to the shoulders; to the elbows being over the wrists but under the shoulders; and the hips, where are the hips in relation to the shoulders?; and it goes on.   So if we do this efficiently, and amp up our body’s abilities to communicate and make minute adjustments in a flash, you may already see how handstand training can benefit other athletic goals. But, I promised that handstands will make you better at everything, so let’s keep on going. 

Al Kavadlo Performs a Handstand

 Internal Tension

A tense body is a strong body.  Why is it so easy to balance a ruler or a bat vertically on your hand? Because the object is rigid, with no bends or “leaks.” Whether you are lifting your own body or grinding out a 1000 pound deadlift, the concept is the same – you need to create a rigid structure from which you can pull, push, lift or balance.  In Progressive Calisthenics, there is no room for any part of your body to lose connection or leak tension, and you learn very quickly about any leaks in your chain.  Mastering total body tension will not only accelerate your handstand training, but will be directly applicable to most of your other training as well.

 Grip Strength

In addition to “tense the whole body,” you’ll hear a lot of HB coaches tell you to “grip the ground.”   In our foot we have the luxury of a heel which plays a clever game of leverage to make walking and standing fairly easy tasks. Unfortunately, we don’t have the same advantage in our hands. So, the fingers must DIG into the ground, countering the body’s tendency to over balance (topple over), or let up to counter an underbalance.  It’s this constant battle between the finger extensors and flexors trading off between the rolls of agonist and antagonist that keeps us upright.   And along the way you’ll be conditioning for some brutal forearm strength.

Shoulder Stability

Few exercises can compare to a handstand for building shoulder stability. And let’s face it, nobody is going to be staring in amazement while you’re performing more band internal/external shoulder rotations.

 The shoulder – so incredible, so complex, and so commonly abused – can be an important source of power, but also a source of hidden weakness impacting your training in ways you don’t even realize.  Over repetition syndrome, poor form, and especially faulty postures can create imbalances that lead to injury or instability. But even if you don’t feel pain, if your body senses a weakness in the shoulder, it will automatically restrict the amount of power passing through that joint, and can actually dial down the surrounding muscle excitation.  I’m going to assume that everyone would rather be tapping into all of their strength for their efforts. As the saying goes, “you can’t shoot a cannon from a canoe.”

In Hand Balancing, the shoulder is the first line receiving all of that information from the sensors in the hands and forearm musculature, reacting to the head and hands below and the rest of the body above.  The muscles at the shoulder joint have to fire up like a synchronized light show to adjust to the constantly changing center of gravity over such a limited base of support, from the deeper muscles like Supraspinatus, Infraspinatus, Teres Minor, and Subscapularis (rotator cuff), to the bigger and more powerful Lats, Pecs, and Delts.  Even with the elbow completely locked, the heads of the Bicep and Triceps that cross the shoulder joint play a role in stabilizing the shoulder.  And that’s not even mentioning the other muscles that keep your Scapula strapped to your back.

 Simply put, handstands will make you stronger through increased activation and stabilization.

Free Standing Handstand

Spinal Stabilization

Handstands require not just spinal, or core, stabilization, but true multi-planar stabilization involving inversion of the body.

 Now, I realize there are many views on spinal stabilization and some debate over its efficacy and “functional” carryover to life or sport  (“You have to draw in to activate TVA!”  “No, bracing is the only way!”  “Let’s fight!”).  But we can probably all agree that the surrounding musculature of the spine (ie the core) needs to be able to properly stabilize to protect the spinal cord, and that the spine needs to be able to fight gravity’s constant pull, distributing the load while generating force and, more importantly, accepting external forces (whether that’s gravity, or a linebacker). It flexes, extends, rotates, laterally flexes and in the case of the handstand, stays perfectly still, and STABLE. 

When we are upright, we know that the core musculature should be firing to allow for gait pattern as in walking or running, or bending over to snatch up a kettlebell. But get inverted and everything changes.  The anchor or base is now the shoulder girdle, sitting on top of those mechanically disadvantaged hands. So now the spinal stabilizers have to figure out how to balance the pelvis over the shoulders, with the big legs riding on top.  This is true multi-planar stabilization! In a hand balance, all of the spine’s muscular units have to play their part to keep the spine in perfect alignment – i.e. spinal stabilization.

GETTING STARTED: TUTORIAL

I am constantly asked, “What’s the key to learning handstands?”  And there is a clear answer:  “To get good at handstands, you practice handstands.”   There is no other weighted exercise that will make you better at handstands – you just need to put in the time to practice the handstand-specific progressions and conditioning exercises. It IS skill specific training.

So here’s the part where you get to see what you’re made of.  Are you willing to put the time in to taking this challenge on? Are you ready to approach it with discipline, practicing often, even daily if necessary? You are no longer trying to merely increase your reps;  now you are working to improve yourself, master difficult skills, and achieve long-term goals.

I can tell you from my own experience that the handstand can be an allusive opponent.  I first learned an arch-back style handstand, which is common for most beginners, before I was challenged by a gymnast friend to learn the flat back style.  That process of re-educating took months! It was probably a year before I could easily switch between the two, along with other body positions, and stay up for multiple minutes. I learn more about Hand Balancing every single day and am humbled by it constantly.  I’m certainly a lot better now than I was a few years ago, and I definitely have more goals yet to reach.  It’s clear to me that it’s a life-long practice.  There’s no turning back now.

 Intro to Handstand Conditioning: The Wall-Assisted Handstand

Begin your handstand training with the simple Wall Assisted Handstand.  It may seem like the most basic conditioning exercise, but remember, a baby has to crawl before he could stand. The exercise itself is as simple as it sounds, but I have some tips to help make it wildly successful for you:

  1. First of all, you should have your front, not your back, facing the wall.  Otherwise you’re automatically training in an arch back handstand.  While the arch back is a legitimate handstand in itself, the mechanics are different and you may not get the same benefits I mentioned earlier.

  2. Follow these steps to get yourself safely into place:   Start by facing away from the wall. Bend forward and place your hands on the ground at roughly shoulder width.  Place your feet on the wall and walk them up until the body is elongated.  Walk your hands towards the wall until they are about 6 inches or so away from the wall (this may vary – just find a distance that feels comfortable psychologically).  The toes should be pointed with the top of the foot flat on the wall.

  3. Once in position, SET the body:  Grip the ground with your fingertips.  Lock the elbows completely, driving down into ground, creating as much space as possible between your toes and the ground.  When you successfully fire the traps, the space between your ears and shoulders will close.  Squeeze the glutes and quads, and draw in or brace the abdominal wall. Make sure not to hinge at the hips.

  4. Don’t forget to breathe!

  5. Time yourself to see how long you can hold this perfectly tensed handstand.  Your goal is to first work up to one minute, then two. Once you can hold for two minutes, begin bringing your hands closer and closer to the wall.

  6. And here’s an important Bonus Tip:   If you’re not used to twisting or summersaulting out of a handstand, be sure to leave enough strength to get back DOWN the wall!

Wall Walking Handstand

Expect to be humbled by this isometric conditioning.  But keep up with your handstand practice, and it will absolutely fast track your way to being better at EVERYTHING!

For more information on Hand Balancing, check out our new 5-part video series, Hand Balancing for the Bodyweight Athlete, available as downloads or on DVD.

Mike Fitch is the Founder/President of Global Bodyweight Training, a fitness company providing training, education, and promotion of bodyweight training disciplines, as well as creator of the popular Animal Flow program. Mike’s current interests lie in exploring how bodyweight training disciplines can be integrated with skills-based practices, and multi-planar, fluid movement. He’s been featured in Men’s Health, Shape, and Fitness Magazine, as well as on The Doctor’s, Good Morning America, and LIVE with Kelly and Michael.

Filed Under: Progressive Calisthenics Tagged With: carryover, coordination, hand balancing, handstands, Mike Fitch, progressive calisthenics, skill training, strength training

Primary Sidebar

Featured Products

previous arrow
GetStrongBookCover
ConvictConditioningBookCover
StreetWorkoutBookCover
ExplosiveCalisthenicsBookCover
StrengthRulesBookCover
next arrow

Categories

Progressive Calisthenics Certification Logo
Click here for more information or to register for the PCC workshop

Get Strong Workouts TriadXP App
Get Strong Workouts App

Recent Posts

  • Top 5 Reasons Why an In-Person Workshop is the Best Way to Supercharge Your Training
  • HYBRID STRENGTH TRAINING IS HERE!
  • My Calisthenics Journey to the PCC
  • The Handstand Press: Complete Control Through the Handstand
  • The Get Strong App is Here!

Dragon Door Publications

Dragon Door Publications

Recent Comments

  • bross dandon on The Case for Curved Handstands
  • Johnny Flewellen Jr. on Strength for Life
  • Dan Earthquake on The Pursuit of the Daily Minimum
  • Johnny Flewellen Jr. on The Pursuit of the Daily Minimum
  • Johnny Flewellen Jr. on Yoga, Calisthenics and the Journey of a Lifetime
FOLLOW US ON TWITTER!

Copyright © 2025

Dragon Door Publications / The author(s) and publisher of this material are not responsible in any manner whatsoever for any injury that may occur through following the instructions or opinions contained in this material. The activities, physical and otherwise, described herein for informational purposes only, may be too strenuous or dangerous for some people, and the reader(s) should consult a physician before engaging in them.