• Skip to main content
  • Skip to primary sidebar
  • Home
  • Contributors
  • Resources
    • Q&A with Paul “Coach” Wade
  • Workshops
  • Products
  • Forums
  • Articles
  • Blogs
    • RKC Blog
    • Strong Medicine Blog
  • Archives

PCC Blog

Progressive Calisthenics - The Official Blog for the PCC Community

Archives for July 2014

The Bodyweight Arm Training Revolution

July 29, 2014 By Matt Schifferle 29 Comments

Al and Danny Kavadlo bare their calisthenics arms
PCC Lead Instructors Al and Danny Kavadlo showing off their calisthenics arms.

“Matt I thought we were friends. How could you do this to me?!”

My buddy Tony is standing in front of me, all 295 pounds of him. He’s a powerlifter who considers benching 315 a warm up.

“My biceps feel like they are going to explode. I can hardly get my triceps to relax they are so pumped up. How could you do this to me?” He says with a smile on his face.

Tony’s just gotten a taste of two of my favorite arm blasting exercises. They are simple, efficient and they don’t require a single ounce of iron. They are also somewhat backwards to classical strength training for the biceps and triceps. So when Tony said it was his arm day and wanted something different, I didn’t pull any punches.

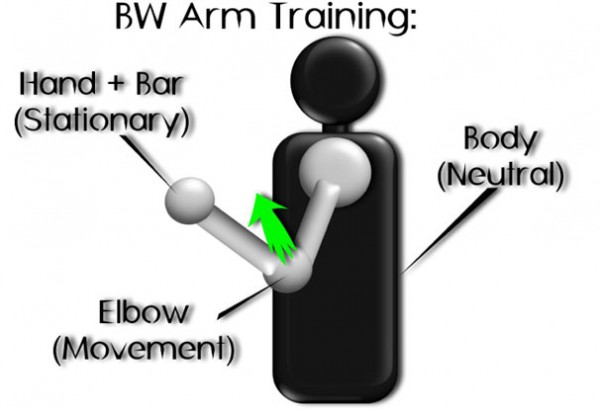
The classic approach to weight lifting work involves holding a weight or cable attachment in the hand. Good technique is classically done with a body that doesn’t move much and a neutralized elbow.

Classic Arm Training Diagram

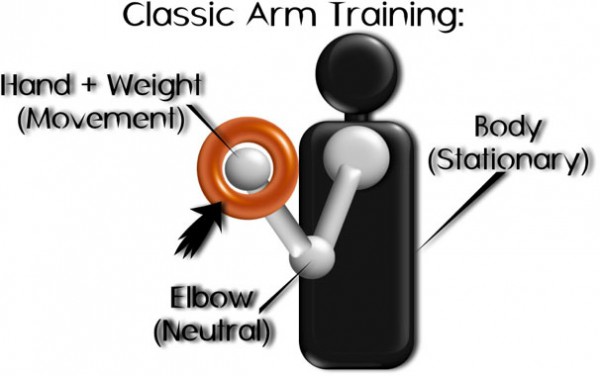
The bodyweight approach works the opposite way. The objective is to lock the hand in place, neutralize the body and move the elbow as much as possible.

Bodyweight Arm Training Diagram

This New Approach Has Some Big Advantages:

Less stress on joints.

The joints of the body typically become more stable and less likely to move into stressful positions when the extremities are against an unmoving object and the body itself moves through space.

More energy on target muscles.

Since there is less energy spent trying to prevent the body from moving (you actually want it moving around) you can spend more effort towards actually performing the movement and working the muscles in the arms.

More functional carry over to pull ups and pressing movements.

The curling exercise is still very much a pull up style movement. The triceps extension is also a style of push up. Just like with pull ups and push ups, you keep your hands in place and move your body using the action of the elbow joint. This is neurologically similar to push ups, dips, rows and pull ups. This means that you’ll program your nervous system to engage your biceps and triceps more during all pushing and pulling exercises. So you won’t just be hitting your arm muscles during these two moves, but you’ll also place more emphasis on those muscles with almost every upper body bodyweight movement in your calisthenics arsenal.

Carry over to Olympic lifting.

Some of my clients who practice Olympic lifting report a carry over to exercises such as cleans. I believe this is due to the fact that both of these moves train you to become more conscious of using your elbow as opposed to just trying to move the hands into an ideal position.

It’s easy to adjust resistance mid-set or even mid-rep.

Both moves have a variety of ways you can adjust the resistance on the fly. You can dial-in the perfect level of resistance and make adjustments as necessary even during those last few reps.

The bottom line is this–by reversing the classical weightlifting arm strategies with calisthenics, you open the door for unbelievable levels of tension applied directly to your biceps and triceps with more comfort and safety. How’s that for a formula for success?

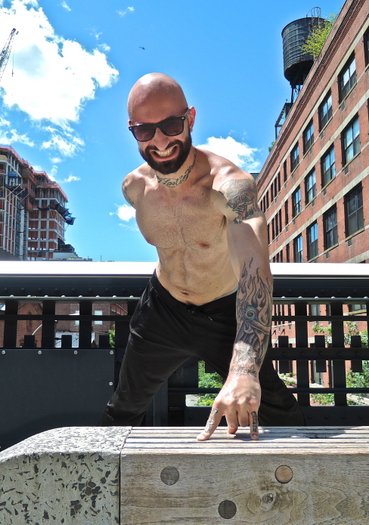
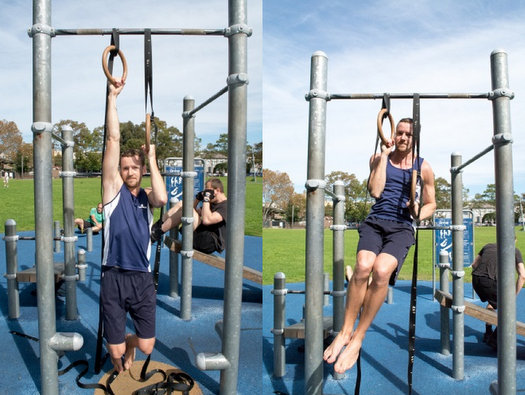
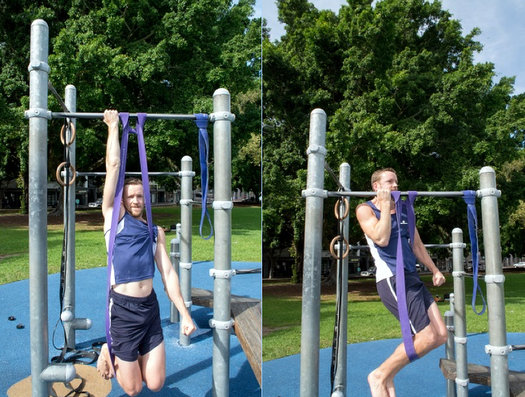
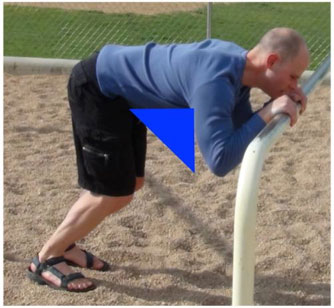
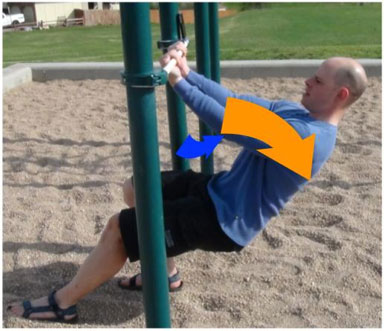
The first exercise is the triceps move known as the Tiger Bend. You can do this move on any elevated platform or edge of a counter. Park benches and sturdy table tops work particularly well.

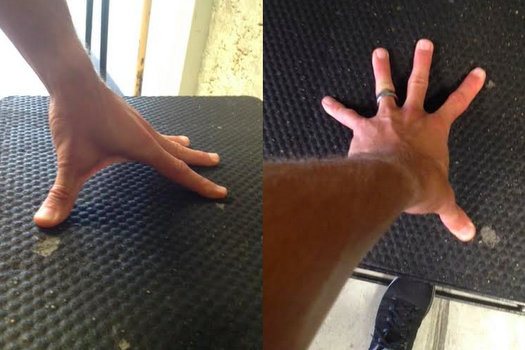
Place both hands about shoulder width, palms-down with a thumb-less grip. If you’re using a narrow surface, your hands may need to be placed next to each other, which will be fine.

Bend your elbows downward and forward without letting them flare out to the side. The key is to keep your elbows pointing down to the ground, creating a gap between your arm and torso as indicated with the blue triangle in the picture. Tense up your triceps and shoulders as hard as possible, and tense your lats to stabilize your back.

Low Bar Setup Position ArmTraining

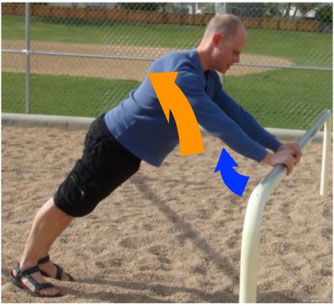
Apply resistance by stepping your feet back so some of your weight goes directly to your hands. Once your feet are firmly planted, push directly down with your hands and push your elbows up and away from the surface your hands are pressing down on. (See blue arrow below.) This should cause your body to lift up and back as indicated by the orange arrow. Once your arms are fully straight begin coming back down by bending your elbows down and forwards.

Low Bar Arm Training Top of Movement

Regressions and Progressions:

I love this exercise because it’s so easy to progress and regress it. Moving your feet back will place more weight on your hands and increase the resistance. Moving them closer will do the opposite, making the move easier.

You can also change the resistance by putting your face in a different place in relation to your hands. Bringing your chin between your hands will be easier, while bringing your nose or forehead between your hands will be respectively more difficult. You can also make this move much easier or harder by selecting hand placements at different heights. Just like the push up progressions, the more your body tilts towards the floor, the harder the move will become. Placing the hands on a higher surface will stand your body up more and take away some of the resistance. If you want some additional assistance, you can simply place one foot in front of the other to help lift you into position on those last few reps. Lastly, you can also bend your body in half a little at the hips. Again, this will bring more of your body weight to your feet to make the exercise a little easier. Straightening out your body into one straight line will make the movement more difficult.

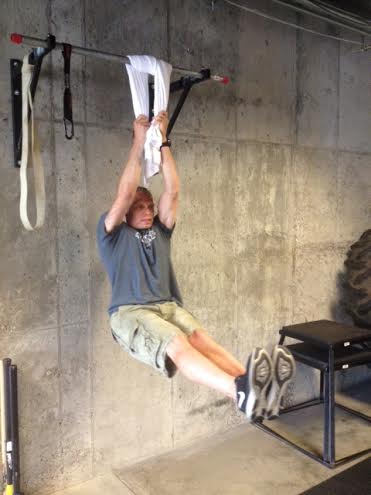
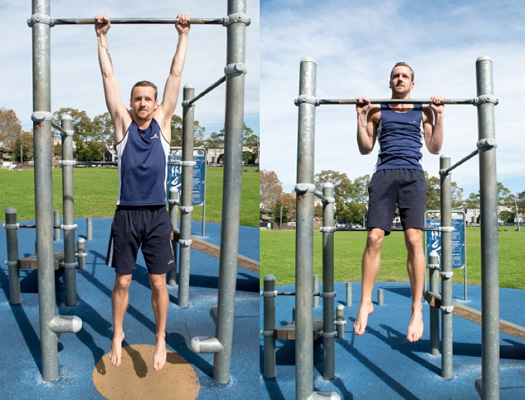
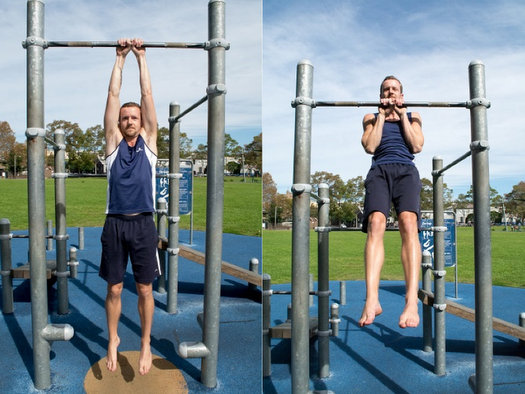
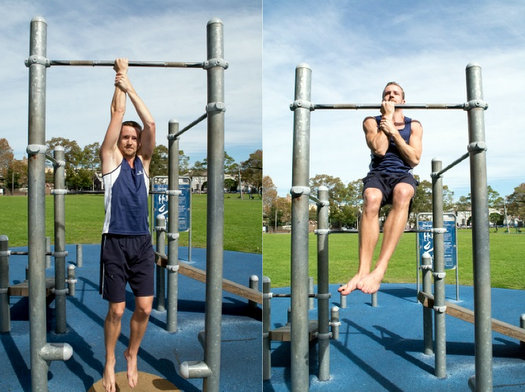
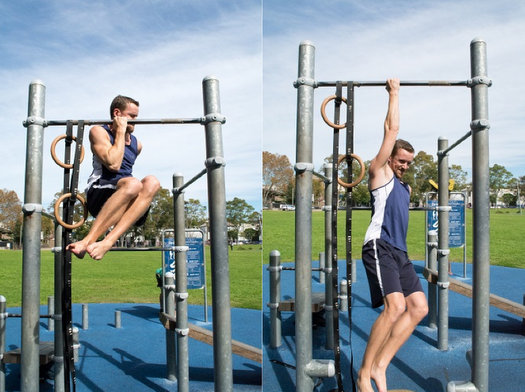
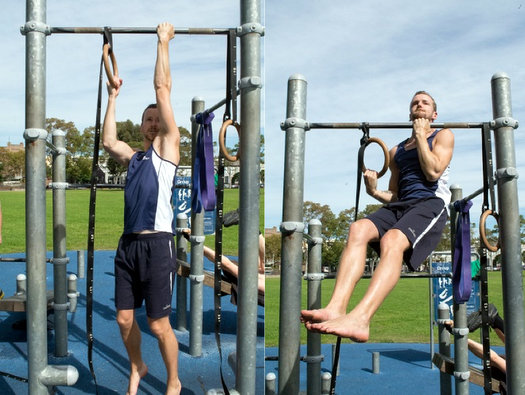
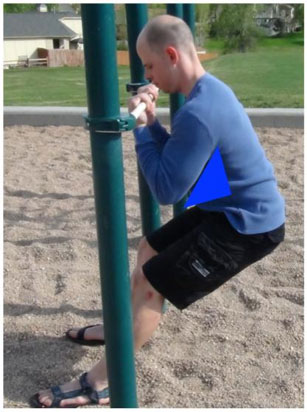
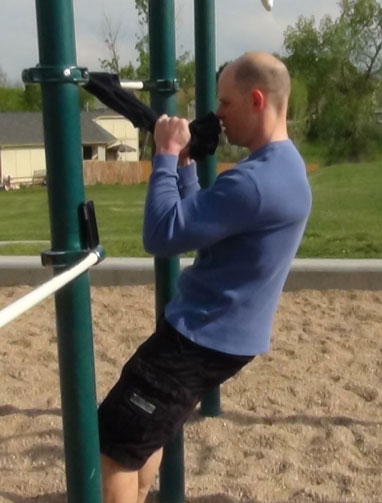
The biceps exercise is very similar, only now you face the other way. Since this is technically a pull up style exercise, so bars or handles you would usually use for moves like Australian pull ups will be ideal.

Place your hands on the back side of the bar with your fingers on top of the bar. Once again, a thumb-less grip may be ideal, but I’ve also used a thumb grip without much trouble.

Tense up your biceps and push your elbows away from your rib cage with your hands right next to your chin. It’s still ideal to keep your elbows in front of your torso as you can see from the blue triangle below. This position will ensure maximum tension on your biceps.

Chin Up Position Flexed Bodyweight Arm Training

I recommend using a slight kink in the hips rather than keeping your body straight. This will allow a bit more flexibility in your motion and lend itself to a more natural motion.

Chin Up Position Bodyweight Arm Training

Lower yourself down and back by bringing your elbows out and upward (blue arrow) which will cause your body weight to fall away from under the bar(orange arrow). Return to the starting position by bending your elbows down and forward to maintain that elbow position in front of the ribs.

Performance Tips:

-It’s a good idea to keep tension on your target muscles at all times. It’s tempting to relax at the bottom or top of each rep, but maintaining tension on the muscle is key in maximizing your progress.

– A little goes a long way. If you need to adjust your resistance, just moving your body an inch or two can make all of the difference in the world. Sometimes even moving your feet a couple of inches or slightly straightening your knees can be more than enough.

– Towels are a great addition to these moves. They can provide a neutral grip which many people find more comfortable. Plus they are great for building up that grip. Nothing complements your bis and tris like a pair of beefy forearms.

Bodyweight Arm Training Towel Variation

– Once you’re more comfortable with the motion of the exercises, work on tensing other muscles in your body as much as possible. Adding more tension to your back, shoulders, hips, hamstrings and even your chest can bring these moves to a whole new level and your results will follow.

– Be patient and use light resistance for the first few weeks. These moves can take some practice to get everything dialed-in just right. Making the movement of the elbows the focus of the exercise can feel a little strange at first, especially if you’re used to the classic method of curls and extensions. Keep tweaking the position and movement of the elbow, and it will feel natural before too long.

– Listen to your joints. both of these moves can place a massive amount of tension through your biceps and triceps. Sometimes people find their joints need some time to become accustomed to the high degree of tension running through the muscles. It’s always okay to use a shorter range of motion and a lower level of resistance at first to allow the tendons around the elbow to strengthen up. Take your time easing into the exercise over a few weeks. Once they are accustomed to the exercise, feel free to use a big range of motion. By then your elbows will be bulletproof!

Good luck with these two movements. If you have any questions please don’t hesitate to ask in the comments down below.

****

Matt Schifferle a.k.a. The Fit Rebel made a switch to calisthenics training 5 years ago in an effort to rehab his weight lifting injuries. Since then he’s been on a personal quest to discover and teach the immense benefits of advanced body weight training. You can find some of his unique bodyweight training methods at RedDeltaProject.com.

Filed Under: Tutorial Tagged With: arm training, biceps, bodyweight exercise, calisthenics, Matt Schifferle, no gym necessary, outdoor training, strength, triceps

Calisthenics Grip Training

July 22, 2014 By Corey Howard 31 Comments

Handshake

I’ll never forget Gary. It’s not that Gary was such an amazing person, in fact he was quite bland. Imagine shaking hands with someone’s limp lifeless, overcooked soggy noodle hand. That was what made him disappointingly unforgettable. We’ve all met someone like that, and it creeps most people out. Shake my hand like you mean it!

On the other side of the spectrum is Rich. Rich has been crowned the World Arm Wrestling Champ many times. After introducing him to my father, my dad said, “that was like sticking your hand into a bunch of bananas! I wasn’t sure I was getting my arm back!” Your handshake says a lot about you. Grip strength says even more.

Al Kavadlo Human Flag
Grip strength is an essential part of many advanced calisthenics exercises, such as the infamous human flag, demonstrated here by PCC Lead Instructor Al Kavadlo.

How can a strong grip help?  First, your grip is the linkage between your body and whatever it is you’re trying to control.  If you’re trying to put heavy objects overhead, a crushing grip can actually tighten the linkage in your shoulder and give you a safer press.  If you’re a calisthenic ninja, killer grip can keep you on the bar for more pull-ups or help your handstands as you grip the ground and drive upward.  But how on earth can you develop card tearing grip strength using only calisthenics?  According to Paul Wade in Convict Conditioning II, finger tip push-ups and towel hangs are all you need.  From my own experience, he’s right!

Finger tip push-ups are simple; just do a push-up on your finger tips!  Well, there’s a bit more to it than that.  This one killer exercise strengthens the entire hand from the fingers up through the forearms.  It’s easy to let your ego get in front of you with this one, so be sure to progress slowly and cautiously. I recommend starting these as incline push-ups.  This enables you to keep your technique spot-on and stay injury free.

Fingertip Setup Hand Position
Make sure you set your hand up with your fingers locked and spread.

It’s important to make sure you set your hand up with your fingers locked and spread.  Try and create a tall wide support structure with your fingers.  Ideally you want your fingers to look like they are flowing right up into your arm, there should be no odd bends or strains.

As you make progress with these just keep moving closer to the floor, and once you’re able to do 8-10 quality fingertip push-ups, try one arm push-ups, or 3 finger push-ups.

AlKavadlo Three Finger Incline Pushup
PCC Lead Instructor Al Kavadlo demonstrates a 3-finger incline one arm push-up, unofficially known as the “Heavy Metal” push-up.

Towel hangs can start out easy, then progress to a battle of will between your body and your mind.  These work amazingly well for developing grip endurance as well as thick muscled forearms.

Again I strongly suggest starting out with a grip training drill you can do fairly well and slowly progress to the harder stuff like one arm hangs, thicker towel hangs, longer hangs, or even pull-ups or leg raises with a towel.  I would also encourage you to pull the shoulders down away from your ears while you hang.  This tightens up the shoulder complex and creates more stability.  Once you can hang for about a minute I’d suggest you bump it up a bit.  Remember, everything can be made more challenging with simple calisthenics tweaks.

Corey Howard Towel Hangs for Grip Strength
I love to use towel hangs for developing my grip!

I caution you about pushing too hard and trying to progress too fast.  Sometimes you can overwork these smaller muscles and not even know it until you have a painful case of tennis elbow.  Remember for most people, grip is the smallest link in the chain.  The last thing you want to do is allow your brain and larger muscles to overpower your grip work and cause an injury.

Grip training can be tricky but the rewards are huge! I can tell you from my own experience, Paul Wade’s combo rocks!  After doing these two movements fairly consistently I’ve had to add a link in my watch, and can no longer slip my wedding ring off for any pull-up work.  My forearms, wrists and fingers have thickened up a bit.  If you increase the size of the motor, most of the time you increase the output as well…. More grip strength!  More pull-ups!  Fire it up!!

***

About Corey Howard, PCC, RKC, CK-FMS: Corey Howard strives to constantly become stronger, and to help others to achieve their fitness goals. He is the owner of Results Personal Training, and can be reached at www.resultsptonline.com or www.coreyhoward.com.

Filed Under: Progressive Calisthenics, Tutorial Tagged With: bodyweight exercise, Convict Conditioning, Convict Conditioning Vol 2, Corey Howard, grip strength, grip training

PCC DC – A Historic Occasion

July 15, 2014 By Al Kavadlo 33 Comments

Al Kavadlo and Danny Kavadlo at the Washington Monument

Last weekend my brother Danny and I visited our nation’s capital en route to our latest PCC event in Alexandria, Virginia. Between touring sights like the Washington Monument and witnessing so many historic PCC firsts, it was a weekend I will never forget!

As is always the case with the PCC, calisthenics enthusiasts from various backgrounds and disciplines gathered together to hone their bodyweight skills, draw inspiration from one another and push their limits to set new personal achievements.

Every time we do a Progressive Calisthenics Certification, it’s a whirlwind of a weekend and I can’t believe how quickly it’s all over. But like the old saying goes, time flies when you’re having fun!

Time was not the only thing flying at last weekend's PCC!
Time was not the only thing flying at last weekend’s PCC!

The caliber of athletes attending the PCC continues to impress and amaze me. We had so many incredibly strong individuals gathered together in one room that the collective energy was off the charts! The number of firsts that took place was truly awe inspiring.

A First Muscle-up at the DC PCC
There’s no better feeling than the satisfaction of getting your first muscle-up!

For the first time in Progressive Calisthenics Certification history, each and every PCC candidate who took on the Century test met the challenge and earned their ranking to become an official PCC instructor. The collective energy amongst this group was so intense, once the Century momentum got going, it was unstoppable!

In addition to the unprecedented passing rate, we also saw lots of first muscle-ups, first back levers, first handstands and other groundbreaking achievements. Many a plateau was destroyed. It really felt like there was magic in the air!

Al Kavadlo Spotting a Handstand at the DC PCC
Calisthenics magic!

In fact, I even achieved a personal best myself! I did what I’d consider my cleanest, slowest muscle-up I’ve ever done. Or at least the best one I’ve gotten on video!

Notice that I am rolling my hand slowly over the bar rather than beginning with a false grip, which adds an extra challenge. Thankfully the bar is relatively thin!

Congratulations to all the newly certified PCC instructors! Knowing that this group will be out there spreading the word about calisthenics and changing lives in the process is a wonderful feeling.

There are currently PCC events planned in 9 different cities over the next several months. I hope to see YOU in the next group photo!

We’re Working Out!

-Al

Group Photo at the July PCC in Washington DC

***
Al Kavadlo is the lead instructor for Dragon Door’s Progressive Calisthenics Certification. Recognized worldwide for his amazing bodyweight feats of strength as well as his unique coaching style, Al is the author of four books, including Stretching Your Boundaries, Raising The Bar: The Definitive Guide to Pull-up Bar Calisthenics and Pushing The Limits! Total Body Strength With No Equipment. Read more about Al on his website: www.AlKavadlo.com.

Filed Under: Workshop Experiences Tagged With: Al Kavadlo, Century Test, handstands, muscle-up video, muscle-ups, PR, Washington DC PCC Workshop

Be Warned, You Have to Earn It!

July 7, 2014 By Claude Castro 8 Comments

Al and Danny Kavaldo with Claude Castro

I have a new fondness and respect for all things bodyweight since completing the Progressive Calisthenics (PCC) course in Australia this past February and successfully passing the “Century” test.

As a lifter, I typically liked to lift what I thought of as “heavy stuff.” However this “stuff” was rarely my own bodyweight. It was obvious from the start that I would have my work cut out for me!

When the PCC initially came to my attention approximately 6 months before the workshop. I immediately jumped on it, and paid my registration while thinking, “Time to get it done and earn another worthwhile certification!”

My next thought was that I’d never been heavily into bodyweight training…  What would I do to prepare? Had I mixed up my ambition with my ability?

This had to change!

Previously, I dropped my own body weight down from a solid 92kg frame to a leaner (and much more comfortable) 78kg .  I had made that change with a focus on running and the desire to be a more complete trainer.  So, it wasn’t long before I was playing around with my own weight while preparing for the PCC. Fortunately I have both of the Convict Conditioning books along with a reasonable library of other resources which allowed me to plan accordingly and meet the workshop testing criteria.

My programming was designed around the following basic movements. Please note these were not all performed on the same day.

  • Chin-up & push-up variations.
  • Pistol squats
  • Hanging leg raises (now my go-to abs exercise)
  • Running. Well it is bodyweight!
  • Bridges
  • Handstand /play holds and handstand pushups
  • Bodyweight dips on gymnastic rings
  • All the stretches I knew!!!

I worked with a basic 5×5 based strength protocol for all the movements. The benefit of this for me was that I had already applied it to barbells and kettlebells with success.  Now, given my fondness of the protocol, it worked for my bodyweight training.

Sometimes I needed to switch to a simple 3×3 depending on how fried my body felt from an overloaded workout the day before–a rookie mistake that I often made from stubbornness. It’s a different kind of hurt when the nervous system is depleted! Take my word for it!

The only other major variation was on the days when I felt good and decided to put in more volume. For example a 15 x 5 set on the chins up–clearly I like chin ups! They’re the one movement that petrifies the newbies and are the base test entry for the RKC cert. So out of fear, I already had the “money in the bank“ with regard to pull ups. I now actually enjoy them!

With my new enthusiasm and lower body weight, I was well on my way towards my plan to pass the PCC.

I like to plan, so my first stop was asking myself, what does it take to pass? How long do I have? And then work backward from there.

To pass the PCC I’d have to do the following in less than 8 minutes:

  1. FULL SQUATS:                        40 reps
  2. FULL PUSH-UPS:                   30 reps
  3. HANGING KNEE RAISES:   20 reps
  4. FULL PULL-UPS:                    10 reps

TOTAL:    100 reps

At first this seemed like a reasonable request. I gave it a go, sort of completed it and thought it wasn’t too bad. This was another rookie mistake! Later on I realized I would have to do the test after 3 days of intense bodyweight training, and had to finish each exercise in one set with strict form!

Fortunately for me, this was a great big wake up call. I prepared myself accordingly with a solid base of general physical preparation (GPP). I turned up to the workshop ready to be taught, and was physically conditioned to at least perform the basic exercises.  I was there to learn and not get hurt because of a lack of conditioning. It costs money to attend these courses and it’s a total waste for all if you turn up unprepared.

Many movements are taught–push-ups and variations, chins and variations, front levers, back levers, pistols, and floor holds–just to name a few.  And let’s not forget the muscle ups!

I take a casual approach to these workshops because I like to have fun and absorb the knowledge as it is taught. As I know these guys are not going to just hand your certification to you just because you’ve shown up to the workshop. So I make a point of getting myself adequately prepared and ready by cert time. No excuses.

You have to earn it, so be warned!

It was clearly one of the more enjoyable workshops that I have attended. Along with the incredible manual, the information I now have access to will keep me and my clients busy and challenged for a long time to come.

Now off to the bar for some much needed practice!

Claude Castro One Arm Handstand PCC Australia

Filed Under: Workshop Experiences Tagged With: Century Test, Claude Castro, PCC Australia, workshop preparation

My Journey Towards the One Arm Pull Up

July 1, 2014 By David Mace 36 Comments

Al Kavadlo performs a One Arm Pull-Up at the PCC in Sweden

I have a confession to make; I’m obsessed with the one arm pull-up! It wasn’t always this way; three years ago I was a skinny runner, who weighed less than 60kg. In April 2012, I stumbled across a book that would change all this – Convict Conditioning by Paul Wade. After reading it, I decided then and there that in my lifetime I would perform a dead hanging one arm pull-up.

Note that this is simply the progressions I have made. The more you train calisthenics, the more you realize there are many different paths to progression, and what may work for one individual may not work for another.

At the beginning of my training, I could perform a handful of full range pull-ups, so I skipped the first few levels (sorry Coach) and went straight into full pull-ups, followed by close hand and then uneven pull-ups. It took me about 3 months to perform 2 sets of 10 strict full range pull-ups; by full range I mean a straight arm at the bottom and my chin over the bar at the top.

David Mace Perfoming Standard Pull-ups
Your arms should be straight at the bottom, with your chin over the bar at the top.
David Mace Performs Close Pull-ups
This time bring your hands next to each other.

After training uneven pull-ups for a few months I hit my first road block; I could perform 2 sets of 9 uneven each arm, but any attempt at half one arm pull-ups was met with failure. Knowing what I know now I would have built in some extra progressions and gradually moved my non-working hand further down my arm.

David Mace Performs Uneven Pull-ups
The uneven pull-up can be made more difficult by moving the non-working hand further down the arm.

Instead of this I found an alternative progression upon the purchase of a set of rings; whereby one arm is on the top ring, with the other arm on a lower ring. This way you can easily increase the distance between arms over time. As both arms are on the rings, your head can go between them, which makes it slightly easier than with one arm on the bar.

David Mace Uneven Ring Pull-ups
Start with your working arm straight; at the top position your chin should be above the hand of your working arm.

My training for this had gone on for a few months when I read a couple of articles from Coach Wade and Al Kavadlo, here on the PCC blog about training for mass and training for strength. I had been toying around with the idea of moving away from strict Convict Conditioning style progressions for a while and this proved to be the catalyst. I split my main training plan into 2 different groups of sets; the first being the hard set, consisting of 2 sets of up to 5 reps, and being the most difficult exercise you can do in the progression whilst you are fresh. After this I perform my working sets, consisting of 4 sets of 5 reps. This new plan allowed me to switch to 2 separate progressions in the same workout, which I’ve found to be extremely effective towards reaching my goal.

For my hard sets I added one-arm negatives. Simply pull yourself up to the bar with both arms, then gradually take one arm off the bar and lower yourself with as much control as possible. Starting with fewer fingers is a good way to progress to this, otherwise the most likely initial outcome will be you dropping straight down. The working sets were made up of my uneven ring pull-ups.

David Mace Performs One Arm Pull-up Negatives
Start at the top position of a one arm pull-up, then lower yourself with as much control as possible.

With uneven ring pull-ups you eventually reach a point where your lower arm is performing a pushing motion, rather than a pull in the top position. This is where it starts to become easier and means it is time to change to a new progression. In this instance I moved my pulling arm back to the bar, then used just the one ring to assist. It’s really important with this exercise that your head follows the path of your pulling arm; this means that your working arm is taking most of the weight and replicates the path you would take for a one arm pull-up. Note that this exercise could easily be performed with a towel or the post of your pull-up bar, if you do not have access to rings.

David Mace Performs Ring-Assisted One Arm Pull-ups
Your chin follows the path of your working arm; whilst your other arm is just assisting.

By this time I had been teaching calisthenics to some of my work mates for around a year. For those who can’t yet perform a full range pull-up, they start with negatives for their hard sets and band assisted pull-ups for their working sets. Exercise bands have some good advantages in that you don’t need anyone to help you, and you know exactly how much assistance you’re getting. They’re very easy to progress with as they have different levels of assistance. Having said that, they have a major weakness in that they assist you a lot at the bottom but not as much at the top. This has worked for a number of people to get full pull-ups though, so I was keen to see how the band would work for the one arm pull-up.

When attempting this you will find that your body naturally wants to twist. Squeeze your core and obliques tightly to help prevent this, but you may need to reset yourself every few reps. What I particularly like about this exercise is it allows me to use just one arm, with no assistance from the other. I now train this exercise in my hard sets and the assisted one arm pull-ups in the working sets.

David Mace Performs Band-Assisted One-Arm Pull-ups
The bottom position your arm should be straight; you haven’t reached full range until your chin is over the bar.

Finally, below is my latest attempt at a jump assisted one arm pull-up. As you can see my left arm is quite a lot weaker than my right, this I’m trying to resolve by only moving onto the next progression once both arms can do it, but my right arm will always be stronger.

Though I forgot to do it when pulling with my left, you may have noticed that both in my video and the picture above, I squeeze my non-working hand as tightly as possible. This is a technique to create extra tension in the working arm, there is a link between the 2 – the more full body tension you can get, the more power you will have. For this reason you should squeeze your non-working arm, core, glutes, and in fact pretty much every muscle in your body as tightly as you can.

I will achieve a dead-hanging one arm pull-up eventually, look out for a video and an update then.

***

David Mace is a full time programmer and a part time calisthenics enthusiast and loves to teach PCC to friends and co-workers. Success for him is measured in helping others (and himself) to achieve their maximum potential and doing things that you once thought were impossible. He can be contacted through his website at www.mpcalisthenics.com, where you can also read his blog, get advice on nutrition, training and life philosophy.

Filed Under: Progressive Calisthenics, Tutorial Tagged With: advanced progressions, Convict Conditioning, David Mace, OAPU, one-arm pull-up, pull-ups, tutorial

Primary Sidebar

Featured Products

previous arrow
GetStrongBookCover
ConvictConditioningBookCover
StreetWorkoutBookCover
ExplosiveCalisthenicsBookCover
StrengthRulesBookCover
next arrow

Categories

Progressive Calisthenics Certification Logo
Click here for more information or to register for the PCC workshop

Get Strong Workouts TriadXP App
Get Strong Workouts App

Recent Posts

  • Top 5 Reasons Why an In-Person Workshop is the Best Way to Supercharge Your Training
  • HYBRID STRENGTH TRAINING IS HERE!
  • My Calisthenics Journey to the PCC
  • The Handstand Press: Complete Control Through the Handstand
  • The Get Strong App is Here!

Dragon Door Publications

Dragon Door Publications

Recent Comments

  • bross dandon on The Case for Curved Handstands
  • Johnny Flewellen Jr. on Strength for Life
  • Dan Earthquake on The Pursuit of the Daily Minimum
  • Johnny Flewellen Jr. on The Pursuit of the Daily Minimum
  • Johnny Flewellen Jr. on Yoga, Calisthenics and the Journey of a Lifetime
FOLLOW US ON TWITTER!

Copyright © 2025

Dragon Door Publications / The author(s) and publisher of this material are not responsible in any manner whatsoever for any injury that may occur through following the instructions or opinions contained in this material. The activities, physical and otherwise, described herein for informational purposes only, may be too strenuous or dangerous for some people, and the reader(s) should consult a physician before engaging in them.