• Skip to main content
  • Skip to primary sidebar
  • Home
  • Contributors
  • Resources
    • Q&A with Paul “Coach” Wade
  • Workshops
  • Products
  • Forums
  • Articles
  • Blogs
    • RKC Blog
    • Strong Medicine Blog
  • Archives

PCC Blog

Progressive Calisthenics - The Official Blog for the PCC Community

Archives for November 2015

Strength Rules Is Here

November 24, 2015 By Danny Kavadlo 24 Comments

Danny Kavadlo Strength Rules Book Cover

First Things First

I am the luckiest guy who ever lived. When my last Dragon Door title, Diamond-Cut Abs was released one year ago, it was extremely well received. In fact, it became a #1 bestseller!

Diamond Cut Abs Bestseller

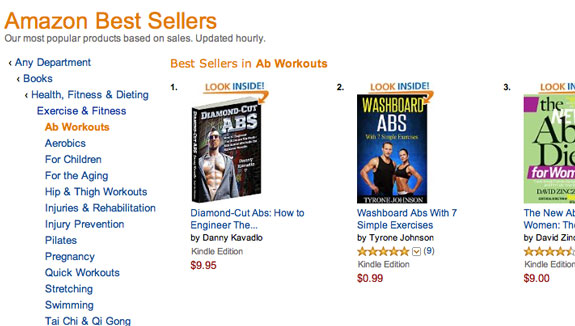
I consider it a tremendous honor that my words, programs and experiences resonated with so many. I am grateful that in the months that followed, I received a great deal of correspondence about Danny-style abdominal training. But, interestingly enough, for as many abs-related questions and comments as I received, there were even more inquiries about Danny-style strength training as it relates to the entire body. People loved the abs, but they wanted more! In fact, I had never authored a book about full-body strength training… until now!

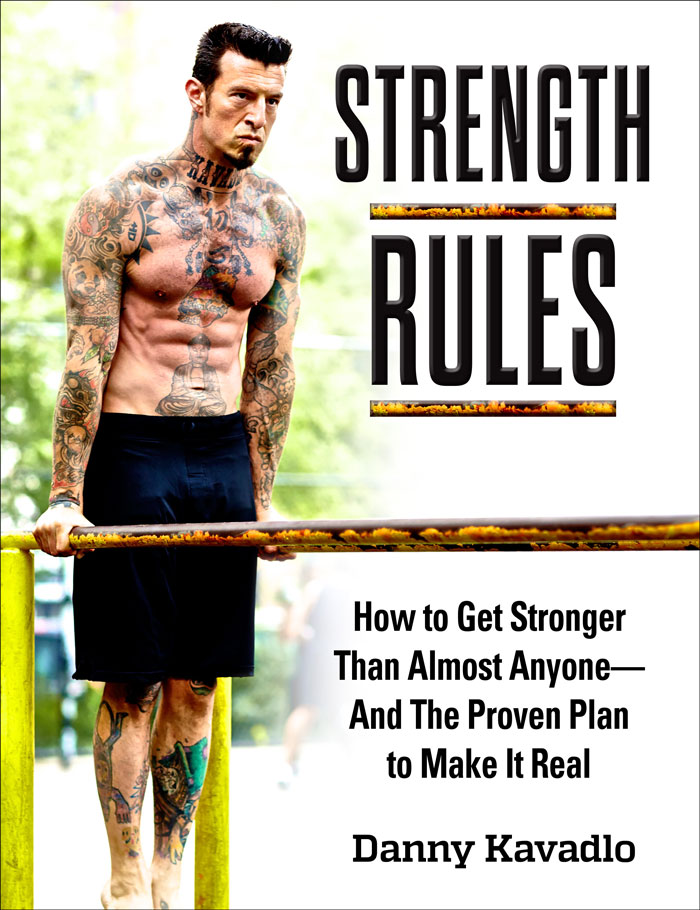
I knew I had something unique to bring to the table and here it is… Strength Rules.

Full Disclosure

Just prior to the writing of Strength Rules, my life went through some unprecedented and unexpected changes. Things that I thought would last forever fell apart. On New Year’s Day 2015, a ten-year relationship with the woman I thought I would spend the rest of my life with ended. Fast.

Things change. I’ve never needed strength more than I have in the past year. I went from being a family man to a full time single dad. I had to be strong for myself, but even more so, for my son. It was at this time when I realized that a book about full body physical strength simply would not be enough…. My next work would have to be about mental strength, spiritual awareness and emotional fortitude as well.

Danny Kavadlo Truth

So There You Have It

Strength Rules is my most personal work to date. The project is about perseverance, endurance and overcoming obstacles. It contains over seventy-five bodyweight exercises, including Plyo-Muscle-Ups deconstructed like you’ve never seen before, not to mention my in depth take on One-Arm Push-Ups. This book is about working hard and mindful practice–making the time to train, prioritizing what matters most and not taking “No” for an answer. We cover living a healthy life, harvesting physical prowess and fostering a positive mental attitude. Strength Rules focuses on walking face-first through the fire, and coming out stronger for it. Not in spite of it, but because of it!

Danny Kavadlo Muscle-Up

Everything is fair game in these pages and I pull no punches. Be prepared not only for my unconventional take on nutrition, but also on the supplement businesses, equipment manufacturers and even the medical industry!

Danny Doc

Further, Strength Rules contains workouts, progressions, supplemental stretches and some amazing (and far out) images. It even has the long awaited return of Danny’s Dos and Don’ts! I can’t wait for you to check it out!

But Don’t Take My Word For It

In the words of Olympian, scholar and author Dan John (from the foreword):

“This book is about true strength. The old kind of strength where heroes were people, like Beowulf and Ullysses, who protected the community first. This book is about empowering yourself and others. Strength Rules by Danny Kavadlo is so good you can’t ignore it.”

Danny And Wilson
Strong to the finish.

****

Danny Kavadlo is one of the world’s foremost authorities on calisthenics, nutrition and personal training. He is the author of the Dragon Door titles Strength Rules, Diamond-Cut Abs and Everybody Needs Training. Danny is known for his minimalist philosophy, simple approach and motivational talents.

A true in-person experience, Danny is a Master Instructor for Dragon Door’s Progressive Calisthenics Certification. He has been featured in the NY Times, TRAIN, Men’s Fitness and is a regular contributor to Bodybuilding.com. Learn more about Danny at www.DannyTheTrainer.com

Filed Under: Progressive Calisthenics Tagged With: calisthenic strength training, calisthenics, calisthenics strength, Danny Kavadlo, Danny's new bestseller, nutrition, Strength Rules, strength training

The Push-Up Lever

November 17, 2015 By Matt Schifferle 36 Comments

Push Up Lever Lead

Give me a lever, and a place to lay, and I shall make crazy gains.
– Archimedes (probably)

There are a million reasons why I love calisthenics. Aside from the obvious, calisthenics has allowed me to unleash my inner mad scientist and build a variety of “devices.” It’s amazing what you can create with a little imagination and a few trips to the hardware store.

Most of my designs are home made versions of commercially available products such as suspension straps and calf blocks, but one of my favorites is a unique way to load extra resistance onto a standard push-up that I call the Push-up Lever.

PushUpLever
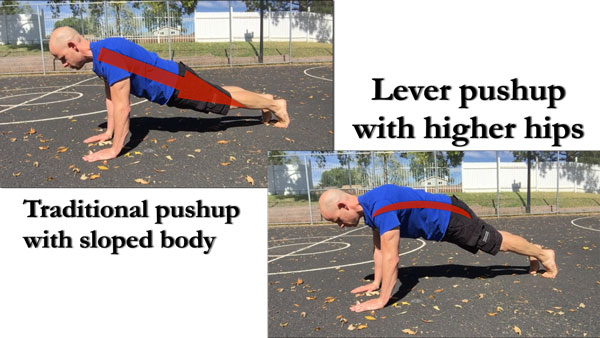
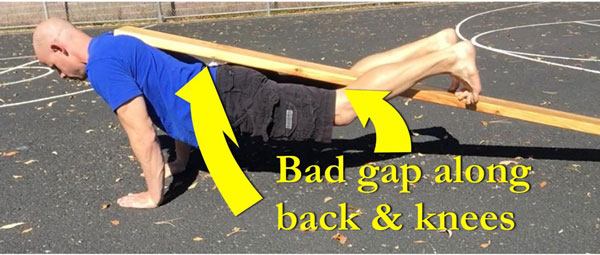
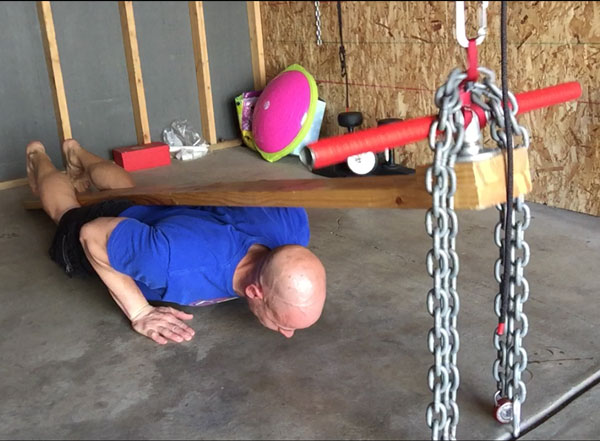
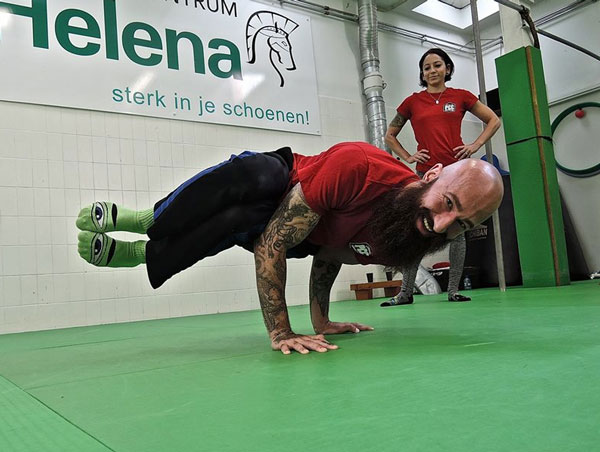
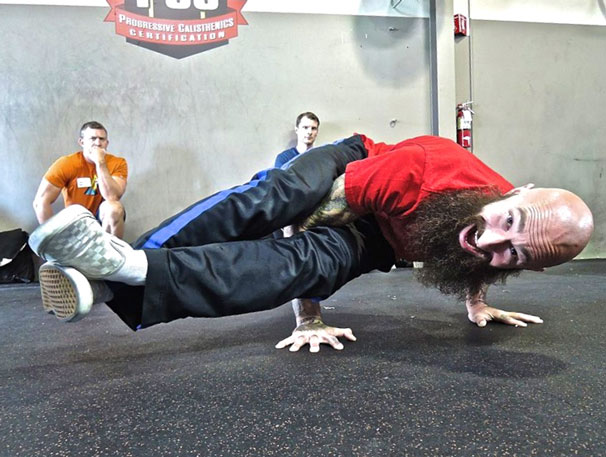
The struggle to load the push-up…

She may not look like much, but that simple plank of wood solves many issues that have plagued anyone who’s tried to add resistance to a standard push-up.

In the time of 10-15 B.C. (Before Calisthenics) I used to do a lot of weighted bodyweight exercises. Most moves were pretty simple, like using a dip belt to load pull-ups, but push-ups were always a struggle for me. I’ve used weight vests, weighted backpacks, stretch bands and stacking weight plates on my back. While all of these methods did produce more resistance, that hard work came at a steep price. Loading the back or neck produced a lot of stress on the spine which felt unnatural and awkward. In some cases, like with sandbags or plates, the weight was difficult to load on my back, plus the load was always prone to shift forcing me to compromise my technique. Using items like bands or chains caused loading on sensitive pressure points like the neck or lower back.

Weight vests seemed to be an ideal solution, but they were expensive and hard to adjust. Even adjustable weight vests required opening numerous pockets and removing small weights. It just wasn’t worth the hassle so I seldom adjusted the load. Despite my effort, I always felt most methods didn’t work very well. I wanted some serious resistance and a plate on the back or a chain around the neck only brought marginal difficulty.

I figured there had to be a better way, so I started to meditate on the ways progressive calisthenics makes push-ups harder. One of the classic methods is to do push-ups on the knees and then make the lever of the body longer by doing them on the toes. So I asked myself, is it possible to further extend the lever of the body out beyond the toes?

That question was the inspiration the Push-up Lever.

What is a Push-up Lever?

The Push-up Lever is the world’s first complete push-up amplification device. Unlike methods that simply load more resistance on pushing muscles, the push-up lever amplifies all of the technical requirements of the push-up. This includes not only the muscles in the arms and chest, but also improving the strength in the core, hips, and legs. It also requires greater scapular control and even more tension in the feet. Many people claim they are sore in their abs and hips the next day after trying it for the first time.

The beauty of the lever is it doesn’t place any excess weight or pressure on your spine, but instead places it on your hips, which can handle the load in a much safer way and with far more control. It’s also something you can easily adjust by sliding where your hips are on the lever. The more you extend the lever out beyond your toe,s the more difficult it makes your push-up.

The further you slide the board up your hips the easier the move becomes!

Not only is the lever easier to use and adjust, but it can challenge even the strongest athletes. This is because it makes the traditional push-up more difficult in 2 ways. It makes the lever of your body longer so you have to work against more resistance. It also makes your whole body lift against gravity. So not only are you working with a mechanical disadvantage but you’re also lifting more of your own body weight.

The Lever forces you to lift your entire body directly against gravity, not just your upper torso.

You can use any long slender object as a push-up lever. Pipes, barbells and even small trees can suffice, but I much prefer a 2 x 4 or a 2×6 plank of wood. Make sure any board you use is straight and not warped. Also look out for splinters. You may wish to sand it down and varnish it for a nice finished look.

How do you use a push-up lever?

Using the push-up lever requires a slightly different technique than a standard push-=up. Since the board rests on your hips, you need to slightly elevate your hips so they are the same height as your shoulders throughout the full range of motion. It can take a little bit of practice to use this type of push-up, however I find it to be natural and very useful.

Push Up Comparison

Also, be sure you have the strength to do your push-ups from the floor up. If you struggle to maintain control of your push up while “kissing the baby” with your chest to the floor, you may want to work on the lower range of your push-up for a few weeks before giving the push-up lever a try.

To use a push-up lever, simply lay down as you would in a push-up position and place the board against your hips at the appropriate length. Wrap your feet around the board so you’re “hugging” it with your thighs and the back of your knees. Some people prefer to use a flat foot against the board but I’ve always found more control through dorsi-flexing my feet and pressing my toes straight into the board.

Push-Up Lever Up and Down

Place your hands in the position you would normally do a push-up with and make your entire body tight, especially your quads, hips, and core. From there, simply do a push-up while pressing your hips up against the board and holding it tight with your legs. The first few times you do this you might feel like you’re sticking your butt up in the air, but I promise you’ll quickly become used to the new position.

Beware of the pressure from the lever pushing your hips down causing your back to sag.

If you’re using the lever at the half point of the board you should have a gap between your upper back and the lever as you push upwards. If the board is touching against your upper back you’ll need to lift your hips up even more to prevent the pressure of the lever going to your spine.

Notice the end of the board against my upper back and the gap between the board and my hips and knees. This places the pressure against my shoulders and causes pressure along the spine.
Here the gap between the board and the upper back is seen while my hips and legs are locked into the lever.

As you lower yourself down to the floor you want to “lead with your chest” so your hips stay at the same height of your shoulders through the full range of motion. Ideally, both your chest and hips should arrive at the ground at the same time and then lift up at the same rate of speed.

Once you have the technique down you can use the push-up lever for any push-up variation you normally use. Wide push-ups, close push-ups, alternating push-ups, medicine ball push-ups, etc.

Want even more resistance?

The classic push-up lever will offer a substantial amount of resistance and challenge to your classic push-ups. If you’re of the masochistic type and want even more resistance you can use the lever to safely add actual weight through the power of leverage.

This is done through adding weight pegs on one end of the lever with a small carabiner to suspend it off of a set of suspension straps or gymnastics rings.

PushUpLeverWeightPegs

In this position, you’ll use the lever backwards as the weight is suspended above and forward of your body. You’ll use the pivot point very close to your feet but still keep the load of the lever on your hips.

Be aware that it won’t take much weight to significantly load your push-ups. Most of the guys I’ve introduced this set up two will use no more than 10 to 15 pounds of weight. I’ve had powerlifters max out through as little as 40 pounds!

These chains only weigh about 12 pounds but they feel like a 225# bench press!

Using the lever in this way is the same as before where you will place yourself underneath and tighten your legs around the lever and push yourself up off the floor while driving your hips into the board.

While the push-up lever can be a great addition to your push-up program, it’s in no way a substitute for good old fashioned progressive calisthenics. When I first discovered it I made the mistake of using the lever for most of my workouts while neglecting the progressive steps towards the one arm push-up. Even though the lever helped me grow much stronger, I still had to fight to rebuild some of the muscle control and coordination I had lost from neglecting the advanced push-up techniques. Ultimately, the push-up lever is just one more tool for your toolbox. It can help you get stronger, but you still have to do the work.

***

Matt Schifferle a.k.a. The Fit Rebel made a switch to calisthenics training 5 years ago in an effort to rehab his weight lifting injuries. Since then he’s been on a personal quest to discover and teach the immense benefits of advanced body weight training. You can find some of his unique bodyweight training methods at RedDeltaProject.com and on his YouTube channel: RedDeltaProject.

Filed Under: Progressive Calisthenics, Tutorial Tagged With: homemade fitness equipment, Matt Schifferle, progressive calisthenics, push-up, Push-Up Lever, pushup, simple gym equipment

The SCC is Here!

November 10, 2015 By Al Kavadlo 20 Comments

First Ever SCC Workshop Group Photo
Since the launch of the Progressive Calisthenics Certification (PCC) nearly 3 years ago, my brother Danny and I have had the amazing opportunity to teach calisthenics to fitness professionals and enthusiasts all over the world.

The reaction to the PCC has been tremendously positive. Those who attend get better at moving their bodies, but many people are moved emotionally as well. Each person brings their own unique experience to the group and we all leave with new knowledge and inspiration. The only thing stronger than our attendees is the camaraderie formed during the time spent training together and learning from one another.

FirstSCC2
Though the success of the PCC has had a powerful impact on the underground calisthenics scene as well as the mainstream fitness industry, the 3-day course can be intimidating to some. Furthermore, many people who’ve expressed a desire to attend the PCC are simply unable to make a 3-day commitment.

The brand new Strength Calisthenics Certification (SCC) is changing all of that. By providing a 1-day calisthenics experience focused solely on Coach Wade’s “Big 6″–the squat, push-up, pull-up, bridge, hanging leg raise, and handstand–the SCC offers calisthenics fans the chance to test the waters without having to dive in headfirst.

FirstSCC3
Last Saturday the SCC made its debut in New York City. Fitness enthusiasts from all over the world came together in the Big Apple for a fun-filled day of calisthenics and strength coaching. Attendees hailed from Germany, Ireland, and Canada, as well as many of the 50 states.

In addition to Danny and myself, the entire PCC leadership team was on hand for the debut of SCC: Adrienne Harvey, Angelo Gala, Beth Andrews and Logan Christopher were all there helping to coach and inspire our SCC hopefuls.

FirstSCC4
We spent the morning focused on floor calisthenics, including loads of push-up, squat, bridge and handstand variations, then got on the pull-up bar in the afternoon to work on hanging leg raise and pull-up progressions. Everyone was challenged to push themselves and many personal bests were set. We even had one attendee achieve her very first full pull-up!

After the training I lectured on a wide variety of topics including principles of progression, bodyweight programming and the reality of the personal training business.

AlKavadloAtFirstSCC5
The day seemed to fly by in a New York minute and everyone had an amazing experience. When all was said and done, we had a brand new group of freshy-minted calisthenics warriors!

Though the first SCC has come to an end, this is really just the beginning. Look for more SCC workshops to be announced in the weeks and months ahead. I hope to see you at a PCC or SCC in 2016.

We’re Working Out!

-Al

AlKavadlo6

****

Al Kavadlo is the lead instructor for Dragon Door’s Progressive Calisthenics Certification. Recognized worldwide for his amazing bodyweight feats of strength as well as his unique coaching style, Al is the author of five books, including Raising The Bar: The Definitive Guide to Pull-up Bar Calisthenics and Pushing The Limits! Total Body Strength With No Equipment. Read more about Al on his website:www.AlKavadlo.com.

Filed Under: Workshop Experiences Tagged With: Al Kavadlo, calisthenics certification, calisthenics workshop, entry level calisthenics certification, PCC, SCC, SCC NYC, Strength Calisthenics Certification

Side Crow and Crooks Pose

November 3, 2015 By Grace Kavadlo 19 Comments

GraceYogaLead-Pic

The world of hand balancing encompasses much more than just the traditional handstand. Moves like the side crow and crooks pose are excellent additions to your Progressive Calisthenics routine. These hand balancing skills cultivate synergy in the body between the upper and lower extremities and help foster improved body awareness. Although they may seem like just a party trick, they are actually a great way to build strength throughout your entire body, especially in areas like our hands, wrists and fingers, which are often overlooked in strength training. They can also be a great way to work on mobility.

Beyond the physical benefits, adding hand balancing to your regimen can be a wonderful way to hone your powers of concentration. We live in a culture where people drown out the sounds of their own breathing during training with iPods and other distractions. Learning the crooks pose requires you to be completely present and focused. This practice of mindfulness and attention can really extend into every aspect of our lives and allow us to learn to live fully in every moment.

Is this dude even working out?

The side crow and crooks pose are eye-catching exercises that will challenge your mental fortitude, physical strength and flexibility. These moves are a beautiful expression of what it means to be mobile, strong, and healthy! Before you attempt either of one, however, you should have a solid grasp on the basic crow pose. If you need to work on getting into your crow, check out my tutorial here.

Once you have gotten comfortable in the crow pose, we can continue using the system of progressive calisthenics to systematically break down these more advanced variations and help you along the journey.

GraceYoga3

Let’s Get Twisted
Since both the side crow and crooks pose involve intense trunk rotation, we will start off with a stretch to prep the lateral sides of your body. Sit on the ground with your left leg extended and cross your right leg over. Begin to twist your entire torso to the right side, placing your right hand on the ground behind you to help extend your spine upwards. Place your left elbow outside your right knee to actively push your body deeper into the twist. You should feel this stretch around your lower back, sides and midsection. Repeat on both sides.

Al Kavadlo Side Crow

The Side Crow
For many people, the side crow will be a helpful lead-up step before attempting crooks pose. Start in a squat position, then twist to one side and place your arms on the outside of one leg with your hands on the ground. Similar to crow pose, your elbows should bend back toward your legs, except this time making contact with only one leg and at two points: near your knee and the other by your hip. Lift your hips up and shift all your weight onto your hands, with your knees stacked together.

If you do not have the mobility to do the above variation, you will start by placing your hands further apart and only use one elbow as a contact point. Try to line up your elbow mid-thigh, before lifting your hips and shifting your weight onto your hand. Make sure to practice the balance on both sides!

Bow & Arrow Stretch
After you’ve conquered the side crow, you are ready for the crooks pose. Once again, we will start off with a preparatory stretch. Begin in a seated position with both legs extended. With your right hand reach for the toes of your right foot and pull your leg back, bending your knee. Wrap your leg around your shoulder and resist the urge to round your spine forward by propping yourself up with your left hand. Breathe easy and hold the position for 30 seconds before repeating on the opposite side.

GraceYoga5

Floating Bow & Arrow
This move is similar to an L-Sit in that it requires monster wrist, triceps and core strength to perform. Begin by getting into your bow and arrow stretch, but place both hands on the ground at your sides. Tense your abs and lock out your elbows to lift your butt off the ground. Actively point your toes and lean slightly forward in order to stay afloat.

Crooks Pose
Now it’s time to put it all together! From the floating bow and arrow, cross your ankles, bend your elbows and lean forward. Extend your legs to the side where you threaded your leg through and squeeze your knees together to create tension throughout the entire body.

AlYoga6

Often our own minds create a blockage as a way to shield us from the unknown. Practicing hand balancing gives you the opportunity to move past some of these self-imposed limitations. As Bruce Lee once said: “If you always put limits on everything you do, physical or anything else. It will spread into your work and into your life. There are no limits. There are only plateaus, and you must not stay there, you must go beyond them.”

Thanks for joining me on this journey into hand-balancing. Til next time, peace, love and ninja kicks!

***

Grace Kavadlo, PCC, HKC is a personal trainer and group exercise instructor located in New York City. She is a columnist for Bodybuilding.com and can be seen in several Dragon Door books, including Coach Wade’s Explosive Calisthenics. For more information about Grace, check out her website, www.DieselGrace.com

Filed Under: Tutorial Tagged With: crooks pose, Grace Kavadlo, hand balancing, side crow, yoga

Primary Sidebar

Featured Products

previous arrow
GetStrongBookCover
ConvictConditioningBookCover
StreetWorkoutBookCover
ExplosiveCalisthenicsBookCover
StrengthRulesBookCover
next arrow

Categories

Progressive Calisthenics Certification Logo
Click here for more information or to register for the PCC workshop

Get Strong Workouts TriadXP App
Get Strong Workouts App

Recent Posts

  • Top 5 Reasons Why an In-Person Workshop is the Best Way to Supercharge Your Training
  • HYBRID STRENGTH TRAINING IS HERE!
  • My Calisthenics Journey to the PCC
  • The Handstand Press: Complete Control Through the Handstand
  • The Get Strong App is Here!

Dragon Door Publications

Dragon Door Publications

Recent Comments

  • bross dandon on The Case for Curved Handstands
  • Johnny Flewellen Jr. on Strength for Life
  • Dan Earthquake on The Pursuit of the Daily Minimum
  • Johnny Flewellen Jr. on The Pursuit of the Daily Minimum
  • Johnny Flewellen Jr. on Yoga, Calisthenics and the Journey of a Lifetime
FOLLOW US ON TWITTER!

Copyright © 2025

Dragon Door Publications / The author(s) and publisher of this material are not responsible in any manner whatsoever for any injury that may occur through following the instructions or opinions contained in this material. The activities, physical and otherwise, described herein for informational purposes only, may be too strenuous or dangerous for some people, and the reader(s) should consult a physician before engaging in them.