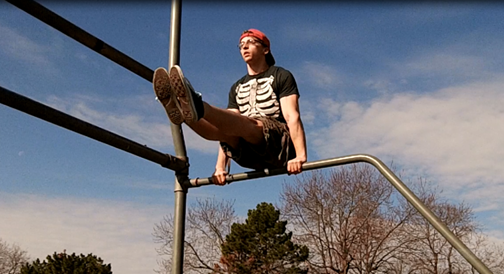
The L-hold (also known as the L-sit) is one of the 7 static holds included in the PCC syllabus. Like all statics, L-holds are phenomenal for tendon strength and powerful, total-body co-ordination—but don’t expect to see them performed in gyms around America anytime soon.
My own recent exploration of the L-hold started off somewhat embarrassingly – with a locked-up lower back. After botching my first dance with heavy pullovers, my lower back felt like a piece of wood – stiff and immovable (note to interested parties: common sense would dictate not to arch your back while doing pullovers. My common sense was evidently on a smoke break at the time. Don’t arch your back if you do them). I couldn’t do anything. I couldn’t do pistols, I couldn’t do L-holds, I couldn’t even hinge at the hips without feeling like I was going to catapult face first into the ground.
I was in trouble with a capital “TROUB”.
Fortunately, I had a hunch that there was a simple solution to this sudden bout of inflexibility, and the answer lie in strengthening my low back’s next door neighbor: my abs.
I chose the L-hold because hanging leg raise variations were unbearable at the time, and because of the high promises made about L-holds in Convict Conditioning 2: “Cure bad hips and low back inside and out.” Could it really be that simple? Would the L-hold break its promise when I most needed it to deliver? There was only one way to find out, and fortunately the progression sequence Paul Wade laid out in Convict Conditioning 2 was just what the doctor ordered. I started with bent leg holds and found that pumping my legs between progressions increased the difficulty and skyrocketed my strength and blood flow to my low back all at the same time. To make a long story short, within a few short days my back was as good as new. In this post, I’m going show you how I approached mastery of the L-hold.
First and foremost, you are going to need two things: strength in the form of strong shoulders, lats, triceps, and (of course) abs. Be sure you’ve cut your teeth on dips, one-arm pushups and their progressions, handstands, pull-ups, and leg raises before you tackle this move. Second, you are going to need some good active flexibility, or as Coach Wade refers to it in CC2 “Tension flexibility”, in your hips and legs. Whereas passive flexibility is essentially yielding to the force of gravity to improve your range of motion, active flexibility uses muscle tension to kick gravity to the curb and move in an advanced range of motion against the Earth’s otherwise unforgiving pull.
L-hold domination
To begin with, start on some sort of raised surface rather than on the floor: paralettes, kettlebell handles (careful!), or a sturdy desk will do the trick. For the sake of variety, consider practicing them on all these surfaces. While I have no hard proof of it, getting good at a this or any skill in a variety of contexts may very well make you better at the movement overall.
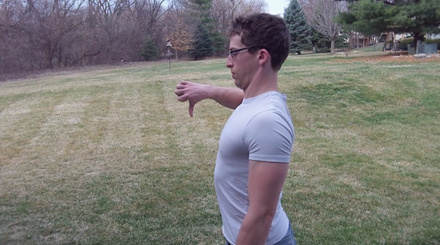
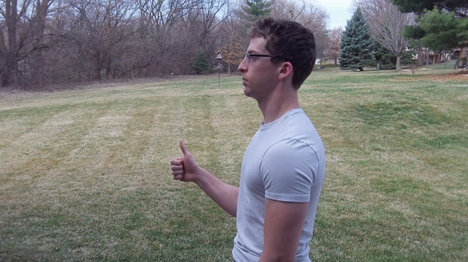
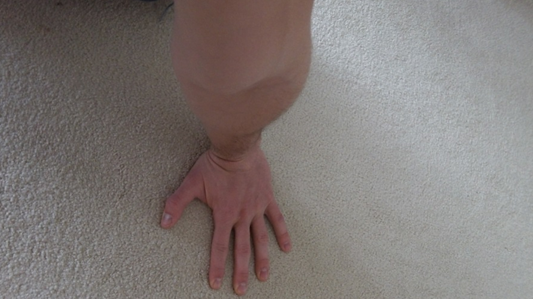
To keep your shoulders happy, keep them pushed down as far away from the ears as possible, and keep your “elbow pits” forward for all the steps in each series. Let your shoulders round forward – flare your shoulder blades – and hold that position tight. Keep your gaze straight ahead.

Nope! Chest is too wide and back is arched. You may not pass go.

Bingo! Back is flexed, chest is sunken, abs are tight. You have redeemed yourself.

Make your elbow pit point the same direction as your fingers.
Your goal is to work up to 20 second holds on each progression before moving on. However, because you’ll achieve that goal by getting stronger before focusing on endurance, I’ll give you a tool to get a taste of the next progression in the series to help build your strength faster and work your way toward the advanced L-hold more time efficiently. Not only will you be building static strength, but you will also be building dynamic strength, thereby giving you some built-in variety and the ability to feel out the movement a bit better.
When your arms start shaking and you are making ugly faces and grunting to get through your sets, you’ve already gone too far. If you’re working yourself into the ground you’re building fatigue, not strength. Knock it off.
You’re going to start with the bent leg hold. Prop yourself up on your raised surface, bend your legs to about 90 degrees, and…well, hold it. Hold it for as long as you (semi) comfortably can, take a break, and repeat.
Your journey through the progressions will go in this order.
1) Bent leg holds
–>Bent leg-to-straight leg
2) Straight leg holds
–> straight leg-to-N-holds
3) N-holds
–> N-holds-to-L-hold
4) L-hold
And if you want to take the first small step toward V-holds, you can add in this gem
==> L-hold-to-advanced L-hold
5) Advanced L-hold
Check out the video for the deeper details to kicking gravity in the face L-hold style. Note that during the dynamic variations I’m controlling my leg movement, not letting it control me (i.e. bouncing around and losing balance). Don’t move on until you can do the same.
The following programs are examples. You may progress faster, you may progress slower. Use these programs as templates, not gospel, and you will find that you have a solid base to work from and progress should roll in faster than you can spell “transverse abdominis.”
Beginner program:
Week 1: Don’t overthink it – keep your effort level at around 50%-80%. No need to go balls-to-the-wall just yet.
Monday: Bent leg holds
Thursday: Bent leg holds to straight leg holds
Week 2:
Monday: sets of bent leg holds and bent leg-to-straight leg holds
Thursday: Straight leg holds
After this, three days a week should be no problem. If that’s still overdoing it, stick with two days a week and progress as slowly as you need to. You don’t get a medal for racing through the progressions.
Intermediate program:
Week 1:
Monday: straight leg holds + bent leg-to-straight leg holds
Wednesday: bent leg holds
Friday: straight leg-to-N-holds
Week 2:
Monday: N-holds + straight leg-to-N-holds
Wednesday: straight leg holds
Friday: N-holds to L-hold
And if you’re more advanced and want to work on these daily, here’s an advanced program.
Advanced program:
Week 1:
Monday: (warm up: bent and straight leg holds) N-holds + N-hold-to-L-hold
Tuesday: (warm up: bent and straight leg holds) N-holds
Wednesday: (warm up: bent-to-straight leg holds) N-holds-to-L-hold + L-holds
Thursday: (warm up: bent-to-straight leg holds) N-holds
Friday: (warm up: bent-to-straight leg holds) L-hold-to-advanced L-hold
Week 2:
Monday: (warm up: straight leg holds) N-hold-to-L-hold
Tuesday: (warm up: straight leg holds) L-holds
Wednesday: (warm up: straight leg holds and N-holds) L-holds + L-holds-to-advanced L-holds
Thursday: (warm up: straight leg holds to N-holds) L-holds
Friday: (warm up: N-holds) Advanced L-holds
Congratulations! You have just kicked the L-hold’s ass! And now your abs are punch proof. But they’re not punch proof enough – not if you’re reading this anyway. For the average exerciser a full L-hold is a laudable accomplishment. But you’re not average, otherwise you wouldn’t be here reading this. The time to go above and beyond is nigh. Stay tuned. The V-hold is calling your name. And it will soon be time to answer the call.
***
About Aleks Salkin: Aleks Salkin is a calisthenics and kettlebell fanatic and Primal Move Fundamentals instructor currently headquartered out of Haifa, Israel. In addition to his love of old school strength training, he is also a devotee of intelligent flexibility training and tension flexibility in particular. Aleks grew up scrawny and unathletic until he was exposed to Pavel and his training methodologies in his early 20s. He currently spends his time spreading the word of strength and health both in person to his clients and online via his website and Facebook page. He is available for online coaching for select, dedicated individuals, and enjoys crushing weakness wherever it tries to hide. Find him online at http://www.alekssalkin.com/