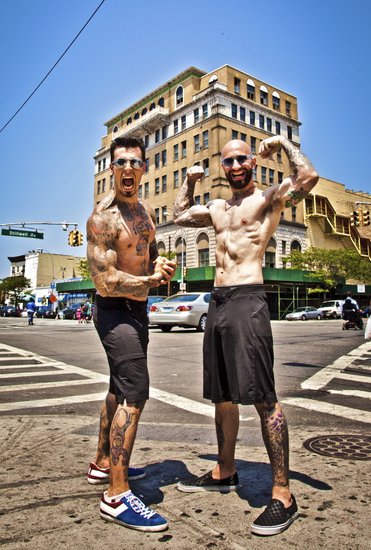
“Matt I thought we were friends. How could you do this to me?!”
My buddy Tony is standing in front of me, all 295 pounds of him. He’s a powerlifter who considers benching 315 a warm up.
“My biceps feel like they are going to explode. I can hardly get my triceps to relax they are so pumped up. How could you do this to me?” He says with a smile on his face.
Tony’s just gotten a taste of two of my favorite arm blasting exercises. They are simple, efficient and they don’t require a single ounce of iron. They are also somewhat backwards to classical strength training for the biceps and triceps. So when Tony said it was his arm day and wanted something different, I didn’t pull any punches.
The classic approach to weight lifting work involves holding a weight or cable attachment in the hand. Good technique is classically done with a body that doesn’t move much and a neutralized elbow.
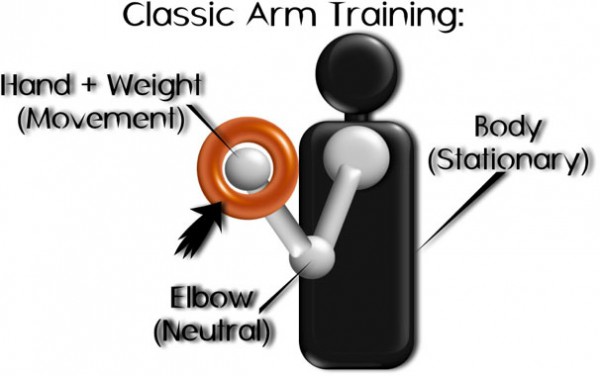
The bodyweight approach works the opposite way. The objective is to lock the hand in place, neutralize the body and move the elbow as much as possible.
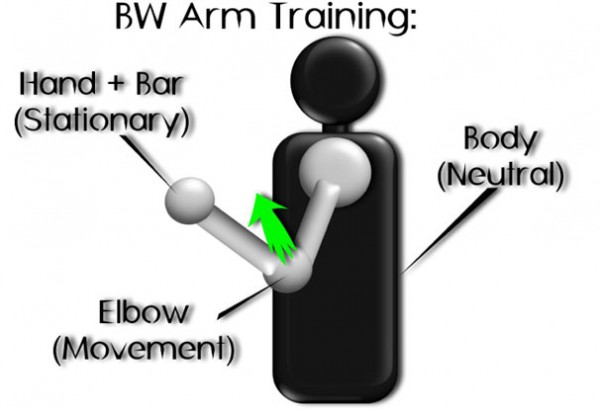
This New Approach Has Some Big Advantages:
Less stress on joints.
The joints of the body typically become more stable and less likely to move into stressful positions when the extremities are against an unmoving object and the body itself moves through space.
More energy on target muscles.
Since there is less energy spent trying to prevent the body from moving (you actually want it moving around) you can spend more effort towards actually performing the movement and working the muscles in the arms.
More functional carry over to pull ups and pressing movements.
The curling exercise is still very much a pull up style movement. The triceps extension is also a style of push up. Just like with pull ups and push ups, you keep your hands in place and move your body using the action of the elbow joint. This is neurologically similar to push ups, dips, rows and pull ups. This means that you’ll program your nervous system to engage your biceps and triceps more during all pushing and pulling exercises. So you won’t just be hitting your arm muscles during these two moves, but you’ll also place more emphasis on those muscles with almost every upper body bodyweight movement in your calisthenics arsenal.
Carry over to Olympic lifting.
Some of my clients who practice Olympic lifting report a carry over to exercises such as cleans. I believe this is due to the fact that both of these moves train you to become more conscious of using your elbow as opposed to just trying to move the hands into an ideal position.
It’s easy to adjust resistance mid-set or even mid-rep.
Both moves have a variety of ways you can adjust the resistance on the fly. You can dial-in the perfect level of resistance and make adjustments as necessary even during those last few reps.
The bottom line is this–by reversing the classical weightlifting arm strategies with calisthenics, you open the door for unbelievable levels of tension applied directly to your biceps and triceps with more comfort and safety. How’s that for a formula for success?
The first exercise is the triceps move known as the Tiger Bend. You can do this move on any elevated platform or edge of a counter. Park benches and sturdy table tops work particularly well.
Place both hands about shoulder width, palms-down with a thumb-less grip. If you’re using a narrow surface, your hands may need to be placed next to each other, which will be fine.
Bend your elbows downward and forward without letting them flare out to the side. The key is to keep your elbows pointing down to the ground, creating a gap between your arm and torso as indicated with the blue triangle in the picture. Tense up your triceps and shoulders as hard as possible, and tense your lats to stabilize your back.
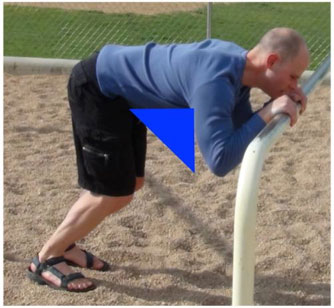
Apply resistance by stepping your feet back so some of your weight goes directly to your hands. Once your feet are firmly planted, push directly down with your hands and push your elbows up and away from the surface your hands are pressing down on. (See blue arrow below.) This should cause your body to lift up and back as indicated by the orange arrow. Once your arms are fully straight begin coming back down by bending your elbows down and forwards.
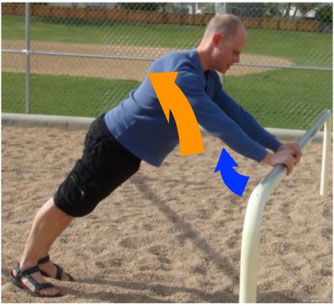
Regressions and Progressions:
I love this exercise because it’s so easy to progress and regress it. Moving your feet back will place more weight on your hands and increase the resistance. Moving them closer will do the opposite, making the move easier.
You can also change the resistance by putting your face in a different place in relation to your hands. Bringing your chin between your hands will be easier, while bringing your nose or forehead between your hands will be respectively more difficult. You can also make this move much easier or harder by selecting hand placements at different heights. Just like the push up progressions, the more your body tilts towards the floor, the harder the move will become. Placing the hands on a higher surface will stand your body up more and take away some of the resistance. If you want some additional assistance, you can simply place one foot in front of the other to help lift you into position on those last few reps. Lastly, you can also bend your body in half a little at the hips. Again, this will bring more of your body weight to your feet to make the exercise a little easier. Straightening out your body into one straight line will make the movement more difficult.
The biceps exercise is very similar, only now you face the other way. Since this is technically a pull up style exercise, so bars or handles you would usually use for moves like Australian pull ups will be ideal.
Place your hands on the back side of the bar with your fingers on top of the bar. Once again, a thumb-less grip may be ideal, but I’ve also used a thumb grip without much trouble.
Tense up your biceps and push your elbows away from your rib cage with your hands right next to your chin. It’s still ideal to keep your elbows in front of your torso as you can see from the blue triangle below. This position will ensure maximum tension on your biceps.
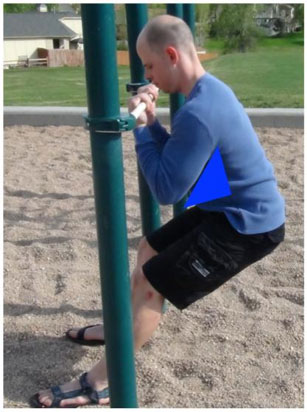
I recommend using a slight kink in the hips rather than keeping your body straight. This will allow a bit more flexibility in your motion and lend itself to a more natural motion.
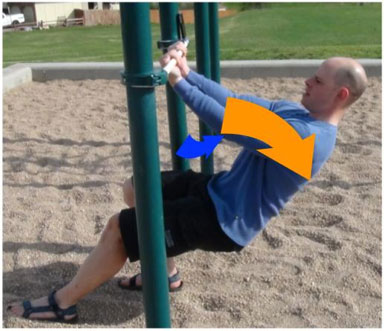
Lower yourself down and back by bringing your elbows out and upward (blue arrow) which will cause your body weight to fall away from under the bar(orange arrow). Return to the starting position by bending your elbows down and forward to maintain that elbow position in front of the ribs.
Performance Tips:
-It’s a good idea to keep tension on your target muscles at all times. It’s tempting to relax at the bottom or top of each rep, but maintaining tension on the muscle is key in maximizing your progress.
– A little goes a long way. If you need to adjust your resistance, just moving your body an inch or two can make all of the difference in the world. Sometimes even moving your feet a couple of inches or slightly straightening your knees can be more than enough.
– Towels are a great addition to these moves. They can provide a neutral grip which many people find more comfortable. Plus they are great for building up that grip. Nothing complements your bis and tris like a pair of beefy forearms.
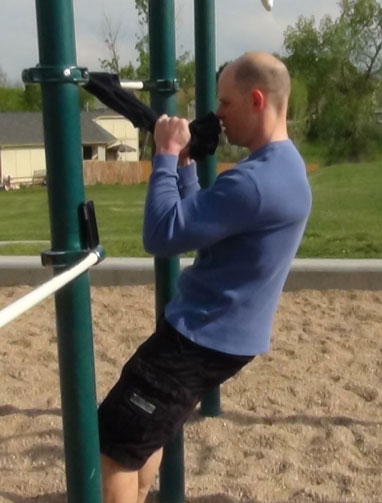
– Once you’re more comfortable with the motion of the exercises, work on tensing other muscles in your body as much as possible. Adding more tension to your back, shoulders, hips, hamstrings and even your chest can bring these moves to a whole new level and your results will follow.
– Be patient and use light resistance for the first few weeks. These moves can take some practice to get everything dialed-in just right. Making the movement of the elbows the focus of the exercise can feel a little strange at first, especially if you’re used to the classic method of curls and extensions. Keep tweaking the position and movement of the elbow, and it will feel natural before too long.
– Listen to your joints. both of these moves can place a massive amount of tension through your biceps and triceps. Sometimes people find their joints need some time to become accustomed to the high degree of tension running through the muscles. It’s always okay to use a shorter range of motion and a lower level of resistance at first to allow the tendons around the elbow to strengthen up. Take your time easing into the exercise over a few weeks. Once they are accustomed to the exercise, feel free to use a big range of motion. By then your elbows will be bulletproof!
Good luck with these two movements. If you have any questions please don’t hesitate to ask in the comments down below.
****
Matt Schifferle a.k.a. The Fit Rebel made a switch to calisthenics training 5 years ago in an effort to rehab his weight lifting injuries. Since then he’s been on a personal quest to discover and teach the immense benefits of advanced body weight training. You can find some of his unique bodyweight training methods at RedDeltaProject.com.