• Skip to main content
  • Skip to primary sidebar
  • Home
  • Contributors
  • Resources
    • Q&A with Paul “Coach” Wade
  • Workshops
  • Products
  • Forums
  • Articles
  • Blogs
    • RKC Blog
    • Strong Medicine Blog
  • Archives

PCC Blog

Progressive Calisthenics - The Official Blog for the PCC Community

bridging

ABSOLUTE BEGINNERS: 4 New Year Goals for Total Noobs

January 7, 2014 By Paul "Coach" Wade 132 Comments

 My bodyweight brothers and sisters!
My bodyweight brothers and sisters!

Welcome to the world’s finest bodyweight strength blog—and welcome to 2014! I really hope this year turns out to be something really special for all of ya.

New Year means a time for new fitness and conditioning goals—at least for a lot of folks. A brand-spankin-shiny new year is a perfect time for a fresh start…and God knows, millions of people need it. Two-thirds of Americans are overweight or obese; only 20% get regular exercise; and, horrifically, it has been estimated that less than 10% of the population can perform a full pullup. That’s only one in ten! (I think.)

Many folks are so goddam outta shape, they just have no clue how to make a start in calisthenics. So they put it off…sometimes, forever.

If that’s you—or someone you care about—then this blog is my New Year challenge for YOU. I’m often guilty of writing for experts. Why? Coz the bodyweight community is a remarkable one; it’s typified by smart, mature, knowledgeable, advanced athletes. I love you all, but this post’s not for you. It’s for the noobs.

What’s a “noob”? Well, in terms of bodyweight training:

  • If you can barely do a handful (or less) of sloppy pushups;
  • If a strict, full pullup is outta the question;
  • If a full, deep squat is impossible or feels like it’s ripping your knees apart;
  • If getting up off the couch leaves you out of breath;
  • Or if any of the above apply to you;

…then yer a noob, kid. So if you are a desperate neophyte, an interested but confused lurker, or a collapsed ex-athlete—listen up!

Four Fundamentals in Strength Calisthenics

In this post I’m going to give you FOUR basic goals to get working on. You don’t need more than that—the more goals you set, the more your willpower gets spread around ‘em, so the less likely you are to meet any of them. Research also shows that the more inconvenient New Year goals are, the less likely they are to get met. So all these exercises, and their regressions (i.e., easier versions) can be performed in a tiny space, in the comfort of your own home. You don’t need jack s*** to start today. You don’t need to buy my book. You don’t need a pullup bar. You don’t need a gym membership or new sneakers. All you need is a little courage to accept my challenge, a few minutes time, and enough space to lay down. Everybody has that much, right?

Here are the goals:
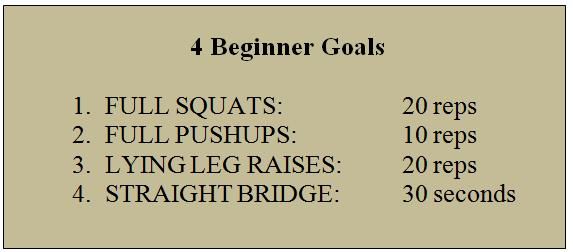
noobs_textbox1All techniques are to be executed with perfect form.

To a dedicated athlete, these four are modest goals; easy, in fact. But they are also incredibly important; the average de-conditioned American would be unable to meet these standards…amazingly, given the decline of fitness in our schools, even the average teen would struggle! So let’s get to work on these fundamentals. If these basics are beyond your reach, you stand zero hope in hell of going any further in strength or fitness. And if you really ARE new to strength training, don’t give me any of that “shouldn’t I be lifting weights?” bulls****. If you can’t do ten pushups perfectly, you got no business laying down on a bench press. Likewise, if full bodyweight squats are impossible, then perching under a loaded barbell or leg press for messy, incomplete reps is only going to wreck your knees.

Bodyweight comes first!

The Four Techniques

1. Full Squats:

Full squats generate strength in the entire lower body—quads, hamstrings, calves, glutes, shins, everything. They also build mobility in two areas that badly need it, the knees and ankles, while strengthening the lower back. To put it bluntly, they are essential, whether ya like it or not.
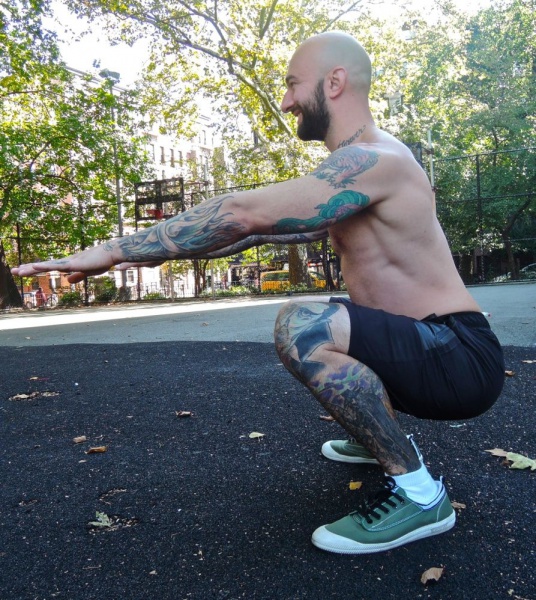
Full squats means all the way down until the hamstrings are resting on the calves!

You can’t do twenty full squats until you can do one full squat RIGHT. So begin by focusing on deep motion. I don’t care how weak or rusty your knees are—you can begin building motion using no weight on the knees at all. Lie on your back or shoulders, with your legs straight up, and bend your knees as fully as you can that way. (These are called shoulderstand squats.) As your mobility improves, try deep squats the right way up; use a partner or a sturdy object to help pull yourself out of the hole. Over time, use the assistance less…build to solo half-squats, and ¾ squats. Soon full squats won’t seem so tough. Once you can do your first set of 5-10 full squats, just add a perfect rep every so often. You’ll hit twenty reps real soon.

2. Full Pushups
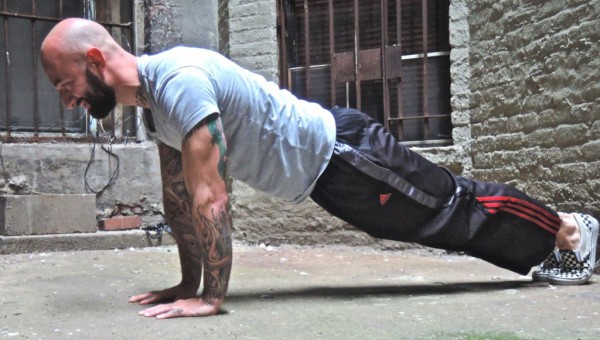
Keep your back and legs straight and aligned—you’ll get all the benefits of planks, but without the boredom!

Hey, ten pushups is easy right? Everyone can do that, right?

Wrong.

Most people—even coaches who should know better—do them wrong. If you do them the right way—my way—they are tough as hell. For a start, most folks rush their pushups. I want you to eliminate ALL momentum (if momentum is doing the work, your muscles aren’t, right?). I want you to take two seconds up, two seconds down, with a moment’s pause at the bottom position. Secondly, you need to go deep—go down until your sternum is a fist’s width from the floor: no less. (Use books or an object like a softball to guide you, at first.) Third, don’t bounce! When you descend so that your sternum touches your books, it should touch them as lightly as you would kiss a baby on the forehead. This technique (“kiss-the-baby”) is murder, forcing you to control your body FULLY. What else is strength, but control?

Doing pushups this way makes them brutal and incredibly productive as an exercise. If they are too hard for ya, begin doing them on an incline, or even against a wall. Once you find a pushup technique you can perform five reps in, add a rep every workout or two until you can do ten, then make things harder.

3. Leg Raises

Forget what you have probably been told about working “abs”…isolating the muscles, tensing, and performing lots of sets of teeny crunches or machine exercises. Real, functional strength—from hanging on a bar to picking up a fridge—requires not just strong abdominals, but an iron “anterior chain”—that means your hips, abs, intercostals, serratus, obliques and even the deep muscles of the quads. For strengthening your anterior chain perfectly, God gave you a gift—leg raises!
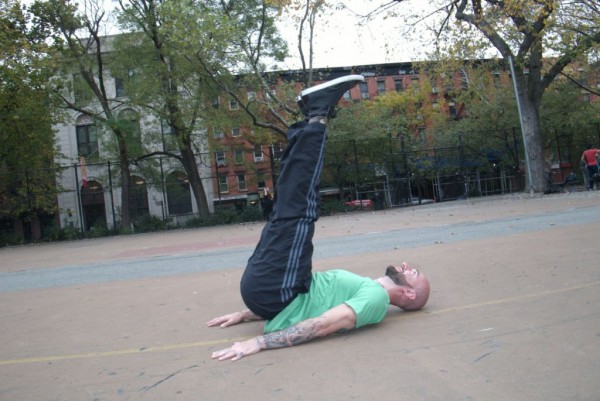
Isolation is for hermits, kid.

As usual, begin easy. Start with lying knee raises; build to twenty reps. Then extend the legs a little. Then you can try one–leg leg raises, with the knees locked. Pretty soon, twenty strict leg raises will be within reach, and your abs will be harder than those pathetic crunches could have ever got ‘em. Damn, you’ll be doing these suckers hanging in no time. Six-pack from Hell, here we come…

4. Straight Bridge

The straight bridge is a wonderful exercise for noobs to aspire to master. Whereas leg raises work the entire anterior chain—the muscles at the front of the bod—the straight bridge works the posterior chain. It builds the spinal erectors, reduces low back pain, bulletproofs the spine, trains the hamstrings, and helps heal bad knees. Because the arms are pushing behind the body, this type of bridge also strengthens the “lats” of the back, and the muscles around the shoulder blades—an awesome benefit for those who don’t have a pullup bar. Straight bridges also give ya triceps of steel kid—no more kickbacks necessary.
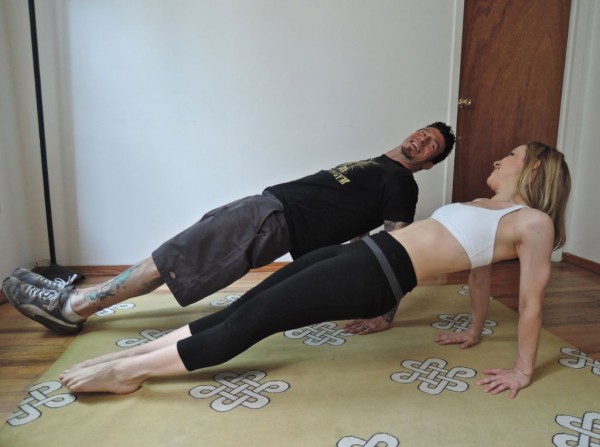
Once again, alignment is what’s up.  Athletes make the straight-body position look easy. It ain’t.
Once again, alignment is what’s up. Athletes make the straight-body position look easy. It ain’t.

Normally I wouldn’t advise beginners to perform bridges—I think the time and energy is better spent on pulling work, typically on a low horizontal bar. That said, if you don’t have access to a bar, straight bridges can be a good way to work the back muscles.

Bridging can be demanding—so start easy. Commence with short bridges (with the shoulders on the floor), then move to table bridges (straight bridges, but with the knees bent). When ten seconds of perfectly aligned form is easy, start adding seconds—build to 20 seconds, then move to something harder. If straight bridges are too easy, try them with one leg lifted off the floor. That will teach you what your hamstrings were made for.

How to Train for these Goals

How do you go about training to achieve these goals? For a start, if you are de-conditioned, you need to get an okay from a doc before you start training hard (that’s the legal s*** outta the way). When you start, start slow. This is absolutely key—never throw yourself full tilt into a new training program. Start with exercises that are about half your full ability, and add work s-l-o-w-ly—a rep here, better form there, a harder exercise somewhere else. This approach will allow your joints and soft tissues time to adapt and get stronger, preventing joint pain. (Joints adapt to stress slower than muscles.)

As a noob, you really need to keep your programming easy and simple at first. I advise performing two exercises per session, with a day off in-between. Warm up with a gentle, ten minute walk, and perform one set of a lighter version of each exercise you are doing, also as a warm up. (For example, if you are doing incline pushups, warm up with wall pushups; if you are doing flat pushups, warm up with incline pushups. Got it?) After the warm up, perform two hard “work” sets of each exercise. Don’t go til failure, keep your form as perfect as possible, and rest between sets long enough to get most of your strength back. Such a program would look like this:
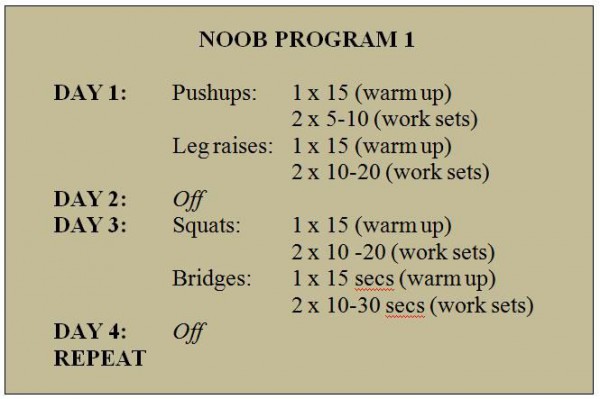
noobs_textbox2If you get sore, or stop making progress, add more rest days. If this seems easy, reduce rest days—but only if you keep making progress. If this seems like way too little, or you get fitter real fast, try the exercises all together:
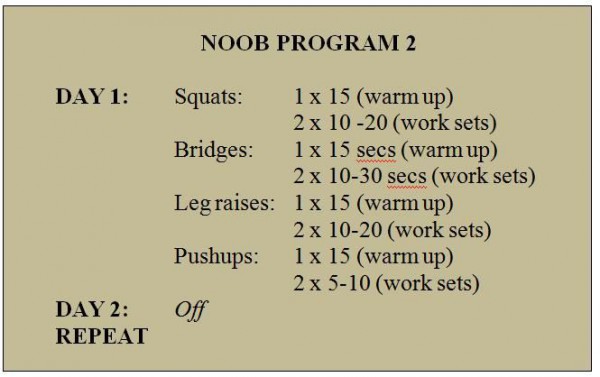
noobs_textbox3Take a day off in between workouts, or more if you need to. Some will say this is not enough work. It is. Trust me, if your numbers are going up, if you are making progress weekly, you are doing better than 95% of those suckers with expensive gym memberships. More detailed programming info is included in Convict Conditioning. For motivation and to keep ya on the straight and narrow, try to write down your training sessions in a logbook, ‘kay?

I’m too fat for bodyweight workouts!

No, you aren’t. Obese would-be ninjas need bodyweight training as much or more than slimmer folks—they just need to start with easier exercises.

I’m going to tell ya a well-known “secret” now…calisthenics and weight-loss go together like love and marriage. Once your body recognizes it is regularly struggling to heft its own weight up and down, the subconscious mind kicks in and will help you shed those useless pounds. I’ve seen this happen hundreds of times, and it will work for you too if you give it a chance.

Yes, nutrition will play a role, of course. You gotta start dealing with your weight at the same time you start bodyweight training: it’s no goddam use saying; “I’ll work out when I get to such-and-such a weight”, or; “I’ll start eating right when my training gets off the ground”. Start training AND eating well right now.

The Next Step: Moving to Intermediate Level

Okay. Let’s say you have worked for a few weeks—or months—to meet these fundamental requirements. Congrats, kid! You did it. You are now stronger and more mobile than the average American! Well done.

Whazzat…? You feel better? You have added muscle, and firmed up? You are hungry for MORE? You want to know how to take the next step, and work towards becoming an intermediate bodyweight athlete?!

Now your arms, back, waist and legs are stronger, you’re qualified to begin studying at the ultimate bodyweight training college—the School of the Bar! You gotta get hanging. This article is too short to discuss bar training and techniques. Luckily, Al Kavadlo has got you covered. With John Du Cane, Al has put out the super-acclaimed Raising the Bar…the master text-book of hanging training techniques.
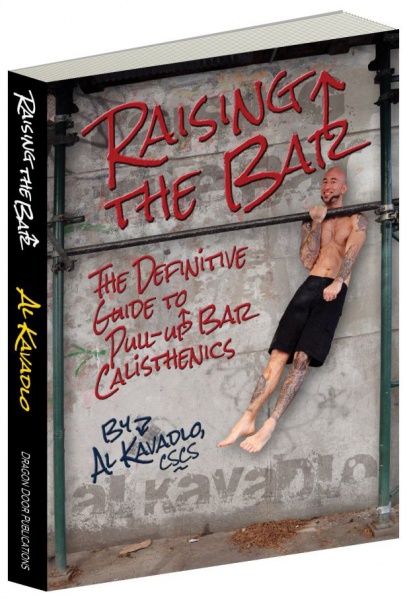
noob_RTB
Despite what you might think, I’m not a Dragon Door “affiliate” or any of that crap, and I don’t get paid one cent for promoting Al’s book.  It’s just too damn good not to mention. Raising the Bar includes every bar calisthenics technique under the sun—from Australian pullups and archer pullups, to muscle-ups and Korean dips, plus bonus floor training and pressing methods. Best of all, Al’s system is designed for bar athletes of all capabilities; whether you can do a hundred pullups, or if you can barely hang on to the bar, this book will get you stronger, safely.

Anyhow, I hope that gives some of you new fish some food for thought. You know somebody who needs to get started training? Be a true friend and email them a link to this post TODAY, so we can start helping them as soon as possible.

***

Got questions? Just holler at me in the comments, and I’ll do what I can to answer ya. Any experienced athletes who have advice for noobs (we are ALL ex-noobs, remember!), I’d also love to hear what you got to say, so please make a comment.

I need you all to step up this year—bodyweight is rapidly becoming the biggest movement in fitness, and I need you hidden geniuses out there to support us, and help tip it over the edge. I want lotsa ideas, questions, tips and feedback. So get typing, Jack!

***

Paul “Coach” Wade is the author of five Convict Conditioning DVD/manual programs. Click here for more information about Paul Wade, and here for more information on Convict Conditioning DVD’s and books available for purchase from the publisher.
Filed Under: Motivation and Goals Tagged With: beginner, beginner goals, bridge, bridging, calisthenics, Convict Conditioning, fitness, how to start, leg raises, Paul Wade, push-ups, squats, straight bridge

Five for 5

May 28, 2013 By Paul "Coach" Wade 46 Comments

Summer is knocking at the door, boys and girls. (Allegedly.) Everyone is outside, hanging out in the golden rays, whiling their hours away in sun-soaked fun and romantic adventure. (Allegedly.) Summer lovin’. It’s like a scene from Grease, I tells ya. And why the hell not? A spell in the sunshine promotes Vitamin D synthesis, improves mood, and boosts immunity. It may even increase lean tissue-building testosterone levels. (Allegedly.)

Seriously, there are some times you want to lock yourself away in your cell and perform hours and hours of calisthenics—and there are times you definitely don’t. There are times you want to get a quick, productive workout under your belt, so you can go out and enjoy life instead. For a lotta folks, summer is one of those times.

My hands are up, officer; I’ve been guilty of long, draining, excessive workouts throughout my career. But I have also experimented with very brief, efficient, training sessions—and I want to share a few of the tactics I’ve personally used for super-short workouts. Specifically, I’m gonna give you five types of session that will keep your motivation high, keep you strong, flexible and tough—and all for the temporal investment of a mere five minutes. (Yeah, you read that right. Five minutes.)

I want you crazy kids to enjoy summer. Think you can’t get a viable training session done in five minutes? Read on, Macduff.


The S4 Method

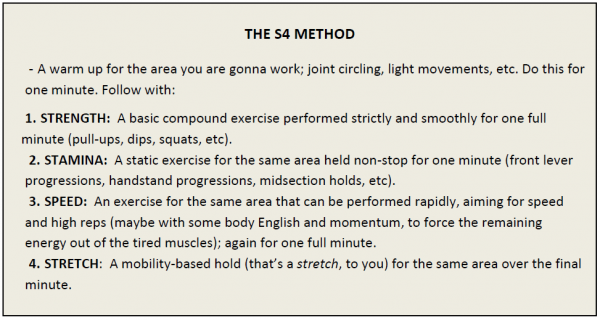
This right here is my personal favorite strategy for a quick, effective workout. It’s simple, too—provided you can view a clock or wristwatch. For any movement or body-part, you warm up, then perform: a minute of a strict bodyweight strength exercise; a 60 second muscular hold for stamina and control; a minute of a fast calisthenics exercise; and a final stretch. (Strength, Stamina, Speed and Stretch—four “S” qualities. S4, get it?)

So the method looks like this:

paul_pic1

How quick and simple is that? You just knock out each of these for one full minute. Non-stop activity, with no rest in-between exercises. That’s it!

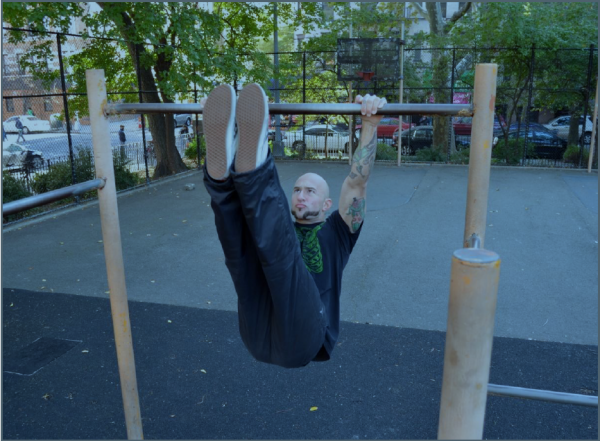
If you think this is not effective, I challenge you to try it. Here’s how it might work for midsection. You warm up for a minute with some abdominal tension, leg swings and hip rolling; then—eye on the clock—jump up and grab the overhead bar. For sixty seconds you grind out slow, smooth, perfect leg raises. (Ten reps is about right, champ.)

paul_pic2

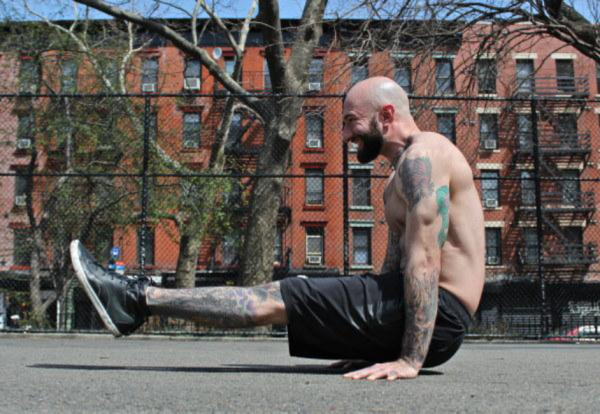
By now, you are grimacing—but you still got some life in ya, right? So drop to the floor and press out into an L-hold—now stay there for sixty seconds.

paul_pic3

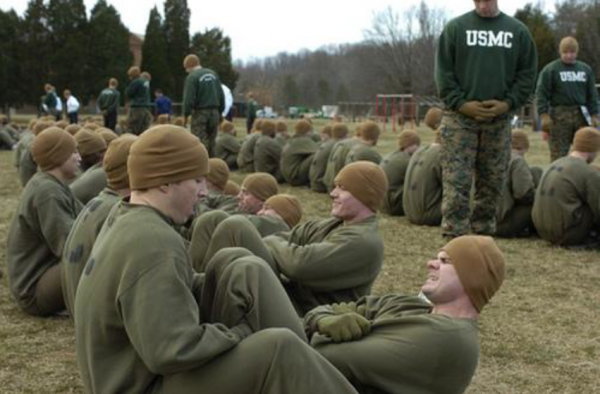
By the end of this (if you manage it) your legs will be trembling, and your gut will be in agony. But the show ain’t over, bud. Hook your feet under something; you have one minute to pump out as many bent-leg sit-ups as you can stomach. (Pun intended.) You are going for speed—military style.

paul_pic4

 USCMC image (LCpl Esteban Gallegos)

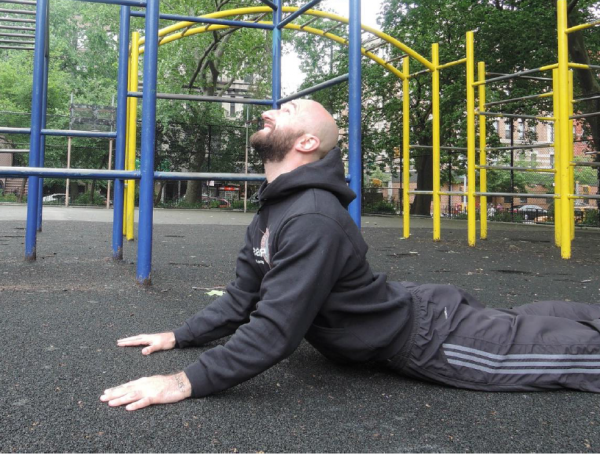
By now your midsection is spent, and you will be pretty much snapping up using everything you have. The minute—which will seem endless—finishes, somehow. Your body just wants to curl up in pain right now, but I want you to do the opposite—roll onto your stomach and straighten your arms, pushing up into a cobra stretch.

paul_pic5

This hold is a strange mix of relaxing—as it decompresses your confused and tangled, deep-fried muscles—and painful, as the time mounts up. One minute of this, and you walk out a free citizen—if you can walk at all!

Sure, this workout is too tough for most athletes. But as with all progressive calisthenics, you can tailor it to your own level. Can’t do leg raises? Knee raises or lying leg raises. Not loved by the L-hold yet? Bent-leg holds or jackknife holds work the same. Too shot to do the sit-ups? Throw a b-ball at the wall and catch it on the rebound for a minute (an underrated gut exercise).

Even the time aspect is variable. A minute is unthinkable for these exercises? Start with 30 seconds for each and build up a few seconds each session.

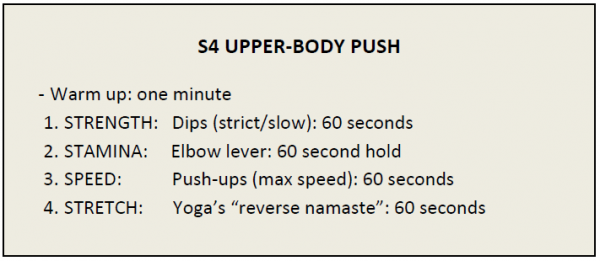
The S4 method works with pretty much anything. Want some upper-body push action?

paul_pic6

Again, with the PCC “toolbox” you can vary the difficulty in dozens of ways. For example, beginners might sub dips for kneeling push-ups. The elbow lever could be swapped for easier prone statics like planks, wall planks or raised elbow levers (see the PCC Instructor’s Manual for even more options). Fast push-ups could be subbed for incline push-ups, focusing on pumping out rapid-fire reps in the top range. Stretch out on a doorway for an easier pec stretch.

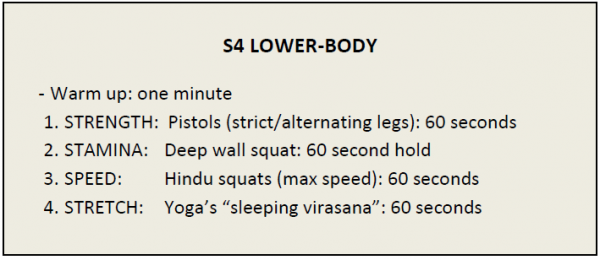
S4 works for legs, too:

paul_pic7

If you are working on unilateral or asymmetrical exercises, it’s best to alternate sides each rep. Again, you can use different difficulty levels, or different techniques—S4 stands a lot of tweaking.

Strength, control, speed and mobility. That’s three simple, five-minute workouts right there that very few advanced athletes could manage—trust me.


Gear Change Sets

Fancy a change? A workout new and fresh, free from the baggage of your long-term program? It’s a good idea to try novel exercises. It’s another cool idea to change your sets and reps. But how many athletes think about radically changing their speed? Or, how about changing your speed as much as possible…in a single set?

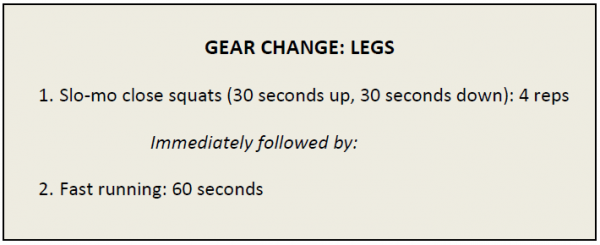
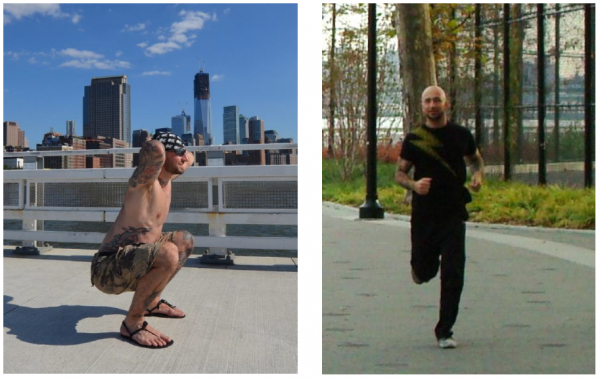
This is the basic idea behind Gear Change sets. You begin with a handful of slow-mo reps, and finish with a bunch of max speed reps. There are many ways you can approach this. A great one is to shoot for 4 slo-mo reps—that’s 30 seconds up, 30 seconds down—immediately followed by a minute’s worth of a very high-speed, explosive exercise for the same body-part. For example, after 4 slo-mo squats, I used to perform tuck jumps for a minute (if you are outside, a maximum speed run for 60 seconds is probably even better).

So here’s a potential Gear Change workout for the legs:

paul_pic8


paul_pic9

Ever combined slo-mo squats with running? Murder.

Pick the right movements for your ability, and you have an amazing five minute body-part workout right there. But for Christ’s sake, always start each slo-mo rep at the bottom—or you may find yourself doing a 30 second negative squat you cannot push up out of. Slo-mo reps are tough, so don’t try slo-mo with an exercise unless you can do at least twenty strict reps with it at regular speed.

The method works for any body-part. For midsection, you could follow 4 slo-mo leg raises with squat thrusts for 60 seconds. After slo-mo push-ups or pull-ups, you might apply a minute of intense bag work or shadow boxing. You get the idea.

This slow-to-fast method is an amazing way to train. Through the complete elimination of momentum, the slow moves are tougher than you imagine (until you try ‘em). They just seem to hit the muscles in a new way, activating deeper fibers we don’t reach by bouncing mindlessly through reps, like so many folks seem to do. Very slow reps also really teach your brain something about the movements you are using; leverage, joint tracking, movement angles, weight shift. Subtle qualities of bodyweight motion, easy to miss at regular speed, now scream at you. When you are done with them, your muscles feel totally numb—and asking them to switch to their highest gear is a true challenge.

The Gear Change set also replicates real life. There would have been times when our ancient ancestors had to move very slow with high tension—maybe dragging a carcass back to the cave—then they were forced to suddenly fight off a predator trying to steal their prize. Slow to fast. Survival today is no different; imagine a soldier in the desert carrying heavy weapons or equipment, suddenly having to run for cover in a firefight.

Don’t get me wrong. Gear Change sets (like the other ideas here) are not meant to form the basis of your long-term training program. But they sure are fun, effective and instructive once in a while.


The H.P.A.S. Protocol

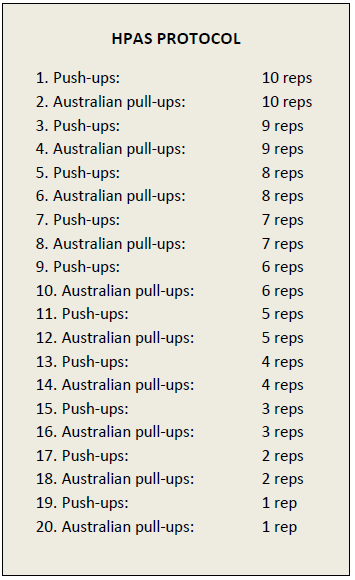
This is a beaut of a workout. I’m gonna call it HPAS, coz “Half Pyramid Antagonistic Super-sets” is too hard to say (at least for me). The premise—as always—is real straightforward. Pick two exercises for opposing muscle groups. Begin by doing each for 10 reps, then each for 9 reps, then 8 reps and so on, until you get down to one rep per set—and you do all this without stopping.

Here’s one potential workout:

paul_pic10

paul_pic11

paul_pic12

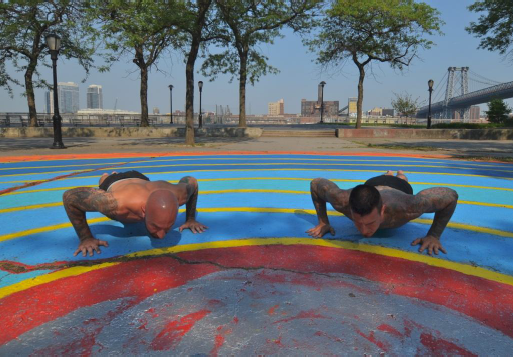
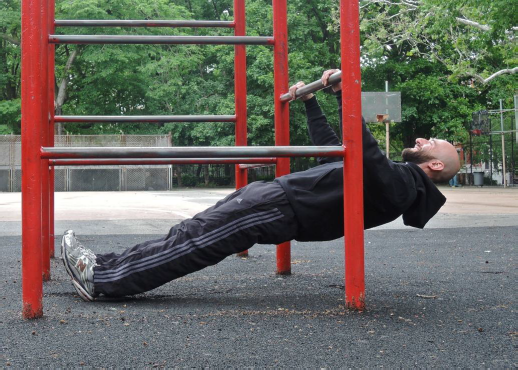
Few exercises go together better than regular push-ups and Aussie pull-ups.

Back to back antagonistic superset madness! On sale NOW!!

Can all this be done in five minutes?—if you use brisk reps with no pauses, yeah. But it’s not easy, and most folks will have to seriously build up to this. (There’s a good goal, huh? I’m looking at you, Jack.)

The HPAS Protocol is a perfect example of how short sessions can be both powerful and productive. Very popular in jails. If you can follow the above workout, you will have scorched every muscle in your upper bod, knocked out 20 sets, and got a helluva cardio workout, too.

This workout is proof that you don’t need to be in the gym for hours to make progress. In calisthenics—as in life—it’s quality that counts, not quantity. A hundred thousand rhinestones won’t make you rich, son; but a handful of diamonds sure will.


“The Century”

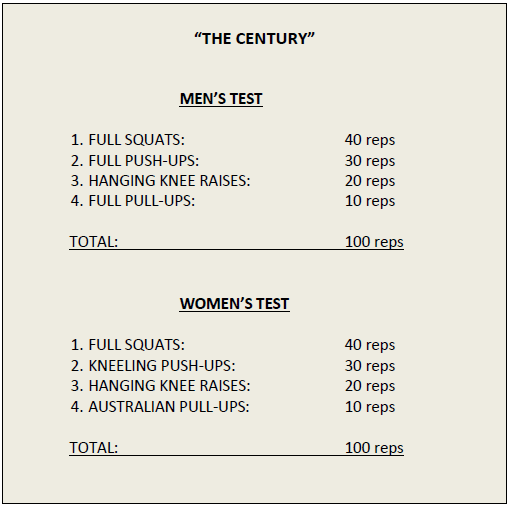
The Century is the rapidly-becoming-classic PCC certification test. It is designed to display technical ability in combination with an advanced level of conditioning, but it can also be a damn fine workout in its own right. In case you haven’t heard of The Century (where you been, dude? Under a rock?!), it’s so-called coz it features one-hundred nonstop reps in a single set:

paul_pic13

PCC-certified super-achievers will probably be sick of training for The Century, but it’s still a good staple to return to from time-to-time. Not only is it great to get back to the basics, but a hundred reps of the good stuff will leave your circulation and energetic system supercharged.

Beware though—if you want to crack this sucker in five minutes, you better have taken some Super Soldier Serum this week, kid. It can be done, though.


Al Kavadlo owns The Century in under 2 minutes 39 seconds.
Can you come close to that?


The Bridge

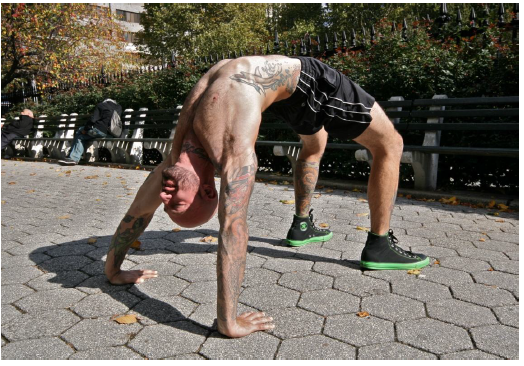
One final suggestion. You want the best five minute bodyweight workout money can buy? Hold a bridge for five minutes.

paul_pic14

I’m not kidding. The bridge has so many benefits, it’s crazy. It is the best bodyweight exercise in the world. A long hold will increase total-body strength and endurance—not just in the showy muscles, but in the vital deep tissues and tendons. It will increase flexibility, mobilize the ribcage, hip flexors and stomach wall, and disperse adhesions and calcifications in the shoulders. It bulletproofs the spine and lower back and drastically reduces knee pain. The inverse head position increases circulation to the noggin, releasing endorphins, inducing calm, and improving brain health. The bridge rocks.

I know what you’re thinking. Just one exercise? That’s an imbalanced workout, for sure! No way, José. In the real world, most eager athletes do so much for the front of their bodies—the showy pecs, biceps, abs and quads—that throwing a little extra meat to the under-loved posterior chain cannot hurt one bit.

Besides, the bridge is one of the all-time bodyweight classics, no different from pushups, squats or pull-ups. If you can’t hold a bridge for five minutes, there’s no way you can call yourself in great shape, no matter what else you can do.


Lights Out!

There you go—a killer series of five-minute summer training tactics, just for you.

So, what are your plans tonight, buttercup? What’s that? In a little while, you’re gonna eat, grab a shower, then head out for the evening?

Sounds great!

…before that, you’ve got five minutes to spare for old Coach, right?

My thanks go out to Al Kavadlo (PCC Lead Instructor) for generously contributing such cool pics to illustrate this article. This is not the first time Al has donated pics (and advice) for free to promote the bodyweight cause—thanks Al!

***

About Paul “Coach” Wade: Paul Wade is the author of five Convict Conditioning DVD/manual programs. Click here for more information about Paul Wade, and here for more information on Convict Conditioning DVD’s and books available for purchase from the publisher.
Filed Under: Progressive Calisthenics, Tutorial Tagged With: Al Kavadlo, bodyweight exercise, bridge, bridging, calisthenics, Century Test, Convict Conditioning, creating workouts, fitness, HPAS Protocol, Paul Wade, progressive calisthenics, S4 Method, short workouts, tutorial, workout

Primary Sidebar

Featured Products

previous arrow
GetStrongBookCover
ConvictConditioningBookCover
StreetWorkoutBookCover
ExplosiveCalisthenicsBookCover
StrengthRulesBookCover
next arrow

Categories

Progressive Calisthenics Certification Logo
Click here for more information or to register for the PCC workshop

Get Strong Workouts TriadXP App
Get Strong Workouts App

Recent Posts

  • Top 5 Reasons Why an In-Person Workshop is the Best Way to Supercharge Your Training
  • HYBRID STRENGTH TRAINING IS HERE!
  • My Calisthenics Journey to the PCC
  • The Handstand Press: Complete Control Through the Handstand
  • The Get Strong App is Here!

Dragon Door Publications

Dragon Door Publications

Recent Comments

  • bross dandon on The Case for Curved Handstands
  • Johnny Flewellen Jr. on Strength for Life
  • Dan Earthquake on The Pursuit of the Daily Minimum
  • Johnny Flewellen Jr. on The Pursuit of the Daily Minimum
  • Johnny Flewellen Jr. on Yoga, Calisthenics and the Journey of a Lifetime
FOLLOW US ON TWITTER!

Copyright © 2025

Dragon Door Publications / The author(s) and publisher of this material are not responsible in any manner whatsoever for any injury that may occur through following the instructions or opinions contained in this material. The activities, physical and otherwise, described herein for informational purposes only, may be too strenuous or dangerous for some people, and the reader(s) should consult a physician before engaging in them.