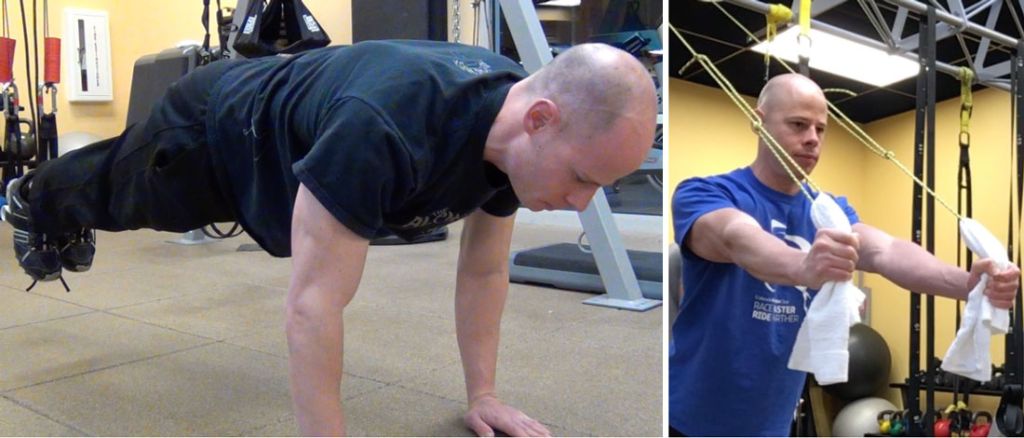
Suspension trainers are the multi-tool of the calisthenics world. You can do hundreds of exercises with them for almost any goal imaginable. They are ideal for mimicking classic weight machine exercises like chest flys, triceps extensions, and core work. Suspension trainers give you hundreds of exercises that can enhance and supplement your training. Suspending your feet, like in the image on the left, can make planks much more challenging. You can also simulate weight machine exercises, like the triceps extension on the right. A suspension trainer is the closest thing you can get to a truly portable gym. They really come in handy when you need to do pull-ups, rows, and dips while traveling.
Almost a decade ago, I purchased some of the easiest suspension trainers to come on the market. But, I quickly became obsessed with creating my own customized designs. I don’t even want to think about the time and money I’ve spent trying to develop a suspension trainer I was happy with. Every version I created had flaws and drawbacks, so I would scrap the design and start all over again. I quickly became obsessively picky with my designs and drew up a list of qualities I wanted. These included:
- Dual anchor points so the straps can be set up at any width to accommodate your unique build and what’s best for each exercise.
- Full vertical handle adjustment so the handles can go from an inch above the floor to an overhead reach.
- Small and lightweight, so it’s ultra-portable.
- Super easy to set up and take down within a minute.
- Strong, safe and durable enough for weighted dips and pull ups.
- Ergonomic without any rough edges or elements that impede movement.
- Universal anchoring so you can hang it from points above that are within and beyond your reach.
- Quick and easy infinite handle height adjustment so you can place the handles at any height.
- Can easily accommodate a variety of accessories.
- Can be made from inexpensive and readily available materials.
I lost a lot of sleep trying to figure out how to make all of these requirements work within one design but I finally got it right with what I call the prusik trainer.
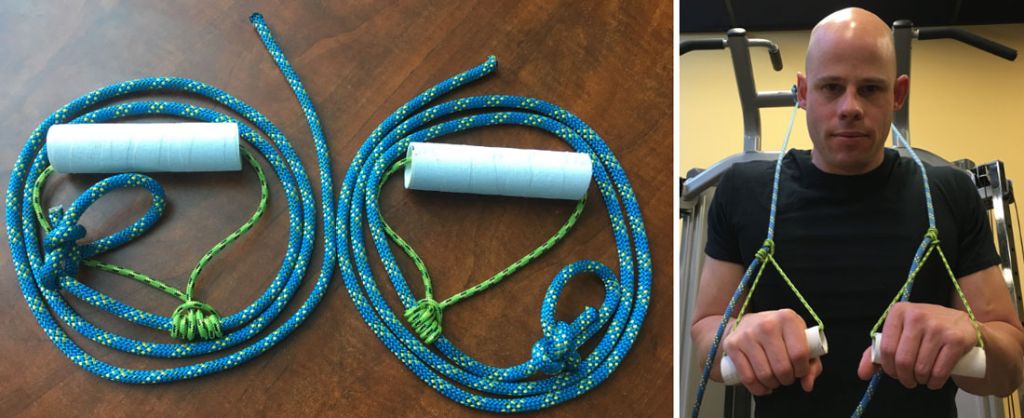
The prusik trainer uses rope instead of nylon straps like most other suspension trainers. Rope is the ultimate smart device. It’s reliable, inexpensive and readily available. It allows you to easily customize every characteristic of the trainer to your specific needs, because rope gets its functionality from knots. Nylon suspension straps use metal hardware and stitching which work, but they add bulk, weight and cost. Hardware and stitching also compromise the versatility of the suspension trainer. Once you stitch a loop into a strap, you can’t make that loop bigger or smaller later. Knots give you all of the functional qualities you need without the weight, bulk, cost and lack of versatility. Metal hardware can also wear out nylon straps over time. Knots have much more longevity.
Materials You’ll Need:
- Two lengths of 8mm climbing rope 9-12 feet long
- Two lengths of 4mm climbing rope 3.5 feet long
- Handle material from either PVC or a weight machine handle
- Small razor blade and light grit sand paper if using PVC handles
- Climbing tape
I buy my rope from outdoor supply stores like REI, where they can cut it to the length I need. If possible, have a professional cut your rope there at the shop. Most shops cut the rope with a heated tool that melts the ends and prevents fraying.
Knots You’ll Need to Know
- Bowline knot
- Fisherman’s knot
- Prusik knot

These knots are cinch knots, so the more weight you place on them, the tighter they hold. They are not too complicated, but I do recommend practicing how to tie them correctly before building your first suspension trainer. You can find videos and instructions on how to tie these knots at animatedknots.com.
How to Build a Prusik Trainer
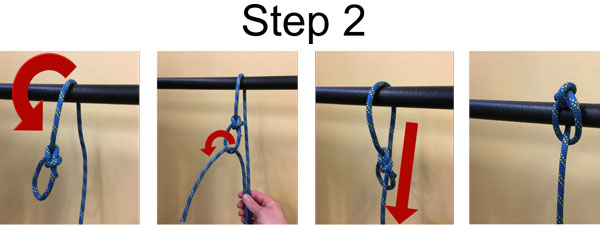
Once you understand how to tie the knots, building a prusik trainer is quick and easy. First, take your 8mm anchor rope and tie a bowline knot into one end to create a two inch diameter loop. This loop will serve as the anchor point you will throw over an overhead bar and feed the handle through.
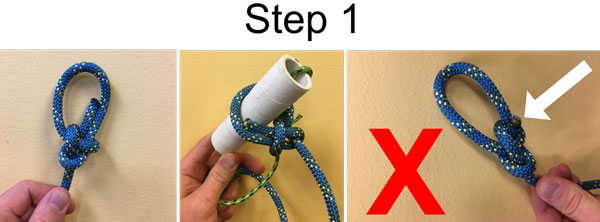
Next, take the 4mm handle rope and feed it through your handle and connect the two ends with a fisherman’s knot.
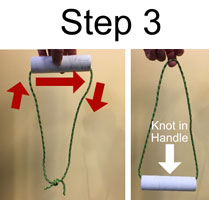
Next, tie the handle rope to your anchor rope using a prussic knot with 3-4 loops. I find it’s easier to tie the prussic knot around the anchor rope when it is hanging with some tension pulling down on it. You can stand on the end of the rope or ask someone else to gently pull down on the rope it to keep it tight.
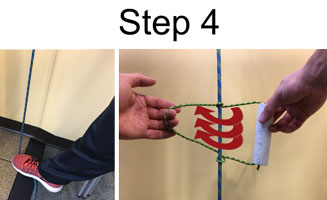
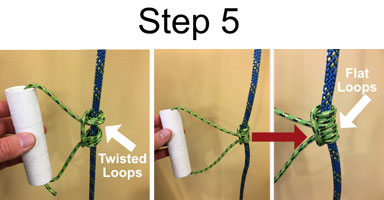
Finally, smooth out the overlapping handle rope so it hugs the 8mm rope. Be sure your prusik knot loops are flat to securely grip the 8mm rope.
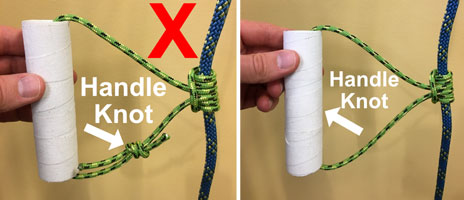
Be sure the fisherman’s knot remains inside the handle rather than outside it. One reason is the knot won’t rub against your arm while doing push-ups and dips. The other is to prevent the knot from moving to the prussic knot and jamming it. Jamming will compromise the safety of the prusik knot.
What Kind of Handle Should You Use?
You have two options when making the handles for your suspension trainer: PVC pipe or handles from a commercial weight machine. I’ve used both and each option has its pros and cons.
Like rope, the advantage of using PVC is that you can custom build your handle in any length and diameter. People with larger hands may prefer a beefy handle about 1-1.5 inches in diameter and 5.5-6 inches long. Smaller hands tend to work best with a 3/4 -1-inch diameter pipe that’s about 5 inches long. PVC is also inexpensive and available in most hardware stores.
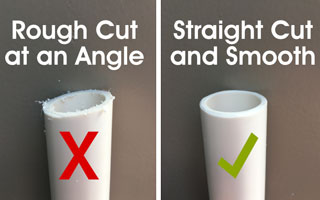
The disadvantages of PVC are that it is a bit tricky to cut with smooth edges that won’t wear into the handle rope. If you use PVC, you must make sure each cut is at a 90-degree angle to avoid angled ends that can make rotating the handle feel uneven. More importantly, you’ll need to smooth out the inside and outside edges of the handles to minimize wear on your rope. I cannot stress enough how important it is to make sure the rotation of your handle is as smooth as butter under load. If not, you’ll risk wearing out your rope which can lead to it fraying and failing under load.
I’ve been able to smooth out the ends of PVC with a razor blade and a sanding block. Creating a smooth edge takes a little practice. Shave off the inside lip so that there are no nicks or bumps. Sanding down the ends of each handle takes time and patience, but it’s well worth it for a smooth finish.
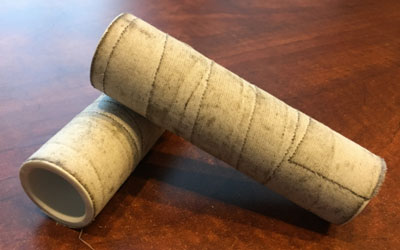
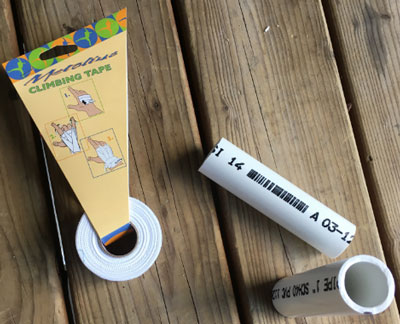
Once your handles are cut and smoothed, wrap them in climbing tape to give them a grip texture that won’t slip. Climbing tape has a similar feel to hockey tape but holds up better. The tacky adhesive won’t bleed through over time and it won’t get on your hands. You can also pick up a roll when buying your rope at the outdoor store.
The other option for handles is to buy weight machine handles with a nylon strap. You can find these in many fitness equipment stores or online.
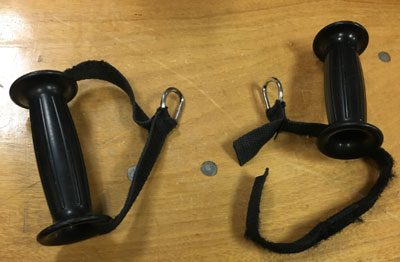
These handles are more expensive than PVC, but they are a commercially produced product designed for physical training. They are a good fit for most size hands, have smooth edges and provide a sure-grip texture. Most of them will come with a nylon loop attached. You can feed your handle rope through the D-ring on the loop, but I just cut it off to save bulk and weight. The D-rings can also get in the way of your arm or elbow during pushing moves.
So, that is my DIY prusik trainer. In a future post, I’ll share some of my favorite exercises along with some fun accessories you can add to the trainer. Feel free to drop any comments or questions down below.
****
Matt Schifferle, PCC Team Leader a.k.a. The Fit Rebel made a switch to calisthenics training 5 years ago in an effort to rehab his weight lifting injuries. Since then he’s been on a personal quest to discover and teach the immense benefits of advanced body weight training. You can find some of his unique bodyweight training methods at RedDeltaProject.com and on his YouTube channel: RedDeltaProject.