• Skip to main content
  • Skip to primary sidebar
  • Home
  • Contributors
  • Resources
    • Q&A with Paul “Coach” Wade
  • Workshops
  • Products
  • Forums
  • Articles
  • Blogs
    • RKC Blog
    • Strong Medicine Blog
  • Archives

PCC Blog

Progressive Calisthenics - The Official Blog for the PCC Community

Archives for November 2017

How to Build Your Own Suspension Trainer

November 28, 2017 By Matt Schifferle 8 Comments

Matt Schifferle DIY Suspension Trainer

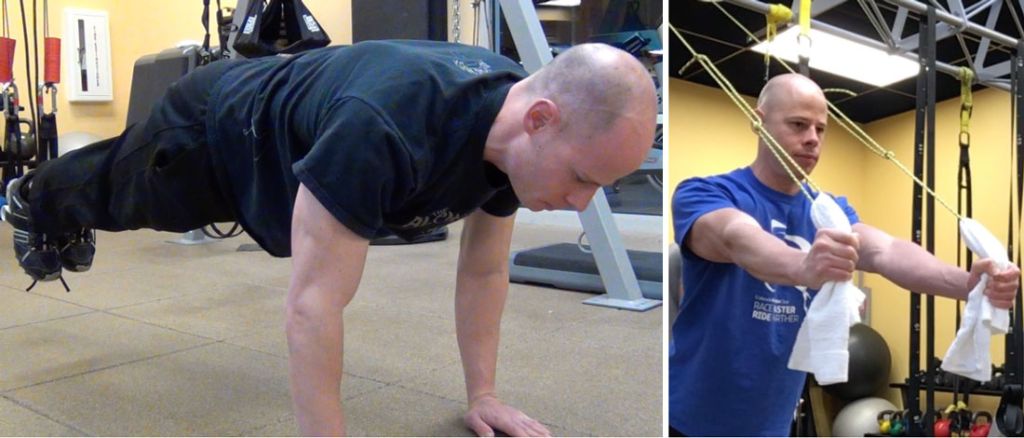
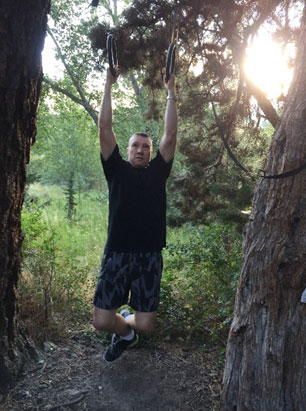
Suspension trainers are the multi-tool of the calisthenics world. You can do hundreds of exercises with them for almost any goal imaginable. They are ideal for mimicking classic weight machine exercises like chest flys, triceps extensions, and core work. Suspension trainers give you hundreds of exercises that can enhance and supplement your training. Suspending your feet, like in the image on the left, can make planks much more challenging. You can also simulate weight machine exercises, like the triceps extension on the right. A suspension trainer is the closest thing you can get to a truly portable gym. They really come in handy when you need to do pull-ups, rows, and dips while traveling.

Almost a decade ago, I purchased some of the easiest suspension trainers to come on the market. But, I quickly became obsessed with creating my own customized designs. I don’t even want to think about the time and money I’ve spent trying to develop a suspension trainer I was happy with. Every version I created had flaws and drawbacks, so I would scrap the design and start all over again. I quickly became obsessively picky with my designs and drew up a list of qualities I wanted. These included:

  • Dual anchor points so the straps can be set up at any width to accommodate your unique build and what’s best for each exercise.
  • Full vertical handle adjustment so the handles can go from an inch above the floor to an overhead reach.
  • Small and lightweight, so it’s ultra-portable.
  • Super easy to set up and take down within a minute.
  • Strong, safe and durable enough for weighted dips and pull ups.
  • Ergonomic without any rough edges or elements that impede movement.
  • Universal anchoring so you can hang it from points above that are within and beyond your reach.
  • Quick and easy infinite handle height adjustment so you can place the handles at any height.
  • Can easily accommodate a variety of accessories.
  • Can be made from inexpensive and readily available materials.

I lost a lot of sleep trying to figure out how to make all of these requirements work within one design but I finally got it right with what I call the prusik trainer.

Matt Schifferle DIY Suspension Trainer

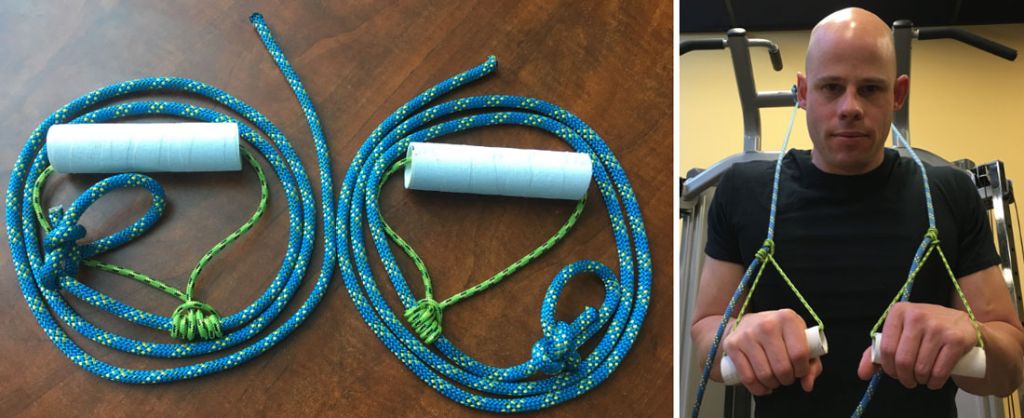
The prusik trainer uses rope instead of nylon straps like most other suspension trainers. Rope is the ultimate smart device. It’s reliable, inexpensive and readily available. It allows you to easily customize every characteristic of the trainer to your specific needs, because rope gets its functionality from knots. Nylon suspension straps use metal hardware and stitching which work, but they add bulk, weight and cost. Hardware and stitching also compromise the versatility of the suspension trainer. Once you stitch a loop into a strap, you can’t make that loop bigger or smaller later. Knots give you all of the functional qualities you need without the weight, bulk, cost and lack of versatility. Metal hardware can also wear out nylon straps over time. Knots have much more longevity.

Materials You’ll Need:

  • Two lengths of 8mm climbing rope 9-12 feet long
  • Two lengths of 4mm climbing rope 3.5 feet long
  • Handle material from either PVC or a weight machine handle
  • Small razor blade and light grit sand paper if using PVC handles
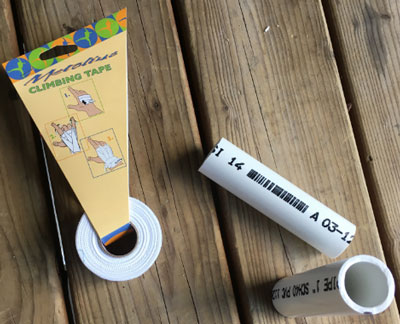
  • Climbing tape

I buy my rope from outdoor supply stores like REI, where they can cut it to the length I need. If possible, have a professional cut your rope there at the shop. Most shops cut the rope with a heated tool that melts the ends and prevents fraying.

Knots You’ll Need to Know

  • Bowline knot
  • Fisherman’s knot
  • Prusik knot

Matt Schifferle DIY Suspension Trainer Knots

These knots are cinch knots, so the more weight you place on them, the tighter they hold. They are not too complicated, but I do recommend practicing how to tie them correctly before building your first suspension trainer. You can find videos and instructions on how to tie these knots at animatedknots.com.

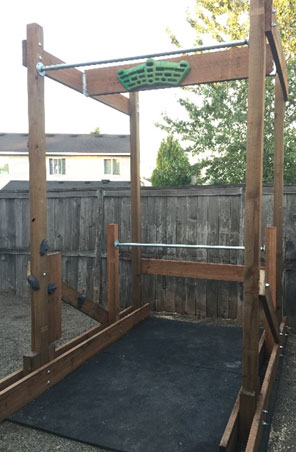
How to Build a Prusik Trainer

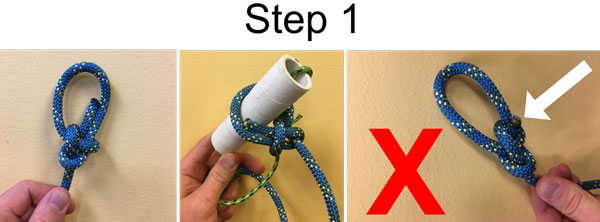
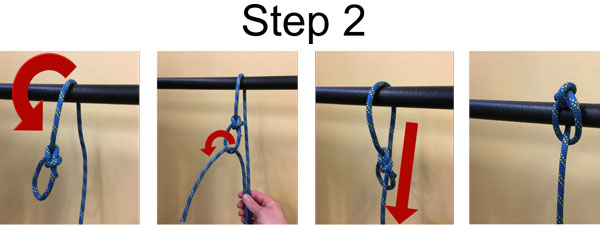
Once you understand how to tie the knots, building a prusik trainer is quick and easy. First, take your 8mm anchor rope and tie a bowline knot into one end to create a two inch diameter loop. This loop will serve as the anchor point you will throw over an overhead bar and feed the handle through.

Matt Schifferle DIY Suspension Trainer Step1
Tie a bowline knot into the end of your 8mm rope ensuring the loop is large enough to fit your handle through. This will allow you to set up and take down your trainer without having to remove the handle. Be sure to leave some extra rope at each end of the knot to reduce the risk of it coming undone.
Matt Schifferle DIY Suspension Trainer Step 2
Throw the bowline knot over a sturdy overhead support that can easily support your weight. Thread the other end through the loop and pull it down to lock the rope around the support.

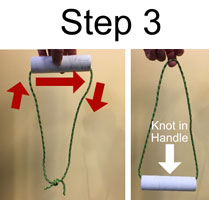
Next, take the 4mm handle rope and feed it through your handle and connect the two ends with a fisherman’s knot.

Matt Schifferle DIY Suspension Trainer Step 3
Run the 4mm rope through the handle you’ve selected and tie the ends together with a fisherman’s knot. Rotate the rope so the knot is inside the handle.

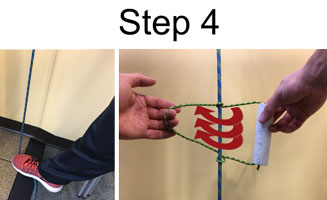
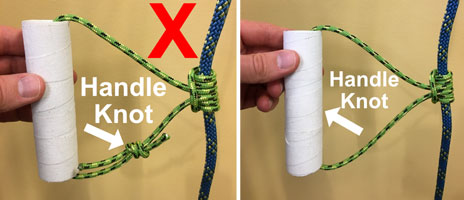
Next, tie the handle rope to your anchor rope using a prussic knot with 3-4 loops. I find it’s easier to tie the prussic knot around the anchor rope when it is hanging with some tension pulling down on it. You can stand on the end of the rope or ask someone else to gently pull down on the rope it to keep it tight.

Matt Schifferle DIY Suspension Trainer Step 4
Place some tension on the hanging 8mm rope. Wrap the handle around the 8mm rope 3-4 times. Do this by feeding the handle through the loop on the other side of the handle.

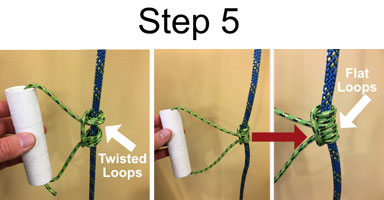
Finally, smooth out the overlapping handle rope so it hugs the 8mm rope. Be sure your prusik knot loops are flat to securely grip the 8mm rope.

Matt Schifferle DIY Suspension Trainer Step 5
Move the two ends of the prusik knot together and smooth out any overlapping loops so they all lay flat and hug the anchor rope securely.

Be sure the fisherman’s knot remains inside the handle rather than outside it. One reason is the knot won’t rub against your arm while doing push-ups and dips. The other is to prevent the knot from moving to the prussic knot and jamming it. Jamming will compromise the safety of the prusik knot.

Matt Schifferle DIY Suspension Trainer Handle Knot Diagram

What Kind of Handle Should You Use?

You have two options when making the handles for your suspension trainer: PVC pipe or handles from a commercial weight machine. I’ve used both and each option has its pros and cons.

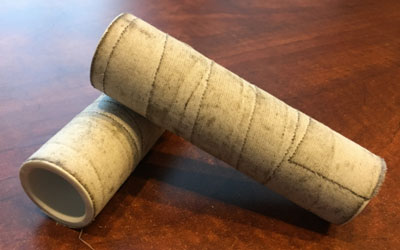
Like rope, the advantage of using PVC is that you can custom build your handle in any length and diameter. People with larger hands may prefer a beefy handle about 1-1.5 inches in diameter and 5.5-6 inches long. Smaller hands tend to work best with a 3/4 -1-inch diameter pipe that’s about 5 inches long. PVC is also inexpensive and available in most hardware stores.

Matt Schifferle DIY Suspension Taped PVC Handles
PVC handles are inexpensive and highly customizable, but they do take a little more work to produce a finished handle that works properly.

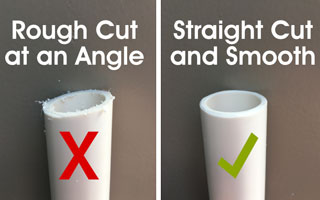
The disadvantages of PVC are that it is a bit tricky to cut with smooth edges that won’t wear into the handle rope. If you use PVC, you must make sure each cut is at a 90-degree angle to avoid angled ends that can make rotating the handle feel uneven. More importantly, you’ll need to smooth out the inside and outside edges of the handles to minimize wear on your rope. I cannot stress enough how important it is to make sure the rotation of your handle is as smooth as butter under load. If not, you’ll risk wearing out your rope which can lead to it fraying and failing under load.

I’ve been able to smooth out the ends of PVC with a razor blade and a sanding block. Creating a smooth edge takes a little practice. Shave off the inside lip so that there are no nicks or bumps. Sanding down the ends of each handle takes time and patience, but it’s well worth it for a smooth finish.

Matt Schifferle DIY Suspension Trainer Handle Cuts

Once your handles are cut and smoothed, wrap them in climbing tape to give them a grip texture that won’t slip. Climbing tape has a similar feel to hockey tape but holds up better. The tacky adhesive won’t bleed through over time and it won’t get on your hands. You can also pick up a roll when buying your rope at the outdoor store.

Matt Schifferle DIY Suspension Trainer Tape and Handles
Climbing tape is a useful way to add some grip to the smooth texture of PVC. It’s also more durable and doesn’t leave a tacky residue like hockey or duct tape.

The other option for handles is to buy weight machine handles with a nylon strap. You can find these in many fitness equipment stores or online.

Matt Schifferle DIY Suspension Weight Machine Handles
Commercial grade weight machine handles are perfect for building your own suspension trainer. Just cut off the nylon strap and you’re good to go!

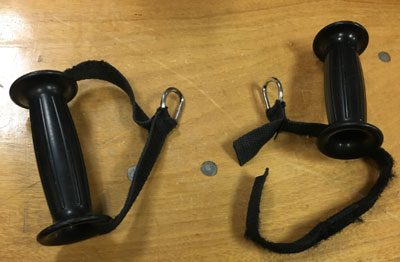
These handles are more expensive than PVC, but they are a commercially produced product designed for physical training. They are a good fit for most size hands, have smooth edges and provide a sure-grip texture. Most of them will come with a nylon loop attached. You can feed your handle rope through the D-ring on the loop, but I just cut it off to save bulk and weight. The D-rings can also get in the way of your arm or elbow during pushing moves.

So, that is my DIY prusik trainer. In a future post, I’ll share some of my favorite exercises along with some fun accessories you can add to the trainer. Feel free to drop any comments or questions down below.


****

Matt Schifferle, PCC Team Leader a.k.a. The Fit Rebel made a switch to calisthenics training 5 years ago in an effort to rehab his weight lifting injuries. Since then he’s been on a personal quest to discover and teach the immense benefits of advanced body weight training. You can find some of his unique bodyweight training methods at RedDeltaProject.com and on his YouTube channel: RedDeltaProject.


Filed Under: Tutorial Tagged With: calisthenics, DIY, DIY suspension trainer, Matt Schifferle, PCC team leader, suspension trainer, suspension training, The Fit Rebel, tutorial

Borrow These Calisthenics Cues From the Recent NYC PCC

November 21, 2017 By Adrienne Harvey 6 Comments

NYC PCC Instructors Team Danny Kavadlo, Adrienne Harvey, Julie Briggs, Al Kavadlo

One of my absolute favorite parts of any teaching situation is the opportunity to troubleshoot and help teach the troubleshooting process. This not only helps the participants with their own workouts, but teaches them how to help their clients make big changes quickly.

And whenever there’s a new group of people at a PCC, there are new questions, issues, and viewpoints. This was certainly the case at the most recent PCC held at Crunch Gym’s flagship location on 59th Street in Manhattan. As the Kavadlo brothers always say—and they’re totally right about this—on the first day we enter the room as strangers, but leave as friends. The amount of networking, cooperation, and brainstorming among the participants this time was especially high. Can’t wait to see what comes of these new friendships and alliances.

While it’s unrealistic to claim that everyone who attends a PCC workshop is guaranteed to experience a big breakthrough in their training, it seems to happen frequently. People attending a PCC are usually either trainers, instructors or serious enthusiasts, but we all have our blind spots. The combination of the demonstrations, lectures, Q&A, and the partner practice sessions on all three days of the PCC creates a powerful learning environment. Even though I’ve been involved with the PCC since the very first workshop back in 2013, I still learn something new every time. Should also add that since even the most recent time I helped instruct, the curriculum has continued to evolve and improve.

All of that being said, it is extremely rewarding to give someone a game changer cue or idea that almost instantly takes them to the next level. So, in this recap of the NYC PCC workshop I’d like to revisit a couple of my favorite cues that came up at the workshop. To those who might think I’m giving away too much, understand that these ideas really are best absorbed real-time in the context of a PCC workshop.

PCC NYC Ladies Pistols: Adrienne Harvey, Julie Briggs, Erica Dohring, Meghan Daly

“Point at Yourself” and “Pew-pew!”

Something I’ve seen both online and at PCC workshops with people who are so close to performing a perfect pistol squat is a slack looking foot on the leg held in front. Often, these same people will have the idea that they somehow aren’t strong enough to do it. But with one (or both) of the following cues they are often able to generate enough tension to pull off the move with precision.

The first cue is a personal favorite, it’s simply to think of pushing through the heel of the suspended leg while pointing the toe back TOWARDS you. “Point your toe back at your nose.” You’re basically flexing the foot as hard as you can, which causes the quad to contract very strongly, keeping the straight leg straight out in front of your pistol squat. You will want to stretch out the quad a little after this, and some folks (myself included, especially if I’m a little dehydrated) may actually get a little cramp in the quad. Common sentiment, “Oh I didn’t know I needed to contract the quad THAT hard”

Al also reminded us that generating extra tension from the upper body can also really help the pistol squat. Get in touch with your inner 007 and make the “pew-pew” fingers while strongly clasping your hands together. This can make for much more stable pistol squats in terms of tension and balance, and as in the example above, cute photos.

Al and Danny demonstrate the push-up

“I’m gonna hit you in the tummy, ok?” 

By the time someone attends a PCC workshop, they’ve done a LOT of push-ups in preparation for the Century Test. But, changing the angle or the points of contact from a standard pushup in one of the many advanced progressions taught at the PCC can make the exercise feel brand new again. Old habits can sometimes creep back when the focus moves from the familiar standard pushup. The novelty of trying a new progression can cause even the most advanced of us to forget the crucial basics.

Such was the case with a participant I helped at the workshop. He had been repping out fantastic standard push-ups and all the other variations perfectly until this point. While raising one hand high on a platform to try a nearly one-arm uneven push-up, he seemed to forget about his midsection. But, without trunk stability, this advanced push-up would be impossible. I knew he could do it based on previous performances, and after seeing his lower back sagging on the attempt, I said, “Wait! Use your abs, I’m going to hit you in the tummy, ok?”

He said, “OK,” so I gently gave him a couple little chops right in the tummy. The first one let both of us know that he had let his core go slack, and the second one revealed that he’d fixed the situation. His back was suddenly straight again and he was able to successfully complete a rep of this difficult and frankly extreme push-up variation.

No matter what push-up variation we’re discussing, the push-up at its heart is a moving plank. And that of course requires abdominal stability The more advanced the progression, the more extreme the stability requirement.

PCC NYC Participants Muscle-Ups

One Last Thing…

At the workshops I’ve been invited to help teach over the years, I’ve noticed that while we have a ton of fitness professionals attend, we also have many people from other fields. As someone with a computer science background I’m always pleased to see developers, engineers, and other technical professionals show up to a PCC and perform extraordinarily well. The idea that they are setting such a strong example in their lives outside the fitness industry is also excellent for public health. Fitness and the ideas in the PCC and Convict Conditioning really are for everyone.

NYC PCC November 2017 at Crunch Gym 59th Street

While we may all admire and aspire to the most advanced steps, and videos and photos of those feats are typically the ones that go viral, the bread and butter basics of calisthenics are applicable to all human bodies. The early progressions, especially as taught at the PCC and in Convict Conditioning are powerful for any level. And the newly certified PCC Instructors from this most recent NYC PCC at Crunch’s flagship gym are ready to bring these transformative ideas to the world.

****

Adrienne Harvey, Senior PCC Instructor, RKC-II, CK-FMS, has been RKC Certified since 2010, and RKC Level 2 certified since 2011. Kettlebell and bodyweight training have been crucial in Adrienne’s personal quest for fitness. A core member of the PCC team, Adrienne loves sharing her knowledge with small groups and individuals. She has modeled in multiple Dragon Door titles including The Neuro-Grip Challenge, Rings of Power, DVRT, Neuro-Mass, Pushing the Limits, and several others.  For her recipes and workout programs to further support performance, body composition, and of course—FUN, check out her website: http://www.giryagirl.com.

Filed Under: Progressive Calisthenics, Tutorial, Workshop Experiences Tagged With: Adrienne Harvey, calisthenics, Crunch Gym, cues, New York City, NYC PCC, pistol squats, progressive calisthenics, push-ups, top tips, tutorial, workshop experience

My Get Strong Transformation Challenge Story

November 11, 2017 By Grand prize Winner, Brian Stramel 7 Comments

Brian Stramel Before After Get Strong Challenge

“When the student is ready, the teacher will appear.”
-Zen proverb

I bought Get Strong when it first came out at the introductory price, and eagerly read it in a day or two. I was no stranger to calisthenics and it looked like a great program… that I would start as soon as I finished up what I was doing at the time. At the time, I didn’t even consider entering the 16-week challenge.

I was also not paying close enough attention to my nutrition, even though I was keeping up with my workouts. Mostly owing to my love of craft beer, my weight had crept up to an all-time high. I remember feeling just blah. I didn’t move as well, and my belly was pressing into my shirt–worse yet, it was pressing into my Army (National Guard) uniform. That was it, I decided I needed to fix this! But, was the Get Strong 16 Week Transformation Challenge still going on?

So, I squeeked my entry in at the last minute, and took my Phase 1 Test on June 30th. Checking my log, I beat the test standards on every exercise except for the active hang. My grip gave out right at the 60 second mark on that one.

I got motivated to build an outdoor bodyweight gym, and did that as a 4th of July project.

Onward into Phase 2!

Phase 2 was a wake-up call for me. I had a solid foundation already, so I passed weeks 1-4 as written with no issues. Slow, controlled reps, I even spent extra time on the handstands. But, the Phase 2 test was another story. I failed on handstands, so it was back to weeks 3 and 4. I failed again, so rinse and repeat!

During this time, we also took our family vacation. Since Get Strong just relies on something to step up on and pull on (and the workouts are short) I could keep up with my Phase 2 workouts on vacation without it detracting from family time, even while camping!

Back from vacation, I was able to pass those pesky Phase 2 handstands and move on to Phase 3. Phase 3 was a lot of fun, I enjoyed the split routines and extra volume devoted to the upper and lower body on their respective days. Handstands remained a challenge and while I passed week 3 as written, it was at the raggedy edge of my ability. So, I camped out in week 4 for a few weeks and just passed the Phase 3 test on October 23rd.

I met my goal of getting to Phase 4 by the end of the 16-week challenge timeline. I know the real work is just beginning as I work steadily towards the Phase 4 test.

By focusing on my workouts, dialing in my nutrition, and eliminating most of the empty beer calories, perhaps dabbling with intermittent fasting (thanks for the tip Al!), I have made tremendous progress over these 16 weeks. The stats: I lowered my body fat by 7%–from 16% down to 9% (digital caliper measured). I dropped 23lbs and lost six and a half inches from my belly and over three inches from my waist! More importantly, I look and feel better than I did a decade ago when I returned from a tour in Afghanistan, and I was in great shape then.

The final bonus of this journey is that I witnessed a really cool culture of fitness develop within my family. The kids (8, 8, and 13) call the bodyweight rig the “ninja gym” after American Ninja Warrior and love playing on it. They also all knocked out at least one chin-up after getting inspired by watching me work out. My wife is feeling left out as the only one in the family who can’t do one. That won’t last, however. She’s now passed her phase 1 test and is determined to surpass her chin up goal!

***

Brian Stramel is the Grand Prize Winner of The GET STRONG 16-Week Transformation Challenge

Filed Under: Contest, Motivation and Goals, Progressive Calisthenics Tagged With: Brian Stramel, calisthenics, fat loss, Get Strong, Get Strong Transformation Challenge, Get Strong Transformation Challenge Winner, workouts

Primary Sidebar

Featured Products

previous arrow
GetStrongBookCover
ConvictConditioningBookCover
StreetWorkoutBookCover
ExplosiveCalisthenicsBookCover
StrengthRulesBookCover
next arrow

Categories

Progressive Calisthenics Certification Logo
Click here for more information or to register for the PCC workshop

Get Strong Workouts TriadXP App
Get Strong Workouts App

Recent Posts

  • Top 5 Reasons Why an In-Person Workshop is the Best Way to Supercharge Your Training
  • HYBRID STRENGTH TRAINING IS HERE!
  • My Calisthenics Journey to the PCC
  • The Handstand Press: Complete Control Through the Handstand
  • The Get Strong App is Here!

Dragon Door Publications

Dragon Door Publications

Recent Comments

  • bross dandon on The Case for Curved Handstands
  • Johnny Flewellen Jr. on Strength for Life
  • Dan Earthquake on The Pursuit of the Daily Minimum
  • Johnny Flewellen Jr. on The Pursuit of the Daily Minimum
  • Johnny Flewellen Jr. on Yoga, Calisthenics and the Journey of a Lifetime
FOLLOW US ON TWITTER!

Copyright © 2025

Dragon Door Publications / The author(s) and publisher of this material are not responsible in any manner whatsoever for any injury that may occur through following the instructions or opinions contained in this material. The activities, physical and otherwise, described herein for informational purposes only, may be too strenuous or dangerous for some people, and the reader(s) should consult a physician before engaging in them.