• Skip to main content
  • Skip to primary sidebar
  • Home
  • Contributors
  • Resources
    • Q&A with Paul “Coach” Wade
  • Workshops
  • Products
  • Forums
  • Articles
  • Blogs
    • RKC Blog
    • Strong Medicine Blog
  • Archives

PCC Blog

Progressive Calisthenics - The Official Blog for the PCC Community

Eric Buratty

Six Reasons to Start Your Workouts With Unilateral Calisthenics

December 6, 2016 By Eric Buratty 4 Comments

unilateralcalisthenics1

Quick quiz!

What’s the one thing missing from most fitness programs that translates into extraordinary progress?

  1. Ice Cream
  2. More Posterior Chain Work
  3. Single-Sided Bodyweight Exercises
  4. Chipotle
  5. A Good Workout Partner

While a case could probably be made for any of these choices, the answer that has the greatest return on your time investment is C. Single-Sided Bodyweight Exercises.

Behold, The Domino Effect: One Side Fits All

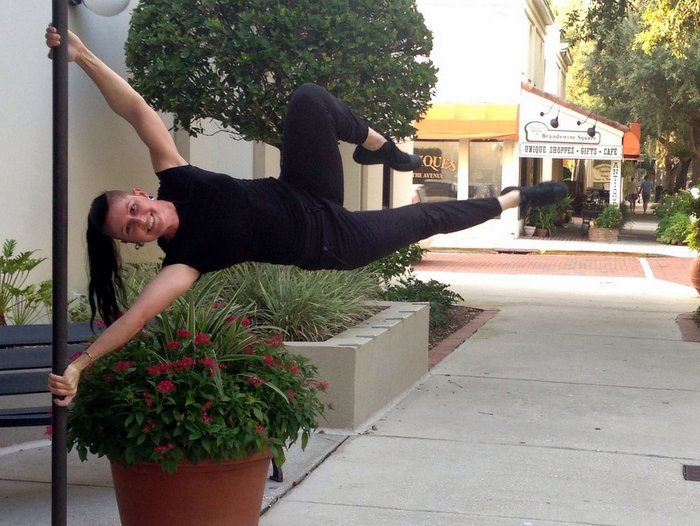
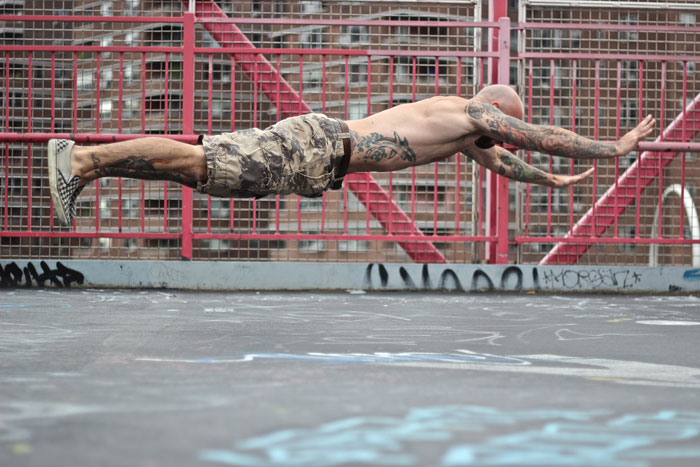
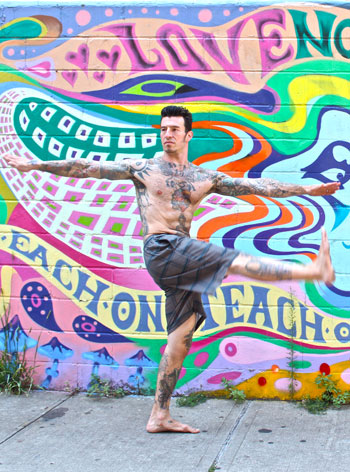
Also known as unilateral movements, focusing on one side at a time with the upper or lower extremities has been shown to play a key role in promoting equilibrium, transforming mental and physical ideals into reality, overcoming current health setbacks, and preventing future issues from happening. These positive changes are especially noticeable when you consider the value of starting your workout on a high note with such moves—which is arguably the most important habit you can develop to increase workout productivity.

If there is such a promising range of benefits from their application, why don’t we see more single-sided exercises being performed by others on a regular basis?

Well, there are three understandable reasons why some fitness gurus still don’t prescribe one-sided exercises in their training programs. The total number of repetitions take more overall time to perform (which can lead to impatience), they don’t allow the practitioner to add a sexy amount of external load (which can influence ego), and they’re significantly more challenging on both the mind and body to perform (which can make poor form inevitable). This puts many well-informed coaches in a tough position when it comes to attracting new business and ultimately selling their training philosophy.

The good news is, no matter where you’re at right now in your fitness journey, you can have the best of both worlds—catering to both your wants AND your needs—by including unilateral calisthenics movements in the first half of every workout. The following list vivifies the healthy domino effect of this “one side fits all” training strategy—meaning that, once one of these motives is set in place, you will set off a chain reaction for the rest. Hopefully after going through this list, you too will find new motivation or be able to put previous advice into healthier perspective by balancing movement from both sides of the body more effectively.

  1. Train and Recover Smarter

The cool thing about training one side of the body at a time is that it encourages you to do more work without exceeding your capacity to recover. More specifically, once you become aware of which side is less strong, you have a few options for splitting up the total volume (i.e. reps) more evenly. For example, you could begin working your non-dominant side while you are more energetic, and finish on your stronger side to elicit a healthier adaptation response. You might also find alternating between sides throughout a given “set” to be beneficial—particularly when performed with a “flow” mindset. Finally, you could split up the work into halves, thirds or quarters depending on your target number of reps. As long as you sustain a quality over quantity mindset, you can really use one-sided movements to your advantage.
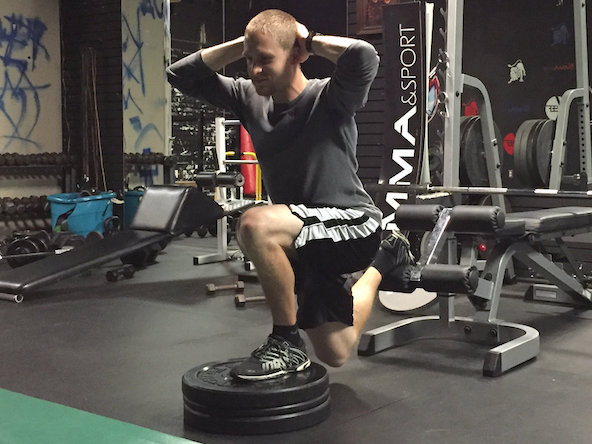
Eric Buratty raised lunge

  1. Improve Core Strength

Having visible abs is considered the holy grail in the field of “bro science.” However, don’t neglect your glutes, back muscles and psoas muscle group when training your entire core. Fortunately, unilateral calisthenics moves take all the guesswork out of the equation, allowing you to turn on these key muscle areas when they matter most: when you’re OUTSIDE of the gym and NOT in a workout state of mind. The best set of cues I’ve used as an instructor to help others work their core more effectively is to turn on their glutes (an internal cue) and then pretend like they’re about to get punched in the stomach (an external cue)—before doing anything. Being able to do this without thinking about it (i.e. create a habit out of applying core strength) will ultimately contribute to further longevity.

  1. Cultivate Mobility, Joint Health & Overall Movement Quality

Mobility is defined as the ability to move a joint or a series of joints actively through a range of motion that encourages a healthy interaction between muscles, joints and the central nervous system. So you are not just passively increasing the range-of-motion for muscles that lack full flexibility, but you are using exercise as a tool to move your joints actively while simultaneously improving strength. If these words are a bit too complex to digest, just take any lunge variation—a unilateral lower body move—as a simple example. Holding the bottom of that lunge position will obviously increase hip flexibility, but when performed dynamically (i.e. for reps), you will also give the hips an opportunity to make the position “stick” for next time you practice the move, allowing strength & stability to settle in better. Ideally, you’ll want to include both isometric and dynamic style reps as part of any sustainable training program—always ending your practice on a high note for medicinal-like effects. By using unilateral calisthenics moves as mobility insurance, you’ll unlock new gains in movement quality and correct left & right muscle asymmetries because you’ll truly be moving your joints in every way, every day. Just remember this equation the next time your progress seems to have stalled: Strength + Flexibility = Mobility.
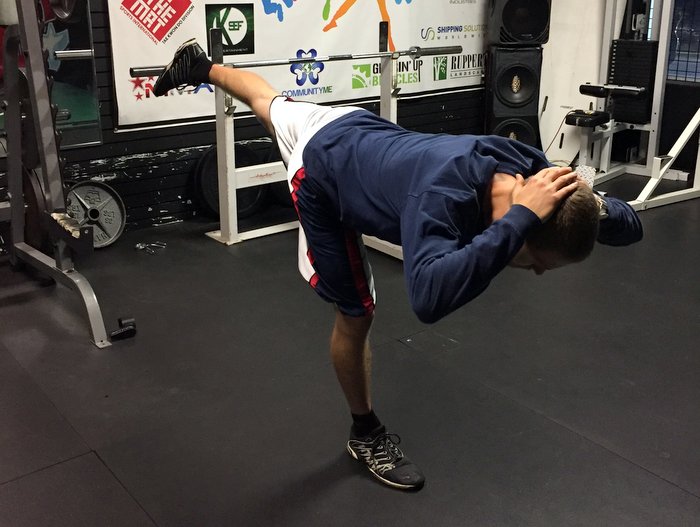
Eric Buratty unilateral exercises

  1. Activate Your Nervous System

How many high-threshold muscular units does it take to stimulate muscle growth? Ideally, you’ll want to fire up as many as possible. In order to make this happen, though, you must first activate the neural pathways to your fast-twitch muscle fibers. Two-sided explosive strength and power training (with and/or without load) is an extremely effective way to do this. But what if you’re not ready for that style of training yet? Well, you have a few options. Your first option is to do absolutely nothing about it, and continue being weak and lame. Your second option is to start familiarizing your body with exercise through cardiovascular and weighted machines at a commercial gym. Your third and final option is to explore progressions and regressions for unilateral calisthenics moves. I don’t know about you, but that last option sounds the most fun and rewarding to me.

Just imagine for a moment what it would be like as a gymnast—being able to turn on an extremely high percentage of the muscles in your body. At that level of body tension, your muscles really have no choice but to display superhuman strength and build lean body mass. Back to reality, you can create similar opportunities for physiological gains by working one arm or one leg at a time because the nervous system has no choice but to send electrical pulses from head to toe to close any energy leaks. In this context, energy leaks are the same as leverage—which dictates how much effort you’ll be able to apply before form starts to break down. For beginners and taller/long-limbed individuals, unilateral calisthenics training will offer an even more distinguished neural activation effect—due to their experience level and anatomy, respectively.
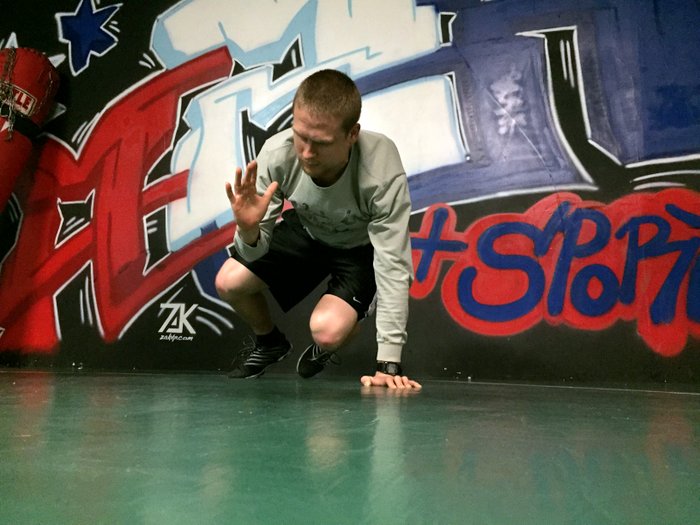
Eric Buratty crawling exercise

  1. Increase Energy Expenditure

It’s kind of hard not to burn a ton of calories while being more athletic. More specifically, while training for strength, speed or power on one side at a time, the demand for hormonal adaptations is quite high. This heightened hormonal response leads to some favorable changes in energy expenditure and body composition that are commonly associated with active people in general—such as elevated insulin sensitivity, lower cortisol, optimized growth hormone and thyroid secretion, along with a healthy balance between testosterone and estrogen output. However, what separates unilateral resistance training from most other forms of exercise is the additional amount of time, space and force that’s required to execute such moves. This basically means that more range of motion is covered for every rep—which significantly reflects your mobility.

  1. Look Cool, Have More Fun!

At the end of the day, being able to have fun while working out is what it’s all about. ‘Cause if you’re not having fun, you won’t do it. Period. While everyone’s definition of fun may be slightly different, I think we can all agree that looking cool can play a healthy role in having fun. So, even if you currently suck at unilateral training or it’s not your favorite training strategy, keep in mind that we all need to start somewhere. Just because these benefits exist does not mean you have to totally ditch your bilateral movements, either. Besides, there’s a strong chance that you can already do something pretty cool that even Olympic-medal athletes or your favorite celebrity cannot do—whether fitness related or not. Start facing your weaknesses today before they turn into tomorrow’s health problems.
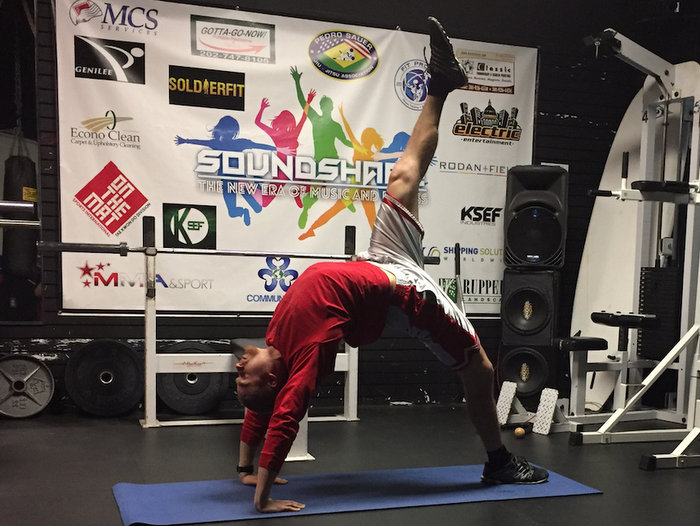
Eric Buratty One leg bridge

Summary of Unilateral Training Recommendations – To Infinity And Beyond!

Now that you have the motives behind the Who, What, Where, When and Why of unilateral calisthenics training, let’s recap with the three most practical ways for How you can get started today.

  1. Perform unilateral calisthenics along with your 10-15 minute full-body warm-up.
  2. Perform one 45-minute workout per week exclusively dedicated to unilateral calisthenics movements.
  3. Perform unilateral calisthenics movements for preventative maintenance–once or twice a month for tune-up purposes or year-round for complimenting your other bilateral workout programs and rebuilding your body all together.

Do you have a favorite unilateral calisthenics move? How about a unique exercise modification to the various progressions and regressions commonly practiced? Drop any questions, comments or wisdom you’d like to share below, and I’ll be sure to address them soon. Thanks for reading!

***

Eric “E-Rock” Buratty is the health & fitness coordinator at MMA & Sport, located in Damascus, MD. When he’s not fine-tuning his own awesome core strength, he teaches fitness enthusiasts of all levels how to achieve their goals. Eric offers both individualized sessions and group classes, creates evidence-based health content for websites and blogs and offers expert tips on how to prevent and manage diet—for lifestyle-related health issues. To learn more about Eric, feel free to connect with him on his Facebook page.
Filed Under: Progressive Calisthenics Tagged With: athletic training, calisthenics, calisthenics training, Eric Buratty, joint health, MMA training, one side training, progressive calisthenics, recovery core strength, unilateral calisthenics

One Rep Away To Undo Laziness

January 26, 2016 By Eric Buratty 18 Comments

LeadPhotoOneRepBuratty

Laziness is a cornerstone of the many excuses people give for not staying active.

In an effort to reduce laziness, we commonly experiment with several workout strategies that offer us an exciting challenge and minimize boredom.

When we think about it, though, many proven strength training programs are boring cookie-cutter routines. These same workout templates have been around forever—as recycled/revamped set-rep schemes that are also available online for free.

If they work so damn well, what’s the issue?

Well, for starters, they’re hard to stick to.

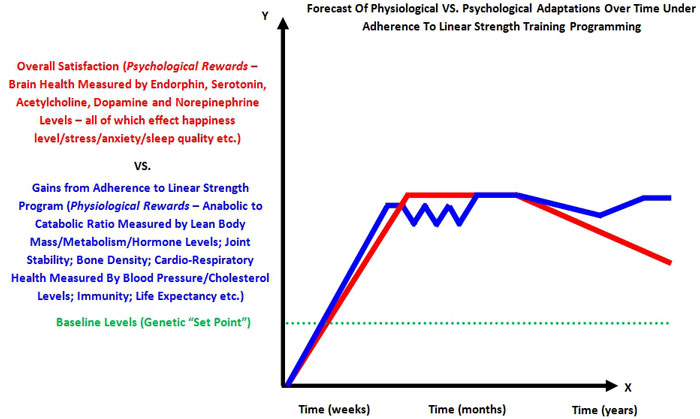
This is because the physiological benefits from a strength training program over the short run aren’t always consistent with our psychological experience over the long run.

In other words, we all enjoy getting stronger by following those cookie-cutter programs until their linear progressions stop working.

Then we no longer experience the same level of happiness from our workouts.

Then anxiety, frustration and boredom settle in.

Then we lose interest and get lazy.

Then we find ourselves hopping around programs like a bunny that lost its energizer batteries.

EricBurattyChart

As we can see, it’s a hellacious cycle of unrewarding time and effort invested. This is what happens when our original goals become more important than our journey.

So . . .

HOW do we adapt our goal-oriented mindset to fit in with our process-oriented reality?

HOW do we embrace the method to our madness without letting our strength program become just another boring cookie-cutter routine?

HOW do we find balance between the physiological and psychological aspects of exercise without losing sight of what we originally set out to accomplish?

. . . We focus on performance.

Even on the most sluggish of days, the way we perform our reps still dictates the type of gains (or lack of gains) we receive. So, once we become more aware of our stronger and weaker days (over the course of weeks, months and years of experience), the key to boosting performance is then through executing variety in repetition.

Let’s go over how to apply some popular rep styles that further maximize performance and minimize laziness.

Please note that, to get the point across in the most objective manner possible, we’ll assume a total body workout emphasis with demonstrations of each rep style coming from the handstand push-up chain of progressions (i.e. pike push up – to target upper body) and the shrimp squat chain of progressions (i.e. foot elevated/Bulgarian split squat – to target the lower body).

ExerciseCollageKavadlos

FASTER “SNAPPY” Reps

This rep style is characterized by a maximum application of force on the acceleration phase of a range-of-motion. Imagine trying to launch off like a rocket or catapult when transitioning from the eccentric/lowering phase to the concentric/lifting phase–especially when our bodyweight resistance makes a movement (initially) feel lighter (until fatigue sets in, of course).

This rep style can be further divided into two subcategories: explosive/ballistic and plyometric reps. The key difference between these two subcategories is that explosive/ballistic reps are performed without “catching any air,” while plyometric reps involve a short but powerful time period off the ground.  From a physics perspective, explosive/ballistic reps demonstrate why force equals mass times acceleration (i.e. F = ma), whereas plyometric reps take things a step further to show why power equals force times velocity (i.e. P = fv).

FASTER Upper Body Demo 1 (explosive-ballistic)

FASTER Upper Body Demo 2 (plyometric)

FASTER Lower Body Demo 1 (explosive-ballistic)

FASTER Lower Body Demo 2 (plyometric)

Pros: Improves speed, explosiveness and fast-twitch motor recruitment—which means greater carryover to athletic skills that require considerable force and power production; Permits the use of momentum to support a smoother eccentric to concentric transition—which allows for a higher number of reps to be performed cleanly.

Cons: Decreases total body awareness—which can lead to injury when an individual hasn’t fully mastered a movement or progressed it appropriately; Does not simulate the amount of speed and muscle tension for setting PRs.

When to Use: Ideal for all fitness levels training in the 6-12 rep range (i.e. working with the lower level progressions of “the big six” from Convict Conditioning) – wherein the emphasis is on speed & power output first, muscle-building & size second, and strength third.

Beyond Calisthenics: For those who wish to supplement their calisthenics training with weighted movements, this rep tempo would be most appropriate for exercises like kettlebell swings and snatches, one-arm rows with dumbbells/kettlebells/barbells, as well as barbell push-presses and hang power snatches.

SLOWER “Grinding” Reps

This rep style is characterized by a deliberate application of constant muscle tension throughout the entire range-of-motion.  Imagine trying to flex the target muscles for an exercise as hard as possible—as if we’re doing a photo shoot for a fitness magazine cover—while executing a single rep for an exercise.

SLOWER Upper Body Demo

SLOWER Lower Body Demo

Pros: Increases total body awareness—which has implications for injury prevention—even if the rest of mainstream health & fitness media deems a particular exercise as being “unsafe;” Simulates the amount of speed and muscle tension required for setting PRs.

Cons: Decreases speed, explosiveness and fast-twitch motor recruitment—which means less carryover to athletic skills that require considerable force and power production; Does not permit the use of momentum to support a smoother eccentric to concentric transition—which will not allow a higher number of reps to be performed cleanly.

When to Use: Ideal for intermediate and advanced-level individuals training in the 1-5 rep range (i.e. working with the higher level progressions of “the big six” from Convict Conditioning) – wherein the emphasis is mostly on strength and precision in power output.

Beyond Calisthenics: For those who wish to supplement their calisthenics training with weighted movements, this rep tempo would be most appropriate for exercises like Turkish get-ups with kettlebells/dumbbells, heavy deadlifts and front squats with a barbell, goblet style shrimp squats (AKA airborne lunges) or Cossack squats (AKA side-to-side squats) with a kettlebell/dumbbell.

MODERATE “Recovery” Reps

This rep style is characterized by a fluid contraction/stretching of the muscles that may also target strength/stability at a specific point throughout a range-of-motion. Imagine the body as an oscillating wave of potential energy—such as a slinky going down a flight of stairs, a child riding a swing back and forth or Wile E. Coyote jumping off the Burj Khalifa building in Dubai with a bungee cord in an attempt to catch The Road Runner.

From a fitness perspective, we’ll have to fire a large number of rapid muscle contractions every second in order for our joints, tendons and muscles to remain stable under oscillating conditions. The more of these contractions we initiate per second while remaining in a stable equilibrium position, the greater our capacity is to recruit the muscles we need to stimulate contraction/growth or stretching/recovery.

There are a few different ways this can be applied:

Isometric Reps

Upper Body Demo

Lower Body Demo

Dead Stop Reps

Upper Body Demo

Lower Body Demo

Pulsed Reps

Upper Body Demo

Lower Body Demo

Normal Reps

Upper Body Demo

Lower Body Demo

Pros: Reinforces a graceful mastering of the positions and transitions throughout a range-of-motion—which can be helpful in overcoming sticking points and plateaus; Encourages healthy circulation and blood flow to muscles, as well as tendons and joints; Ultimately helps make PRs look AND feel easy; Minimizes the amount of muscle fatigue from eccentric stress—which allows the individual to perform more quality work

Cons: Not as energy-expensive as slow or fast rep styles—so they may not be the best starting point for individuals who are simply interested in taking off a few pounds

When to Use: Ideal for anyone interested in progressing high-tension movements like the family of backbends, forward bends, handstands/inversions, front/back/side levers and mid-section holds, as well as one arm or one leg variations for any of these movements—all while facilitating an individual’s original strength training goals

Beyond Calisthenics: For those who wish to supplement their calisthenics training with weighted movements, this rep tempo would be most appropriate for exercises like paused snatches or clean & jerks (i.e. Olympic lifts from floor or blocks), squats with a barbell on the front side or back side, kettlebell or barbell thrusters, cable bicep curls and close grip barbell bench press, as well as farmer’s walks with heavy weight(s) carried above the head, at the “rack position” or beside the torso.

Wrap-Up

At the end of the day, understand that going faster isn’t always better.

And neither is going slower.

We must get stronger and perform better in all rep ranges with their appropriate tempo to balance the physiological and psychological aspects of any workout program.

Since performance is both mental and physical, expect fluctuations to occur depending on sleep and nutrition quality. Learn to respect body along the way to keep those fluctuations to a minimum.

When energy levels are lower, take the intensity down a few notches, and just have some fun without any formal workout structure.

When energy levels are higher, kick the intensity up a few notches, and add in some structured work sets to earn that breakfast, that holiday meal or that dinner out with family & friends over the weekend.

When in doubt, do a little of both!

After all, a wise person once said, “for every action, there’s an equal and opposite amount of laziness we kill.” 😉

Have any favorite rep styles? Or how about a movement flow that combines one or more rep styles?

Share them in the comments below!

****

Eric Buratty is the health & fitness coordinator at MMA & Sport in the suburbs of Montgomery County. When he’s not fine-tuning his superhero core powers, he helps self-starters move their bodies with more integrity in both one-on-one and group workout settings, writes actionable health content and seeks out further education to help others prevent health problems instead of cure them.

Get to know Eric better and stay updated on his content by connecting with him on Facebook.

Filed Under: Progressive Calisthenics, Tutorial Tagged With: bodyweight training, Eric Buratty, rep speed, reps, tutorial, video, workout strategies

Cut to the Core

September 1, 2015 By Eric Buratty 14 Comments

Al Kavadlo Front Lever

It’s tempting to use the terms “core” and “abdominal” muscles interchangeably.

After all, having visible abs and sub-seven percent body fat gives us an automatic pass to forget training our core, right?

Not exactly.

You see, the truth is that the abdominal muscles are just a part of our core.

Why?

Because BROscience. And because I said so.

All joking aside, our entire core includes our upper back muscles, our lower back muscles, our psoas muscle and then our abdominal muscles.

That last area becomes especially important for earning our “beach body” card.

However, without a strong core, our “beach body” muscles are just there for show.

The good news is that Progressive Calisthenics happens to be the perfect way to wake these muscles up—even when they’re hidden beneath layers of fat.

What about abs being made in the kitchen (not the gym)? Yeah, yeah . . . we’ve all heard that one before.

We could just as easily counter that question with: What foods STRENGTHEN the core musculature?

So, instead of wasting time on semantics and dogmatic fitness debates, let’s cut to the core with more important matters.

Like WHEN and HOW to train the core for best results.

Who’s with me?

Al Kavadlo Beach Back Lever

WHEN to Train the Core

Ideally, we’ll train the core first thing during our workouts whenever we are:

  1. Making a comeback from a sports injury
  2. Combating some form of lagging or acute inflammation around a joint/tendon so that it doesn’t turn into chronic inflammation (i.e., performing an active recovery workout in place of a regular workout)
  3. Not feeling a solid muscle contraction where we need to on a given movement—which could lead to acute and/or chronic inflammation

Whenever we are feeling closer to 100 percent and beyond, we’ll train our core after emphasizing our lower body muscles.
This is because, when we target our largest muscles first, we elicit a favorable hormonal response that translates into greater energy expenditure from our core musculature.

What if we’re emphasizing our upper body muscles during our main workout?

Well, it’s still recommended to superset some lower body plyometrics and core moves during our warm-up to help get us get in the zone.

We could also consider throwing in some core moves as bonus work if we accomplish our desired training effect earlier than expected for a given workout day.

Just ‘cause, you know, that playing around stuff is good for us every so often.

HOW to Activate the Core

Now that we’re all on the same page with when we should train our core, I’m sure you’re dying to know how you can start applying this info . . . like yesterday.

Kavadlo Brothers Two Flags

In this capacity, here are some drills to help you feel what it’s like to activate the entire core musculature.
These are ordered from least to most challenging and should be practiced as such.

  1. Hollow Rock (Floor)
  2. Hollow/Reverse Hollow Sideways Roll (Floor)
  3. Reverse Hollow (Superman) Rock (Floor)
  4. Hollow/Reverse Hollow Swing (Start/Stop – Hanging)
  5. Sideways Hollow Swing (Start/Stop – Hanging)

Here’s what these moves look like in action in case you’re unfamiliar with the naming system I’ve used for them.

While it’s not necessary to structure your practice too much with these moves, it is recommended to just pick one or two at a time, and really focus on accentuating total body tension with them.

Implication or Application – You Decide!

As you’ll see and feel over time, a stronger core allows you to progress toward more advanced skills without fear of injury.

In particular, the similarities between the positions and transitions of these moves and those of front levers, kipping muscle-ups, and human (press) flags should be fairly noticeable.

Defying gravity rules!

Adrienne progression towards the human flag
Senior PCC, Adrienne Harvey working towards the full press flag with Step #6 Split Press Flag from Convict Conditioning Vol. 2

Now that you have further knowledge and tools to help you cut to the core, hopefully you will either imply other intelligent questions from this info, or apply greater integrity when using these muscles, moving forward.

In other words, knowledge is power, and the choice is yours in how you use it!

****

Eric Buratty brings six years of experience to the DC Metro Area as a Certified Personal Trainer, Progressive Calisthenics Instructor, Nutrition Consultant and Sports Injury Specialist. For more information about Eric check out his website, EricBurattyFitness.com.

Filed Under: Progressive Calisthenics, Tutorial Tagged With: abdominal training, abs, body control, calisthenics, core, core strength, core training, core training drills, Eric Buratty

3 Steps to Getting “In the Zone” for EVERY Workout

February 17, 2015 By Eric Buratty 36 Comments

Al Kavadlo superman push-up

Want to know what it feels like to explode?

No, I’m not referring to those whack pre-workout supplements.

I’m referring to what it feels like to get “in the zone,” which naturally occurs during your superhero-like workouts. These are the moments when you look and feel deceptively stronger to the naked eye. These are the moments that ultimately allow you to push your limits.

Since we’ve all experienced those days where we feel like crap and less motivated to train, it’s time to put a cap on that mental and physical stress once and for all. Here are three steps for a stronger workout and improved recovery rate, EVERY time.

Step I: First Things First – Eliminate Distractions!

  1. Turn off your computers, mobile devices, and yes, even “high energy” music.

Responding to emails, text messages and social media notifications during the time you’ve set aside for working out is a good way to kill your training progress all together—due to their emotionally distracting capabilities. Playing “high energy” music may also upset the balance you want to achieve between feeling overly excited and feeling too calm.

  1. Turn away from all timers, stopwatches and clocks.

Reaching the highest level of performance possible during a given workout requires an attentive mind and body. Therefore, it would be silly to try and gauge your performance in the moment right in front of you if you’re too focused on beating the clock. While in a utopian-like society we would make linear progress, the mind and body simply do not work like that. So, in reality, we must respect our body’s dynamic progress capabilities without training on the nerve from elapsed time.

  1. Ditch the mirrors.

Mirrors create the illusion of space—which can sometimes be helpful in the short run for teaching body awareness. However, in the long run, too much reliance on mirrors can slow down your reaction time, affect your force and power development and interfere with your body’s natural balance and stability. These are the EXACT qualities you need to be mindful of when successfully getting in the zone

Step II: Select Your Secret Weapon – Choose a Movement for the Type of Workout You’re About to Do.

  1. Choose a Jump Variation for workouts involving more lower body volume AND for total body workouts.

Here’s a video I put together that features some fun options for you to try.

  1. Choose a plyometric Pushing Variation for workouts involving more upper body pushing volume.

This guy knows what I’m talking about.

  1. Choose a plyometric Pulling Variation for workouts involving more upper body pulling volume.

Unless you’re proficient with chest to bar pull-ups or kipping muscle ups, stick to the horizontal axis for some explosive Australian pull-ups.

Step III: Get in the Zone – Activate Your Nervous System.

  1. Regardless of what your current fitness levels are like, when you last worked out or what time limitations you may currently have, it’s imperative that you hit a warm-up that’s specific to the workout you’re about to perform. This is because the way you spend your first 5-10 minutes is the best indicator of how the rest of your workout will go. So we’re all on the same page, a solid warm-up will typically involve any of the following elements.

a) Active Stretch

Danny Kavadlo Toy Soldier
Danny Kavadlo demonstrates the “toy soldier”

b) Isometric or Dynamic Core Move (examples: plank or leg raise)

c) Lower Level Big Six Movement from Convict Conditioning for higher reps

d) Lower Intensity Cardio Exercise of your choice (light jog, jumping jacks, wall or some moderately paced mountain climbers with a training partner if you have one (see below))

Angelo Grinceri & Rosalia Chann of Couples Calisthenics

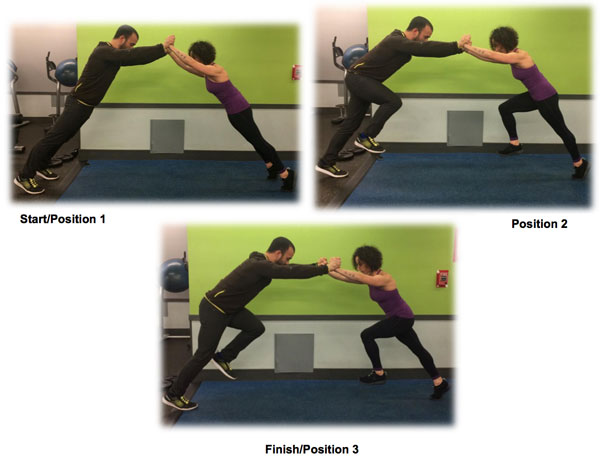
If you have a training partner, some moderately paced mountain climbers for as little as 15 seconds at a time will surely warm-up your core, and get some blood flowing through your entire body. Talk about killing two birds with one stone!

  1.  We’ll now kick up this baseline warm-up a few notches with that plyometric move you selected in Step II above. This is because, the more athletic your warm-up is, the better your chances are of putting yourself into the zone. Perform a superset between that plyometric movement and your warm-up movement(s).
  1. In order to make the plyometric movement look and feel as graceful and explosive as possible, you’ll perform 3-5 reps ONLY at various points throughout your warm-up. Ideally you’ll want to get away from counting with such few reps as this habit encourages you to train on the nerve. But that’s the approximate range for those of you who need quantitative satisfaction in the beginning.

Not sure where to start?

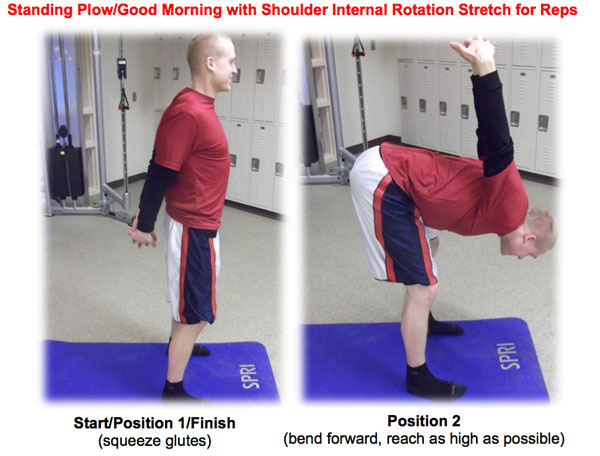
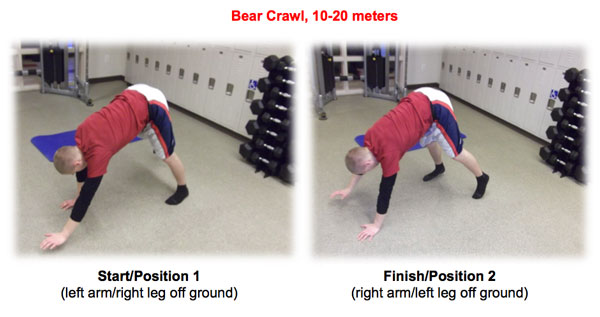
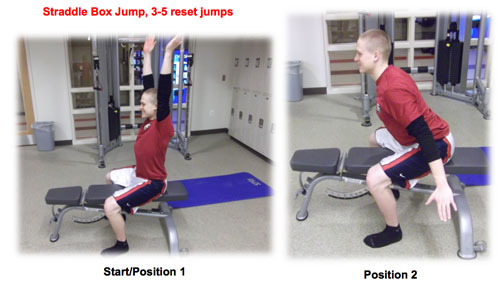
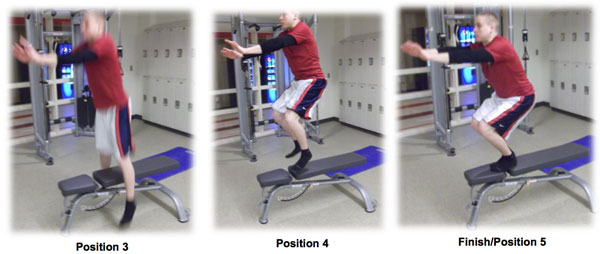
I recently performed a total body workout that consisted of pike push-ups, hanging V-leg raises, reverse lunges and straight leg bridges for reps. So, to give you an idea of how to apply this info, here’s the specific warm-up sequence/circuit I used prior to that workout.

Burraty Pike To Pancake

Burraty Standing Plow Good Morning

Burraty Bear Crawl

Burraty Staddle Box Jumps 1

Burraty Staddle Box Jumps 2

You’ll learn to feel this, but your performance WILL increase with each successive set/rep of your plyometric movement if you’re completely engaged in the moment right in front of you. It should also go without saying that this info can be applied toward workouts with weights for those of you who choose to supplement your calisthenics training.

By the end of your warm-up, you should feel ready to do more—with noticeable improvements in performance—but should NOT at any time feel excessive metabolic fatigue, out of breath or as though you’re doing the Valsalva Maneuver.

In sum, here are some key benefits you’ll experience from getting in the zone for EVERY workout.

  • Mood-uplifting, “neural-charge” effect—wherein eustress exceeds distress from an exercise standpoint
  • Greater body awareness through free space—remind upper and lower extremities of each other for total body synergy
  • More control over body momentum—reinforce a strong carryover between “loading” and “landing” positions (i.e., eccentric and concentric phases in a range-of-motion)
  • Make exercise fun, playful and less routine-like.

Do YOU have any favorite strategies that help you get in the zone for your workouts? If so, I’m sure we would love to hear about them. Just drop your tips in the comments below!


***
Eric Buratty brings five years of experience to the DC Metro Area as a Certified Personal Trainer, Progressive Calisthenics Instructor, Nutrition Consultant and Sports Injury Specialist.
For more information about Eric, check out his website, EricBurattyFitness.com.

Filed Under: Progressive Calisthenics, Tutorial Tagged With: Eric Buratty, explosive calisthenics, fitness training, focus, mental training, plyometrics, stretching, tutorial, warm up, warmup, workout strategy

Back to Basics: 6 Moves to Master Before Moving Forward

November 4, 2014 By Eric Buratty 35 Comments

Kavadlo Brothers Squat

Everybody wants to go straight to the advanced moves, but ain’t nobody want to make time for getting better at the basics!

Here at PCC, we get it. Your mind was just blown away from someone’s Facebook picture or YouTube video performing some sexy, ninja-like move that you want to try, too. This simply means you’ve been inspired to either try a calisthenics move (which is cool), or convert your training efforts exclusively toward calisthenics all together (even cooler).

But, like everything else people are good at in life, such graceful displays of strength, control and power require a considerable amount of time and practice to master. Not to mention the patience involved will humble anyone who might already have a strong fitness background from other disciplines (e.g., weight training, dancing and yoga).

That said, before moving on to some of the more advanced variations of calisthenics moves, EVERYONE needs to become proficient in the following basic positions.

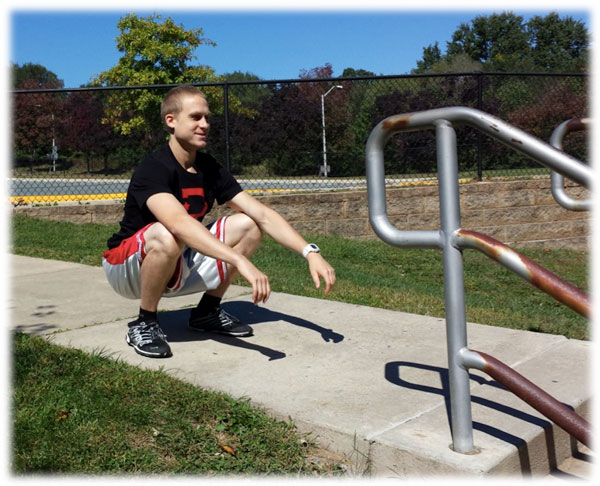
1. Full-Depth Squat

Eric Buratty Squat

Also known as an “ass-to-grass” squat, this is a basic human resting position that involves maximal bending of your hips and knees. NO ONE has any business loading this movement pattern until they can achieve full range-of-motion with their own bodyweight, and still remain upright from a postural perspective.

Calisthenics Transition: Foundation for Progressing the Squat Chain (i.e., working up towards pistol and shrimp squat variations)
Recommended Practice: Sit in this position for 5-10 minutes daily. The more favorable times to do so are upon waking for the day, before bed, whenever on a rest day and before or after a tough workout. Feel free to shake up social conformity any time you have the opportunity to squat—especially when waiting in line or shopping out in public.

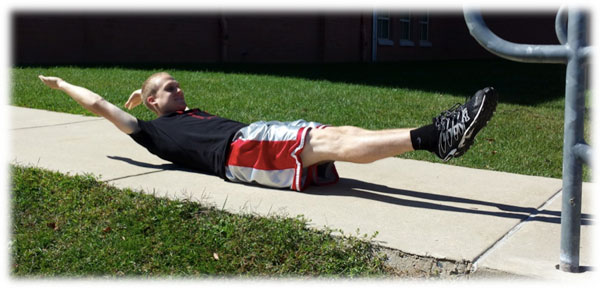
2. Supine Hollow Body

Eric Buratty Supine Hollow Position

The hollow body is the ultimate educator on the principle of whole body tension. A challenging core workout on its own, this position teaches you the principles of progression in all of calisthenics. More specifically, it allows you to feel the effect of lengthening or shortening the body as a lever for resistance, so you can adapt your training on a given day accordingly. Without understanding the principles of progression in calisthenics, you will only be setting yourself up for failure—and even injury.

Calisthenics Transition: Foundation for Precision and Control Required in Handstand, Front/Side/Back Levers
Recommended Practice: Maintain this position for a total of 2 minutes on training days involving handstands, front/back levers and human flags. Use as part of a warm-up, or superset with the aforementioned moves as active recovery during a workout (e.g., 8 sets of 15 seconds, 6 sets of 20 seconds, 4 sets of 30 seconds).

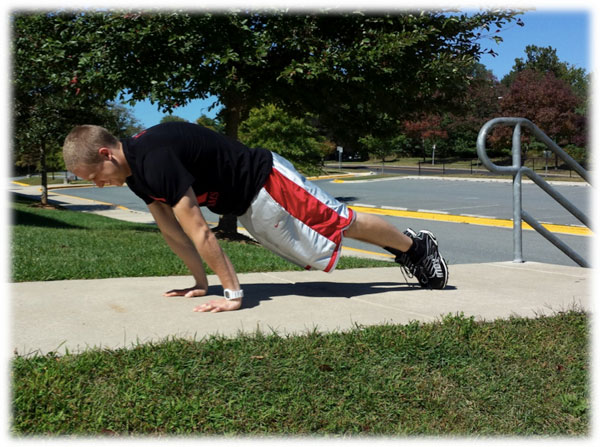
3. Hollow Body Leaning Push-Up Plank

EricBuratty Hollow Leaning Plank PushUp

By “leaning” into a standard push-up position, you’ll reach a higher level of total body tension that forces you to have greater balance and control over your body. The ability to achieve this position also serves as an excellent confidence booster for when you start experimenting with moves that involve less point(s)-of-contact with the ground.

Calisthenics Transition: Foundation for Progressing Midsection Floor Holds (e.g., N/L/V-Sits, Side Planks, Planche, Manna), Inversions and Elbow Levers
Recommended Practice: Use as part of a warm-up on workout days involving midsection floor holds, as a “finisher” on workout days involving push-ups or as active recovery on workout days involving vertical and horizontal pull-ups. Work up to holding this position for a solid 2 minutes without form breakdown.

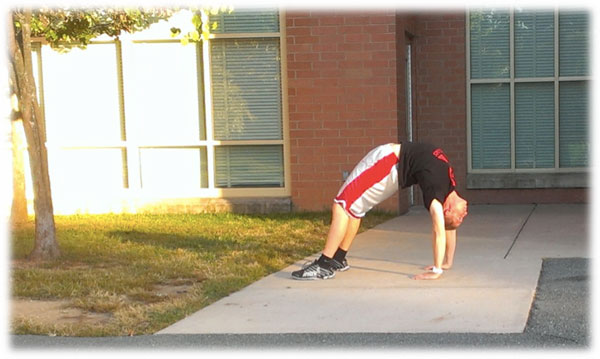
4. Hollow Body Backbend

Eric Buratty Hollow Body Backbend

When it comes to improving overall mobility, look no further than backwards bending (AKA “bridging”). Insert “do you even backbend?” parody for “do you even lift?” here. Known for its extremely therapeutic benefits on the muscles and tendons of the entire body, you can further enhance the quality of this position by putting the lower body into as much extension as possible and concentrating on pushing the shoulders past the hands. What you’re left with is a more “hollowed” version in the basic family of bridging that opens new doors for achieving stronger three-limb holds, geckos, stand-to-stands, walkovers and eventually, arched “Mexican” handstands.

Calisthenics Transition: Foundation for Progressing Handstands
Recommended Practice: Work up to holding this position for at least a solid minute after every workout you do. Given the powerful stretch that occurs in common problem areas for Americans from performing this movement (i.e., spine, shoulders and hips), you might even want to start devoting an entire training session to bridging throughout the week.

5. Hollow Body Dead Bar Hang

Eric Buratty Dead Hang Hollow

Similar to the full-depth squat mentioned above, passive hanging is another type of human resting position. When you take the passive hang one step further and connect the scapular muscles with the rest of the body, you’re left with this active hang that’s visually appealing and graceful. This happens to be one of the best positions for activating the core, as it decompresses the entire spine and puts the shoulders into a healthy stretched position with straight arms. With consistent practice of this deceptively challenging hang, you might “accidentally” become stronger at pull-ups AND start revealing your Diamond-Cut Abs.

Calisthenics Transition: Foundation for Progressing Pull-Up Chain & Leg Raise Chain
Recommended Practice: Hang from any straight bar (or any freestanding object for that matter) that allows you to put your body into a fully extended, hollow position, and maintain the position for a total of 1-2 minutes daily. This can either be done before or after a workout to facilitate warm-ups and cool downs—or as a nice complement to an active recovery day away from your regular training.

6. Hollow Body Bar Support

Eric Buratty Hollow Bar Support

As with the other “hollow” positions above, you’re pretty much forced into a state of total body tension with the bar support—which will lead to stronger reps on any related movement you’re preparing to train. In this instance, the ability to support yourself over a bar in a straight arms, locked out, elbows forward position is definitely a good indicator that you’re ready to reach the top of the dipping chain and beyond. Who ELSE is ready to work towards their first straight-bar muscle-up?!

Calisthenics Transition: Foundation for Progressing Straight Bar Dips & Top of Dipping Chain (i.e., Muscle-Up)
Recommended Practice: Use as part of a warm-up on workout days involving the dipping chain—or as active recovery on workout days involving vertical and horizontal pull-ups. Work up to holding this position for a solid minute at a time without form breakdown.

In no particular order, there you have six positions to master before you get slammed in the face with a serious slice of humble pie.

Why do we want to emphasize these isometric positions before worrying about reps and transitions anyway?

Simply put, it’s so we know where our body is in free space and when its position changes. That way, when we reflect on those workout days where our bodies felt ginormously heavier, we might be able to identify which positions felt strong and which ones felt stronger, so we know where to improve on next time.

I’ll end with one of my favorite training-related quotes which comes from Gymnastics Coach Christopher Sommer: “Save the nonsense. Bad form simply means bad attitude. Plain and simple. It means that you did not care enough to do it right.”

To acknowledge this quote from a PCC standpoint, always focus on becoming stronger than yesterday but not as strong as tomorrow! 😉

***
Eric Buratty brings five years of experience to the DC Metro Area as a Certified Personal Trainer, Progressive Calisthenics Instructor, Nutrition Consultant and Sports Injury Specialist.
For more information about Eric, check out his website, EricBurattyFitness.com.

Filed Under: Progressive Calisthenics, Tutorial Tagged With: bodyweight exercise, bridge, calisthenics basics, calisthenics positions, Eric Buratty, foundation calisthenics, hanging hollow position, hollow position, skills training, squats, tutorial

Primary Sidebar

Featured Products

previous arrow
GetStrongBookCover
ConvictConditioningBookCover
StreetWorkoutBookCover
ExplosiveCalisthenicsBookCover
StrengthRulesBookCover
next arrow

Categories

Progressive Calisthenics Certification Logo
Click here for more information or to register for the PCC workshop

Get Strong Workouts TriadXP App
Get Strong Workouts App

Recent Posts

  • Top 5 Reasons Why an In-Person Workshop is the Best Way to Supercharge Your Training
  • HYBRID STRENGTH TRAINING IS HERE!
  • My Calisthenics Journey to the PCC
  • The Handstand Press: Complete Control Through the Handstand
  • The Get Strong App is Here!

Dragon Door Publications

Dragon Door Publications

Recent Comments

  • bross dandon on The Case for Curved Handstands
  • Johnny Flewellen Jr. on Strength for Life
  • Dan Earthquake on The Pursuit of the Daily Minimum
  • Johnny Flewellen Jr. on The Pursuit of the Daily Minimum
  • Johnny Flewellen Jr. on Yoga, Calisthenics and the Journey of a Lifetime
FOLLOW US ON TWITTER!

Copyright © 2023

Dragon Door Publications / The author(s) and publisher of this material are not responsible in any manner whatsoever for any injury that may occur through following the instructions or opinions contained in this material. The activities, physical and otherwise, described herein for informational purposes only, may be too strenuous or dangerous for some people, and the reader(s) should consult a physician before engaging in them.