• Skip to main content
  • Skip to primary sidebar
  • Home
  • Contributors
  • Resources
    • Q&A with Paul “Coach” Wade
  • Workshops
  • Products
  • Forums
  • Articles
  • Blogs
    • RKC Blog
    • Strong Medicine Blog
  • Archives

PCC Blog

Progressive Calisthenics - The Official Blog for the PCC Community

Logan Christopher

Unlock the Power of Your Mind for Greater Bodyweight Strength

October 20, 2015 By Logan Christopher 17 Comments

Logan Christopher Demo Straddle Back Lever

When I was growing up I had a fantasy of being strong, quick and agile. Basically, I wanted to be a ninja. As a scrawny and weak kid I was anything but.

Years later as I entered into adulthood I realized that this was something I could actually go about changing, and thus, my long path into strength and exercise began.

Since I didn’t have the best start, I sought out other means to help me gain the super powers I dreamed of. Steroids were always out of the question for me, so what else was there?

It appeared to me that mental training was largely unexplored territory. There was a lot of lip service paid to the idea, but not a whole lot of concrete methods to this seemingly esoteric field.

I had a couple of early and impactful experiences, yet so much of it was fluffy. If someone said to you, “Just exercise,” you wouldn’t actually have any idea or insight into how to do it correctly. Yet in the mental game you’re often simply told to “believe in yourself” without so much as a process on how to do so.

This made me even more determined to get answers. Just like in my strength pursuits, I was dedicated. And after some time I was fortunate enough to stumble upon some great teachers.

In the end I decided it was up to me to write the book I wish I had when I was starting out. And I’m proud to see that John Du Cane saw the need for a book like this to complement all the great physical exercise and health training manuals that Dragon Door has made available.

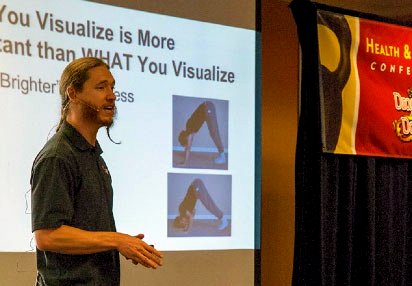
So when I recently presented at Dragon Door’s inaugural Health and Strength Conference, I noticed a commonality about several examples I used in my presentation on how to become instantly stronger using the power of your mind. Most of them had to do with bodyweight exercises!

Logan Christopher Presenting at Dragon Door's Health and Strength Conference, 2015

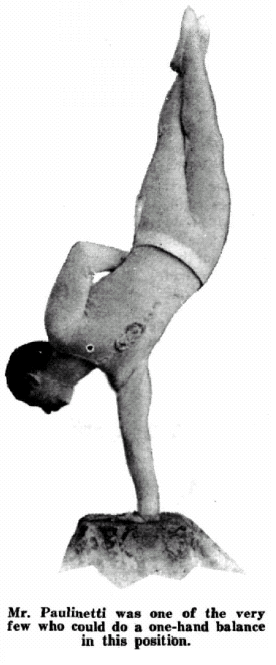
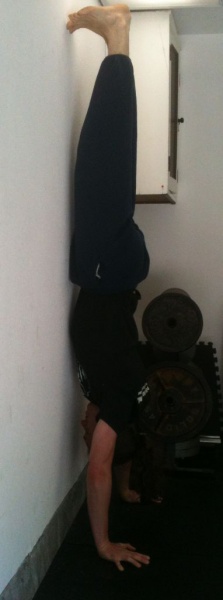
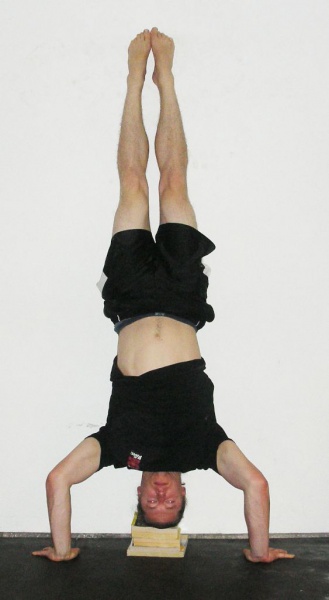
I talked about myself being stuck at a single freestanding handstand pushup until I realized I had a mental block. When I removed that through a simple process, I immediately hit a double, followed by a triple, and within a month nailed six reps.

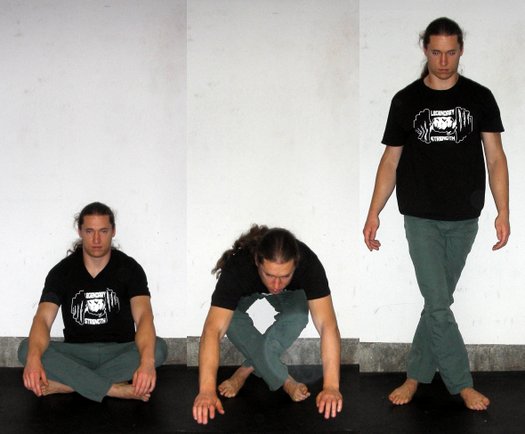
I showed how I improved a friend’s yoga posture…without even focusing on that move at all.

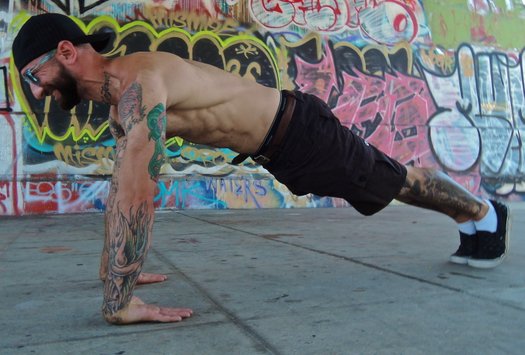
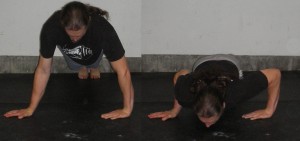
Then live on stage at that event, I took a woman from two one-arm pushups to busting out seven. This was done without a single tip on technique but by getting her nervous system activated in an optimal way through “visualization”. (I put that in quotes because what I do is not the typical visualization that most people are familiar with.)

It’s not that the performance boosting mental training skills only work with bodyweight. Far from it. But maybe there was something to this idea.

One of the reasons you and I love bodyweight exercise is because there seems to be a higher degree of self-awareness that comes into play.

This still occurs with weights, especially if you actually pay attention to it, but even more so in bodyweight, probably because you are both the resistance and the one resisting.

This kind of self-awareness is critical for stepping behind the curtain, so to speak, in your mind, to help you get even better results.

As such, this makes a case for more of the nervous system being at play, rather than just using muscle. And if the nervous system is being used, we can definitely work to optimize it through mental training.

Logan Christopher Coaching Flags
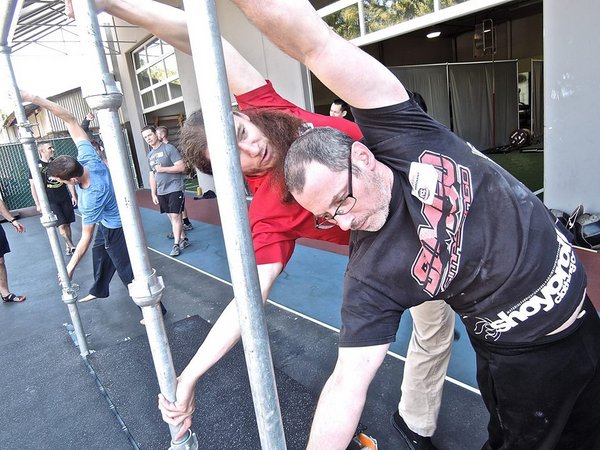
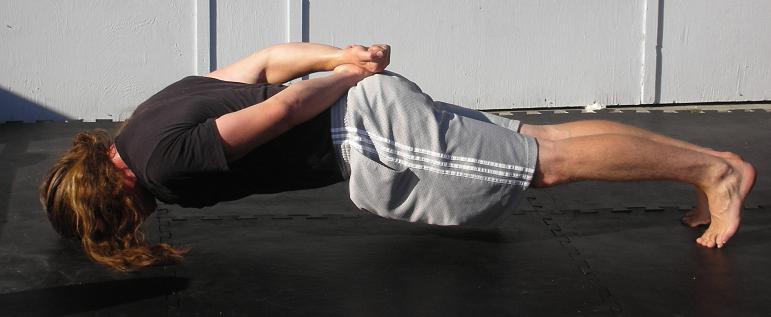
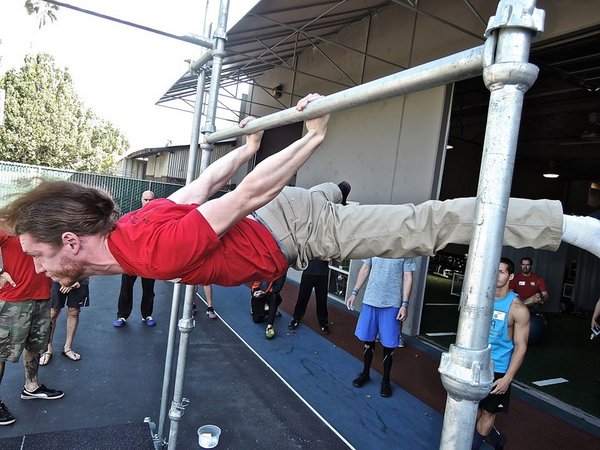
At the recent PCC in Mountain View, the Kavadlo brothers talked a lot about the nervous system activation required in all the moves we did from flags to levers to pushups.

What I’ve found in studying and experimenting with mental training is you can basically change how your nervous system works in regards to any exercise. And the higher the skill component of the move, oftentimes the more impactful the results become.

Muscle is good, but it is only one piece of the strength puzzle, of which there are many more. These include:

  • Technical ability
  • Nervous system
  • Beliefs
  • Internal dialog
  • Tendon and ligament strength
  • Bone strength

Yes, we can get the nervous system to work better through physical things like tensing other parts of the body to create more strength.

We can also approach it more from the mental side. What I like about this is you’ll often find you can do things easier and better, with less effort when you do it right.

After all, who is stronger, the person who can hold the human flag easily or the one that needs to work really hard to do so?

I’m not saying that you won’t ever need to work hard. But when you truly use your mind you may be surprised at just how much further you go.

Your mind governs everything you do, in your workouts and otherwise. So doesn’t it make sense to spend your time maximizing it?

More attention gets paid to learning a new exercise variation, the technical aspects of how to do it, and then programming for training.

Of course this is all important.

But HOW you think about all of the above can do even more to determine your results.

Mental Muscle by Logan ChristopherIn my new book, Mental Muscle, there are tons of step by step drills, not just theory. In doing some you’ll get to experience tangible results just like you would expect in doing exercises from an exercise book.

So let me take you “behind the curtain” to show you more how your conscious and subconscious mind works so you can put it to use in becoming stronger.

I had the great honor of having Paul “Coach” Wade write the foreword to Mental Muscle. In his books he’s talked about the mental side of training. In fact, most of the great strength training books over the decades have had at least a chapter devoted to the subject.

If you’re into bodyweight training I highly encourage you to check it out. If it adds just 10% to what you can do, wouldn’t that be worth it?

***

About Logan Christopher: Logan Christopher has been called a physical culture renaissance man as he is accomplished in a wide range of strength skills from kettlebell juggling, performing strongman stunts, and bodyweight exercises. He is the author of numerous books including Mental Muscle, Secrets of the Handstand and The Master Keys to Strength & Fitness. In addition, he’s spent the last several years going deep into mental training to find out what it takes to really excel and tactics that can help people instantly improve their exercises. You can find out more about all this at http://www.legendarystrength.com/.

Filed Under: Motivation and Goals Tagged With: Logan Christopher, Mental Muscle, mental training, one arm push up, one-arm pull-up, PCC, Progressive Calisthenics Certification, Progressive Calisthenics Certification Workshop

Building an Indestructible Body with “Outside the Box” Exercises

August 12, 2014 By Logan Christopher 32 Comments

Al Kavadlo Back Of The Wrists Push-Ups

Push-ups. You move in one plane of motion, up and down.

Squats. The same thing. Pull-ups too.

Everyone here will agree that bodyweight exercises are great, but it’s important to realize that there are many, many different ways of doing them.

If all you ever do are one dimensional exercises, even if you build a lot of strength in them, your overall fitness and athleticism will remain one dimensional.

It’s a sad fact that one of the biggest things holding people back from hitting their training goals are injuries. Yet, with smart training these can largely be avoided. And if you do suffer from pain currently, there are always things you can do to work to improve your situation.

Whether you are rehabbing or pre-habbing (doing work that aims to prevent injuries), these exercises generally are the same.

So, what makes one of these exercises different than a regular exercise?

The focus on building flexibility and/or mobility along with a strength component.

The more mobile you are (up to a point), the more likely you can fully exert the strength of that joint and the surrounding tissue.

The more flexible you are (once again up to a point), the more likely you can fully exert the strength of that joint and the surrounding tissue.

When you recognize that strength must be used in combination with mobility and flexibility, then you see why you need to do more than just “straight line” and conventional exercises. The effects of this type of training help you to build an indestructible body.

Before we begin it is important that you move into these exercises slowly. While they will help strengthen your weak points, remember that you are still working on weak points! The difference between something that is good for you and something that is not, can be separated by very little intensity or volume, so you must ease in slowly. Be smart!

Cross Leg Squats

The knee is a simple hinge joint. As such, so many personal trainers and coaches become deathly afraid if it ever does anything outside of that ability. “If the knees go past the toes in a squat you’re going to wreck yourself!” they say.

But here’s the truth: If your body can move in a way, that ability can be strengthened. And if it is strengthened then you’ll have less of a chance for injury. Not only do cross leg squats work the knees, they stressing them in a plane of movement they don’t normally go—and the ankles get worked too.

Begin by sitting with your legs crossed, then rock your weight forwards and press on the sides of your feet, extending your legs until you come to a standing position. Make sure to try it with your legs crossed both ways.

For assistance you can grab onto a doorknob or other solid object to help. You don’t need to do a lot of reps, but instead work to make this an easy way you can get up from the ground at any time.

Logan Christopher Demonstrates the Cross Leg Squat

Sit to Cossack Squat

Was that last one too easy for you? I’m guessing that’s the case for many people reading here. So try this challenge.

Do a Cossack squat to one side while keeping the heel flat on the floor. Once at the bottom, sit back until your butt is sitting on the floor. Now rock back up to Cossack squat, switch sides and repeat.

If you need assistance use your hands to get back up, but the challenge is to do it without them, while trying to use as little momentum as possible. This takes some deep flexibility, and you may notice that your knees don’t necessarily track your toes.

This video shows it in action as well as the secret I found to performing it after much frustration and failure to do it.

One Arm Twisting Bridge

Let’s move onto the upper body. This is a fairly advanced move that I covered before here on the PCC Blog: One Arm Bridge, Twists, and the Valdez.

It’s so useful I’m bringing it up again. The twist in particular builds shoulder stability and strength in an extended range of motion. It even works the wrists in a flexible manner.

At the same time the spine is in full flexion and then twists. A big “no-no” that I say yes to!

If you can do this, there’s a good chance you don’t have issues with any of the joints mentioned above. If you can’t do it right now, but take the time to build up to it, your body will be that much more indestructible from your work.

Back of the Wrist Pushups

An important thing to realize when doing these “outside the box” exercises is that you can still follow the same rules of progress as you would in all your other training.

Back of the wrist push-ups are a great complement to doing lots of push-ups and handstands. In regular push-ups and handstands, your wrist is extended back. But here, you flex your wrist fully and put the weight on the back of the hand. This builds strength and toughness in the wrists, but also works the elbow joints in a big way.

Start slowly with these, as in kneeling push-ups. You can hold for time or rep them out. Progress to regular push-ups when you’re able to. Remember to go slow.

I decided to see just how far I could progress with this and worked my way up to a back of wrist handstand push-ups.

Adding Indestructible Exercises to Your Program

Here’s the great part about these exercises and the hundred, if not thousands, of other moves like them. You don’t need a whole lot to get the benefits.

Doing a few of these exercises, like a few reps in a single set, will be enough to get better at them, and reap the benefits.

Any of the following will work:

  • Add them to your warm-up.
  • Add them to your cool down.
  • Add them to your stretching program.
  • Add them to your mobility work.
  • Do a few on your off days.
  • Do them as part of a morning wake up routine.

You can work through your entire body or just focus on one area at a time.

If you enjoyed this article let me know in the comments section below. I’d love to share more exercises with you in the future!

***

About Logan Christopher: Logan Christopher has been called a physical culture renaissance man as he is accomplished in a wide range of strength skills from kettlebell juggling, performing strongman stunts, and bodyweight exercises. He is the author of numerous books including Secrets of the Handstand and The Master Keys to Strength & Fitness. In addition, he’s spent the last several years going deep into mental training to find out what it takes to really excel and tactics that can help people instantly improve their exercises. You can find out more about all this at http://www.legendarystrength.com/.

Filed Under: Flexibility, Progressive Calisthenics, Tutorial Tagged With: advanced variations, ankles, back of the wrist push-ups, Cossack squat, flexibility, hips, how to, Logan Christopher, mobility, shoulder mobility, tutorial, unconventional exercises, wrist training

The Case for Curved Handstands

December 3, 2013 By Logan Christopher 24 Comments

sig-klein-handstandAsk any gymnast or circus performer about doing handstands and they’re likely to tell you that a straight handstand is the only way to do it. It’s the perfect form, and anything else is wrong.

I disagree! Let me tell you why.

Recently on this site was an article all about the straight handstand and the benefits of doing them in that manner. I don’t disagree with those points, but wanted to give a different opinion on why the curved handstand is a viable option as well.

Are Curved Handstands Dangerous?

First off, let’s talk about the claim that doing a curved handstand is going to hurt your back. Just like anything else, it can happen, but if you’re smart about it, they’re completely safe.

I think this myth is simply a result of people doing straight handstands for other reasons, and then not knowing why that is the case.  To think that bending your spine is going to hurt you is ridiculous.

Push too far with bridging exercises and you can tweak your back, but doing them right you’ll develop more flexibility and strength.

When doing a handstand if you let gravity just pull your legs over without maintaining any core tightness, it can take you into a position that you’re not ready for. Doing too much of can certainly cause you to strain your back.

Instead maintain tightness, and build up what you do over time. Just like any other exercise.

Art2 - OHBalAre Straight Handstands Necessary for Higher Level Skills?

The straight handstand can help you do harder skills but it is not necessary.

I have heard people say that you need perfectly straight alignment to hold a one arm handstand. Tell that to Professor Paulinetti, the man who basically invented the one arm handstand.

You see, old school hand balancers, did all their handstands with curves in their backs. All of them! And they pulled of amazing skills.

They treated the straight handstand as an advanced variation of the handstand. This harder skill was something to practice later on after you could stand on your hands.

Over time, hand balancers transitioned away from the curve to the straight position you see commonly today. Part of this was for aesthetic reasons. It’s more pleasing to the eye, and for things like gymnastic competitions, you’re judged on this.

Another part is that a straight handstand does help you to achieve more difficult skills. By beginning with it you can build those habits from the beginning. This is a smart thing to do if you plan on taking your hand balancing skills far.

To prove this point, in the future, I’d like to build up to the one hand handstand in a curved position like the old timers did.

What About The Beginner or Recreational Athlete?

Don’t plan to be paid to do hand balancing professionally? Not a gymnast? Would you just like to be able to hold a freestanding handstand? If that’s the case I don’t think going for the straight handstand is necessarily for you.

If you ask anyone to hold a handstand that has never done it before, what will you see? When they kick up, before they fall down almost instantly, they’ll be in a curved position.

The curved handstand is a more natural position. It takes a lot of effort to get a perfect line in your handstand because it is unnatural. To tighten the muscles as needed to form a straight line is significantly more difficult, and not to mention, it takes additional shoulder flexibility, that many people don’t have.

If you choose, you can practice the curved handstand. You’re likely to gain the skill faster than someone going after a straight handstand. You’ll be freestanding in a shorter amount of time, which is of course dependent on how much you practice. Then from there you can practice other hand balancing skills and work on straightening out later if you choose.

Or you can practice a straight handstand from the beginning. It will take longer with more practice time. But once you have it you’ll be good to go onto other more advanced skills.

It is a choice you can make.

Sure, a straight handstand is better, in that it is more advanced. Just like a 315 lb. snatch is better than a 225 lb. one. But that doesn’t make the curved handstand wrong.

Reverse Handstand SideHow to Learn the  Straight or Curved Handstand

If you’re going to do handstands the starting place is against the wall. But depending on which of these two you want to go for you’re going to do them differently.

If you choose to go with the curved handstand then when doing wall handstands your back can face the wall. Kick-up into position then hold for time.

If you choose to go with a straight handstand you’ll want to face the other way. The reason for this is that this orientation forces you into a straighter position, especially as you inch your hands closer and closer to the wall.

In either style you build endurance by holding for time and maintaining your position. Then when it comes to freestanding handstands this skill set should be built in as you learn to balance out in the open.

So let’s take a poll. Do you do curved or straight handstands? Even if its just against the wall, what are you going for? Answer in the comments below.

***

About Logan Christopher: Logan Christopher has been called a physical culture renaissance man as he is accomplished in a wide range of strength skills from kettlebell juggling, performing strongman stunts, and bodyweight exercises. He is the author of numerous books including Secrets of the Handstand and The Master Keys to Strength & Fitness. In addition, he’s spent the last several years going deep into mental training to find out what it takes to really excel and tactics that can help people instantly improve their exercises. You can find out more about all this at http://www.legendarystrength.com/.

Filed Under: Progressive Calisthenics, Tutorial Tagged With: curved handstands, handstands, Logan Christopher, opposite handstands, straight handstands, tutorial

Handstand Push-ups and My “Aha” Moment

September 24, 2013 By Logan Christopher 10 Comments


Logan_Phonebook HSPU
This very wide stance, along with phonebooks to limit the range of motion, can be useful when getting started with this exercise. Demonstrated by Logan Christopher.

When I got started with bodyweight training my goal was to be able to do a handstand push-up against the wall. My upper body strength had always been quite weak as judged by the bench press, so I figured if I could achieve this goal I’d be on my way.

However, it was a long ways off. It took me awhile just to get the handstand against the wall. If I bent my arms at all I would come crashing down. But I was committed to the journey, and within a few months I achieved my goal.

This started a lifelong love of the handstand push-up. There wasn’t all that much information available on how to do this exercise out there so a lot of what I learned came from trial and error.

elevated handstand
Al Kavadlo demonstrates the elevated handstand.

I’ll never forget the one training session that led to my “Aha!“ moment. Fast forward a couple of years from my first rep and I was doing a handstand push-up focused routine. I had worked up to doing about 5 reps and thought I was ready to increase my range of motion. Now my goal was a full range handstand push-up  (hands to shoulders on an elevated platform).

One of the best ways to get better at handstand push-ups is to increase the range of motion just a little bit at a time. This was a method I had used in getting to my first head-to-the-floor rep, and it was my plan in working towards the full range.

I kicked up on my elevated setup in my garage and went for my first rep. As I lowered down I couldn’t even manage a single rep. What was going on?

I had only increased the range of motion about two inches. It shouldn’t have been THAT much harder. But it was.

What I came to realize is that I hadn’t just changed the elevation but much else about how I was doing the exercise. This was the first time I came to realize that small changes in your body position make BIG differences in the difficulty of the handstand push-up.

When the average person does regular push-ups, their elbows flare out far to the sides. While this is okay, it is not optimal. Done too much, this can cause problems for the shoulders as all the stress is placed into one area.

However the same problem does not occur in handstand push-ups. Because of the vertical, rather than horizontal angle, the shoulders are in a fine position either way.

Al -HSPU
Al demonstrates the handstand push-up.

Do a little experiment with me. Go ahead and put your arms straight overhead right now. Now widen their position. If you look closely you’ll notice that when you widen them they’re not quite as high.

A part of how this hand position changes the difficulty may be in a favorable angle for you to push. This will probably depend on what you’re used to doing. The majority of it comes from the fact that you shorten your range of motion with a wider hand position. A shorter range of motion means an easier exercise. And this is something you can do without any sort of equipment.

Although it’s not a huge decrease in range of motion, it is close to the sticking point in the press and thus can make a big difference in what you can do.

If handstand push-ups are something you can do right now go ahead and kick-up against the wall and give this a shot. Do a few reps with a wide hand placement. (Don’t go too wide as you’d lose all leverage and it would then become very hard). Then try a couple with the hands at shoulder width and note the difference.

If you watch people doing handstand push-ups, you can notice how close or far their hands are when they do them. Remember,  a wider position is easier and will allow you to do more.

This can be helpful in allowing you to achieve that first rep.

This can be useful in allowing you to push your numbers up. (This easier form of handstand push-ups is what I used to achieve my current record of 21 reps against the wall.)

This can be used in helping you do full range handstand push-ups.

This can also be a big help in doing freestanding handstand push-ups and other bent arm presses.

When you’re holding a handstand you’ll usually want the hands to be shoulder width apart, as this is best for maintaining the structure in the handstand. However, if you’re doing any sort of bent arm press it can be made easier using this technique. All you have to do is practice balancing in the handstand with a wider than normal hand placement.

Of course, if you use this all the time it may make it harder to do anything where you need the shoulder width or more narrow hand position. For this reason it is best to mix it up. In any case this technique can be a useful addition to your bag of tricks, and a form of progression you can use.

The wide stance makes these freestanding handstand pushups easier.
The wide stance makes these freestanding handstand pushups easier.  Demonstrated by Logan Christopher.

***

About Logan Christopher: Logan Christopher has been called a physical culture renaissance man as he is accomplished in a wide range of strength skills from kettlebell juggling, performing strongman stunts, and bodyweight exercises. He is the author of numerous books including Secrets of the Handstand and The Master Keys to Strength & Fitness. In addition, he’s spent the last several years going deep into mental training to find out what it takes to really excel and tactics that can help people instantly improve their exercises. You can find out more about all this at http://www.legendarystrength.com/.

Filed Under: Progressive Calisthenics Tagged With: advanced, bodyweight exercise, handstand, handstand push-ups, Logan Christopher, strength training

Odd Object Training with Bodyweight?

July 23, 2013 By Logan Christopher 12 Comments

There’s a method of training with weights called odd object lifting. While a barbell is made to be lifted, with its small diameter handle that is easy to grip, and the weight being perfectly balanced, most of what is encountered in the real world is not.

If you’ve ever moved furniture you know this to be true. While an item may not be all that heavy, its size and shape can prove very difficult to maneuver.

Thus if you want to become strong the use of odd objects is suggested. This means lifting things that are harder to lift like rocks, stones, barrels and the like. The idea being that this will force your stabilizing muscles to work much harder. Often your grip is taxed much more. Plus your form in lifting these odd objects will be different than how you’d handle a barbell.

But what does this have to do with bodyweight training? Can we take this idea of odd object training and apply it to bodyweight exercises?

Well, I was reading Raising the Bar by Al Kavadlo the other day. There’s a single sentence in there that got me thinking.

“Training on odd objects can sometimes offer unique challenges and benefits.”

This sparked my thinking about this more so in this article I’m going to go deeper on how to use odd objects in your bodyweight training.

Most pull-up bars are just like the barbell. Its perfectly straight and has a thin handle to make the exercise as easy as possible. So what happens when you do your pull-ups on things besides a normal pull-up bar?

Try it on a tree branch. The thicker grip will make it harder to do. Plus here you won’t be able to wrap the thumbs around. Depending on the strength of the branch there may be some sway as you do the exercise (of course you’ll want to make sure the branch can easily support your weight before you jump on it).

Tree Branch Pullup
The thicker grip will make chin-ups more challenging.

You could modify this even more with a tree. What if one hand hangs on a branch while the other is closer to the base of the tree, where the branch comes out. This will be an uneven pull-up and depending on how wide your hands are apart could also be an archer pull-up.

This same thing can be done on many monkey bars. Look around at the thick bars and the angles you can use.

Uneven Pullup
An uneven chin-up with one hand on the thick bar and one on a chain.
Not only is the grip tough here on two chains, but I was forced to straddle the legs.

And don’t just think pull-ups. Levers, hanging leg raises and dips can be done on different bar setups too.

Wide Dip
Feel the stretch with wide dips.

Here you’ll gain some similar benefits as those odd objects can bring. The exercise will become harder as certain parts of your body will need to work more. The great thing is if you spend some time working on the odd bars when you go back to a regular bar its going to feel that much easier.

Bars aren’t the only way you can get this effect. What about pushups? Although you could use a variety of pushup handles you may be able to find objects to do pushups on too.

This pushup is done with offset hands at different heights.

Plus this same effect can be accomplished on the flat floor just as well. Instead of always doing pushups in your perfect, ideal form, change them up.

Alter hand placement. Go closer, go wider, go offset. Turn one or both hands out to the side. Turn one hand backwards as you keep on forwards. Try this while they’re both wide.

No objects are necessary. Try this pushup with both hands pointing in the same direction.

The great hand balancer Professor E.M. Orlick taught handstands just like this. Don’t just keep trying to add time to holding a normal handstand. Instead alter your hand position (among many other things). Once again go closer, go wider, or offset.

Doing an open fist handstand. Harder than flat hands but easier than fully on the fists.

When you train in this manner, since almost all of it will be harder than the normal version, when you get back to that regular pushup or handstand it will be that much easier.

While consistency with the basics is necessary and a good thing to do, one of the best ways to improve that is to “complexify” what you’re doing. This “odd object” like training will allow you to do just that. Sometimes you need to go outside the normal and play around with as many variations as you can.

***

About Logan Christopher: Logan Christopher has been called a physical culture renaissance man as he is accomplished in a wide range of strength skills from kettlebell juggling, performing strongman stunts, and bodyweight exercises. He is the author of numerous books including Secrets of the Handstand and The Master Keys to Strength & Fitness. In addition, he’s spent the last several years going deep into mental training to find out what it takes to really excel and tactics that can help people instantly improve their exercises. You can find out more about all this at http://www.legendarystrength.com/.

Filed Under: Progressive Calisthenics, Tutorial Tagged With: bodyweight exercise, Logan Christopher, odd object training, pull-up variations, Raising the Bar, strength training, tutorial

One Arm Bridge, Twists and the Valdez

April 30, 2013 By Logan Christopher 8 Comments

In my previous article I covered some advanced versions of the wrestler’s bridge exercise to build both more neck and spine strength, as well as dynamic flexibility.

Now its time to turn on the gymnastic bridge.

By itself the bridge requires a high degree of flexibility. The truth is when your flexibility is great, then holding the position isn’t too hard. It requires more strength when you don’t have the flexibility to do it, because you can’t quite get to lock out.

If you’re not there yet, keep at it. Make sure to read Convict Conditioning to build your bridge.

And what I want to cover here is an advanced variation not covered in that book, that takes your flexibility, and stability, to another level. Here is a short series of progressions you can do. The video shows each one and you can read more about them below.

One Arm Bridge Hold

Get into a gymnast bridge and lockout your arms. Shift your weight slightly to one side then raise up the other arm off the ground. Hold for time. If you can get a minute you’re doing great.

Work both sides equally. You can come down and rest between sets or shift back to two hands, then onto the other arm.

One Arm Bridge Twist

There are several versions of this move that just change it up slightly.

To start with get into you’re your one arm bridge. Rotate your torso towards that arm as you kick your opposite side leg over until you come to a position where you’re on all fours.

Note that your hand may need to twist on the ground as you turn.

After you get to all fours you can then rotate back.

Work to both sides. You’ll likely find one side is better than another. This is usually more because of flexibility than strength. Also notice that it requires an even greater degree of shoulder and wrist flexibility plus shoulder stability through an interesting plane of motion.

One Arm Bridge Twist from Sitting

Now we’re going to do the same thing starting from a sitting position. For description purposes I’ll describe this from the position of having the left hand on the ground.

Start with your left hand on the ground, pointing away from your body. Your left leg will be straight and your right leg bent and close to your body. Raise your hips up and onto that arm as you bridge over. Your hand has to do a 180 as you come into a bridge position. Once in position you can place your right hand on the ground.

Try coming up with the same or opposite arm back to a sitting position.

Valdez

This is a move from gymnastics that is usually reserved for women as they tend to have more flexibility. Still it can be worked up to, if you’re willing to put in the time.

This combines the previous exercise, the one arm bridge twist from sitting, with a kick over done in seamless fashion. In the beginning you may need to break it down into sequential steps and of course both should be solid before attempting to put them together. You actually begin kicking up with the leg even before your second arm touches the ground.

I’ve pulled this one off before, but not in many years. Without working on it recently, I haven’t quite got the flexibility and control required for it.

So if you’re ready for some more intense bridge work start working in this series. If you can do all this, just holding a bridge will never be a problem again.

***

About Logan Christopher: Logan Christopher has been called a physical culture renaissance man as he is accomplished in a wide range of strength skills from kettlebell juggling, performing strongman stunts, and bodyweight exercises. He is the author of numerous books including Secrets of the Handstand and The Master Keys to Strength & Fitness. In addition, he’s spent the last several years going deep into mental training to find out what it takes to really excel and tactics that can help people instantly improve their exercises. You can find out more about all this at www.LegendaryStrength.com.

Filed Under: Progressive Calisthenics, Tutorial Tagged With: advanced, bridge, calisthenics, Logan Christopher, One arm bridge, tutorial, twists, valdez, video

Advanced Bridging Variations

February 19, 2013 By Logan Christopher 24 Comments

As a kid I was always skinny. I mean very skinny. Entering high school I weighed less than 100 lbs. I played football there and lifted weights though I wasn’t really good at either.

The truth is I only really started seeing results in my strength and body when I got into bodyweight exercises about the end of school. After a year or two of consistent work in bodyweight training I ran across an old friend. His first statement to me:

“Wow! Your neck filled out.”

Guess what I had been doing? Various forms of bridging. Looking back I’ve been doing these exercises for about ten years now; and in this article I want to share with you some variations. If you’ve been doing Convict Conditioning for awhile you may be able to get started with these, because the truth is all these are more advanced than the basic holds.

Weighted Bridging

I started adding weight to my bridges because I was getting bored with long static holds. My best ever hold was ten minutes in a hands free wrestler’s bridge. I know I could have gone further but I didn’t want to. What can I say? I get bored easily and 10 minutes is about my maximum attention span.

I first did this with people, but I started using weight simply because I didn’t always have a person to sit or stand on me. In the beginning I’d pull over a light kettlebell and hold it. Then two kettlebells. Eventually I had to move inside a power rack as getting the weight into place proved harder than the hold.

I don’t recommend going this far for most people I just wanted to see how far I could take it and follow in line with guys like George Hackenschmidt who supported big weights in this position. If you work up to even a light weight you’ll probably have more than enough neck strength for your daily life, unless you’re involved in sports or martial arts.

To give you an idea of what can be achieved this video shows my current best hold. It’s a very brief support of over 600 lbs. split over the barbell and Bud Jeffries sitting on me. I plan to take this support to over half a ton in the future.

Neck Plank

As the wrestler’s bridge became too easy and I had to do something to make it harder, so the same was true of the front bridge. I experimented with adding weights but my favorite came from extending the leverage. For this you start in the front bridge position and walk your legs back while keeping your forehead on the ground. It’s like a plank position where only your forehead and toes are on the ground, with the stress being on your neck (and your abs as well to some degree) hence the name.

lchristopher2


Dynamic Bridging

The static holds are great and make up a large part of bridging. But they’re not the only things you can do.

The next couple exercises are dynamic in nature and thus train the body in a slightly different way. Both involve going from the front to back bridge position albeit in different ways. Check out this video to see both in action.

Bridge Kickovers

This move takes a good degree of strength, flexibility and acrobatic ability all at the same time. You must start in a wrestler’s bridge with the hands on the ground.

To get started I like to rock three times from my toes to chest, kicking with one leg hard, on the third go. The leg kicks up and over, then the other comes to follow it. You’ll land in a front bridge position although it’ll be far from perfect. From here you can kick one or both legs back to end in the wrestler’s bridge once again. When you’re first starting out one rep at a time is fine. When you get good you can go back and forth very quickly.

Only progress to the hands free version if you have lots of practice and are sure your neck can take it. It is significantly tougher to do. If you don’t quite make it over you may end up spinning and coming down in an awkward manner which you want to avoid.

Either of these variations can be made progressive by kicking off of a raised stable surface.

Bridge Twists

This final bridging exercise involves twisting from a back to a front bridge. This works every single muscle in your neck as you go to the sides, as well as some interesting spine action taking place.

This is great for improving your flexibility and is commonly done by wrestlers. As before, be sure to start with your hands and become great at that before moving to the hands-free position.

You’ll also find it easier if you stay more towards the back of your head.

That should give you some new variations to play with. Don’t try to do these all at once. In fact, I’ve found that a little bridging goes a long way. If you have any questions be sure to ask below. Also if you’d like to see me write more on gymnastic bridge variations (on top of these wrestler’s bridging exercises) for you to play with, then let me know.

—

Logan Christopher has been called a physical culture renaissance man as he is accomplished in a wide range of strength skills from kettlebell juggling, performing strongman stunts, and bodyweight exercises. He is the author of numerous books including Secrets of the Handstand and The Master Keys to Strength & Fitness. In addition, he’s spent the last several years going deep into mental training to find out what it takes to really excel and tactics that can help people instantly improve their exercises. You can find out more about all this at http://www.LegendaryStrength.com.


Filed Under: Progressive Calisthenics Tagged With: advanced, bridge, bridge progressions, Legendary Strength, Logan Christopher

Primary Sidebar

Featured Products

previous arrow
GetStrongBookCover
ConvictConditioningBookCover
StreetWorkoutBookCover
ExplosiveCalisthenicsBookCover
StrengthRulesBookCover
next arrow

Categories

Progressive Calisthenics Certification Logo
Click here for more information or to register for the PCC workshop

Get Strong Workouts TriadXP App
Get Strong Workouts App

Recent Posts

  • Top 5 Reasons Why an In-Person Workshop is the Best Way to Supercharge Your Training
  • HYBRID STRENGTH TRAINING IS HERE!
  • My Calisthenics Journey to the PCC
  • The Handstand Press: Complete Control Through the Handstand
  • The Get Strong App is Here!

Dragon Door Publications

Dragon Door Publications

Recent Comments

  • bross dandon on The Case for Curved Handstands
  • Johnny Flewellen Jr. on Strength for Life
  • Dan Earthquake on The Pursuit of the Daily Minimum
  • Johnny Flewellen Jr. on The Pursuit of the Daily Minimum
  • Johnny Flewellen Jr. on Yoga, Calisthenics and the Journey of a Lifetime
FOLLOW US ON TWITTER!

Copyright © 2023

Dragon Door Publications / The author(s) and publisher of this material are not responsible in any manner whatsoever for any injury that may occur through following the instructions or opinions contained in this material. The activities, physical and otherwise, described herein for informational purposes only, may be too strenuous or dangerous for some people, and the reader(s) should consult a physician before engaging in them.