I’m pretty sure there hasn’t been a PCC or SCC workshop where the following question hasn’t come up:
“Where do I put my elbows during the push-up?”
Or if it isn’t asked, there’s always more than a handful of people who need some coaching on elbow placement with the push-up.
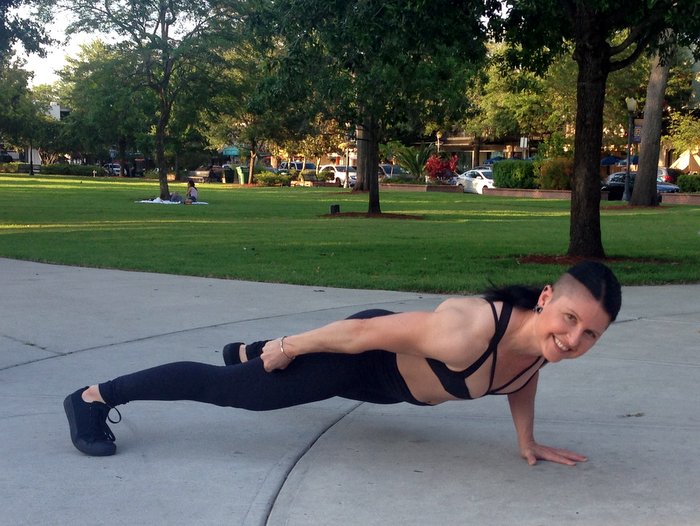
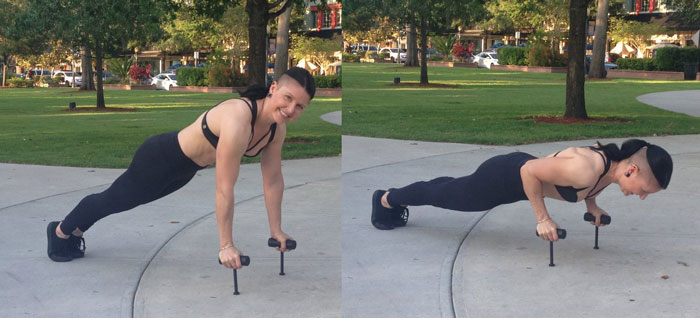
Al’s answer is a real winner, and we can all benefit from hearing and reviewing it. Basically, you want to make sure your elbows stay below your shoulders. Keeping them way out at a 90 degree angle to your torso is not ideal, but they don’t have to be right next to the body either. For most people, the ideal arm position will create somewhere between a 0-60 degree angle between the upper arm and the torso.
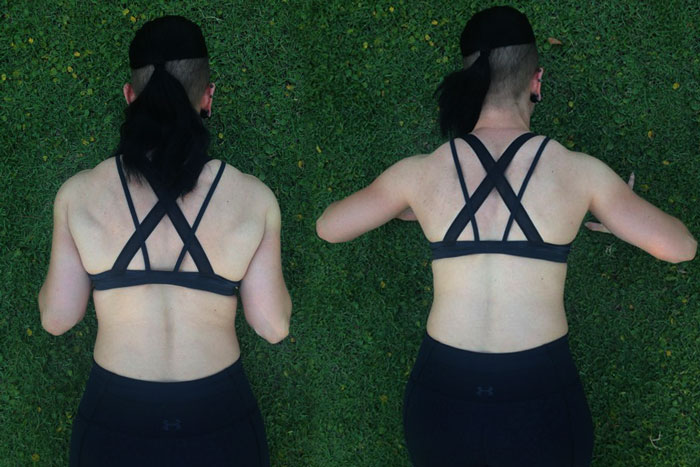
The good news is the range of 0-60 degrees allows each of us to find a strong and comfortable place, but by intentionally varying the angle in our sessions we can recruit different muscle groups more intensely. Generally speaking within this safe range, when the elbows are close to the sides as on the left photo above, there’s more emphasis on the triceps and front delts. When the degree is greater, we can experience a little more recruitment of the pectorals.
There’s several reasons that the elbow issue keeps coming up, and will probably continue to be up for discussion with trainers and enthusiasts alike. Here are three of the bigger reasons:
- There are a LOT of heavily used stock photos of people doing push-ups with their arms way out at big 90-degree angles. This is actually a huge pet peeve of mine because you’ll see these photos in well known, famous magazines and advertisements for everything from workout wear to every supplement you can imagine. The most extreme example I’ve seen was a (at least we were told) highly converting photo chosen to promote my friend’s boot camp. The woman in the stock photo had her elbows cranked out to such a degree that doing a push-up from that picture-posed position looked physically impossible!I could continue with more examples, but you get the idea—we’re all surrounded by tons of strange visual examples of something as simple as a push-up. It’s easy for even experienced exercisers to start thinking that this super-wide elbow angle is a preferred position, considering how often we see it in supposedly authoritative mainstream books, magazines, ads, etc. for men and women!
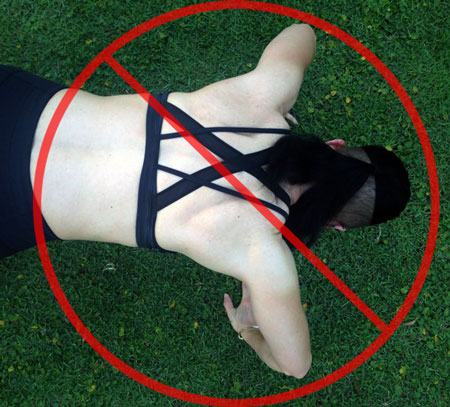
- The elbows can sneak out and up when someone has moved ahead to a more difficult variation too quickly. I’ve also seen many people start out with a great elbow position, then as they fatigue, the elbows start coming forward as compensation. At the same time, you’ll see their head jut forward to the ground as another, often simultaneous compensation. Beginners can sometimes be so focused on hitting a particular rep goal, that they won’t even feel these compensations happening.That’s where you, as a great instructor can help out.
If you are training on your own, check in from time to time by shooting a short video (just for you) on your phone and checking your form. Whenever I feel like something is “off” with any given exercise, I get out the camera, it’s a great tool. When you’re coaching a client and they’re doing well, you can also shoot short videos of them on their own phones—they will now have that as a reference (they’ll also probably proudly show it to their friends and end up sending you referrals). It takes everyone some time to build the body awareness to know when the form is breaking down. This is part of why it’s so important NOT to rush through the beginning steps of any calisthenics exercise.
- I’m sad that we need to bring up this third reason. As with the “squat depth” debate there still are still plenty of dogmatic trainers out there who are insisting that “there can only be one” (true for the Highlander, but not for elbow position) correct elbow position for everyone all the time. So, feel free to break free from the “right and wrong” dogma and find your effective elbow placements within that generous 0-60% angle area. Experiment, have fun, and don’t do anything that hurts!
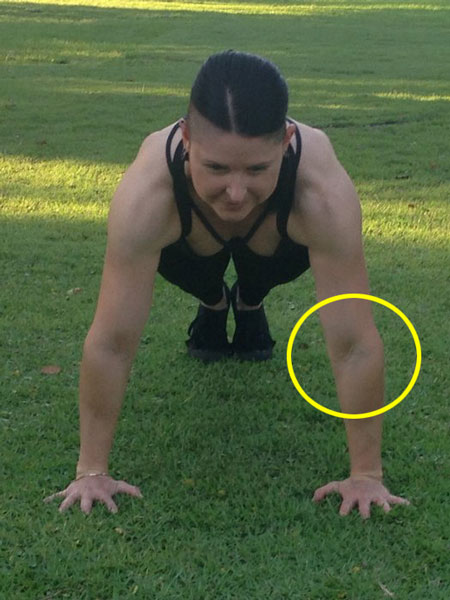
The important thing to remember (and which is stressed at both the SCC and PCC) is that the exact elbow position will vary with each person. It can even be fun to challenge yourself within this range after you’re comfortable with your own ideal elbow position. Always remember to think of pointing your “elbow pits” forward at the top of the push-up, and the points of your elbows aimed at your feet or toes. This will help maintain your position and keep the reps nice and productive for building strength and habits.
What if someone can’t perform a push-up without putting the elbows way up high with their shoulders crushing their ears? This simply means they’ll need to work on an earlier step in the progression until they have enough strength. Push-ups on railings are great for teaching the elbow position while building the requisite strength. Be extra sure that the hands are placed in line with and below the shoulders, no matter what surface is used. Knee pushups performed with absolute precision are also very useful for gaining the strength and habit of a healthy elbow/shoulder position.
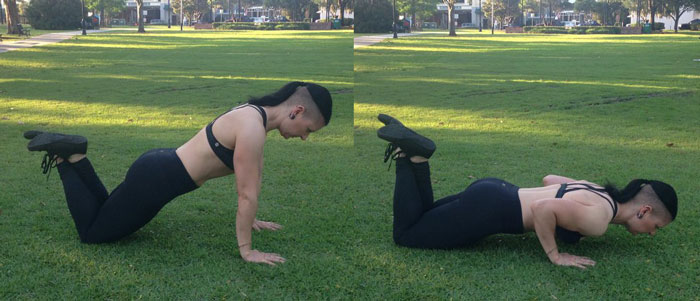
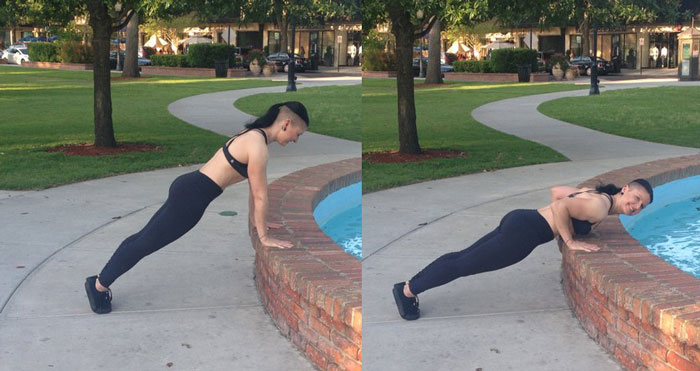
Let’s start with the “smallest” angle. This is with the arms right next to the body—even touching. Yoga enthusiasts may recognize this position as similar to when they perform the chaturanga series of movements. The hands are almost automatically placed right under the shoulders with this position too. It’s a very stable feeling for most people. If I’m going for high reps, or am helping a student activate and use the whole of their torso (lats, serratus), then this is a great go-to position.
People with large lats from serious pull-up habits, as well as those who may have a few pounds to lose will naturally need to take their arms a little further away from the body. They will of course need to still be sure to engage the lats, keep the shoulders away from the ears and maintain a plank position and tension throughout the body.
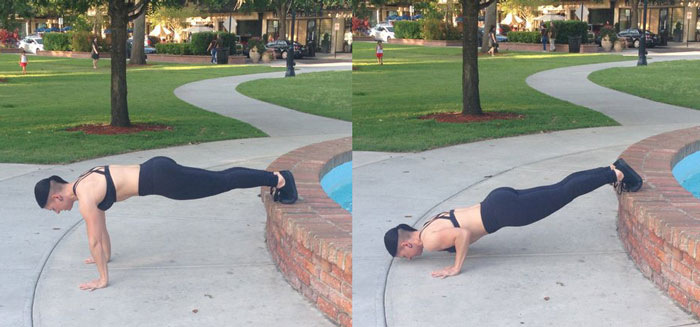
Taking the elbows out to a 45 degree or larger angle will usually be a choice of personal preference given physiology, or a choice made to make the exercise different or a little more difficult. We know that taking the hands out wider past the shoulders will be more challenging for most as well. When you’re ready, explore different hand positions, and then prepare to progress to a really fun intermediate/advanced push-up, the archer push-up.
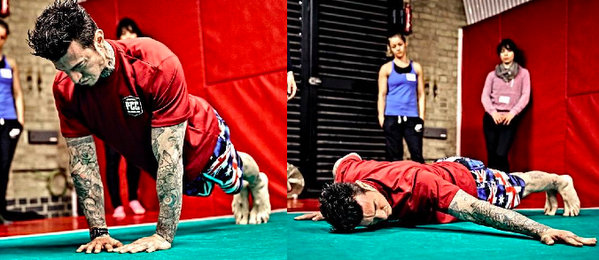
No matter what elbow angle is best for you, a real power-booster with the push up is the idea of having a spiraling feeling throughout the arm, and especially with the hands through the ground. A useful cue for this is to have your fingers pointing forwards, but at the top of the push-up, your “elbow pits” (see earlier phoot) will also be pointing forward. In a pinch—like those last few crucial reps of the Century Test—this spiraling feeling can make the difference between pass and fail.
Figuring out your optimal elbow angle can also lead to great success with the intermediate/advanced variations below, and of course your path to the one-arm push-up:

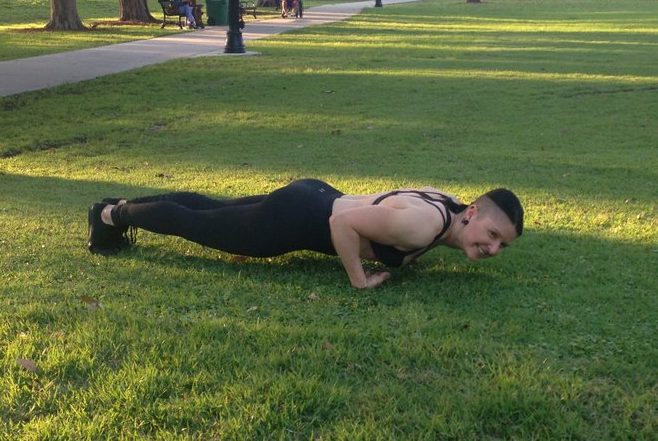
Hopefully these ideas will help you and your clients/students continue to get strong and progress with the eternally useful, do-anywhere push-up. Please share your experiences in the comments below.
Train STRONG!
Adrienne
****
Adrienne Harvey, Senior PCC Instructor, RKC-II, CK-FMS, has been RKC Certified since 2010, and RKC Level 2 certified since 2011. Kettlebell and bodyweight training have been crucial in Adrienne’s personal quest for fitness. A core member of the PCC team, Adrienne loves sharing her knowledge with small groups and individuals. She also loves to develop recipes and workout programs to further support performance, body composition, and of course—FUN.
Adrienne will be leading a one-day SCC (Strength Calisthenics Certification) Workshop in Gaithersburg, MD next month, and joining the Kavadlos at the PCC in New York next month as well. There are still a few spots available for each workshop, sign up today.
