• Skip to main content
  • Skip to primary sidebar
  • Home
  • Contributors
  • Resources
    • Q&A with Paul “Coach” Wade
  • Workshops
  • Products
  • Forums
  • Articles
  • Blogs
    • RKC Blog
    • Strong Medicine Blog
  • Archives

PCC Blog

Progressive Calisthenics - The Official Blog for the PCC Community

bodyweight row

Strength from Down Under – Aussie Pull-ups & Beyond

May 3, 2016 By Grace Kavadlo 13 Comments

Aussie Pull Up

“We all came here for the pull-ups!”

I love to see faces light up when Al or Danny say these words at the start of the PCC pull-up module. But before even getting into full pull-ups, we begin by practicing some lead-up steps, including the bodyweight row, aka the Australian pull-up.

Often dismissed by advanced calisthenics practitioners who can already perform full pull-ups, the Aussie is a viable and underrated exercise in its own right. Aussie pull-ups strengthen your arms, abs and even your grip. They can also help improve your posture, specifically countering the forward-head position that is prevalent in our texting, typing, and sedentary society, by strengthening the muscles of the upper and mid-back, including your rhomboids, lats, and traps.

While it may not be the sexiest or most eye-catching exercise, as a trainer, the Aussie pull-up is money! If you work at a gym, you will most likely be working with the general population, not a bunch of calisthenics ninjas. Unfortunately many folks cannot even do one full pull-up – guys or gals. For these clients, the Aussie is a fabulous option for increasing upper body pulling strength. This exercise is also of particular significance due to the fact that women are required to perform 10 consecutive repetitions in order to complete the PCC Century Test.

The Reverse Push-Up

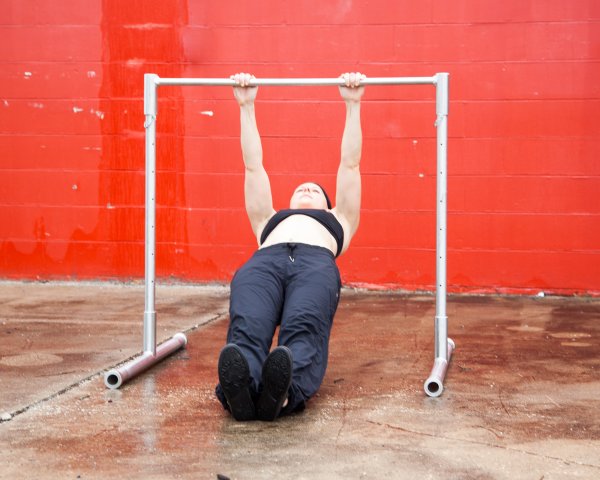
An Aussie pull-up begins with the body suspended horizontally below a bar that is positioned at approximately waist height. In the bottom position of the Aussie, your arms should be fully extended with your body in a straight line, almost like an upside-down push-up. Just like push-ups, you’ll need to engage your abs, legs, and glutes during every inch of the Aussie in order to maintain proper body alignment.

The similarities don’t end there. In push-ups, your shoulder blades should come together as you lower down (eccentric phase), and spread apart as you extend your arms and push back up (concentric phase). The same principles apply to the Aussie, only with the positive and negative phases reversed: The shoulder blades should come together as you pull yourself to the bar (concentric phase) and spread apart as you lower down (eccentric phase).

Similar to the push-up, beginners often mistakenly initiate the movement by extending their head forward. Remember to cue your clients to allow their head to relax in a more neutral position so their neck is in line with their spine. The body should be in a straight line from the ears all the way down to the heels.
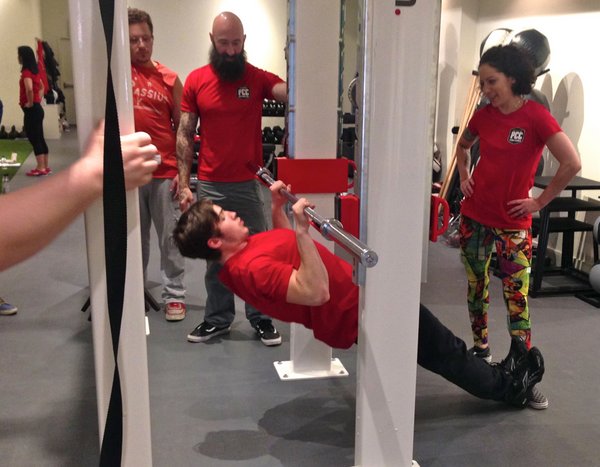
Aussie Pull-Ups at the PCC

Scaling Back

Thanks to the principles of progression outlined in the PCC curriculum, even the Aussie can be regressed for your more deconditioned clients. By shortening the length of your body, you can make this exercise less challenging. As with the push-up, bending the knees is a very simple way to accomplish this. Furthermore, the bent knee position allows the practitioner to push through their feet and create more favorable leverage. You can also flip your grip to an underhand position for the Aussie if you are having a hard time with the overhand grip. You can further regress the exercise by increasing the height of the bar, thereby distributing more of your weight in your feet.

Next Level Aussies

Just how elevating the bar can make the Aussie easier by placing your body in a more vertical position, raising your feet can make this exercise more challenging as you shift more of your weight into your hands and upper body. You can prop your heels on an opposing bar or a bench to use as an incline.
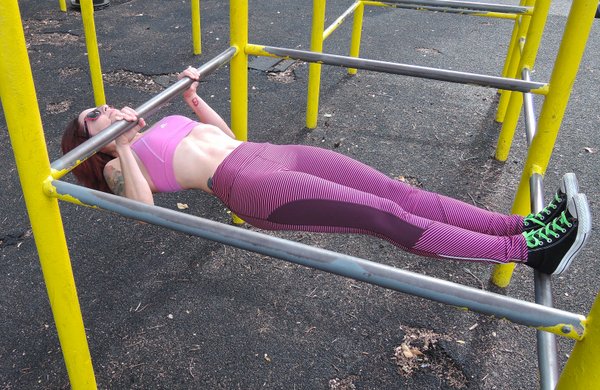
Aussie Pull-Up Variation

At the PCC, we also teach various grips for pull-ups in order to emphasize different muscle groups. These same methods can be applied to the Aussie. Experiment with placing your hands wider for more lat/back recruitment or closer together for more arm action. You can even try a variation on the Archer pull-up, which incorporates lateral movement in addition to the standard up and down motion. If you’re working towards a one-arm pull-up, you can even hone your unilateral skills in Aussie form, too. The variations on the Aussie are endless and fun to practice on your own, or with your clients.


Speaking of Aussies, I am excited to be teaching at the first ever PCC in Sydney, Australia this September along with PCC Lead Instructor Al Kavadlo. It’s always a pleasure to connect with you guys in person, and I can’t wait to do lots of Aussie pull-ups with my friends from down under.

I hope to see you there!

****

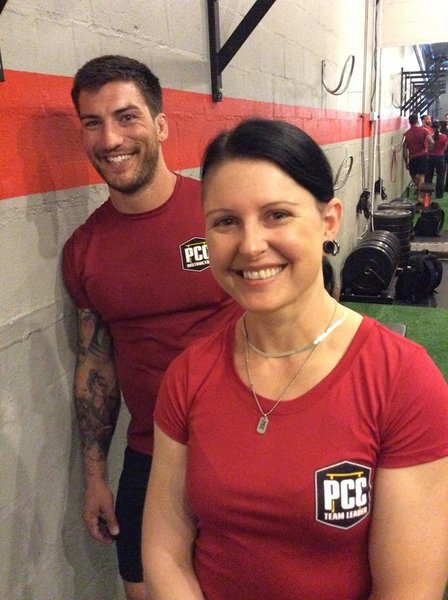
Grace Kavadlo is a PCC Team Leader, personal trainer and group exercise instructor located in New York City. She is a columnist for Bodybuilding.com and can be seen in several Dragon Door books, including Coach Wade’s Explosive Calisthenics. For more information about Grace, check out her website, www.DieselGrace.com
Filed Under: Progressive Calisthenics Tagged With: Aussie Pull Up Progression, Aussie Pull Up regression, Aussie Pull-Up, bodyweight row, Grace Kavadlo, PCC, progressive calisthenics, regressions, reverse pushup, row

Conquering the Century Test

November 18, 2014 By Adrienne Harvey 51 Comments

Adrienne Testing Pushups At Sweden PCC
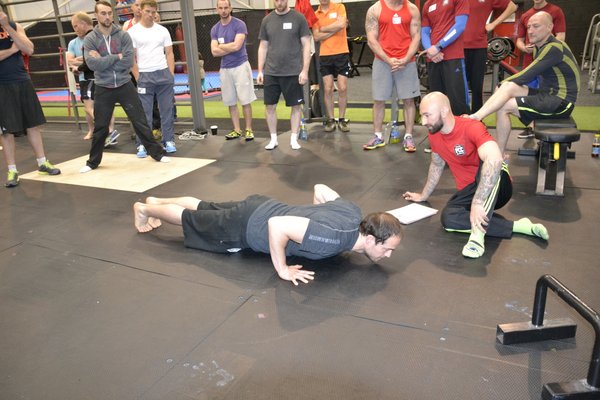
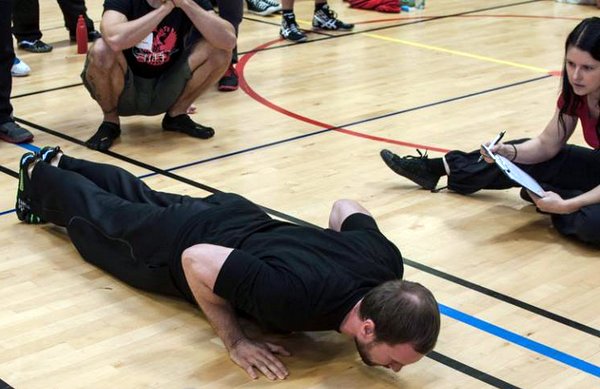
Adrienne closely observes push ups during the Century Test at a PCC Workshop

The Century Test is the climax of every Progressive Calisthenics Certification event. After three days of intense training, the Century is the only opportunity for prospective candidates to prove their mettle and earn the title of PCC Instructor.

While helping Al and Danny teach at several PCC workshops, I’ve noticed the same common issues continually come up during the Century Test. Before you think these don’t apply to you, remember I’ve actually seen many accomplished and highly athletic people make these very mistakes! Of course we make sure to point out the complete rules and standards at each workshop, but why not work to avoid these hidden perils from the beginning?

First, let’s talk about speed—you will have a total of EIGHT minutes to complete your Century Test. Somewhere along the line, a terrible rumor started about doing the test “as fast as you can.” Unfortunately, this is the opposite of how the test should be approached; the Century is not a race!

While we don’t want you to fall asleep mid-test or run out of time, we do require you to use a moderate pace that allows you to complete each rep with your best form, crisply and cleanly. We also need to be able to evaluate and count your reps in real time. If someone gets into speed demon mode, it’s very difficult to evaluate AND count each rep while making sure they are up to our standards. We shouldn’t be seeing “motion blur” around you!

Once you begin a set, you can’t stop until you have completed the required amount of reps (which will be counted by whoever is testing you—Al, Danny, or an assisting PCC instructor). For example, the first set is 40 bodyweight squats. Once that set begins, there’s no stopping until you complete all 40 reps. After a set is completed, you can take as much time (within that total of eight minutes) as you need to rest between sets—more on that later!

For many PCC attendees, an odd issue happens with the squats, but it is easily corrected. Sometimes people focus SO much on the “down” portion of the squat that they don’t always fully complete the “up” portion! Make sure you stand ALL the way UP at the end of each squat rep. Again, if this can happen to some of the most athletic and accomplished people then it can happen to anyone. If you have a training partner, ask them to keep a close eye on your full squat movement (or record a short video of yourself).

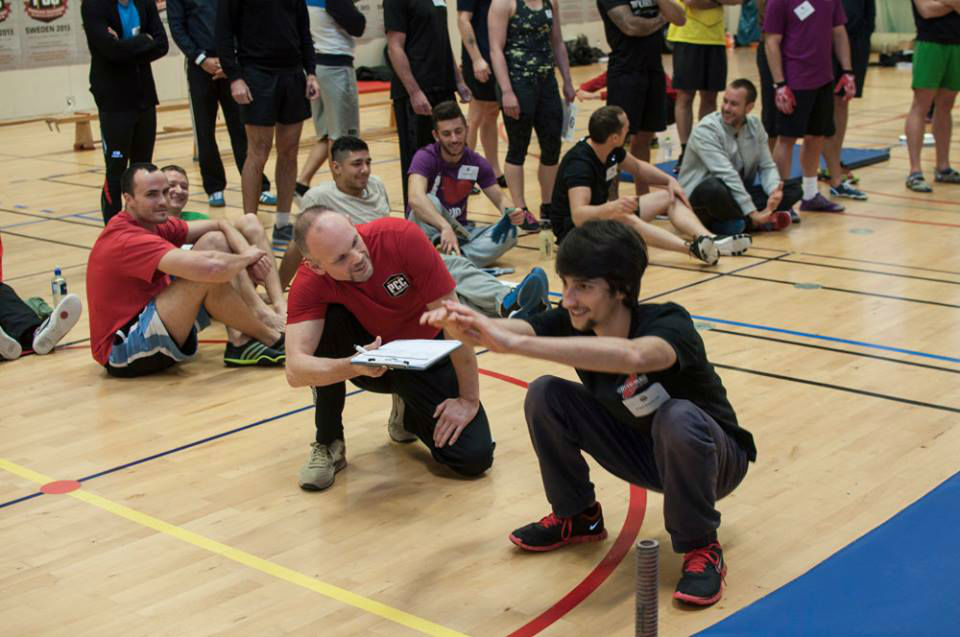
Testing Squats at the PCC

As for the lowering phase, the top of your thighs must come below parallel with the ground without any bouncing at the bottom. Some people have had issues here as well, so make sure you go all the down before you come all the way up!

Next up are push-ups, 30 reps. Men will do these from the feet, and the ladies will be doing them from the knees. (Feet must be together for men; knees together for women.) Again, be sure to come all the way up to a full lockout at the top – much like the squats, it’s easy to become preoccupied with the bottom portion of the exercise, the required depth, etc. while shortchanging the completion of the rep. Use a comfortable, moderate pace so we can see that all your reps are up to our standards.

Al Kavadlo Testing Pushups at a PCC Workshop

Many of the women who come to the PCC are super fit and have not done push-ups from the knees in a while—these same women often tend to have some very fashionable workout wear. This can be perilous when these high performance fabrics make our knees slide during the push-up. Suddenly our hands and knees are very far apart, and it’s against the rules to re-adjust them during the set. Make sure you have a non-slip mat below you, and/or hike up those shiny capris past your knees so they do not move on that mat!

Another issue that even very fit women will have with the knee push-up (especially if we’re used to doing push-ups from the feet) is the idea of keeping the body in a perfectly straight line from the knees to the shoulders, without bending at the hips. Have a training partner observe you, or shoot a video to watch and make sure for yourself. One cue I have used successfully with clients is to have them practice by starting in a “straight arm plank” position, then while keeping the trunk straight, drop down to the knees to find the proper alignment to begin a knee push-up.

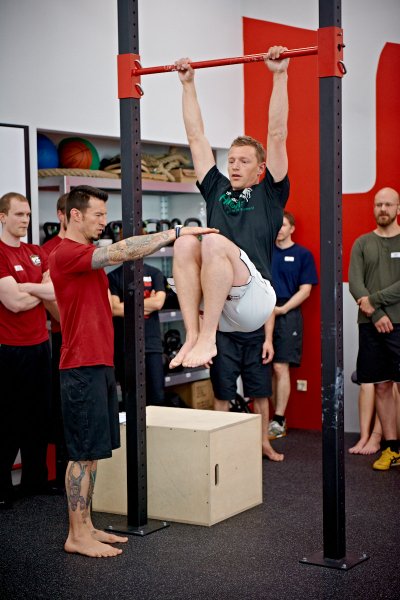
Danny Testing Hanging Knee Raises

Hanging knee raises are a real equalizer! Like squats, they’re tested the same for men and women. You must not swing or use momentum to make these reps, and you must hang onto the bar for the entire duration of the set. Make sure to grip the bar tightly while squeezing your shoulders down and back (basically, don’t hang like a limp noodle!) Imagine trying to bend the bar in half to intensify this feeling. Make sure to practice this at home!

Don’t underestimate a set of 20 knee raises. Bringing your knees above your waist takes a surprising amount of abdominal strength when you don’t use any momentum. When your feet come back down (also under control), I’ve found that aiming to put them just below (or even slightly in front of) your body is a great way to prevent momentum. People have found themselves in big momentum-trouble when they’ve extended their feet behind them on the “down” portion of the knee raises, because they start swinging back and picking up momentum. It almost becomes a mini-kip. Control is the name of the game with knee raises!

Finally we have the pull-ups, which are often the most challenging (and potentially heartbreaking) part of Century Test. Sometimes someone with plenty of time to spare just wants to get the test done and he or she does not give themselves adequate rest between the hanging knee raises and the pull-ups. I’ve seen very strong (but reasonably fatigued from 3 days of fun and intensive PCC work) people fail the test at the workshop because they couldn’t finish those last 1-3 pull-ups. An extra 30 seconds to 1 minute rest time between sets could have meant the difference between passing at the PCC or having to go home, regroup, train and submit a test video. It’s moments like these that we all wish for an “undo” or “rewind” button on life! Don’t underestimate the adrenaline rush of “test time”! Remember, it is not a race; you have 8 full minutes, so use it!

For the pull-ups, men will be doing 10 dead hang pull ups from a pull up bar with their choice of underhand or overhand grip. (If the bar is too high, and/or your hands are somehow shredded because you were inspired to overdo it a bit on the previous days, do not hesitate to ask us for a step stool!) Women will be performing 10 “Aussie” pull-ups (down under the bar—also known as bodyweight rows) from a waist-height bar. Again, I can’t encourage the ladies enough to experiment with these bodyweight rows. When practicing for the PCC, find a bar that’s the right height for you, and make sure that your body is positioned in such a way that you’re able to pull yourself up to the bar without having your feet slide—experiment with a mat, or a good shoe choice, etc. Pull yourself up close to the bar at the top of each rep, stay engaged (think plank) without having your body bow up or slump down.

Adrienne Demonstrates Aussie Pull-Up

Men, make sure that you are doing full pull-up reps, as half reps won’t count and can be costly in terms of fatigue! A SLIGHT kink in the elbows at the bottom of the rep is technically allowed, but make sure to have someone check you and video yourself to make sure that you aren’t slipping into doing half-reps. And, no kipping or momentum allowed!

I hope that these details have been helpful, and please feel free to ask questions here and always at the workshop. We really do want everyone to pass if they are truly ready and able to represent the PCC as a certified instructor, while helping their students/clients improve their fitness and quality of life.

Hope to see you at a future PCC Workshop!
Adrienne

Adrienne at the PCC Workshop with Adam

***

About Adrienne Harvey, Senior PCC Instructor, RKC-II, CK-FMS, Primal Move Nat’l Instructor: Originally RKC Certified in 2010, and RKC Level 2 certified in 2011, kettlebell and bodyweight training have been crucial in Adrienne’s personal quest for fitness. A core member of the PCC team, Adrienne loves sharing her knowledge with small groups and individuals. She also loves to develop recipes and workout programs to further support performance, body composition, and of course—FUN. Go to http://www.giryagirl.com for more information about Adrienne!

Filed Under: Motivation and Goals, Progressive Calisthenics Tagged With: Adrienne Harvey, attending PCC, Aussie Pull Ups, bodyweight row, Century Test, Century Test details, Hanging knee raises, how to pass the Century Test, Knee Push ups, Passing the PCC, PCC Testing, PCC Workshop, Progressive Calisthenics Certification Workshop, pull-ups, push-ups, squats

The Missing Link to the One-Arm Push Up

February 18, 2014 By Todd Cambio 21 Comments

Al Kavadlo One Arm Push Ups

I love body weight exercises.  I think they should be the basis of any training program.  Body weight movements can be used for warming up, for cooling down, for flexibility and mobility.  Then, once you learn these movement patterns, they can be progressed to truly test one’s individual strength.  Things like pistol squats, pull-ups, handstand push-ups and one-arm push-ups are incredible exercises, which is one of the reasons I gravitated towards Convict Conditioning.   This book has been instrumental in bringing my skill set to the next level.  I use it to train myself as well as my clients.  It has helped me clearly structure a periodized workout plan for my clients with clear goals and progressions.

When I design my training programs, I train opposing muscles groups or movement patterns.  For every action – there is an equal and opposite reaction.  For example, we all know that the push up is a fantastic upper body strength exercise – but when overused, it can cause some issues.  The big muscle groups like the upper pectorals; shoulder and the internal rotators of the arm and shoulder can become shorter and tighter than the external rotators and scapula retractors.  This tightness can possibly cause a forward rounding posture and possible neck and shoulder injuries.  So to make sure I don’t cause these possible issues, I always have an opposite movement paired with the exercise, in this case, the body row.  This is my push/pull relationship method of training.

The body row is the sister exercise to the push up, however, it is much less utilized.  It also incorporates almost all the same muscle groups as the push up.  The exception is that the prime movers are the back of the body (posterior chain) as opposed to the front (anterior chain) of the body.  Most of the attention goes to the Pull Up as the ultimate body weight back exercise, which is of course an awesome exercise, but until my clients are strong enough to do them correctly, the Body Row rules the roost!

So, what is that missing link you may ask?  It’s the Body Row.  Actually, since we are talking about the One-Arm Push Up, it’s the One-Arm Body Row!

In fact, as I progress up the ten steps in Convict Conditioning Push Up Series, I progress up my own steps to a one-arm body row.

In Convict Conditioning, the horizontal pull is what I call a body row.  I use the Lebert Equalizers for my horizontal pulls because I can add some great variety to the pulls as well as bring them with me to where ever I want to train, inside or outside.  Always having a place to do a pull up is sometimes an issue.  So, if I am outside and want to add in some pulls, I can.

The Body Row is similar to Convict Conditioning’s Pull Up Series Step Two, but with a different tool.  Here is the point where I branch off from the Pull Up Series and add a few alternative steps with the Equalizers that translate to a better one-arm push up.

I will not go into great detail about each body row movement because I am sure if you are following Convict Conditioning, you get the main points on proper form.  I will point out the basics though, which are pretty straightforward.  When you get into your starting position with the Equalizers (EQ), dig your heels into the ground and fire your glutes to keep your hips locked and aligned.  Grab the black grips with a firm hold to fire the forearms.  Keep a neutral spine as you pull yourself off the ground.   When you progress to the single arm body rows, it is much like a single arm kettle bell swing in that your body will want to rotate on you.  Do your best to keep your shoulders parallel to the floor.  Your core will get quite a workout here too!

Convict Conditioning Push Up Steps with correlating Body Row Movements:

Step 4 – Half Body Row – Mirrors the Half Push Up (the ball under the glutes is to help cue you to keep your hips up)

Todd Cambio Half Body Row Todd Cambio Half Body Row

Step 5 – Full Body Row – Mirrors Full Push Up

Todd Cambio Half Body Row Todd Cambio Half Body Row

Step 6 –Single EQ Chin up – Mirrors Close Push Ups

Todd Cambio Half Body Row Todd Cambio Half Body Row

Step 7 –Single Leg EQ Body Row – Mirrors the Uneven Push Up

Todd Cambio Half Body Row Todd Cambio Half Body Row

Step 8 – One Arm Half EQ Body Row – Mirrors the One Arm Half Push Up

Todd Cambio Half Body Row Todd Cambio Half Body Row

Step 9 – One Arm EQ Body Row – Mirrors the One Arm Push Up

Todd Cambio Half Body Row Todd Cambio Half Body Row

So there you have it, a push/pull relationship that not only enhances your one-arm push up but also increase your overall body weight strength.

Todd M. Cambio, CSCS, HKC is the owner of Precision Fitness in Westerly, RI. He is a strength and conditioning coach that specializes in sports performance and obstacle course race training. Todd is a Certified Strength and Conditioning Specialist, a Spartan Group X Obstacle Course Coach, a published author and Master Body Weight Trainer & Presenter for Lebert Fitness. See what Todd is up to by visiting www.ToddCambio.com.

Filed Under: Progressive Calisthenics Tagged With: bodyweight row, Convict Conditioning, core strength, one-arm push-ups, progressive calisthenics, push-pull, Todd Cambio

Primary Sidebar

Featured Products

previous arrow
GetStrongBookCover
ConvictConditioningBookCover
StreetWorkoutBookCover
ExplosiveCalisthenicsBookCover
StrengthRulesBookCover
next arrow

Categories

Progressive Calisthenics Certification Logo
Click here for more information or to register for the PCC workshop

Get Strong Workouts TriadXP App
Get Strong Workouts App

Recent Posts

  • Top 5 Reasons Why an In-Person Workshop is the Best Way to Supercharge Your Training
  • HYBRID STRENGTH TRAINING IS HERE!
  • My Calisthenics Journey to the PCC
  • The Handstand Press: Complete Control Through the Handstand
  • The Get Strong App is Here!

Dragon Door Publications

Dragon Door Publications

Recent Comments

  • bross dandon on The Case for Curved Handstands
  • Johnny Flewellen Jr. on Strength for Life
  • Dan Earthquake on The Pursuit of the Daily Minimum
  • Johnny Flewellen Jr. on The Pursuit of the Daily Minimum
  • Johnny Flewellen Jr. on Yoga, Calisthenics and the Journey of a Lifetime
FOLLOW US ON TWITTER!

Copyright © 2025

Dragon Door Publications / The author(s) and publisher of this material are not responsible in any manner whatsoever for any injury that may occur through following the instructions or opinions contained in this material. The activities, physical and otherwise, described herein for informational purposes only, may be too strenuous or dangerous for some people, and the reader(s) should consult a physician before engaging in them.