• Skip to main content
  • Skip to primary sidebar
  • Home
  • Contributors
  • Resources
    • Q&A with Paul “Coach” Wade
  • Workshops
  • Products
  • Forums
  • Articles
  • Blogs
    • RKC Blog
    • Strong Medicine Blog
  • Archives

PCC Blog

Progressive Calisthenics - The Official Blog for the PCC Community

flexibility

Give The Squeaky Wheel Some Grease

September 13, 2016 By Bret Hamilton 17 Comments

Al and Danny Kavadlo PCC demo squats and mobility

Keeping things simple, yet effective is something that I’ve personally struggled with at times. Every so often, I find myself imagining the solution to a problem has to be complex in order to provide the result I desire. I’m also often reminded that said solution to said problem is staring me in the face, I simply don’t realize it right way.

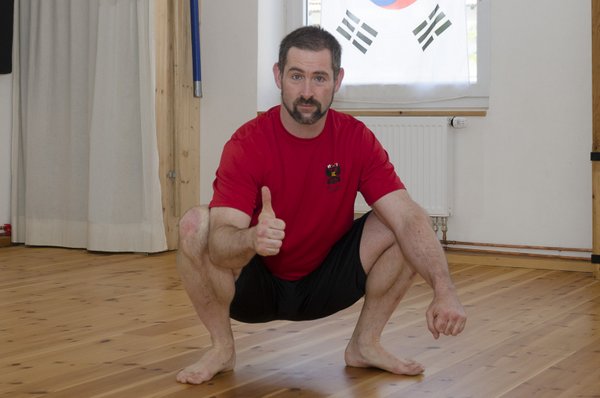
Back in June of this year, I had the privilege to meet and work with Al and Danny Kavadlo at the Progressive Calisthenics Certification. Over the course of the weekend, we did one-to-two hour modules on each movement taught in the course. It was during the squat workshop when I approached Al with a question regarding ankle flexibility as it pertains to the squat–specifically the airborne or hover lunge variation. “Al,” I said. “When you are working with someone who may have an ankle that is stiff or impinging, do you have any specific go-to drills to help develop flexibility in that joint to make the squat feel more symmetrical?”

His response, so simple as it was, annoyed me at the time. To be honest, I expected more than, “Give the squeaky wheel some grease.” With Al’s trademark grin, smiling eyes, and a pat on the back, he walked away as I reflected upon his words.

“Give the squeaky wheel some grease,” I thought, silently grumbling to myself. “That was not the answer I was anticipating, nor looking for!”

brethamiltonalkavaldopcc2

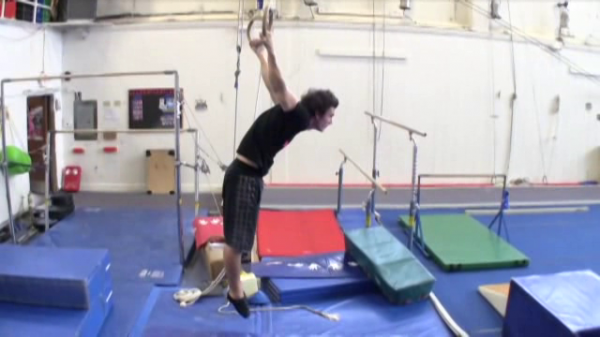
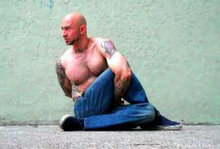
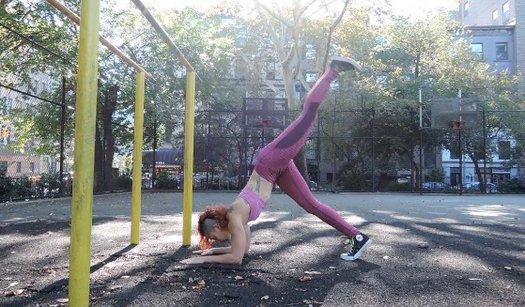
You see, when I asked that question, I was specifically asking it in reference to an old soccer injury of my own that left my right ankle feeling very bound up, and occasionally painful compared to the other side. I’d utilized various joint self-mobilizations in the past, yet nothing had really helped the ankle improve permanently. As a point of reference, by the time I attended the PCC in June, I was capable of performing full depth pistol squats and hover lunges for reps on either side, but they were rather sloppy on the right leg, due to my mobility limitations.

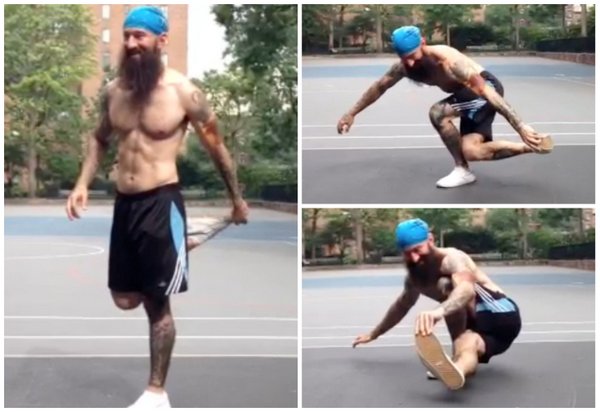
When I returned home from the course, Al’s words stayed with me. Even though I was skeptical, I trusted that maybe there was more to what Al said than I’d initially thought. I decided to put his words to the test. I dedicated myself to working on my hover lunges daily, focusing on “pulling” myself into the movement using my hip flexors and shin muscles. Gradually, I began to notice that I was more easily able to place the knee of my rear leg closer to the heel of my front foot on the descent of the hover lunge. Although the depth of my hover lunge had not increased, the amount of articulation my ankle was forced to go through in order to complete the rep was increasing steadily.

Al’s words were ringing true, all to my surprise, pleasure, and chagrin! The answer was in front of me all along, but it took a guy named Al six short words of wisdom to help me realize what I needed to do: Practice the move more often, and with a sharp focus on improving specific qualities within that movement, no longer worrying about reps and sets.

Bret Hamilton shrimp squat hover lunge

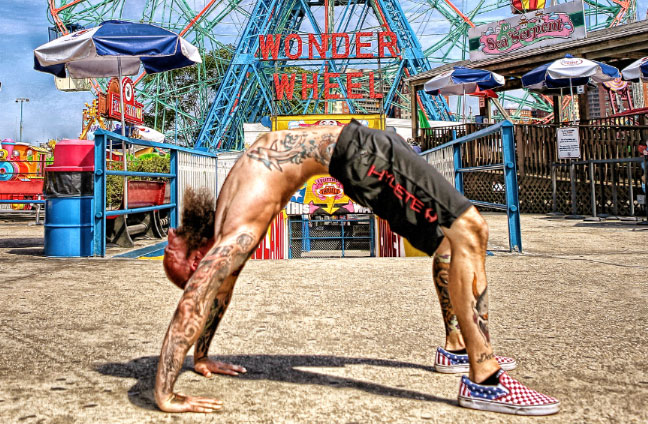
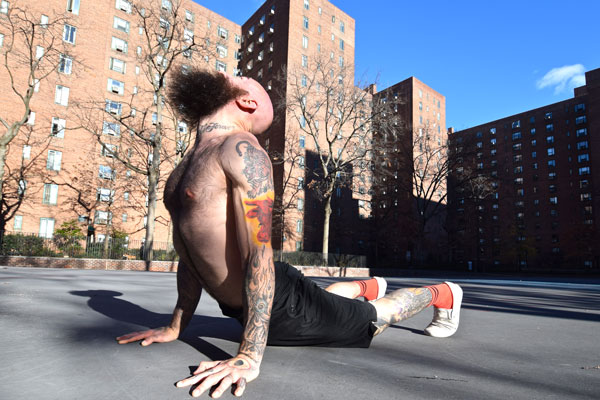
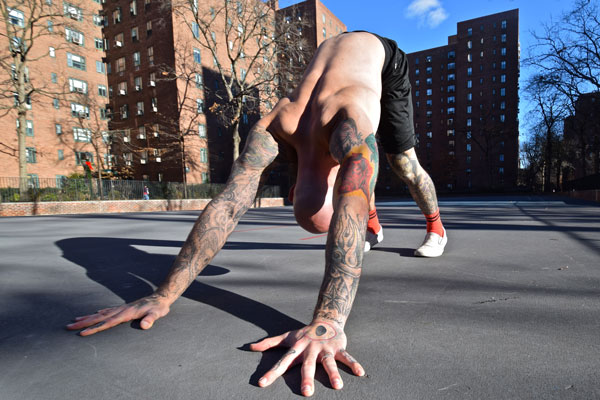
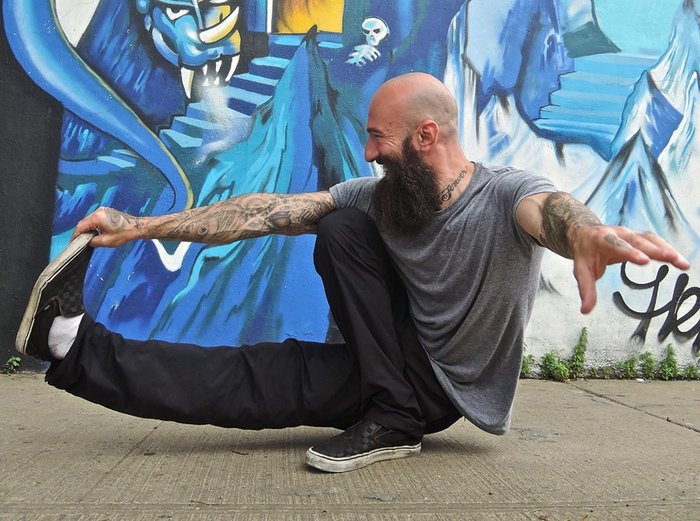
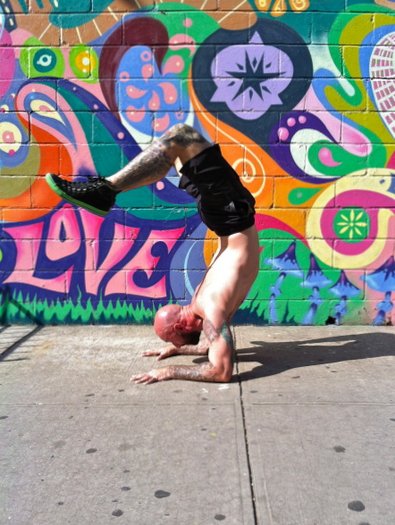
It is now early September. I’ve practiced the hover lunge daily for 6 weeks now. Not only has my ankle improved its flexibility, but it has ceased hurting. I’ve progressed from a regular hover lunge to placing first one hand behind my back, and eventually a second hand behind my back while performing them. This has forced the muscles in my hips, thighs, and shins to contract more forcefully in order to keep stable and complete the rep. I’ve also practiced doing a “dragon” variation of the hover lunge with zero, one, and two hands behind my back, as well as an elevated dragon pistol squat. I was capable of none of these feats prior to attending the PCC.

Throughout this learning process, Al’s simple words have continued to resonate with me. I’ve since applied this principle of consistent practice to other movements I’ve been stuck with and have found it to be equally as effective. I’ve “greased the groove” before, but only with the intent to improve the strength of a movement, never to improve the perceived quality of it. It has been the most liberating six weeks of strength training I’ve had since, well, ever! Letting the process unfold before me has been such a joy, and I encourage everyone to approach their own training with this same mindful pursuit. This is truly why calisthenics is so unique, beautiful, and playful all at once.

brethamiltonandalkavadlopcc4At the end of the day, my goal is to become the best version of myself possible, and to help further others in their own journeys. My hope is that you might take notice of this post and give your own squeaky wheels some grease. Because let’s be honest, we’ve all got them! And don’t forget to keep it simple.

Thanks, Al, you son of a gun!


****

Bret Hamilton is the head coach and co-owner of Constant Forward Progress-Bodyweight and Kettlebell Training. He and his wife Megan live and train near Portland, OR. When Bret isn’t working with clients in the gym, he loves to jump on the trampoline, play pickleball, read a great book, and relax to video game now and then. You can learn more about Bret and CFP at www.constantforwardprogress.com.

Filed Under: Motivation and Goals, Progressive Calisthenics, Workshop Experiences Tagged With: Bret Hamilton, dragon squat, flexibility, hover lunge, mobility, one leg squat, PCC, progressive calisthenics, shrimp squat

Three Easy Stretches to Improve Your Calisthenics Practice

December 22, 2015 By Al Kavadlo 14 Comments

Wonder Wheel Bridge Al Kavaldo

Anyone who’s practiced calisthenics long enough knows firsthand that mobility is a crucial component of bodyweight exercise. Calisthenics staples like L-sits, back bridges and pistol squats all demand a high degree of flexibility, but even less obvious exercises like pull-ups and handstands require mobility as well.

While practicing those moves in and of themselves can help you improve your range of motion, supplemental stretching can elevate your calisthenics game to the next level.

Here are three simple stretches that you can practice daily to improve your overall mobility. Just try to hold each pose a few times a day while you take several deep, slow breaths. There’s no need to set a timer or be too dogmatic about it.

Speaking of dogs…

Updog

What’s up, dog?

For starters, it’s a great way to prep your spine for bridge work. It also opens your hip flexors, warms up your triceps and provides a good stretch for your abdomen.

Begin in a push-up position, then drop your hips toward the ground, lift your chest and look up. Be careful not to let your shoulders shrug up by your ears. Think about pulling down and back through your shoulder blades like you would during a pull-up. Press your hands into the ground, lock your elbows and gently contract your quads to prevent your legs from dragging on the ground.

Al Kavadlo Up Dog

Downward Dog

Downward Dog is a helpful stretch for building flexibility in the entire posterior chain as well as opening the shoulders. It will loosen your hamstrings for L-sits and pistol squats, plus it can improve your handstand as well.

Begin on your hands and knees with your toes curled under your heels, then slowly lift your hips into the air while pressing your chest toward your thighs. Try to keep your back as flat as possible while pressing your hands into the ground and reaching your hips into the air. Do your best to maintain straight arms and legs, though it’s okay to allow your knees to bend and/or let your heels come off the floor. In time, work toward fully extending your legs and pressing your feet flat. People with tight calves may find it helpful to bend one knee while straightening the other, alternating sides.

Al Kavadlo downward dog

Seated Twist

A powerful stretch for the hips and spine, the seated twist is also one of Coach Wade’s three favorite stretches, as noted in Convict Conditioning 2. The full expression of the exercise, which involves binding the hands, is also a great stretch for the shoulders. Seated twists are helpful for any calisthenics move that requires rotation, such as the side crow or dragon pistol squat.

Sit on the ground with both legs extended straight in front of you. Now bend your right leg and cross it over the left, placing your right foot flat on the floor. Twist your trunk and reach your left arm out in front of your right knee. Your right hand should be placed palm down on the floor a few inches behind your back as you twist and look over your right shoulder. From here you can bend your left leg as well, tucking the foot beneath your opposite hip. For an added stretch, reach your right hand behind your back while threading your left hand through the opening beneath your right knee, bringing your hands into a bind (or gripping a cloth between the hands if a bind is not yet attainable). Make sure to repeat the stretch on both sides.

Seated Twists

I encourage you to use these stretches to warm up at the start of your calisthenics practice and/or to cool down at the end. The more time you spend in each pose, the better they should start to feel. Also feel free to practice throughout the day any time you feel stiff.

To find out more about stretching to improve your calisthenics practice, check out my book Stretching Your Boundaries – Flexibility Training for Extreme Calisthenic Strength.

Pic5StretchingYourBoundariesBookCover

****

Al Kavadlo is the lead instructor for Dragon Door’s Progressive Calisthenics Certification. Recognized worldwide for his amazing bodyweight feats of strength as well as his unique coaching style, Al is the author of five books, including Raising The Bar: The Definitive Guide to Pull-up Bar Calisthenics and Pushing The Limits! Total Body Strength With No Equipment. Read more about Al on his website:www.AlKavadlo.com.

Filed Under: Flexibility, Tutorial Tagged With: Al Kavadlo, breathing, calisthenics, downward dog, flexibility, mobility, PCC, progressive calisthenics, seated twist, Stretching Your Boundaries, twist, updog, yoga

The Dragon Pistol Squat

July 28, 2015 By Al Kavadlo 25 Comments

Al Kavadlo Dragon Pistol Lead

The first time I ever tried to do a one-legged pistol squat, I failed miserably. Even though I thought I had strong legs from years of weight training, my initial attempt at this calisthenics staple resulted in me falling on my behind. After several weeks of dedicated practice, however, I was able to nail the pistol squat and eventually build up to performing it for reps.

Later on, I discovered an exercise known as the shrimp squat, which finds the non-squatting leg held behind the body, rather than in front, as it is with the pistol. Once again, my first attempt at this new one-legged squat variation was unsuccessful. This time, however, I was able to get the hang of my newfound lower-body calisthenics challenge within a few training sessions. The strength and stability I’d built from pistols had a good amount of carryover to learning this new skill.

As I got more comfortable with the shrimp squat, I began finding new ways to make single leg squats more challenging. By holding both hands behind my back, I discovered I could change the leverage and add a significant amount of resistance without relying on external weights. I was also starting to practice a technique that would later go on to be dubbed the “jumbo shrimp”, which involves increasing the range of motion of a standard shrimp squat by standing on an elevated surface so that the back leg can drop down lower than when standing on the ground.

Raised Shrimp Squat "Jumbo Shrimp" at Encinitas PCC workshop

Legs Get To Work
One of the most common misconceptions about bodyweight strength training is that it can only be progressed so far. After a certain point, many people would argue that the only way to increase the difficulty of an exercise is to add weight. This is especially true when it comes to leg training. Even folks who have come around to the idea that a muscular and highly functional upper-body can be built with calisthenics alone often have a hard time conceiving that the same is true for their lower half.

Though different people define strength differently, there are plenty of bodyweight squat variations to keep your workouts fun and challenging for a lifetime. If standard pistol squats and shrimp squats are no longer difficult for you, don’t start thinking you need to join a gym. Instead, consider giving the dragon pistol squat a shot.

Dragon Pistol Squat ? #ProgressiveCalisthenics #Legs #Calisthenics #Legday #PistolSquat #BeardPower #NinjaTraining #NowYouTry

A video posted by Al Kavadlo (@al_kavadlo) on Jul 23, 2015 at 11:42am PDT

Enter The Dragon Pistol
Like the traditional pistol squat, the dragon pistol requires serious strength, balance and mobility – and in a very unique way. The dragon pistol can be surprisingly taxing on your inner thighs as well as your deep glute and hip muscles. And of course, all the other muscles that you work in a standard pistol will get hit as well.

As we each have our unique strengths and weakness, some people may find this move a lot harder than a normal pistol, while others may not experience a huge disparity. Regardless, I suggest building a solid foundation in standard pistol squats before beginning to work on this variation.

Convict Conditioning Vol 2 Twist

Other than that, I recommend you spend some time working on your hip mobility by practicing twist holds, which you may recall seeing in Coach Wade’s Convict Conditioning Vol 2. Once you’re able to do a standard pistol and a full twist hold, you shouldn’t be too far from the dragon pistol.


Elevation Training
Though standing on a bench or other elevated surface when performing a shrimp squat can increase the difficulty of the exercise by increasing the range of motion, practicing the dragon pistol while elevated can actually be a very helpful regression. By allowing your non-squatting leg to drop below the bench, you can decrease the amount of mobility required to perform the exercise. (This same technique of standing on an elevated surface can be very useful when someone is learning to do a standard pistol squat as well.)

Dragon Pistol Raised Regression

Toe the Line
If you’ve spent some time working on pistol squats, you’ve probably at some point experienced a cramp in your non-squatting leg as you fought to keep it in the air. This is common when learning the dragon pistol, too, only the cramping may take place in your hip and/or inner thigh instead of your quads. To minimize this issue, many people find holding the toe of their squatting leg to be helpful, particularly in the bottom position.

The dragon pistol also has quite a bit in common with the shrimp squat, as both moves begin with the non-squatting leg behind the body, rather than in front. As such, you may find that holding your toe behind your back at the top of a dragon pistol (similar to how you would in a shrimp squat) will allow you to control your leg as you gradually extend it into the bottom position (which more closely resembles a pistol squat, only with the extended leg threaded behind the squatting leg). Note that your hand will reach across to the opposite toe for this variation, whereas in a shrimp squat it is more common to hold the toe on the same side. So if you’re going for a dragon pistol on your left leg, you would hold your right toe with your left hand.

Al Kavadlo Dragon Pistol How To

When practicing these progressions, I recommend keeping your training volume low. Warm up with a few easier moves (basic squats, split squats, maybe a few pistols and shrimps) then get into practicing your dragon pistol progressions (elevated, holding your toe, etc). When starting out, stick to just one or two reps at a time – a total of 10 reps per side in one training session is probably plenty. If you go slowly and focus on staying in complete control of your movement, you won’t need to do a whole lot of volume.

I’ve only recently begun experimenting with this move, so don’t take my guidance as the final word. I’m sure I will learn a lot more as I go. Feel free to share your experience with the dragon pistol squat in the comments below.

***

Al Kavadlo is the lead instructor for Dragon Door’s Progressive Calisthenics Certification. Recognized worldwide for his amazing bodyweight feats of strength as well as his unique coaching style, Al is the author of five books, including Raising The Bar: The Definitive Guide to Pull-up Bar Calisthenics and Pushing The Limits! Total Body Strength With No Equipment. Read more about Al on his website:www.AlKavadlo.com.

Filed Under: Progressive Calisthenics, Tutorial Tagged With: Al Kavadlo, bodyweight exercise, calisthenics, Dragon Pistol, flexibility, how to, leg training, mobility, tutorial

How to Split

July 7, 2015 By Florian Kiendl 12 Comments

Florian Kiendl Splits

If after reading the headline, you expect me to give you advice on how you can get rid of your significant other, I am sorry to disappoint you. As husband to a beautiful wife and father of two sweet kids, I am simply not qualified to give you advice on that. I am however qualified to answer the question of how you can achieve a full split even if you are distinctly beyond your teens. It is a common misconception that once you have grown out of your teenage years it becomes impossible to achieve flexibility feats like the full front or side split. Let me tell you–this is definitely not the case. How can I know it? Simple: I achieved my first full split at age 40 and have now at 42 reached a level of mobility that I can do it practically every day if I please.

Before I tell you what helped me to finally get my split, let’s first get one thing straight: learning to do a full split should not be your goal just for the sake of it. If you need the flexibility because you are a martial artist like me, a dancer or yogi or otherwise need it for your sport–then go for it. If you have no definite reason to learn the splits, however, I would not advise you to add it to your list of goals. I write this for two reasons. Number one: the split does not come easy, if done properly it is a feat of strength and flexibility that requires months if not years of dedicated training. Reason number two is that it comes at a cost. Moving well in this extreme range of motion requires a very specialized kind of strength. If you don’t spend the time and effort necessary to develop this specific kind of strength, you risk the integrity of your hip and knee joint. Also training for the split will likely interfere with your other training. It’s too much bother just to get a cool looking picture! Use the concepts I will lay out in this post to archive the level of mobility you really need and then go on and pursue your other goals.

How Genetics Impact Flexibility

Everyone knows there are people who are very flexible by nature and there are those who are stiff. In which category you belong is determined by your fascia. If you are fairly young and female, chances are good that your connective tissue is soft and you can get your split fairly easily–if you are in this situation please take my advice and make an effort to strengthen your legs and core before you go for the full split. This will take a little longer but your joints will thank you for it. The fastest way to your goal is not always the best.

Should you, like me, not belong to this gifted group of individuals, I have good and bad news for you: the good news is that it is still both possible and achievable to do a full split; the bad news is that you will have to put in more work and dedication to achieve your goal.

Al Kavadlo Front Split

Understanding the Split

A split is the ability to sit on your butt while having your straight legs either out to the side or one in front and one behind you.

As there is no tissue in the body that connects your legs directly to one another, doing a split should be easy, right? I have been told, but have not seen it personally, that a fully sedated person can be positioned in a split no matter if this person can do so while awake. Anatomically there is no real reason why not everybody should be able to do that.
 The ability to perform a split (or not) lies in our nervous system rather than in our joints or muscles.

There is a right way to achieve your split and a wrong one. If you pick the wrong one you will find that you get problems in your hip and or knees because you “stretched” bands and ligaments instead of your muscles. In the German language this is called joint cavity mobility.  I personally tested this approach in my early Tae Kwon Do career and cannot recommend it.

The correct route is to keep your joints tightly in the socket and lengthen your muscles enough to allow for the desired range of motion. This is also good news for people like me, who passed their twenties without achieving the split. The older you get the harder your connective tissue tends to become–but your muscles do not lose the ability to lengthen with age.

Why is it that average people tend to get stiffer as they age? The answer is simple yet profound: You lose your mobility if you do not use it on a regular basis. Our average contemporary moves less with every passing year and thus also get stiffer. Here in Europe, we have a great example of this process at work: in the more southern parts of Europe like Italy and parts of France, public toilets are usually designed for standing use–in order to do what you have to do, you need to get into a decent (and hopefully stable) deep squat. Guess what: the number of people with a good squat is much higher in the southern parts.

Florian Kiendl Good Squat

Rules for Stretching:

1 – Always use tension
Granted if you stay loose while stretching you will get deeper, but the additional ROM does not necessarily come from the joints you’re trying to stretch, but rather from its neighbors. This does not make you more mobile but sets you up for injury as you weaken joints that are not meant to be mobile–in the case of the split this would be the knees and the lower back. Therefore it is imperative to hold everything tight and only loosen the exact joint you are targeting.

2 – Never force it
Pretty much every body can learn a full split – but not everybody can do every split. If you look at x-rays of the hip joint from different people, you will notice that there are distinct differences that impact the way somebody is most likely to get into his split. The longer the femoral neck and the more shallow the socket of the hip joint is the easier it will be for that individual to get into the a split. I have shallow sockets but a short femoral neck–therefore you will never see me sitting in the split with my toes pointing forward. 
Whenever you find a blockage during a stretch, don’t try to lever through it–simply find a better way.

3 – Understand the pain
Pain is a signal–and to do extreme stretches without injury you need to be able to interpret those signals correctly. For somebody new to stretching, the discomfort involved is usually mistaken for pain–which it is not. It is simply your nervous system trying to talk you out of the idea. Like your mother used to tell you not to go too deep into the woods when you were a kid, your nervous system does not like to explore unknown joint angles. If you are like me–you did not really listen to your mother, but you used caution while exploring the unknown. In my eyes this is the right approach for stretching also: get used to the sensation, try to enjoy it and avoid suffering. Always listen to the warning signals your body sends and back off when necessary.

4 – Mobilize first
No matter which position you’re in, always try to mobilize before you go deeper into it. When you approach the outer limits of your current ROM your joints usually feel very tight and immovable. Instead of forcing your way through this tightness you should try to make small movements until you feel less tight. Only then it is time to progress deeper into the stretch.

5 – Take time to recover
In order to stretch, your main movers need to lengthen, allowing for the increased ROM, while the smaller stabilizer muscles must protect your joints. If you are wise, you back off after every max attempt and give yourself time to recover. Every time I achieved a new PR in my journey to the split I’d take a break – sometimes as long as two weeks before I restarted my split training. In my opinion this is the reason why most people fail to reach these levels of mobility – they go too hard for too long time and the CNS finally sets its parking brake.

Florian Kiendl Stretching Rules

Side Split

The side split was my first split and it is a little easier than the front split for most people. I would not recommend to push both exercises hard at the same time.

Sit with a tall spine and open your legs until you feel a light tension on the inside of your thighs. Pull your toes to the knees and keep the knees tightly locked (pull your kneecaps upwards). Keep your lower back tight at all times.

Now try to tilt your belly button toward the floor. Go as far as you can without suffering too much and hold the position until it feels more comfortable – then open your legs more by pushing your heels away from you. Again hold this position and lightly rock your pelvis forward and back. If you feel you can go on–repeat the process. Try to hold the last position for 10 to 30 seconds before you slowly back off.

To get safely out of the stretch I like to lift both knees with the hands and bring the feet together. Stand up and move your hips.

Florian Kiendl Side Split

Front Split

If you have the side split, it is fairly easy to gain your front split also. For me the front split came almost automatically. Go into a lunge position and push your rear leg back as far as you can while keeping your knee away from the floor. Hold the position and try to go as low as possible without touching the rear knee to the floor. When you feel you cannot go deeper, push back even more until your forward leg is straight. Finally you will be able to touch your hip to the floor.

Florian Kiendl front split with rotation

Seated Straddle with Rotation

Another way to get into the front split is to sit in a wide straddle, rotate the torso toward one leg, and push yourself up. As soon as you find your mid-line, let gravity take care of the rest. Use your arms to support yourself as much as you need.

Remember to go slowly with these exercises and back off when you need to. Enjoy the process and if you are diligent and dedicated, the full splits can one day be yours.

****

Florian Kiendl, PCC, RKC Team Leader, is a second degree black belt in Tae Kwon Do and runs a Martial Arts Gym in a small town close to Munich, Germany. In his search for ways to overcome the movement restrictions of his students (and his own) he found the PCC and now works to help as many people as possible gain back their strength and agility.

Filed Under: Flexibility, Tutorial Tagged With: flexibility, Florian Kiendl, front split, side split, splits, straddle with rotation, tutorial

Simplicity and the Pragmatic Practice of Calisthenics

June 16, 2015 By Silvio Bauer 19 Comments

Silvio Bauer Dragon Flag

It is 6 o’clock in the evening. I’ve just come home from work. I slip out of my shoes and take off my backpack. I quickly get into the kitchen, pour myself a glass of water and drink it.

I head to my bedroom to change into a pair of comfortable shorts and a simple t-shirt. On a piece of paper, I briefly note four words: Muscle-ups, dragon flags, shrimp squats and handstands. I get my keys as well as the piece of paper and a pen.

Outside of the house, I start running at a steady pace. At this point, I’m already shaking off the worries of my day. I feel totally liberated, because for the next hour, all I need to focus on is the movement of my own body. Nothing can distract me. As I’m running, I’m getting further and further away from my phone, my digital leash. I soak in the environment.

In about 5 minutes, I stand before two pull-up bars. One of them I can only reach with a slight jump. My heart rate is already elevated from the run. The movements I’m about to practice will work pretty much every major muscle group, so I prepare for it accordingly.

First, I do some joint rotations for shoulders, hips, knees, ankles. I combine this with dynamic stretches like toy soldiers, arm circles and leg swings to prime my muscles.

The exercises I previously scribbled on the piece of paper are the exercises I will put my focus on today. I split them into two groups, muscle-ups + shrimp squats, then dragon flags + handstands.

For the first “super-set”, I get down into a deep squat and simultaneously do wrist circles. I do some push-ups, get up, do side lunges and then I jump up to the bar for some pull-ups. These “easier” exercises get my blood rushing through the muscles I’m going to need for my focus exercises. I never max out on these because I want to retain my strength.

After two rounds I’m warmed up and ready to rock. After a round of muscle-ups and shrimp squats, I shake out my legs and arms. I do a warrior pose to stretch my quads and hip flexors in order to improve my mobility for the next set of shrimp squats, then some shoulder mobility to help my muscle-ups. I count 5 deep breaths. Rinse and repeat.

While I am practicing these two movements, one at a time, my goal is to maximize the precision – not the effort – of each of them. When I feel I lose control over my form, I simply stop. On my piece of paper, I jot down my reps, not to impress anybody, only as a means to record my progress and to recalibrate my focus.

After 5 rounds I go to the nearest park bench. I am more than warmed up from the first two exercises, so I immediately get on the bench and do my dragon flags. After each set, I do a few kick-ups into a handstand, count 5 breaths and repeat.

After 3 sets of dragon flags, I shift my focus solely on debugging my handstand. After 15 more minutes, I call it a day.

To cool down from my practice, I get into a back bridge and counter that stretch with a forward bend. I do this once more and then I take a leisurely walk home.

As I walk, I contemplate over the quality of my workout and what I achieved. Some moves worked well today, with some I struggled a bit more than usual. But I know that this is part of the process. With consistency, I know I will get better over time.

When I approach the front door to our house, my mind gets filled with a rush of anticipation: I am going to enjoy a delicious and nutritious home-cooked meal.

-The End

The Moral of the Tale

Al Kavadlo prayer pushup

This story is not to brag about how Zen my workouts are, but rather to illustrate the key concept of calisthenics: simplicity.

In Convict Conditioning, Paul “Coach” Wade explained how he used advanced bodyweight exercises out of necessity while serving time. There was just no other way to get strong and survive but with his own body.

In our superfluous world with an abundance of options, practicing calisthenics can also enhance our “inner freedom”. By limiting options (not using machines, weights, apps or other equipment), we can liberate our training from being drawn in every direction.

But in order to make progress over time, we have to consistently apply this pragmatic approach to our training. With all the excellent information available about advanced bar calisthenics or bodyweight strength built with nothing but the floor, the variety of calisthenics exercises can be quite seductive to us enthusiasts.

Only by focusing on a few movement patterns at a time, we can ensure sufficient attention to each of these moves.

There is also no need to over-complicate the process of one’s training. Warm-ups are only needed for the specific body parts that come into play in a workout. If you follow an upper/lower body split routine, there is no need to warm up your legs on your upper body day.

The same principle applies to cool-downs. Static stretches are most effectively applied to the muscle groups that were used to generate mechanical tension. Flexibility does not need to be practiced for its own sake. It serves a purpose: making it possible for you to move the way you want to move. If you want to do pistol squats, insufficient ankle mobility will limit your ability to do so. However, if pistols don’t interest you, the necessity of ankle mobility drills is questionable.

The story above most probably differs from your own. It’s not necessarily better or worse than yours, it’s simply the template I found works best for me. It is merely an example of an application of the underlying pragmatic principles that calisthenics have to offer.

Everybody has a different story. What’s yours?

Move freely.

-Silvio

****

Silvio is a full time medical engineer who loves to practise and teach calisthenics in his free time. He enjoys creating workout plans for his friends and spreads the word about PCC over at his blog, neatstrength.com. You can follow him on facebook.com/neatstrength, twitter.com/neatstrength or on instagram.com/neatstrength/.

Filed Under: Progressive Calisthenics, Tutorial Tagged With: calisthenics, calisthenics workout, flexibility, outdoor workout, Silvio Bauer, simple workout, stretching, tutorial

The Forearm Stand: A PCC Hidden Step

October 7, 2014 By Grace Kavadlo 29 Comments

Grace Menendez Forearm Stand

Are you frustrated with conquering the freestanding handstand?

We all want to progress quickly, but the jump from a wall handstand to a free-balancing one can be a huge hurdle! Enter the Forearm Stand – a relatively unknown movement in the PCC world – and a great “hidden step” on your way to the handstand!

When one of my clients recently told me her goal was to nail the forearm stand, I naturally turned to my PCC Instructor Manual, searching for a regression. At over 600 pages, the PCC manual is by far the most comprehensive guide to calisthenics I’ve ever seen, so I was surprised to find barely any mention of the forearm stand!  Luckily, I had plenty of experience with this move from my Yoga training.

Take A Stand

The forearm stand is a great intermediate step between a beginner’s headstand and a freestanding handstand. Known as Pincha Mayurasana (Peacock Pose) in Yoga, this move is great for strengthening your arms and shoulders while also stretching your neck, chest, abdomen and back.

Inversions are also beneficial for improving circulation throughout the body, as well as challenging the practitioner’s balance. Though a difficult move in its own right, the forearm stand is more accessible than a handstand because you have more points of contact to assist in balancing.

Here’s how to nail this move in just 3 easy steps!

#1 Dolphin Pose

This pose is similar to Downward Facing Dog from Yoga but it is practiced on the forearms rather than the hands. Start in a plank position with your forearms shoulder-width apart, then spread your fingers and align your shoulders over your elbows as you gaze between your hands. Slowly begin to walk your feet in towards your hands as you raise your hips towards the sky. If you are new to this pose, you may only be able to walk a few steps before stopping. Your body should resemble as close to an inverted V as possible. Actively press through your hands and forearms to lift your head further off the ground and hold this position for time.

Grace Menendez Dolphin Pose

#2 The Kick-Up

Begin in Dolphin pose and extend one leg up towards the sky. The closer you can walk your feet to your elbows, the more aligned your spine becomes. This alignment allows you to “float” into this pose rather than having to rely on a significant jump. The more mobility you have in your hips and hamstrings, the less difficult this becomes. Push off the base leg as you kick upward with the extended leg. If you are unable to hold the balance at first, I suggest practicing this variation against a wall or other sturdy object until you build the confidence to try it freestanding.

Grace Menendez Dolphin Kick Up

#3 Forearm Stand

Once you are able to kick up and hold for a few breaths, you’re golden! Keep increasing your hold times by simultaneously squeezing your inner thighs and ankles together and pointing your toes towards the sky to create stability throughout your body. The key to finding the “sweet spot” is to grip the ground with your fingers while “wrapping” your triceps around the arm bones and pressing through your elbows as you balance.

Al Kavadlo Danny Kavadlo Forearm Stand

Scorpion Pose and Beyond

Initially when I began practicing forearm stands, I found it easier to hold the pose by bending my knees and allowing my heels to drop as a counterbalance. This is also known as Scorpion Pose. I must warn you this is an intense back bend, however! If you are having difficulty balancing in a regular forearm stand and want to try the scorpion variation, be sure to fit in some preparatory bridge work to warm up your spine.

Al Kavadlo Scorpion Pose

Be patient with yourself and prepare to put in some work if you want to nail this move. You might experience a “crash-landing” when first attempting freestanding forearm stands but by learning to safely fall out, you’ll gain the confidence to keep trying again. If you have the flexibility you can transition into a bridge if you feel yourself tipping over. If not, try to turn your hips and fall to the side. Stay the course and eventually this move will be yours!

Watch the video for more:

***
Grace Menendez, PCC, HKC is a personal trainer and group exercise instructor located in New York City. For more information about Grace, check out her website, www.DieselGrace.com

Filed Under: Flexibility, Tutorial Tagged With: dolphin pose, flexibility, Forearm stand, Grace Menendez, handstand, handstand regression, headstand, hidden step, how to, tutorial, yoga

Building an Indestructible Body with “Outside the Box” Exercises

August 12, 2014 By Logan Christopher 32 Comments

Al Kavadlo Back Of The Wrists Push-Ups

Push-ups. You move in one plane of motion, up and down.

Squats. The same thing. Pull-ups too.

Everyone here will agree that bodyweight exercises are great, but it’s important to realize that there are many, many different ways of doing them.

If all you ever do are one dimensional exercises, even if you build a lot of strength in them, your overall fitness and athleticism will remain one dimensional.

It’s a sad fact that one of the biggest things holding people back from hitting their training goals are injuries. Yet, with smart training these can largely be avoided. And if you do suffer from pain currently, there are always things you can do to work to improve your situation.

Whether you are rehabbing or pre-habbing (doing work that aims to prevent injuries), these exercises generally are the same.

So, what makes one of these exercises different than a regular exercise?

The focus on building flexibility and/or mobility along with a strength component.

The more mobile you are (up to a point), the more likely you can fully exert the strength of that joint and the surrounding tissue.

The more flexible you are (once again up to a point), the more likely you can fully exert the strength of that joint and the surrounding tissue.

When you recognize that strength must be used in combination with mobility and flexibility, then you see why you need to do more than just “straight line” and conventional exercises. The effects of this type of training help you to build an indestructible body.

Before we begin it is important that you move into these exercises slowly. While they will help strengthen your weak points, remember that you are still working on weak points! The difference between something that is good for you and something that is not, can be separated by very little intensity or volume, so you must ease in slowly. Be smart!

Cross Leg Squats

The knee is a simple hinge joint. As such, so many personal trainers and coaches become deathly afraid if it ever does anything outside of that ability. “If the knees go past the toes in a squat you’re going to wreck yourself!” they say.

But here’s the truth: If your body can move in a way, that ability can be strengthened. And if it is strengthened then you’ll have less of a chance for injury. Not only do cross leg squats work the knees, they stressing them in a plane of movement they don’t normally go—and the ankles get worked too.

Begin by sitting with your legs crossed, then rock your weight forwards and press on the sides of your feet, extending your legs until you come to a standing position. Make sure to try it with your legs crossed both ways.

For assistance you can grab onto a doorknob or other solid object to help. You don’t need to do a lot of reps, but instead work to make this an easy way you can get up from the ground at any time.

Logan Christopher Demonstrates the Cross Leg Squat

Sit to Cossack Squat

Was that last one too easy for you? I’m guessing that’s the case for many people reading here. So try this challenge.

Do a Cossack squat to one side while keeping the heel flat on the floor. Once at the bottom, sit back until your butt is sitting on the floor. Now rock back up to Cossack squat, switch sides and repeat.

If you need assistance use your hands to get back up, but the challenge is to do it without them, while trying to use as little momentum as possible. This takes some deep flexibility, and you may notice that your knees don’t necessarily track your toes.

This video shows it in action as well as the secret I found to performing it after much frustration and failure to do it.

One Arm Twisting Bridge

Let’s move onto the upper body. This is a fairly advanced move that I covered before here on the PCC Blog: One Arm Bridge, Twists, and the Valdez.

It’s so useful I’m bringing it up again. The twist in particular builds shoulder stability and strength in an extended range of motion. It even works the wrists in a flexible manner.

At the same time the spine is in full flexion and then twists. A big “no-no” that I say yes to!

If you can do this, there’s a good chance you don’t have issues with any of the joints mentioned above. If you can’t do it right now, but take the time to build up to it, your body will be that much more indestructible from your work.

Back of the Wrist Pushups

An important thing to realize when doing these “outside the box” exercises is that you can still follow the same rules of progress as you would in all your other training.

Back of the wrist push-ups are a great complement to doing lots of push-ups and handstands. In regular push-ups and handstands, your wrist is extended back. But here, you flex your wrist fully and put the weight on the back of the hand. This builds strength and toughness in the wrists, but also works the elbow joints in a big way.

Start slowly with these, as in kneeling push-ups. You can hold for time or rep them out. Progress to regular push-ups when you’re able to. Remember to go slow.

I decided to see just how far I could progress with this and worked my way up to a back of wrist handstand push-ups.

Adding Indestructible Exercises to Your Program

Here’s the great part about these exercises and the hundred, if not thousands, of other moves like them. You don’t need a whole lot to get the benefits.

Doing a few of these exercises, like a few reps in a single set, will be enough to get better at them, and reap the benefits.

Any of the following will work:

  • Add them to your warm-up.
  • Add them to your cool down.
  • Add them to your stretching program.
  • Add them to your mobility work.
  • Do a few on your off days.
  • Do them as part of a morning wake up routine.

You can work through your entire body or just focus on one area at a time.

If you enjoyed this article let me know in the comments section below. I’d love to share more exercises with you in the future!

***

About Logan Christopher: Logan Christopher has been called a physical culture renaissance man as he is accomplished in a wide range of strength skills from kettlebell juggling, performing strongman stunts, and bodyweight exercises. He is the author of numerous books including Secrets of the Handstand and The Master Keys to Strength & Fitness. In addition, he’s spent the last several years going deep into mental training to find out what it takes to really excel and tactics that can help people instantly improve their exercises. You can find out more about all this at http://www.legendarystrength.com/.

Filed Under: Flexibility, Progressive Calisthenics, Tutorial Tagged With: advanced variations, ankles, back of the wrist push-ups, Cossack squat, flexibility, hips, how to, Logan Christopher, mobility, shoulder mobility, tutorial, unconventional exercises, wrist training

Shoulder Opening: Stretches for Tight Shoulders

April 1, 2014 By Benji Williford 13 Comments

benji_williford_demonstrates_a_shoulder_opening_stretch

Continued progression toward getting stronger and improving performance requires a body that is “open” to the challenge.  One of the biggest complaints that I consistently get from clients is about tight shoulders. It’s simple, you can’t move well if you can’t move. Some clients can’t hang from a bar without pain as they can’t even get their arms over their heads to get into position to do a pull-up; whereas other clients have a hard time in a plank to start push-ups without feeling neck pain (and everything in-between).

Opening up the shoulders and consequently the upper body will improve performance and help prevent injury. The shoulder joint is a ball and socket joint that really could be considered more of a ball and plate joint as it relies on the muscularity of the joint to keep it from dislocating.  It is formed by the articulation of the head of the humerus with the scapula and is the most freely movable joint in the body. The main movements of the shoulder:

  • Flexion-Lifting the arm forward in front of the body. The primary movers to this position are the anterior and medial deltoid, biceps brachii, coracobrachialis, and the upper pectoralis major.
  • Extension-Pulling the arms back down and toward the back of the body. The primary movers are the latissimus dorsi and the teres major.
  • Adduction-Holding the arms out and pulling them toward the midline of the body. The primary movers are the pectoralis major and the anterior deltoid.
  • Adduction-Opening the arms away from the midline of the body. The prime mover is the posterior deltoid.
  • External rotation-Holding the arms by the side, rotate the shoulders outward so that the palms are facing up and the thumbs are pointing to the back using the posterior deltoid, infraspinatus, and teres minor.
  • Internal rotation- Holding the arms by the side, rotate shoulders inward so that the thumbs turn in toward the body using pectorailis major, latissimus dorsi, anterior deltoid, and the teres major.

Although shoulder movements can be placed in specific categories, exercises often times use combinations of those movements to complete a rep. For example in order to perform a muscle-up, the shoulders extend and external rotate to hold on to the bar. The shoulders will then go into flexion to pull the body to the bar and push the bar to the waist. Internal rotation also happens along the way. When looking at a get up, the shoulder will start in flexion with slight external rotation and will go through farther extension, abduction, internal rotation, external rotation, and extension again just to go from the floor to standing (1/2 the rep).

When stretching the shoulders, all of these movements should be taken into account in order to ensure that imbalances are fixed.  The following video will demo a series of stretches that can be incorporated in a yoga practice, used for static stretches after a workout or any time after warming up the shoulders with some mobility work.

The additional benefits are that they will also open the chest, back, neck, and thoracic spine.

***

Benji Williford, PCC, RYT, CF-L1 is a Personal Fitness Trainer located out of Eau Claire, WI. Benji believes that, “A successful fitness program is based on positive dialogue between the mind and body.” He can be reached through his website: http://www.benjiwilliford.com/, or by email: Benji@ChainReaction-Fitness.com.

Filed Under: Flexibility Tagged With: Benji Williford, flexibility, shoulder mobility, shoulder stretches

Get Stronger by Improving Your Back Flexibility

March 18, 2014 By Keira Newton and Jarlo Ilano 19 Comments

Master RKC Keira Newton Spinal Flexibility

We get frustrated when flexibility work is just an afterthought in an athlete’s program, something done for only a few minutes after the main workout without a lot of thought or effort. The truth is that proper and focused flexibility training especially for your spinal flexibility, can help you get stronger!

Getting stronger from stretching sounds great, doesn’t it?

How is that? One of the ways flexibility work can make you stronger is immediately apparent in terms of form and technique. If you are so bound up in your upper back that you can’t pull your shoulders back in a proper line, your pressing is not going to be as strong, whether it’s pressing a kettlebell or your bodyweight in a handstand.

For instance, Keira remembers when she first started working seriously on her flexibility, that although her shoulders were pretty mobile, her upper back wasn’t. By working on that specifically, she was able to improve her shoulder positioning, and found her pressing strength immediately improved, as well as her hand balancing. Being able to extend correctly at the upper back placed her shoulders in a much better mechanical advantage and she was able to use her strength from a better foundation.

She also recalls one of her teaching sessions with an experienced RKC who was having trouble with her pull-ups. Keira gave her some corrective thoracic mobility exercises and she went from barely doing one, to doing sets of multiple reps. The flexibility work put her in a better position for her pull and she broke out of that plateau. She was working hard and putting a lot of effort in her pulls, but her mobility was holding her back. Once that was freed up, she was able to gain so much more from her efforts.

High tension techniques for strength and power are great. There’s no denying that those techniques work for getting people as strong as possible, but you have to balance out that tension with proper mobility to get the most out of your body. It’s not the act of stretching that will give you strength, but it’s the new options your body will have to get in the best positions to utilize the power and strength that you already have.

A Flexible Spine is a Powerful Spine

There’s a reason the word “backbone” is associated with strength and courage. A strong and flexible back is the foundation for power in the upper body, just as the hips are for the lower body. Thoracic spine (mid-back) mobility affects how well you can use your shoulder girdle and arms, by placing them either in resting positions of weakness or strength.

A kyphotic (flexed) thoracic spine puts your shoulders well forward of the vertical midline of your body and away from your power posture. It’s like trying to push from an unstable platform. You won’t be able to use your strength properly no matter how powerful your muscles.

Most of our full body rotation comes from the thoracic spine, so when you think of rotational work, that involves a great deal of thoracic function. Stiffness here reduces not just your mobility but your ability to apply the proper leveraging and angles for a lot of different strength skills.

Below we will show you comprehensive routines for improving your spinal mobility for forward bending, rotations, and backbending. You’ll probably find that some of the moves here will be easier for you while others will jump out and kick you in the butt! (Guess which ones you should work on more…)

We advise you to go through all of these movements and discover for yourself what you need to improve the most.

Forward Bending Sequence

Forward bending involves spinal joint and hip flexion, and the associated flexibility of the muscles and other soft tissues of the posterior chain. It can be difficult to isolate one specific cause as the key issue if you have tightness. While it’s very easy to say you have tight hamstrings, the fact is that the sensation of tightness in the hamstrings may very well come from an issue in your low back.

This sequence is a demonstration of “covering all the bases,” with a comprehensive approach that can be pared down as you practice and figure out what you need to work on for yourself. A quick run-through of the sequence can give you a baseline as well, and act as a measure for progress.

We begin with a full spinal flexion movement, from your neck all the way to your pelvis. You want to round out as much as possible, then move into full extension (back bending). Though the emphasis is on the forward bend, you’ll want to move into extension as a break in between. It takes the spine through a full range of motion and is a good warmup for the sequence.

In the squat, point your toes out at around 45 degrees. This positioning assists in helping you round out your lower back and go into a posterior pelvic tilt (the pelvis tucking under you). Get your chest between your knees and tuck your chin down, as well as letting your tailbone sink down. Play with rocking back and forth between your toes and your heels. Then sit back and drop down even further. Next, jump into a push-up position. Then drop your hips down to the floor and lift your chest up and out, locking your elbows out if possible. Remember to look up as well, for extension throughout the entire spine.

Do ten repetitions, or more if you feel up to it.

Master RKC Keira Newton Forward Bend Seated
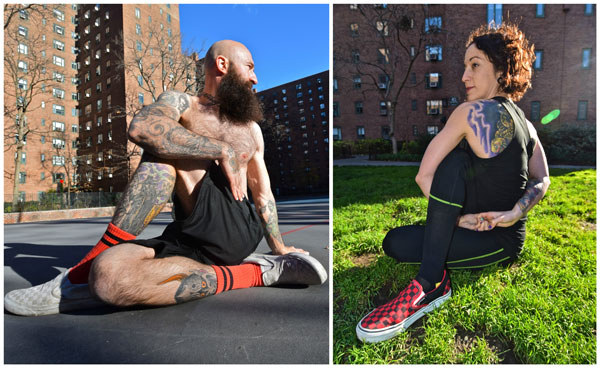
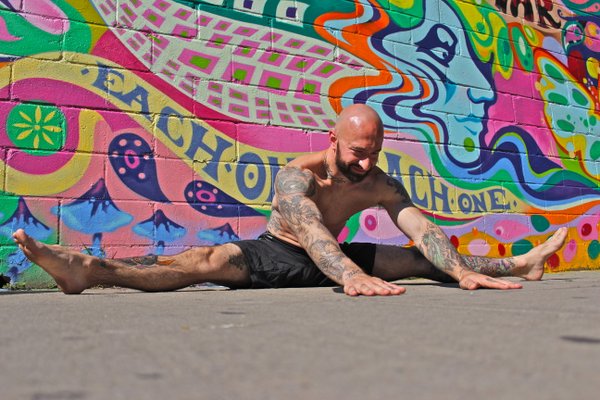
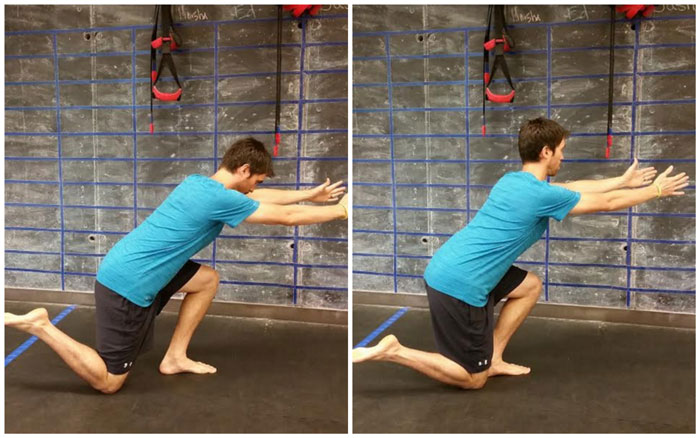
Next is a standing forward bend, where you bring your hands to one side and keep them on the ground as you stand up. This is a combined forward bend and rotation. Another variant is to sit back into the opposite hip. So if your hands are to the right of your body, you’ll sit back to the left. Spend a couple minutes going between one side and the other.

The last move in the forward bending sequence is the seated forward bend. With this move, you’ll add a rotation to the forward bend, just as you did in the standing forward bend. With your legs locked out straight in front of you, pick a side and fold forward at a diagonal on that side. Move in and out of the stretch at least ten times on each side, as well as straight forward, and hold the stretch on one side for upwards of a minute.

Back Bend Preparation

Backbending (spinal extension) can be a very uncomfortable and difficult motion for many people. When you add up all the hours we sit, drive, and are parked in front of the computer, you’ll see how rarely we get into backbending positions during our normal daily activities. So it’s no surprise that a full backbend like the bridge posture can be so daunting.

With this in mind, it helps to go through a thorough preparation before going to the limits of your spinal extension range of motion.

The first emphasis is on the thoracic spine (your midback), and improving extension and rotation in this region. Improving mobility in this part of the spine prevents undue strain on the lower back by distributing the motion throughout the spine rather than all on the lower back. In the first exercise in this video, you’ll see that Keira has to emphasize the motion, not straight down but also forward, as her shoulders are so flexible that she isn’t moving at the spine. When she improves her direction of force, you can see that the stretch is now where it needs to be. Work on this for three sets of one minute each.

Next is thoracic rotation, which is essentially extension at the side of the spine you are rotating towards. This in combination with sidebending takes you to the end-range of the extension motion. So you’ll be working on all the structures that need to be pliable for a good backbend.

Keira is demonstrating two movement variations: the first is up on forearms and knees with the back starting in a neutral position, and the second is more on the back of the upper arm and shoulder with the torso bending to the side. When you try these out, you’ll notice that the second variation places you in a sort of pre-stretched position, so you won’t be moving as far. You may skip the first variation if you are already flexible, but even then, the first one is a good warm-up to do. Play with shifting your weight more onto your knees or your arms to find the best angle for you. Start with three sets of 30 seconds on each side.

Last in this video is a more direct back bend preparation and is adapted from a sequence taught by Jarlo’s Ashtanga yoga teacher, Cathy Louise Broda at http://www.purpleyoga.com. It starts with a kneeling back bend, then works on the hip flexors, quadriceps, and shoulder bridges, to fully warm up and prepare the body for more intense spinal extension postures.

In the kneeling backbend, it is key to elongate and lift the spine as you lean back. Pushing your hips forward and lifting your chest up and back will create this “open” spine, and will prevent a jammed up feeling in the low back. Relaxing your hips and buttocks will be difficult at first, but that is another key to a good backbend. 10 – 12 slow repetitions here will do you well.

Next up are lunge stretches with rotation to the side of the front knee. Adding rotation to this position adds depth to the stretch and is a great concept to employ in almost any exercise. You don’t have to do this in full splits like Keira is showing, just go into as deep a lunge as you are comfortable. The effect is still the same. Do three sets of 30 seconds on each side.

The camel pose in yoga is a backbend with arm support, and can allow you to improve your backbending technique with relatively little strain. With the support of your arms you can stay in the position a bit longer than you could just bending back. Remember the details of pushing your hips and chest away from each other to open up your spine. Work up to three sets of 30 seconds on this posture, as that’s a good amount of time to experience this position.

Following the camel is the kneeling quadriceps stretch. If your knees bother you in this position, you can sit on a small stool or a few cushions to take some pressure off. If this doesn’t help, don’t force it and try a standing or side lying quad stretch instead. You’ll be able to do this later, but don’t hurt your knees and put yourself out of commission. The key point here is to avoid a low back arch. Keep your back flat, so the forces of the stretch will be on the upper thighs and not on your back. Take your time and gradually lean back further when you can do so without pain. Three sets of 30 seconds to a minute will work well here.

Lastly, shoulder bridge practice starts you on a more active backbend and is a great way to get a lot of repetitions in with good technique. You’ll pull all of what you’ve practiced so far in the sequence and work on a smooth spinal curve, relaxed hips, and good mobility and strength in the quads. Choose the shoulder bridge variation that works best for you, and perform a couple sets of 10 repetitions to improve your bridge.

Full Bridge

In the full bridge, or “wheel pose” in yoga, you’ll need good flexibility in your shoulders, hips, and the entire back. But you’ll also need proper technique. Important details here are to create that smooth curve and arch, like an archway in a building that can support weight evenly, and simply looks good. You can tell when a person does a bridge and there is a sharp angle in one part of the spine – in that case, there will be more of a strain rather than a curve that distributes forces evenly.

Master RKC Keira Newton Back Bend
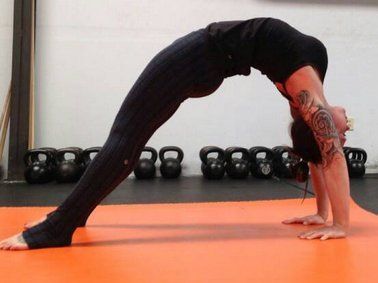
For a proper bridge, your arms and legs are the support structures and your hips and back should be relaxed and open. Your chest should be projected up and back, toward the top corner of the wall behind you, and your hips should be lifted up and forward, toward the top corner of the wall in front of you. This aiming in opposite directions creates that “openness” in the spine. Breathing should be steady and even, and you should hold the position for 5 to 10 breaths. Again, don’t force things. Take your time and improve steadily.

Master RKC Keira Newton Back Bend 2As you improve you can play with shifting your weight more toward your feet or toward your hands. You’ll find which way is more difficult, and that’d be what you need to work on! It will also lead you back to which of the preparation exercises to focus on. It may be the thoracic extension, or your hip flexors and quads if they are holding you back.

Invest in Your Flexibility

What we’ve shared above will improve your back flexibility and consequently improve your body positioning for every exercise and skill you practice.

It does take time and patience to increase your flexibility, especially if it’s been long neglected. But the payoff is well worth the effort. Set aside some time in your routine to make flexibility a priority and you will be more than happy with the benefits in your strength and power.

***

Keira Newton is an accomplished trainer with many certifications including that of Master RKC, Feldenkrais, FMS, and Z Health. Her combined knowledge of strength training along with flexibility and mobility work has helped hundreds of her clients at dkb Fitness and seminar students to help them achieve their maximum potential.

Jarlo Ilano,PT, MPT, OCS has been a Physical Therapist since 1998 and is a Board Certified Orthopedic Clinical Specialist. He has special interests in the neck and back, shoulder, and flexibility work, combining his clinical expertise with his own training in martial arts and yoga to provide practical and cutting edge knowledge for GMB Fitness.

Filed Under: Flexibility Tagged With: back flexibility, bridge, flexibility, Jarlo Ilano, Keira Newton, strength, stretching, thoracic spine, thoracic spine mobility, yoga

Thoughts on Mobility and Flexibility Training

May 14, 2013 By Steven Low 5 Comments

One of the questions people looking to get into gymnastics or bodyweight strength training ask me is, “How much mobility or flexibility do I need in [insert body part here].”

To which I invariably reply, “It depends.”

The reason it depends is because each individual has his or her own goals that they are working towards.

First, let me define how I differentiate between mobility and flexibility:

  • Mobility generally refers to active movement within your given range of motion.

  • Flexibility generally refers to the passive movement of the joints towards the end range of motion with the goal to increase the total range.

The demands of a recreational gymnast are different from the professional athlete which are different from the serious strength trainee. And even these depend on one’s goals and level of commitment.

For example, in most athletics where you need speed, such as sprinting, football, basketball, or other sports, increasing hamstring mobility and flexibility beyond a certain point starts to decrease performance. In particular, the hamstrings need to be tight enough that the stretch-shorten cycle can activate, which helps to conserve muscular energy and provide the rubber band rebound effect that increases overall speed. If you give a sprinter the mobility and flexibility to easily move into splits like a gymnast, it will manifest as a decrease in performance.

On the other hand, if you are a martial arts practitioner you definitely need a large amount of flexibility, perhaps even full splits if vertical kicks are an important part of the specific martial arts. The mobility and flexibility demands of the particular sport and the techniques they employ matter a lot for how much mobility and flexibility training you need.

s_low1

Photo from: threetwoonego.files.wordpress.com

For your average recreational athlete looking to “get healthy” and perhaps develop some cool bodyweight strength movements, they may not need anymore hamstring flexibility than what is required to do a good bodyweight squat or pistol.

Alternatively, a specific gymnastics/bodyweight technique like the straight arm press to handstand may require significant hamstring flexibility to where you can do a full straddle or pike stretch where your chest can go to the floor.

s_low2

photo from: drillsandskills.com

s_low4

photo from: http://woman.thenest.com/

These different scenarios illustrate some of the conflicting nature of how much mobility and flexibility are needed to work towards certain goals.

If you are a sprinter or need great top-end speed for athletics but also want to work towards the splits or the straddle stretch for the straight arm press handstand, you need to be aware that these goals are at odds with each other. There will be trade-offs in your ability to sprint fast if you develop your flexibility beyond a certain point. If this is fine with you, then by all means do it. But the trade-offs are there whether you’re aware of them or not.

The shoulder in particular has the greatest range of motion of any joint in the body. A move like a German hang or skin the cat is good for increasing shoulder flexibility and getting the muscles and joints comfortable in an awkward position. It is also great for stretching and preparing for the back lever, which is one of the primary bodyweight isometric positions.

s_low3

Photo from gymnasticswod.com

If your goal isn’t to work towards manna, then it’s unlikely that you’ll ever need this type of mobility and flexibility in the shoulders.

s_low5

Photo from tumblr.com

However, the benefit of being able to move freely through a larger range of motion cannot be lost on the upper body. Unlike the lower body, where the muscles need to be tight enough to sprint effectively because of the stretch-shorten cycle, it’s very unlikely to do similar plyometric type movements with the upper body. So increasing the flexibility of the shoulders tends not to be a trade-off between various goals.

The main reason I train movements through a full range of motion over isometric or static positions is that it is better at developing strength. One of the key points within that is to become comfortable with your overall total mobility.

For example, if I was a random recreational athlete who wanted to be able to develop the back lever and many of the other gymnastics isometric positions, then becoming comfortable in a skin the cat / German hang is going to be useful. It helps you figure out how to apply force in and out of that position as well as become aware of what muscles are working when and where.

The same would be true of a squat. How can you become totally proficient with squatting if you never spend time at the bottom of the squat but only in moving through it?

This type of movement is delving into the realms between mobility and flexibility training. Maybe I don’t want to increase my shoulder hyper-extension anymore than I already have. Therefore, with the German hang, I use it as a general mobility exercise in the warm up. I can go from inverted hang down into the German hang and then pull back out. This allows me to develop the coordination, body awareness, and specific muscle activation that I need much like with moving into and out of the bottom position of the squat.

Once you have the flexibility you need, you just need to maintain it. You don’t have to spend additional time at the bottom of the position in order to stretch it out further.

So to answer the question “how much mobility or flexibility do you need?” you will have to specifically look at all of your goals and determine it from there.

If your ultimate goal is a manna then you will want to start developing the shoulder flexibility for it right away. You need the passive flexibility before you can start to apply active strength into the position. This is the two step process that should guide you through what you want to work towards.

If your goal is to be able to vertical kick for martial arts then first you have to be able to have the flexibility to do the splits. Thus, you develop your splits so as to improve your ability to actively use your legs to kick higher.

A sprinter may have all of the flexibility he needs to squat well already, while a desk job worker may need more flexibility in the calves, hamstrings, and hips in order to get down into the hole.

You need to specifically look at your body and your end goal and have a plan to bridge that gap.

  1. Look at your goals and your current abilities

  2. See the trade-offs, if any, and make adjustments

  3. Train the flexibility, if needed

  4. Then maintain with mobility work and apply active strength work

If you don’t really need more flexibility in certain joints, then you have no reason to train for it.

***

About Steven Low: Steven Low, author of Overcoming Gravity: A Systematic Approach to Gymnastics and Bodyweight Strength, is a former competitive gymnast who, in recent years, has been heavily involved in the gymnastics performance troupe, Gymkana.  With his degree from the University of Maryland College Park in Biochemistry, Steven has spent thousands of hours independently researching the scientific foundations of health, fitness and nutrition.  Currently Steven is pursuing a doctorate of Physical Therapy from the University of Maryland Baltimore which provides him with insights into practical care for common injuries.  His training is varied and intense with a focus on gymnastics, parkour, rock climbing, and sprinting.  He currently resides in his home state of Maryland. His website is http://eatmoveimprove.com.

Filed Under: Flexibility Tagged With: flexibility, goals, gymnastics, mobility, shoulder mobility, Steven Low

Primary Sidebar

Featured Products

previous arrow
GetStrongBookCover
ConvictConditioningBookCover
StreetWorkoutBookCover
ExplosiveCalisthenicsBookCover
StrengthRulesBookCover
next arrow

Categories

Progressive Calisthenics Certification Logo
Click here for more information or to register for the PCC workshop

Get Strong Workouts TriadXP App
Get Strong Workouts App

Recent Posts

  • Top 5 Reasons Why an In-Person Workshop is the Best Way to Supercharge Your Training
  • HYBRID STRENGTH TRAINING IS HERE!
  • My Calisthenics Journey to the PCC
  • The Handstand Press: Complete Control Through the Handstand
  • The Get Strong App is Here!

Dragon Door Publications

Dragon Door Publications

Recent Comments

  • bross dandon on The Case for Curved Handstands
  • Johnny Flewellen Jr. on Strength for Life
  • Dan Earthquake on The Pursuit of the Daily Minimum
  • Johnny Flewellen Jr. on The Pursuit of the Daily Minimum
  • Johnny Flewellen Jr. on Yoga, Calisthenics and the Journey of a Lifetime
FOLLOW US ON TWITTER!

Copyright © 2025

Dragon Door Publications / The author(s) and publisher of this material are not responsible in any manner whatsoever for any injury that may occur through following the instructions or opinions contained in this material. The activities, physical and otherwise, described herein for informational purposes only, may be too strenuous or dangerous for some people, and the reader(s) should consult a physician before engaging in them.