• Skip to main content
  • Skip to primary sidebar
  • Home
  • Contributors
  • Resources
    • Q&A with Paul “Coach” Wade
  • Workshops
  • Products
  • Forums
  • Articles
  • Blogs
    • RKC Blog
    • Strong Medicine Blog
  • Archives

PCC Blog

Progressive Calisthenics - The Official Blog for the PCC Community

how to

Training Handstands For Strength

March 1, 2016 By Grace Kavadlo 26 Comments

Grace Kavadlo Handstands 1

When many people think of the handstand, they think of a bodyweight skill. In other words, if your goal isn’t to hold a freestanding handstand, somehow it’s not a worthwhile exercise. While learning to balance on your hands is certainly a noble pursuit, a lot can be gained from approaching the handstand from a pure strength training perspective by using a wall for support. In calisthenics, we encourage all types of isometric holds from elbow levers to L-sits. You can think of the wall handstand as just being the inverted variety.

Wall handstands take the balance element out of the exercise and are excellent for building overhead pressing strength. Practicing wall handstand holds is also a great way of building shoulder stability and increasing static strength. Handstands strengthen your triceps, delts, rhomboids, traps, and the extensor muscles of your forearms which can help build strong, healthy wrists. When you tense your entire body in a wall handstand, similar to how you would in a plank, you can also target your quads, glutes, and even your abs.

Below are 3 different wall handstand variations that you can try. Aim to hold each pose for as long as you can, ideally working up to one full minute. It’s not uncommon to feel dizzy or slightly disoriented after performing long holds, so ease in slowly and rest as needed between efforts.

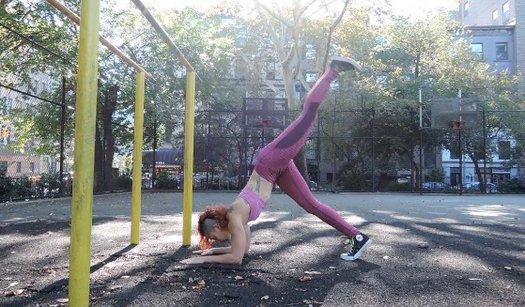
Back-to-the-Wall Handstand
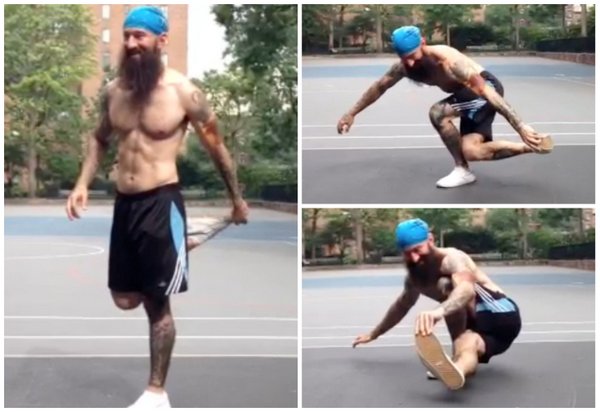
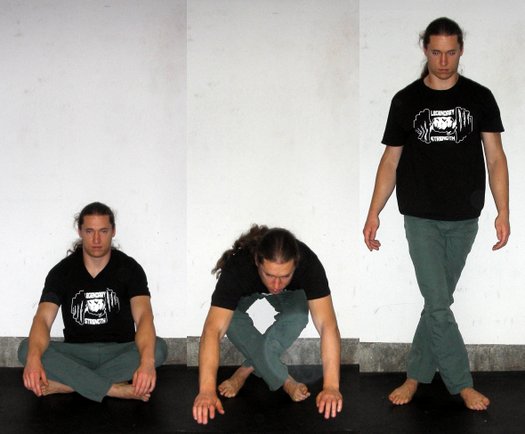
This is a great place to start if you are new to handstands. Begin by facing a wall with both hands on the ground, your front knee bent and the other leg extended behind you. Hop off your bent leg and reach your extended leg towards the wall. It may take a few hops before you finally hit the wall. Make sure your arms are straight with your elbows fully extended. A common mistake beginners tend to make is to bend their elbows as they kick up which makes them fall on their head and never want to attempt a handstand again. Remember “when the elbows bend, the power ends.”

Once you’re up, allow your head to relax between your shoulders as you actively press into the ground. It is normal to have a slight arch in your back when you are practicing this exercise, but aim to minimize this pressure on your low back by actively squeezing your glutes, engaging your abs and pushing your head and chest through your arms. When you’re ready to come down, release one leg at a time back to the ground, doing your best to land gently.

Grace Kavadlo Handstands

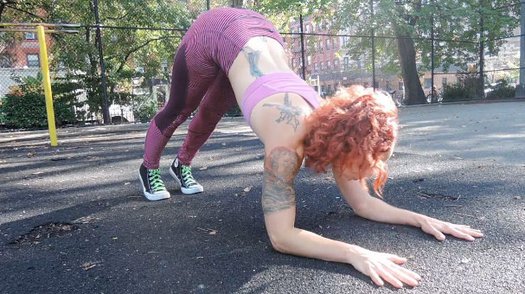
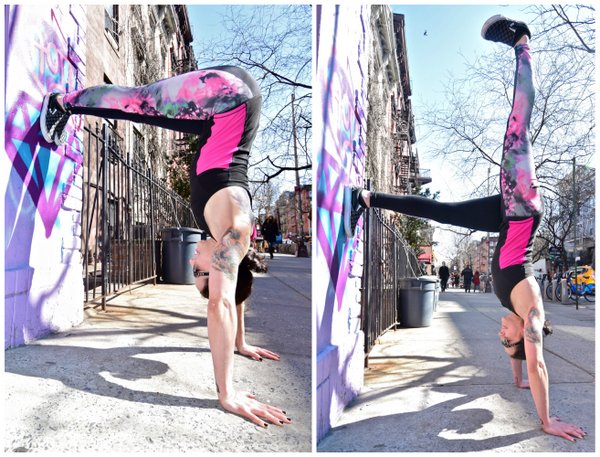
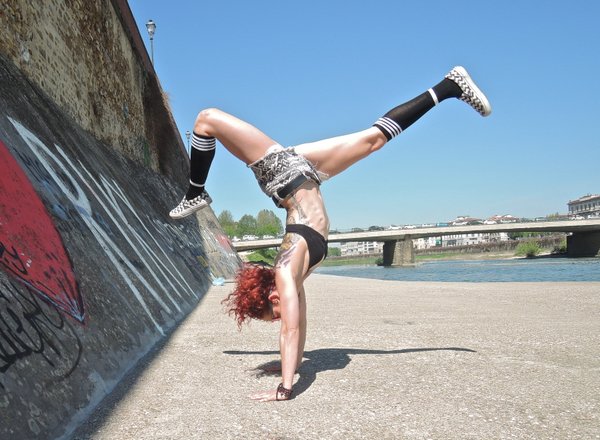
L-to-the-Wall Handstand
Begin in a push-up position with your heels touching the wall behind you. Slowly begin to crawl your feet up the wall as you fold at the waist, walking your hands in closer until your hips are aligned above your shoulders. Your body will wind up in an inverted capital letter L-shape. It may help to have a pair of eyes on you to let you know when you are in position, as it can be hard to tell at first.

In addition to upper body strength, there’s a lot of flexibility needed in your hamstrings to fully extend your legs. If you don’t have the mobility to achieve a full lockout, you can practice with a slight bend in your knees and/or allow your heels to come off the wall slightly. This is also a really intense exercise for your shoulders. It can help to alternate extending one leg upwards at a time in order to take some of the pressure off your shoulders if it starts to get too intense.

Grace Kavadlo Handstands

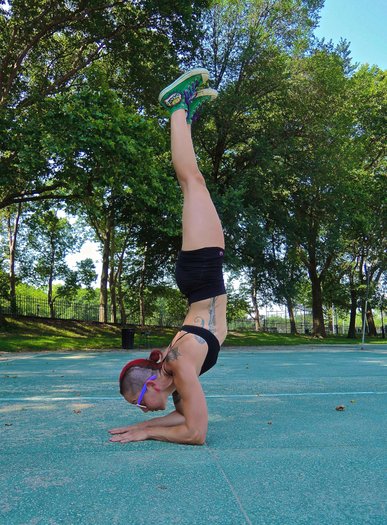
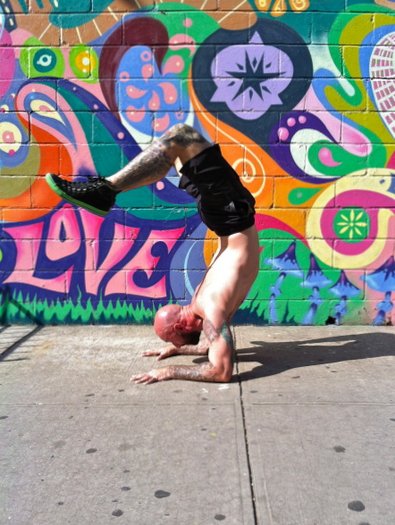
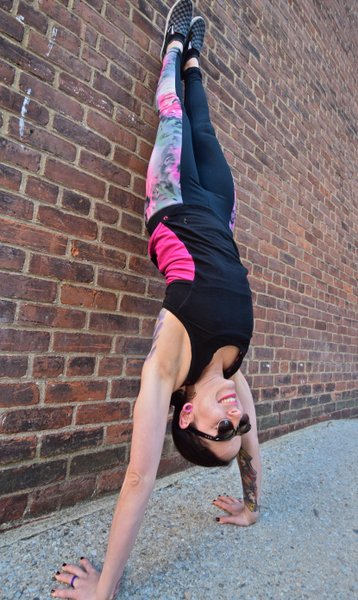
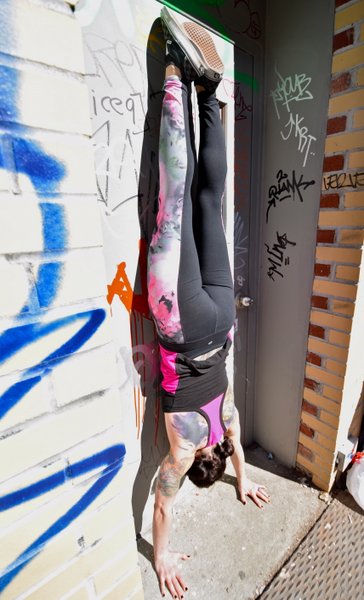
Face-the-Wall Handstand
Similar to the L-to-the-wall, begin in a push-up position with your heels against the wall, then start crawling your feet up and walking your hands in. This time, the idea is to get the entire front of your body pressed flat against the wall. When you reach the wall, tuck your chin to your chest, tense your glutes, squeeze your quads, point your toes and engage your abs. Think about lengthening your body as much as possible by actively shrugging your shoulders, pressing into the ground and reaching your legs upward.

You can ease into this variation by walking in as close to the wall as you feel comfortable and then walking back out. Gradually you will build the strength and confidence to bring your hands all the way the wall.

Grace Kavadlo Handstands

Upside Down and Inside Out
From an overall health perspective, inversions have a lot more to offer than strength or skill alone. Due to the effect gravity has on the body, practicing inversion holds can be beneficial for the circulatory, lymphatic, and nervous systems. Your body has many valves and veins all transporting lymph fluid, nutrients, and blood constantly. By inverting yourself, you are in essence helping these natural processes by encouraging venous return from the lower extremities back to your heart, brain, lungs, and lymph nodes. As such, there are many folks in the yoga community who consider handstands to be the fountain of youth, so don’t neglect them!

See you on the flip-side, ninjas!

Grace Kavadlo Handstands

****

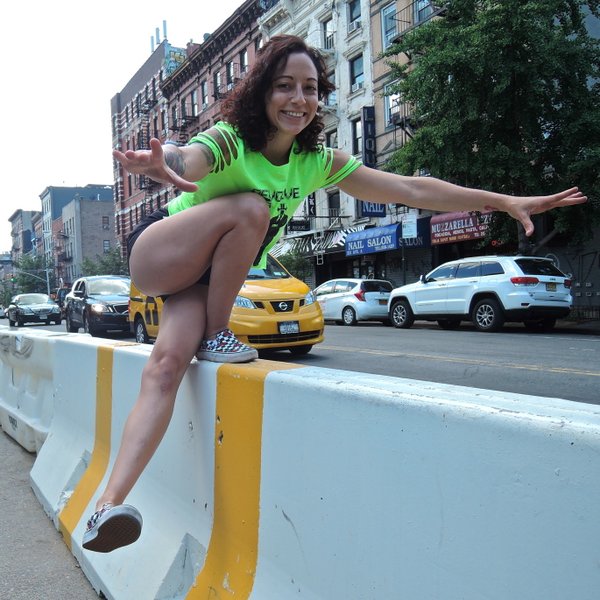
Grace Kavadlo is a PCC Team Leader, personal trainer and group exercise instructor located in New York City. She is a columnist for Bodybuilding.com and can be seen in several Dragon Door books, including Coach Wade’s Explosive Calisthenics. For more information about Grace, check out her website, www.DieselGrace.com

Filed Under: Progressive Calisthenics, Tutorial Tagged With: calisthenics, Grace Kavadlo, handstand, handstand tutorial, handstands, how to, wall handstand variations, wall handstands

The Dragon Pistol Squat

July 28, 2015 By Al Kavadlo 25 Comments

Al Kavadlo Dragon Pistol Lead

The first time I ever tried to do a one-legged pistol squat, I failed miserably. Even though I thought I had strong legs from years of weight training, my initial attempt at this calisthenics staple resulted in me falling on my behind. After several weeks of dedicated practice, however, I was able to nail the pistol squat and eventually build up to performing it for reps.

Later on, I discovered an exercise known as the shrimp squat, which finds the non-squatting leg held behind the body, rather than in front, as it is with the pistol. Once again, my first attempt at this new one-legged squat variation was unsuccessful. This time, however, I was able to get the hang of my newfound lower-body calisthenics challenge within a few training sessions. The strength and stability I’d built from pistols had a good amount of carryover to learning this new skill.

As I got more comfortable with the shrimp squat, I began finding new ways to make single leg squats more challenging. By holding both hands behind my back, I discovered I could change the leverage and add a significant amount of resistance without relying on external weights. I was also starting to practice a technique that would later go on to be dubbed the “jumbo shrimp”, which involves increasing the range of motion of a standard shrimp squat by standing on an elevated surface so that the back leg can drop down lower than when standing on the ground.

Raised Shrimp Squat "Jumbo Shrimp" at Encinitas PCC workshop

Legs Get To Work
One of the most common misconceptions about bodyweight strength training is that it can only be progressed so far. After a certain point, many people would argue that the only way to increase the difficulty of an exercise is to add weight. This is especially true when it comes to leg training. Even folks who have come around to the idea that a muscular and highly functional upper-body can be built with calisthenics alone often have a hard time conceiving that the same is true for their lower half.

Though different people define strength differently, there are plenty of bodyweight squat variations to keep your workouts fun and challenging for a lifetime. If standard pistol squats and shrimp squats are no longer difficult for you, don’t start thinking you need to join a gym. Instead, consider giving the dragon pistol squat a shot.

Dragon Pistol Squat ? #ProgressiveCalisthenics #Legs #Calisthenics #Legday #PistolSquat #BeardPower #NinjaTraining #NowYouTry

A video posted by Al Kavadlo (@al_kavadlo) on Jul 23, 2015 at 11:42am PDT

Enter The Dragon Pistol
Like the traditional pistol squat, the dragon pistol requires serious strength, balance and mobility – and in a very unique way. The dragon pistol can be surprisingly taxing on your inner thighs as well as your deep glute and hip muscles. And of course, all the other muscles that you work in a standard pistol will get hit as well.

As we each have our unique strengths and weakness, some people may find this move a lot harder than a normal pistol, while others may not experience a huge disparity. Regardless, I suggest building a solid foundation in standard pistol squats before beginning to work on this variation.

Convict Conditioning Vol 2 Twist

Other than that, I recommend you spend some time working on your hip mobility by practicing twist holds, which you may recall seeing in Coach Wade’s Convict Conditioning Vol 2. Once you’re able to do a standard pistol and a full twist hold, you shouldn’t be too far from the dragon pistol.


Elevation Training
Though standing on a bench or other elevated surface when performing a shrimp squat can increase the difficulty of the exercise by increasing the range of motion, practicing the dragon pistol while elevated can actually be a very helpful regression. By allowing your non-squatting leg to drop below the bench, you can decrease the amount of mobility required to perform the exercise. (This same technique of standing on an elevated surface can be very useful when someone is learning to do a standard pistol squat as well.)

Dragon Pistol Raised Regression

Toe the Line
If you’ve spent some time working on pistol squats, you’ve probably at some point experienced a cramp in your non-squatting leg as you fought to keep it in the air. This is common when learning the dragon pistol, too, only the cramping may take place in your hip and/or inner thigh instead of your quads. To minimize this issue, many people find holding the toe of their squatting leg to be helpful, particularly in the bottom position.

The dragon pistol also has quite a bit in common with the shrimp squat, as both moves begin with the non-squatting leg behind the body, rather than in front. As such, you may find that holding your toe behind your back at the top of a dragon pistol (similar to how you would in a shrimp squat) will allow you to control your leg as you gradually extend it into the bottom position (which more closely resembles a pistol squat, only with the extended leg threaded behind the squatting leg). Note that your hand will reach across to the opposite toe for this variation, whereas in a shrimp squat it is more common to hold the toe on the same side. So if you’re going for a dragon pistol on your left leg, you would hold your right toe with your left hand.

Al Kavadlo Dragon Pistol How To

When practicing these progressions, I recommend keeping your training volume low. Warm up with a few easier moves (basic squats, split squats, maybe a few pistols and shrimps) then get into practicing your dragon pistol progressions (elevated, holding your toe, etc). When starting out, stick to just one or two reps at a time – a total of 10 reps per side in one training session is probably plenty. If you go slowly and focus on staying in complete control of your movement, you won’t need to do a whole lot of volume.

I’ve only recently begun experimenting with this move, so don’t take my guidance as the final word. I’m sure I will learn a lot more as I go. Feel free to share your experience with the dragon pistol squat in the comments below.

***

Al Kavadlo is the lead instructor for Dragon Door’s Progressive Calisthenics Certification. Recognized worldwide for his amazing bodyweight feats of strength as well as his unique coaching style, Al is the author of five books, including Raising The Bar: The Definitive Guide to Pull-up Bar Calisthenics and Pushing The Limits! Total Body Strength With No Equipment. Read more about Al on his website:www.AlKavadlo.com.

Filed Under: Progressive Calisthenics, Tutorial Tagged With: Al Kavadlo, bodyweight exercise, calisthenics, Dragon Pistol, flexibility, how to, leg training, mobility, tutorial

Increasing Frequency: How to Work Out More Without Overtraining

February 5, 2015 By Silvio Bauer 26 Comments

Silvio Blauer Pistol

If you are anything like me (which means people call you crazy, but that’s another story) you love to work out. You cannot go a day without training and you feel itchy when you miss a workout.

I’ve certainly been there while traveling or when I was stretched thin from work and social commitments. I get a bit moody and my feet start trembling. You may call me addicted.

But all this name calling is total nonsense, because there is a sound way to develop the resilience necessary to work out daily. The good news: I’m gonna tell you about it.

Ready? Good, let’s get to it then.

Why Go High Frequency?

So, let’s first consider the why before we delve into the how. There’s a good number of reasons why it’s pretty neat to be able to work out daily.

  • Habit building: People who struggle working out consistently might find it harder to collect enough will power 3 times a week compared to working out daily. But how can working out less often be harder? Because that way, it’s not a habit. When I come home after work, I change into my workout clothes, find a pull-up bar and do my workout. I don’t ponder about this, I just do it. It’s automatic. By working out only 3 times a week, it’s tempting to postpone a workout because every time, it’s a decision that has to be made.
  • More practice time: If your main goal is mere strength, a high frequency (HF) program is what you need. The more often you practice a certain skill, the faster your progress. And if you, like me, have a long wish list of feats of strength you want to accomplish, that additional practice time gives you room to sneak in one or two more moves you can practice.
  • Plateau busting: When you’re stuck with a progression, say, pistol squats, what can you do? Well, do a lot of pistols or pistol regressions. Do them every day. I dare you to not get better at a move by doing this.
  • Toughening up: When you finally buy into the HF training method, you forget about your excuses. It’s not a big deal anymore when you feel a bit stiff or sense a light muscle soreness. You’ll also learn to really listen to your body, how a good warm-up can do wonders and you will enjoy an enhanced ability to recover from your workouts.

If these are not good reasons to train more often, I don’t know what is.

However, here is what an HF program is not:

  • An ideal bodybuilding method: Most of the Monday-Wednesday-Friday routines come from the bodybuilding community. And if all you want is bigger guns, HF training as described here is not your best bet. I’m not saying you cannot build muscle with this (in fact I gained visible mass from doing pistols every day). It just might not be optimal for mass gaining.
  • A very structured routine: I’ll describe this in detail below, but to implement HF, you have to learn to go with the flow. Therefore, I recommend this only for strength trainees who A) know exactly what they want from their training and B) have enough experience to scale their workouts.

Now, if you want everything from the first list and can manage to miss out on the second one, here is what you need to do.

How to Implement High Frequency Training

Silvio Blauer

I came across the idea of HF training first by reading Squat Everyday by Matt Perryman. It’s an awesome read and, though it’s geared towards weightlifters, really useful for every fitness enthusiast because it’s about much more than just squats. It’s about questioning sport’s “science” and challenging your belief system from time to time.

I never thought I could train that often because I got really sore from my workouts. I was a big fan of the High Intensity Training (HIT) Method and therefore destroyed myself with every workout.

Now, my dentist told me that this won’t work if I wanted to work out almost every day. Here’s a diagram that illustrates why this is the case.

FIV_triangle

I call this the FIV triangle (I’m actually not the first person to come up with this diagram. I first saw this in an article by Alex Zinchenko). The orange dot in the middle is metaphorical you. You can be everywhere inside the triangle. The nearer you are to one corner, the more distant you are from the other two.

Now, when you want to work out very often, the first thing you have to do is do lower intensity and lower volume workouts (volume meaning the total number of sets you do each week, for every muscle respectively).

frequency-FIV

This is an extreme case and probably resembles something like working out 2 times a day, every day. If that’s you, I envy you for your spare time.

A useful method to implement higher frequency training would work with two things:

  1. Scale every workout so that the dot does not come near the lower corners of the FIV triangle (intensity and volume).
  2. Skew the FIV triangle so that a higher frequency is possible with intensity and volume being the same.

The skewed triangle below would resemble a good case of strength focused HF training.

high-frequency-FIV

This means we’re doing HF, medium high intensity and low volume.

To produce this kind of training regimen, you need to learn the Art of Going with the Flow and to push through some light discomfort. To elaborate this further, let’s take the pistol as an example.

Say you want to get really good at pistols and you therefore try to do them every day. Depending on your level of strength, the pistol can be a very demanding and therefore intense exercise. So doing 5 sets of 5 pistols (5×5) every day might be too much.

That’s exactly when you need to listen to your body: If you did a few intense sets of pistols on Monday, scale down on Tuesday. Maybe do a couple of sets of light bodyweight squats followed by one good set of pistols.

Maybe Wednesday and Thursday are medium intensity and you feel good to go again on Friday for a higher intensity workout. I plotted an exemplary weekly course of intensity in the diagram below.

intensity_curve

As you see, the intensity (the orange line) throughout the week varies significantly. This is to keep the balance between volume (dark grey area under the curve) and recovery (light grey area between curve and maximum intensity line).

Now we can see why the FIV triangle makes sense: If you keep intensity at maximum every day, there is no recovery. You can go high intensity, but therefore you need to have rest days (so intensity zero).

The low intensity days are nothing more than active recovery. In fact, doing lighter regressions of an exercise helps promote blood flow to your muscles and your joints, which in turn speeds up recovery and prevents injury. Spiffy!

There is no exact method how to scale each and every workout, because everybody is at a different level, both in strength and recovery ability. That’s something you need to experiment with yourself.

The neat thing about adopting this varied intensity scaling and HF training is that it makes you more resilient. You will get sore less often and will enjoy faster recovery. That’s mighty useful if you want to participate in a PCC Workshop, by the way. You won’t be beat up so much after the three days and can take The Century Test like a breeze.

So once you get the hang of taming your inner beast during your workouts, you can work on skewing the FIV triangle so that you can take more frequency with the same intensity and volume.

But do yourself a favor and be deliberate about your workouts. That means, keep a workout log and write out your workout beforehand on that specific day, based on how you feel. You can correct your plan during the workout but try to keep this at a minimum.

For the first few HF weeks, plan out your workouts lighter than you think you can handle. If after a week you think your workouts have been a joke, scale them up a notch.

Maintaining High Frequency Training

Silvio Blauer L-Sit

There are a couple of things to keep in mind when riding the HF horse. Firstly, warm-up properly with dynamic stretches, mobility drills or very light regressions of your target skill. After your workouts, I recommend some good old-fashioned stretching. Specifically stretch the muscles involved in your HF training.

After about 2 weeks of experimenting with pistols every day, I felt that my legs got really tense and stiff. It wasn’t soreness, just a slight tiredness. So I took a day off, did a nice recovery routine, had a couple of beers (I’m German, that’s how I recover 😉 ) and jumped on the pistol wagon again the next day.

So yes, you can take a day off once in a while. Just know that you won’t die from working out with slightly sore muscles. There have been so many times when I felt like I didn’t have enough energy for a productive workout, but after a good warm-up, it usually turned out great.

You also don’t have to implement this for all your skills and moves (but you could, I guess). I did this with pistols to finally master them with ease. But you could incorporate this for just about any skill like one-arm push-ups, elbow levers or dragon flags.

So there it is. All you need to know to toughen up and practice as often as possible without burning out. Happy tricking!

-Silvio

***

Silvio is a full time medical engineer who loves to practice and teach calisthenics in his free time. He enjoys creating workout plans for his friends and spreads the word about PCC over at his blog, NeatStrength.com. He writes about minimalist fitness and can also be reached through his Facebook page: facebook.com/neatstrength.

Filed Under: Progressive Calisthenics, Tutorial Tagged With: high frequency training, high intensity training, how to, neat strength, programming your training, progressive calisthenics, Silvio Bauer, tutorial

The Forearm Stand: A PCC Hidden Step

October 7, 2014 By Grace Kavadlo 29 Comments

Grace Menendez Forearm Stand

Are you frustrated with conquering the freestanding handstand?

We all want to progress quickly, but the jump from a wall handstand to a free-balancing one can be a huge hurdle! Enter the Forearm Stand – a relatively unknown movement in the PCC world – and a great “hidden step” on your way to the handstand!

When one of my clients recently told me her goal was to nail the forearm stand, I naturally turned to my PCC Instructor Manual, searching for a regression. At over 600 pages, the PCC manual is by far the most comprehensive guide to calisthenics I’ve ever seen, so I was surprised to find barely any mention of the forearm stand!  Luckily, I had plenty of experience with this move from my Yoga training.

Take A Stand

The forearm stand is a great intermediate step between a beginner’s headstand and a freestanding handstand. Known as Pincha Mayurasana (Peacock Pose) in Yoga, this move is great for strengthening your arms and shoulders while also stretching your neck, chest, abdomen and back.

Inversions are also beneficial for improving circulation throughout the body, as well as challenging the practitioner’s balance. Though a difficult move in its own right, the forearm stand is more accessible than a handstand because you have more points of contact to assist in balancing.

Here’s how to nail this move in just 3 easy steps!

#1 Dolphin Pose

This pose is similar to Downward Facing Dog from Yoga but it is practiced on the forearms rather than the hands. Start in a plank position with your forearms shoulder-width apart, then spread your fingers and align your shoulders over your elbows as you gaze between your hands. Slowly begin to walk your feet in towards your hands as you raise your hips towards the sky. If you are new to this pose, you may only be able to walk a few steps before stopping. Your body should resemble as close to an inverted V as possible. Actively press through your hands and forearms to lift your head further off the ground and hold this position for time.

Grace Menendez Dolphin Pose

#2 The Kick-Up

Begin in Dolphin pose and extend one leg up towards the sky. The closer you can walk your feet to your elbows, the more aligned your spine becomes. This alignment allows you to “float” into this pose rather than having to rely on a significant jump. The more mobility you have in your hips and hamstrings, the less difficult this becomes. Push off the base leg as you kick upward with the extended leg. If you are unable to hold the balance at first, I suggest practicing this variation against a wall or other sturdy object until you build the confidence to try it freestanding.

Grace Menendez Dolphin Kick Up

#3 Forearm Stand

Once you are able to kick up and hold for a few breaths, you’re golden! Keep increasing your hold times by simultaneously squeezing your inner thighs and ankles together and pointing your toes towards the sky to create stability throughout your body. The key to finding the “sweet spot” is to grip the ground with your fingers while “wrapping” your triceps around the arm bones and pressing through your elbows as you balance.

Al Kavadlo Danny Kavadlo Forearm Stand

Scorpion Pose and Beyond

Initially when I began practicing forearm stands, I found it easier to hold the pose by bending my knees and allowing my heels to drop as a counterbalance. This is also known as Scorpion Pose. I must warn you this is an intense back bend, however! If you are having difficulty balancing in a regular forearm stand and want to try the scorpion variation, be sure to fit in some preparatory bridge work to warm up your spine.

Al Kavadlo Scorpion Pose

Be patient with yourself and prepare to put in some work if you want to nail this move. You might experience a “crash-landing” when first attempting freestanding forearm stands but by learning to safely fall out, you’ll gain the confidence to keep trying again. If you have the flexibility you can transition into a bridge if you feel yourself tipping over. If not, try to turn your hips and fall to the side. Stay the course and eventually this move will be yours!

Watch the video for more:

***
Grace Menendez, PCC, HKC is a personal trainer and group exercise instructor located in New York City. For more information about Grace, check out her website, www.DieselGrace.com

Filed Under: Flexibility, Tutorial Tagged With: dolphin pose, flexibility, Forearm stand, Grace Menendez, handstand, handstand regression, headstand, hidden step, how to, tutorial, yoga

Building an Indestructible Body with “Outside the Box” Exercises

August 12, 2014 By Logan Christopher 32 Comments

Al Kavadlo Back Of The Wrists Push-Ups

Push-ups. You move in one plane of motion, up and down.

Squats. The same thing. Pull-ups too.

Everyone here will agree that bodyweight exercises are great, but it’s important to realize that there are many, many different ways of doing them.

If all you ever do are one dimensional exercises, even if you build a lot of strength in them, your overall fitness and athleticism will remain one dimensional.

It’s a sad fact that one of the biggest things holding people back from hitting their training goals are injuries. Yet, with smart training these can largely be avoided. And if you do suffer from pain currently, there are always things you can do to work to improve your situation.

Whether you are rehabbing or pre-habbing (doing work that aims to prevent injuries), these exercises generally are the same.

So, what makes one of these exercises different than a regular exercise?

The focus on building flexibility and/or mobility along with a strength component.

The more mobile you are (up to a point), the more likely you can fully exert the strength of that joint and the surrounding tissue.

The more flexible you are (once again up to a point), the more likely you can fully exert the strength of that joint and the surrounding tissue.

When you recognize that strength must be used in combination with mobility and flexibility, then you see why you need to do more than just “straight line” and conventional exercises. The effects of this type of training help you to build an indestructible body.

Before we begin it is important that you move into these exercises slowly. While they will help strengthen your weak points, remember that you are still working on weak points! The difference between something that is good for you and something that is not, can be separated by very little intensity or volume, so you must ease in slowly. Be smart!

Cross Leg Squats

The knee is a simple hinge joint. As such, so many personal trainers and coaches become deathly afraid if it ever does anything outside of that ability. “If the knees go past the toes in a squat you’re going to wreck yourself!” they say.

But here’s the truth: If your body can move in a way, that ability can be strengthened. And if it is strengthened then you’ll have less of a chance for injury. Not only do cross leg squats work the knees, they stressing them in a plane of movement they don’t normally go—and the ankles get worked too.

Begin by sitting with your legs crossed, then rock your weight forwards and press on the sides of your feet, extending your legs until you come to a standing position. Make sure to try it with your legs crossed both ways.

For assistance you can grab onto a doorknob or other solid object to help. You don’t need to do a lot of reps, but instead work to make this an easy way you can get up from the ground at any time.

Logan Christopher Demonstrates the Cross Leg Squat

Sit to Cossack Squat

Was that last one too easy for you? I’m guessing that’s the case for many people reading here. So try this challenge.

Do a Cossack squat to one side while keeping the heel flat on the floor. Once at the bottom, sit back until your butt is sitting on the floor. Now rock back up to Cossack squat, switch sides and repeat.

If you need assistance use your hands to get back up, but the challenge is to do it without them, while trying to use as little momentum as possible. This takes some deep flexibility, and you may notice that your knees don’t necessarily track your toes.

This video shows it in action as well as the secret I found to performing it after much frustration and failure to do it.

One Arm Twisting Bridge

Let’s move onto the upper body. This is a fairly advanced move that I covered before here on the PCC Blog: One Arm Bridge, Twists, and the Valdez.

It’s so useful I’m bringing it up again. The twist in particular builds shoulder stability and strength in an extended range of motion. It even works the wrists in a flexible manner.

At the same time the spine is in full flexion and then twists. A big “no-no” that I say yes to!

If you can do this, there’s a good chance you don’t have issues with any of the joints mentioned above. If you can’t do it right now, but take the time to build up to it, your body will be that much more indestructible from your work.

Back of the Wrist Pushups

An important thing to realize when doing these “outside the box” exercises is that you can still follow the same rules of progress as you would in all your other training.

Back of the wrist push-ups are a great complement to doing lots of push-ups and handstands. In regular push-ups and handstands, your wrist is extended back. But here, you flex your wrist fully and put the weight on the back of the hand. This builds strength and toughness in the wrists, but also works the elbow joints in a big way.

Start slowly with these, as in kneeling push-ups. You can hold for time or rep them out. Progress to regular push-ups when you’re able to. Remember to go slow.

I decided to see just how far I could progress with this and worked my way up to a back of wrist handstand push-ups.

Adding Indestructible Exercises to Your Program

Here’s the great part about these exercises and the hundred, if not thousands, of other moves like them. You don’t need a whole lot to get the benefits.

Doing a few of these exercises, like a few reps in a single set, will be enough to get better at them, and reap the benefits.

Any of the following will work:

  • Add them to your warm-up.
  • Add them to your cool down.
  • Add them to your stretching program.
  • Add them to your mobility work.
  • Do a few on your off days.
  • Do them as part of a morning wake up routine.

You can work through your entire body or just focus on one area at a time.

If you enjoyed this article let me know in the comments section below. I’d love to share more exercises with you in the future!

***

About Logan Christopher: Logan Christopher has been called a physical culture renaissance man as he is accomplished in a wide range of strength skills from kettlebell juggling, performing strongman stunts, and bodyweight exercises. He is the author of numerous books including Secrets of the Handstand and The Master Keys to Strength & Fitness. In addition, he’s spent the last several years going deep into mental training to find out what it takes to really excel and tactics that can help people instantly improve their exercises. You can find out more about all this at http://www.legendarystrength.com/.

Filed Under: Flexibility, Progressive Calisthenics, Tutorial Tagged With: advanced variations, ankles, back of the wrist push-ups, Cossack squat, flexibility, hips, how to, Logan Christopher, mobility, shoulder mobility, tutorial, unconventional exercises, wrist training

Elbow Levers For Superhero Strength

August 5, 2014 By Grace Kavadlo 26 Comments

Grace Menendez One Arm Elbow Lever

Growing up, I was a scrawny, geeky kid who spent my free time reading comic books, fantasizing about having mutant powers and dreaming of looking shredded like my heroes in the stories. The first time I ever saw an elbow lever, the kid in me got excited. I’d always wanted to be a superhero, and this was the closest thing to flying that I’d ever seen. I had to try it myself!

Unfortunately on my first attempt, instead of flying I ended up face planting instead! After scarfing that slice of humble pie, I did what any intelligent athlete would do: I took a step back and started practicing foundational movements to help me earn my wings!

#1 – The Plank

As played out as this exercise may seem, it is the perfect place to start. The plank position puts you in the same plane of movement as a lever and helps you build the necessary core strength. Emphasize keeping an open chest while broadening through the collar and retracting the shoulder blades down and back. “Zip-up” your mid-section by squeezing your glutes, engaging your quads and evenly distributing the weight between the top and bottom of the body. Eventually when you can hold the pose for 2 minutes, experiment with gecko plank variations, which involve lifting a leg and/or arm.

Grace Menendez Gecko Plank

#2 – Back Bridge

In a culture where flexion is the norm (sitting for prolonged periods, driving, etc.) the bridge liberates the spine from excessive upper back arching, as well as from a variety of other back pathologies. How does this apply to levers? In order to hold the body upright, you need to have a flexible upper back and strong spinal muscles–and the bridge addresses both! Take your time with this movement as it can be very intense for beginners. There are less difficult variations you can practice like the straight or table bridge, neck bridge, etc.

Grace Menendez Bridge

#3 – Bound Eagle

One of the gnarliest sensations you need to get past when first practicing this move is getting used to having your elbows jammed in your guts! If you have never tried it before, go ahead and try! Not as easy or comfortable as you thought? No sweat! Master PCC Al Kavadlo, suggests in his book Stretching Your Boundaries (definitely a must-have for every regular calisthenics practitioner) a helpful preparatory pose could be the Bound Eagle. This pose can help you gradually develop the flexibility needed to turn your elbows inward.

Stretching Your Boundaries Bound Eagle

#4 – Midsection Holds

Speaking of jamming your elbows into your midsection, the L-Sit progressions are ideal to get your abdomen prepped to take all your bodyweight. These holds involve tensing almost every muscle in your body, specifically the abdominal region, much like you’ll need to in order to perform a successful elbow lever. Start with a tucked L-sit and progress from there. I also like to include the frog stand here as it emphasizes lifting the chest while balancing on the hands just like in the lever!

Grace Menendez L-Sit At Beach

Grace Menendez Fingertip Frog Stand

#5 – Elevate yourself

Start practicing your elbow lever on elevated surfaces like plyo boxes, tables, counters, park benches, paralletes, etc. Be creative; the sky’s the limit! Start by letting your legs hang over so your form will resemble less of a straight line and more of an arch. As you get stronger, just like in your midsection holds, you can work from a tuck to a straddle and eventually that perfect expression of the pose with long extended legs!

Grace Menendez Elevated Straddle Elbow Lever

Grace Menendez Elevated Elbow Lever

#6 – Get Grounded

If you’ve mastered step 5 and you’re ready to attempt the elbow lever on level ground, you may still find it difficult to completely clear your legs from the floor. It may be helpful at this point to use a wall-assisted regression, in which you press one or both feet into the wall to spot yourself. From there, it’s just a matter of taking a leap of faith and going for it. If you’ve done the work, it should come without too much of a struggle.

Grace Menendez Elbow Lever On Ground

#7 – Next Level Levers

What’s great about progressive calisthenics, is that even after you are finally able to perform the elbow lever, there are even more advanced variations to be conquered! You can try doing an elbow lever on your fingertips, or even just one arm. Be patient during the earlier steps and focus on form. It takes consistency and synergy for your body to learn this unique movement!

Elbow levers are truly the stuff of Superheroes. They take skill, courage, and strength to perform properly! Don’t be shy! Embrace your inner hero and get your lever on!

Grace_POW

***
Grace Menendez, PCC, HKC is a personal trainer, group exercise instructor and massage therapist located in Los Angeles. For more information about Grace, check out her website, www.DieselGrace.com

Filed Under: Progressive Calisthenics, Tutorial Tagged With: abdominal training, abs, Bound Eagle, bridge, crow stand, elbow lever, elbow lever progressions, Grace Menendez, how to, L-sit, midsection training, plank

Primary Sidebar

Featured Products

previous arrow
GetStrongBookCover
ConvictConditioningBookCover
StreetWorkoutBookCover
ExplosiveCalisthenicsBookCover
StrengthRulesBookCover
next arrow

Categories

Progressive Calisthenics Certification Logo
Click here for more information or to register for the PCC workshop

Get Strong Workouts TriadXP App
Get Strong Workouts App

Recent Posts

  • Top 5 Reasons Why an In-Person Workshop is the Best Way to Supercharge Your Training
  • HYBRID STRENGTH TRAINING IS HERE!
  • My Calisthenics Journey to the PCC
  • The Handstand Press: Complete Control Through the Handstand
  • The Get Strong App is Here!

Dragon Door Publications

Dragon Door Publications

Recent Comments

  • bross dandon on The Case for Curved Handstands
  • Johnny Flewellen Jr. on Strength for Life
  • Dan Earthquake on The Pursuit of the Daily Minimum
  • Johnny Flewellen Jr. on The Pursuit of the Daily Minimum
  • Johnny Flewellen Jr. on Yoga, Calisthenics and the Journey of a Lifetime
FOLLOW US ON TWITTER!

Copyright © 2025

Dragon Door Publications / The author(s) and publisher of this material are not responsible in any manner whatsoever for any injury that may occur through following the instructions or opinions contained in this material. The activities, physical and otherwise, described herein for informational purposes only, may be too strenuous or dangerous for some people, and the reader(s) should consult a physician before engaging in them.