• Skip to main content
  • Skip to primary sidebar
  • Home
  • Contributors
  • Resources
    • Q&A with Paul “Coach” Wade
  • Workshops
  • Products
  • Forums
  • Articles
  • Blogs
    • RKC Blog
    • Strong Medicine Blog
  • Archives

PCC Blog

Progressive Calisthenics - The Official Blog for the PCC Community

push-up

A Twist to the Push-up: Introducing the Intrinsic Strength Push-up

August 16, 2016 By Angelo Grinceri 11 Comments

Angelo Grinceri IST Push-Up

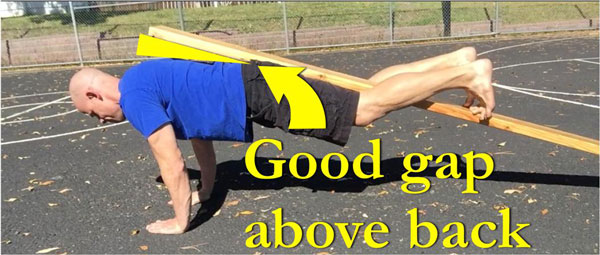
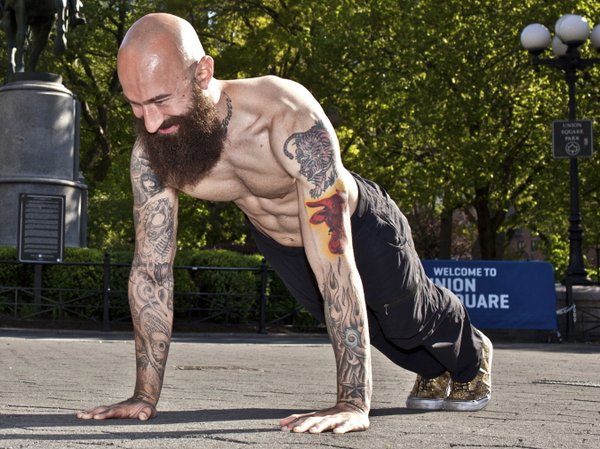
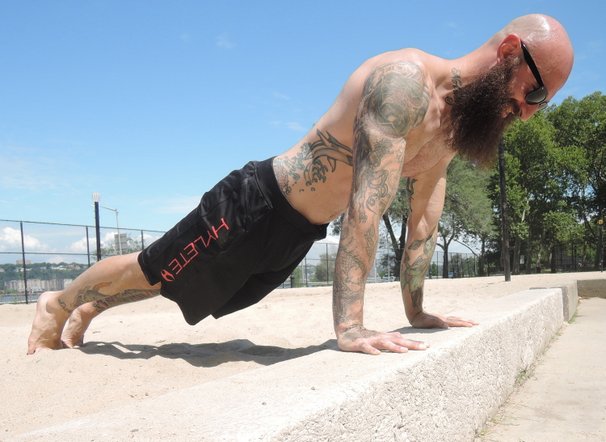
Men and women of all fitness levels are familiar with the push-up and its ability to challenge and build full body strength and muscle. There are many ways to regress and progress the push-up to fit the needs of any everyday athlete. Regressing the push-up’s difficulty can be as simple as changing the angle of the body or adding the use of your knees for a closer point of contact to redirect weight away from the upper body and arms. Progressing the push-up to a more advanced variation can consist of changing or removing an extremity position, adding an external resistance, and changing the angle of the body to redirect more weight into the upper body and arms. Each push-up progression delivers a unique challenge (as with most functional exercises) that can be felt throughout the arms, shoulders, chest, back, and especially the core.

ISTSmallBookCoverAs progression remains a staple focus to any athlete’s training program, the need to challenge the body further than performing more repetitions or adding more resistance to the same exercise over and over again becomes a necessity.

So we start to add variations. As your strength and ability within the push-up progresses, you will be challenged with different positions and fewer points of contact. Each variation will bring a different challenge to the body.

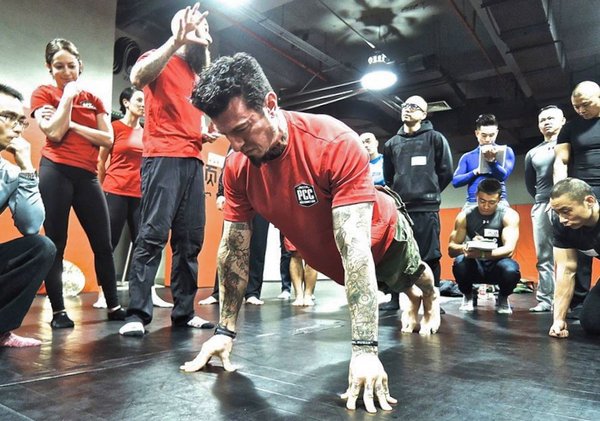
Some of my favorite push-progressions are explained in depth within the PCC; such as the archer push-up, the pike press, and the 1-arm push-up.

Each of these push-variations changes the body’s position, changing the way the extremities and core integrate when challenged throughout each repetition—stimulating the body’s soft tissue (muscle, ligaments, tendons, fascia, and skin) in a different way through various ranges of motion.

Anti-Rotation Variations

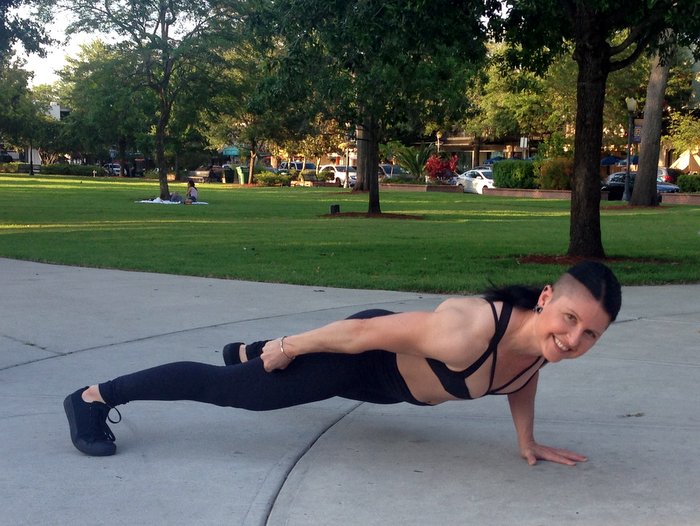
Standard strength training and muscle building exercises focus on performing repetitions in the sagittal plane. One way to progress an exercise in the sagittal plane is by adding a unilateral component, increasing the difficulty that is felt throughout the entire body. Some examples of unilateral variations are a 1-arm plank compared to a standard plank and a 1-arm push-up compared to a standard push-up.

Both of these unilateral variations require extreme muscular tension that originates in the deep core and radiates out through the extremities to integrate the body as one unit; this is known as bracing. Bracing improves muscular integration, muscular strength, joint stability, and joint alignment — allowing the body to fight off the external forces that want to pull your unsupported side down to the ground. When a point of contact is removed in the push-up position, bracing the entire body tight is what allows the body to remain horizontal. Fighting against the forces of gravity and resistance wanting to pull the body a certain way is known as Anti-Rotation.

Without bracing the body for anti-rotation it would be nearly impossible to remain horizontal while performing a 1-arm plank and 1-arm Push-up.

Posi-Rotation Variations

What about training the body through rotation? I would like to introduce a Posi-Rotation variation to our classic strength training exercises. Pose-Rotation variations such as the Intrinsic Strength Push-up challenge the body to maintain core tension and joint stability as the body rotates in the transverse plane while on the ground.

Angelo Grinceri IST Diagram PageOur multifaceted, dynamic body moves in three dimensions with every step we take. The standard function of walking requires a synergistic rotation of the shoulders, spine, and hips. Whenever watching the body move, the transverse plane will always be in “plane” sight.

Since our spine rotates with every step that we take, All humans should be incorporating transverse plane training into their daily workouts.

Training the spine to rotate safely with control is an excellent way to stimulate the body’s ligaments, tendons, muscles, and fascia differently than a regular strict push-up.

Adding a rotational variation to this classic strength exercise will facilitate a different stimulation of soft tissue, leading to a more able body that is stronger in more positions while on the ground and standing.

As the body rotates through each repetition, the arms and shoulders have to adjust to the rotating torso – adding lots of variability throughout the entire body with different leverage points, ranges of motion, and body weight displacement.

Angelo Grinceri IST Push-Up Collage
Start incorporating the Intrinsic Strength Push-up as a simple transverse plane (global rotation) variant to your push-up arsenal.

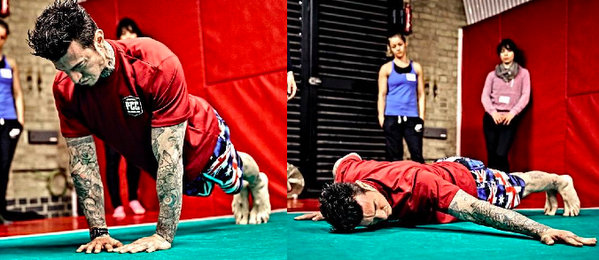
The Intrinsic Strength Push-Up:

IST push-up variations deliver a unique challenge to any athlete from beginner to advanced. This push-up progression stimulates and strengthens the horizontal press with global rotation.

Intrinsic Strength Push-ups offer three variations to the horizontal pushing motion during the same set without having to change the position of the hands. This simple eye gaze over the right and left shoulder allows the muscles to stay engaged, providing the body with great T.U.T. ( Time Under Tension) while still delivering a variation.   Improving strength and muscle throughout the chest, shoulders, back, arms and core is only possible through physical adaptation from Time Under Tension. The more time spent working the position, the more the body adapts to that position.

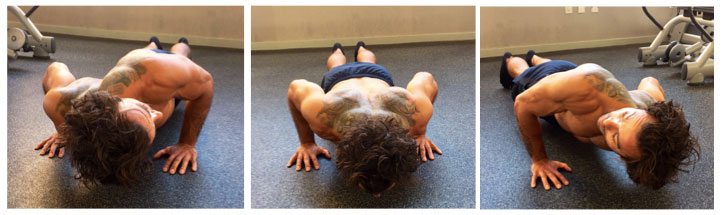
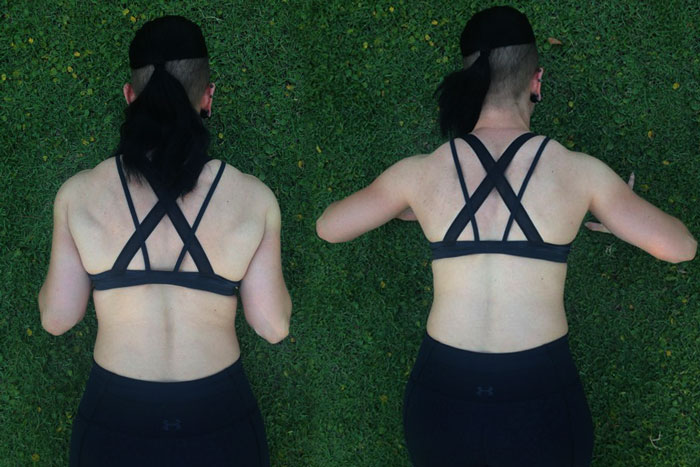
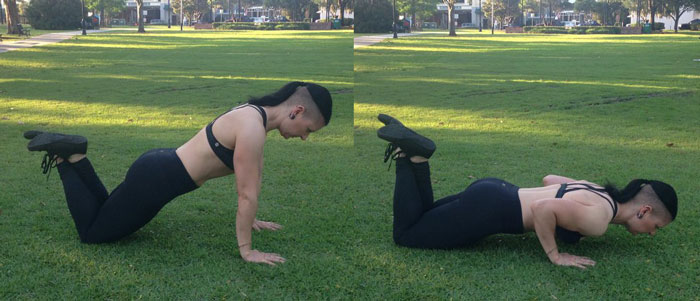
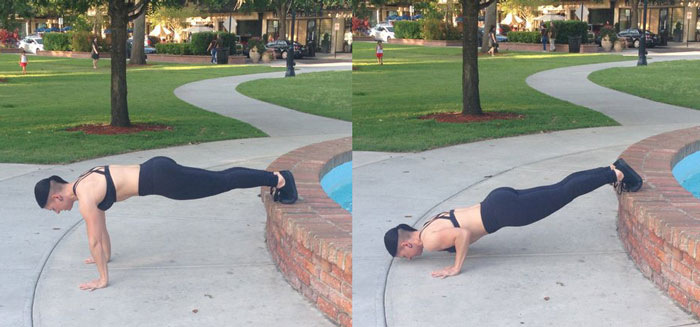
This horizontal rotation is performed by lowering down to the bottom of the push-up while simultaneously taking the eye’s gaze over one of the shoulders. This transverse plane variation causes the shoulders, torso, and hips to rotate to that same side, changing the weight distribution through the arms.

IST Push-ups Over Shoulder

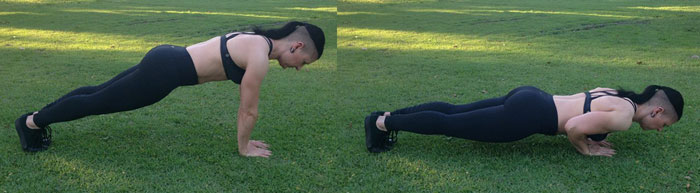
How To Perform the Intrinsic Strength Push-Up

  1. Start with your feet in a bilateral stance, shoulder width apart.
  2. Walk both hands out on the floor until you are in a plank position.
  3. While lowering down to the bottom of the first push-up, simultaneously take your gaze over your right shoulder and return to the high plank position.
  4. Do a regular push-up, after returning back to the high plank position
  5. While lowering down to the bottom of the third push-up, simultaneously take your gaze over your left shoulder and return to the high plank position.

Angelo’s Advice

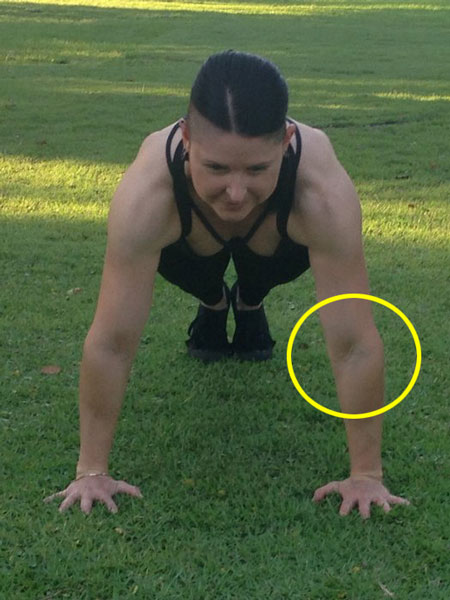
  1. Allow every joint to help with the full body rotation.
  2. Your eyes will direct your head, shoulders, spine, and hips to rotate towards the same focal point (above the shoulder).
  3. Actively apply pressure into the ground through your legs and feet to create lower body tension.
  4. Actively apply pressure into the ground through your shoulders and fingers to create upper body tension.
  5. This extremity tension will radiate through the core – ensuring core tension and more muscular activation.

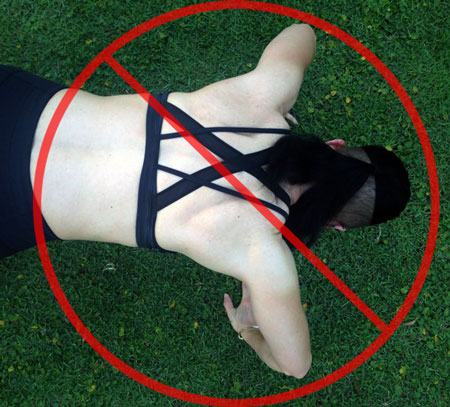
When turning the head over the right shoulder, you will notice that:

  1. More weight and tension will shift into the left shoulder.
  2. A stretch will be felt throughout the left chest

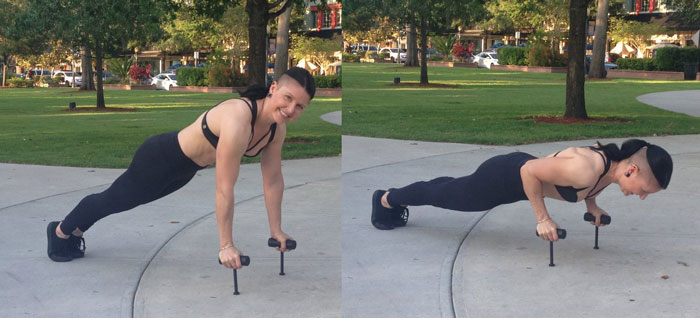
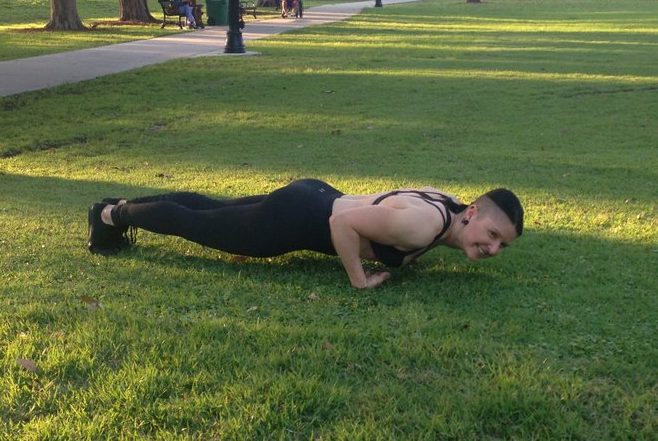
Perform a series of three push ups to complete one repetition of an IST push up.
First push-up: look over the right shoulder.
Second push-up: look in-between your hands.
Third push-up: look over left shoulder.


****

Angelo Grinceri, PCC, FAFS, is the author of Intrinsic Strength: A Breakthrough Program for Real-World Functional Strength and True Athletic Power Angelo’s fitness journey started with a focus on aesthetics and bodybuilding. As he grew as an athlete and coach he started to focus on strength training, corrective exercise, and athletic function. He realized a connection was needed between these different modalities and Intrinsic Strength Training® was born. Based in NYC, he can be contacted through his website, IntrinsicStrengthTraining.com. Follow him on Youtube, Facebook, Instagram, and Twitter for Angelo’s Advice and follow-along workouts.


Filed Under: Progressive Calisthenics, Tutorial Tagged With: advanced push-ups, Angelo Grinceri, Intrinsic Strength, Intrinsic Strength Training, push-up, push-up variations

Coaching and Using Powerful Push-up Elbow Positions

May 17, 2016 By Adrienne Harvey 29 Comments

Adrienne Harvey One-Arm Push-Up

I’m pretty sure there hasn’t been a PCC or SCC workshop where the following question hasn’t come up:

“Where do I put my elbows during the push-up?”

Or if it isn’t asked, there’s always more than a handful of people who need some coaching on elbow placement with the push-up.

Al’s answer is a real winner, and we can all benefit from hearing and reviewing it. Basically, you want to make sure your elbows stay below your shoulders. Keeping them way out at a 90 degree angle to your torso is not ideal, but they don’t have to be right next to the body either. For most people, the ideal arm position will create somewhere between a 0-60 degree angle between the upper arm and the torso.

Push-Up Elbow Range 0-60 degrees

The good news is the range of 0-60 degrees allows each of us to find a strong and comfortable place, but by intentionally varying the angle in our sessions we can recruit different muscle groups more intensely. Generally speaking within this safe range, when the elbows are close to the sides as on the left photo above, there’s more emphasis on the triceps and front delts. When the degree is greater, we can experience a little more recruitment of the pectorals.

There’s several reasons that the elbow issue keeps coming up, and will probably continue to be up for discussion with trainers and enthusiasts alike. Here are three of the bigger reasons:

  1. There are a LOT of heavily used stock photos of people doing push-ups with their arms way out at big 90-degree angles. This is actually a huge pet peeve of mine because you’ll see these photos in well known, famous magazines and advertisements for everything from workout wear to every supplement you can imagine. The most extreme example I’ve seen was a (at least we were told) highly converting photo chosen to promote my friend’s boot camp. The woman in the stock photo had her elbows cranked out to such a degree that doing a push-up from that picture-posed position looked physically impossible!I could continue with more examples, but you get the idea—we’re all surrounded by tons of strange visual examples of something as simple as a push-up. It’s easy for even experienced exercisers to start thinking that this super-wide elbow angle is a preferred position, considering how often we see it in supposedly authoritative mainstream books, magazines, ads, etc. for men and women!
Elbows up too high can put shearing force on the shoulder joints, etc. I hated even taking this picture. OUCH!
  1. The elbows can sneak out and up when someone has moved ahead to a more difficult variation too quickly. I’ve also seen many people start out with a great elbow position, then as they fatigue, the elbows start coming forward as compensation. At the same time, you’ll see their head jut forward to the ground as another, often simultaneous compensation. Beginners can sometimes be so focused on hitting a particular rep goal, that they won’t even feel these compensations happening.That’s where you, as a great instructor can help out.

    If you are training on your own, check in from time to time by shooting a short video (just for you) on your phone and checking your form. Whenever I feel like something is “off” with any given exercise, I get out the camera, it’s a great tool. When you’re coaching a client and they’re doing well, you can also shoot short videos of them on their own phones—they will now have that as a reference (they’ll also probably proudly show it to their friends and end up sending you referrals). It takes everyone some time to build the body awareness to know when the form is breaking down. This is part of why it’s so important NOT to rush through the beginning steps of any calisthenics exercise.

  1. I’m sad that we need to bring up this third reason. As with the “squat depth” debate there still are still plenty of dogmatic trainers out there who are insisting that “there can only be one” (true for the Highlander, but not for elbow position) correct elbow position for everyone all the time. So, feel free to break free from the “right and wrong” dogma and find your effective elbow placements within that generous 0-60% angle area. Experiment, have fun, and don’t do anything that hurts!

The important thing to remember (and which is stressed at both the SCC and PCC) is that the exact elbow position will vary with each person. It can even be fun to challenge yourself within this range after you’re comfortable with your own ideal elbow position. Always remember to think of pointing your “elbow pits” forward at the top of the push-up, and the points of your elbows aimed at your feet or toes. This will help maintain your position and keep the reps nice and productive for building strength and habits.

Point the elbow pits forward at the top of your push ups

What if someone can’t perform a push-up without putting the elbows way up high with their shoulders crushing their ears? This simply means they’ll need to work on an earlier step in the progression until they have enough strength. Push-ups on railings are great for teaching the elbow position while building the requisite strength. Be extra sure that the hands are placed in line with and below the shoulders, no matter what surface is used. Knee pushups performed with absolute precision are also very useful for gaining the strength and habit of a healthy elbow/shoulder position.

The same idea applies for the often-maligned, but still very effective knee push up…
It also applies to the raised push-up step…

Let’s start with the “smallest” angle. This is with the arms right next to the body—even touching. Yoga enthusiasts may recognize this position as similar to when they perform the chaturanga series of movements. The hands are almost automatically placed right under the shoulders with this position too. It’s a very stable feeling for most people. If I’m going for high reps, or am helping a student activate and use the whole of their torso (lats, serratus), then this is a great go-to position.

People with large lats from serious pull-up habits, as well as those who may have a few pounds to lose will naturally need to take their arms a little further away from the body. They will of course need to still be sure to engage the lats, keep the shoulders away from the ears and maintain a plank position and tension throughout the body.

Paying attention to elbow placement VERY much applies for the more advanced variations like this feet raised push up. A good elbow angle will ensure that you don’t face plant when you first progress to this variation.

Taking the elbows out to a 45 degree or larger angle will usually be a choice of personal preference given physiology, or a choice made to make the exercise different or a little more difficult. We know that taking the hands out wider past the shoulders will be more challenging for most as well. When you’re ready, explore different hand positions, and then prepare to progress to a really fun intermediate/advanced push-up, the archer push-up.

Danny Kavadlo performing a precision demonstration of the archer push-up at a recent PCC workshop.

No matter what elbow angle is best for you, a real power-booster with the push up is the idea of having a spiraling feeling throughout the arm, and especially with the hands through the ground. A useful cue for this is to have your fingers pointing forwards, but at the top of the push-up, your “elbow pits” (see earlier phoot) will also be pointing forward. In a pinch—like those last few crucial reps of the Century Test—this spiraling feeling can make the difference between pass and fail.

Figuring out your optimal elbow angle can also lead to great success with the intermediate/advanced variations below, and of course your path to the one-arm push-up:

Close push-ups are safer and more effective when the elbow placement is right for you.
Neuro-Grip Push-Ups are nearly impossible without good elbow placement.
Neuro-Grip push-ups are nearly impossible without good elbow placement.
And the scary-looking back of the wrist push-ups (work up to these gently and only if appropriate for you) simply DEMAND proper form…or else!

Hopefully these ideas will help you and your clients/students continue to get strong and progress with the eternally useful, do-anywhere push-up. Please share your experiences in the comments below.

Train STRONG!
Adrienne

****

Adrienne Harvey, Senior PCC Instructor, RKC-II, CK-FMS, has been RKC Certified since 2010, and RKC Level 2 certified since 2011. Kettlebell and bodyweight training have been crucial in Adrienne’s personal quest for fitness.  A core member of the PCC team, Adrienne loves sharing her knowledge with small groups and individuals. She also loves to develop recipes and workout programs to further support performance, body composition, and of course—FUN.

Adrienne will be leading a one-day SCC (Strength Calisthenics Certification) Workshop in Gaithersburg, MD next month, and joining the Kavadlos at the PCC in New York next month as well. There are still a few spots available for each workshop, sign up today.

Filed Under: Progressive Calisthenics, Tutorial Tagged With: Adrienne Harvey, calisthenics, elbow placement, PCC, progressive calisthenics, push-up, push-ups, SCC, technique

The 100 Push-Up Program

March 15, 2016 By Al Kavadlo 37 Comments

Al Kavadlo 100 Push-up Challenge

There’s a famous Zen parable that says, “If you want to be a monk, you’ve got to cook a lot of rice.” In other words, you can’t get to the destination without doing the work.

Well if you want to be a PCC, you’ve got to do a lot of push-ups. If you’re into calisthenics, chances are you’re no stranger to this classic exercise, but have you ever attempted 100 of them in a single session?

This 100 Push-Up Program consists of doing just that, no matter how many sets it takes. Even if it means you are doing sets of just one rep by the end. For example, you might start out with a set of 20, followed by two sets of 15, then do a couple sets of 10, before finishing with several sets of just 5 reps or less. You are allowed as long of a break in between sets as you need. Focus on keeping your form clean and avoid going to failure.

Completing all 100 reps could take a while at first, but with repeated efforts the amount of sets required to reach that target should start to decrease. Eventually you might even complete all 100 reps in a single unbroken set. Just be careful not to sacrifice good form to get there.

Furthermore, if you feel that standard push-ups are not challenging enough, choose a more difficult variation. Fingertip push-ups, close push-ups or archer push-ups are all viable options. Conversely, you can adjust this workout for a beginner by using knee push-ups or push-ups with the hands elevated.

If you feel standard push-ups are not challenging enough, choose a harder variation.

Here are a few more things to keep in mind:

– A full push-up requires a minimum of 90 degrees of flexion along the outside of the elbow at the bottom of the rep, and a full extension of the arms at the top.

– Make sure you maintain a straight line from your heels to the back of your head throughout the entire range of motion.

– Keep your elbows relatively close to your body; do not flare them out to the sides.

– Your shoulder-blades should come together at the bottom of your push-up, but make sure to spread them apart at the top to get the most from each rep.

Danny Kavadlo Demonstrating Push-up form

Don’t feel constrained to using this training tactic with push-ups only. This simple program is a fantastic way to increase your strength and endurance on any basic calisthenics exercise: squats, pull-ups, dips, etc. are all fair game. Advanced trainees can even use this template for more difficult exercises like muscle-ups and pistol squats.

At first I would recommend only doing this once a week per body part, as it can be a bit of a shock to your system. Eventually, however, you can condition yourself to doing this type of thing regularly. When 100 is no longer a challenging number, pick a harder exercise or raise the total reps to 200 or more. Additionally, if 100 reps is just not realistic for you right now, then pick a smaller number (maybe 50?) and build up from there.

Programming your workout does not have to be complicated. No matter your fitness level, this infinitely scalable template is a great way to increase strength and endurance on any movement. Just remember, you have to train consistently to get results. You don’t become a monk without making a lot of rice.

***

Al Kavadlo is the lead instructor for Dragon Door’s Progressive Calisthenics Certification. Recognized worldwide for his amazing bodyweight feats of strength as well as his unique coaching style, Al is the author of five books, including Raising The Bar: The Definitive Guide to Pull-up Bar Calisthenics and Pushing The Limits! Total Body Strength With No Equipment. Read more about Al on his website:www.AlKavadlo.com.

Filed Under: Motivation and Goals, Progressive Calisthenics Tagged With: 100 push up challenge, Al Kavadlo, Al Kavadlo Push Up Challenge, press-up, press-ups, push up challenge, push-up, push-ups, pushup

Super Slow Reps for Superhuman Strength

February 16, 2016 By Benji Williford 19 Comments

Lead Photo Benji Williford

A lot of my personal training clients start out thinking that training faster means training better. But working out like The Flash won’t make you superhuman if you are bobbing your head for apples with your elbows flared out over your shoulders instead of actually doing push-ups. Poor form at a super-fast pace is not only allowing momentum to carry you through part of the range of motion, but it’s also potentially causing unnecessary strain on tendons and ligaments, as the muscles that should be doing the work aren’t activated properly.

My first rule for my clients is to focus on proper form. I created the phrase “AF3” which stands for Absolute Form Fit Function. The intention is to master the form, which improves fitness and ultimately, overall function. One antidote toward improper form is slowing down the rep speed. Let’s continue to look at the push-up as an example.

As you probably know, the push-up is essentially a traveling plank. It is a total body exercise and not just for building big pecs. Now do me a favor and go try an extremely slow push-up with full range of motion. Start in a plank with fully extended arms and lower down very gradually, touching your chest to the floor, then push back to fully extended arms.

You might have had some form breaks or even lacked strength to complete the rep. You should have definitely experienced the feeling of total body activation needed to maintain the straight body alignment in the absence of momentum. If you couldn’t do the full range-of-motion, consider modifying the exercise. For example, try placing your knees on the floor. This will shorten your body length (lever) so you will have to push less percentage of your bodyweight. Yes, the regression of an exercise can be an important part of progressing. It’s important to not let your ego deter you from modifications. You can often foster quicker progressions by perfecting “easier” versions of an exercise.

There are numerous ways you can manipulate your rep speed in order to develop better body control. The following is one example of a set of 7 push-ups stretched out over 2 minutes and 40 seconds.

Rep 1- 10 second rep (5 seconds down/negative and 5 seconds up/positive)
Rep 2- 20 second rep (10 seconds down/negative and 10 seconds up/ positive)
Rep 3- 30 second rep (15 seconds down/negative and 15 seconds up/positive)
Rep 4- 40 second rep (20 seconds down/negative and 20 seconds up /positive)
Rep 5- 30 second rep (15 seconds down/negative and 15 seconds up/positive)
Rep 6- 20 second rep (10 seconds down/negative and 10 seconds up positive)
Rep 7- 10 second rep (5 seconds down/negative and 5 seconds up/positive)

Notice how the set starts by climbing up the ladder in 10 second increments for each push-up from rep 1 (10 second rep) through rep 4 (40 second rep).  Then at rep 5, it goes back down the ladder by decreasing the time in 10 second increments until you reach rep number 7 (10 second rep).  The times listed aren’t absolute, so feel free to experiment with them. The important thing is to move evenly and controlled throughout the range-of-motion.  Avoid fast jerky movements or hitting and holding positions.

To keep a solid pace, I recommend either using a stopwatch or a metronome (a device that musicians use to keep a specific tempo). Personally, I prefer the sound of the metronome. There are now free metronome apps available that you can download to your smartphone. Be sure to set the beats per minute to 60 (that equals one beat per second). It takes some concentration when counting to avoid rushing where you should be within a specific rep, which adds another layer and takes this challenge to the next level. It is mind over matter.

Though we’ve been using the push-up as our main example, remember that you can use this method with just about any exercise: pull-ups, squats (even pistols!), skin the cats…the list goes on.

Benji Williford PCC Pullup

Of course, you will move slowly if you only train slowly. So yes, performing fast reps is important. The point is to move fast well.  In order to incorporate faster reps, you could use this structure by using the same 60 beats per minute with one set of 7 push-ups and adjusting the times as follows:

Rep 1- 2 second rep (1 seconds down/negative and 1 seconds up/positive)
Rep 2- 4 second rep (2 seconds down/negative and 2 seconds up positive)
Rep 3- 8 second rep (4 seconds down/negative and 4 seconds up/positive)
Rep 4- 16 second rep (8 seconds down/negative and 8 seconds up /positive)
Rep 5- 8 second rep (4 seconds down/negative and 4 seconds up/positive)
Rep 6- 4 second rep (2 seconds down/negative and 2 seconds up positive)
Rep 7- 2 second rep (1 seconds down/negative and 1 seconds up/positive)

Since the first rep and seventh rep are quick, you can even consider making them plyometric to build explosive power. Notice that shorter rep times will inherently eliminate some exercises. For example, it might not be the best idea to do a two second skin the cat.

Experiment with your rep speed but don’t let your ego get in the way. If you need to regress an exercise in order to maintain good quality of movement, then do so. Soon enough, you’ll gain the strength you desire to control any rep at any speed through it’s entire range-of-motion.

****

Benji Williford, PCC, RYT, CF-L1 is a Personal Fitness Trainer located out of Eau Claire, WI. Benji believes that, “A successful fitness program is based on positive dialogue between the mind and body.” He can be reached through his website: http://www.benjiwilliford.com, or by email: Benji@ChainReaction-Fitness.com.

Filed Under: Progressive Calisthenics, Tutorial Tagged With: Benji Williford, bodyweight strength training, progressive calisthenics, push-up, strength training, tutorial

The Push-Up Lever

November 17, 2015 By Matt Schifferle 36 Comments

Push Up Lever Lead

Give me a lever, and a place to lay, and I shall make crazy gains.
– Archimedes (probably)

There are a million reasons why I love calisthenics. Aside from the obvious, calisthenics has allowed me to unleash my inner mad scientist and build a variety of “devices.” It’s amazing what you can create with a little imagination and a few trips to the hardware store.

Most of my designs are home made versions of commercially available products such as suspension straps and calf blocks, but one of my favorites is a unique way to load extra resistance onto a standard push-up that I call the Push-up Lever.

PushUpLever
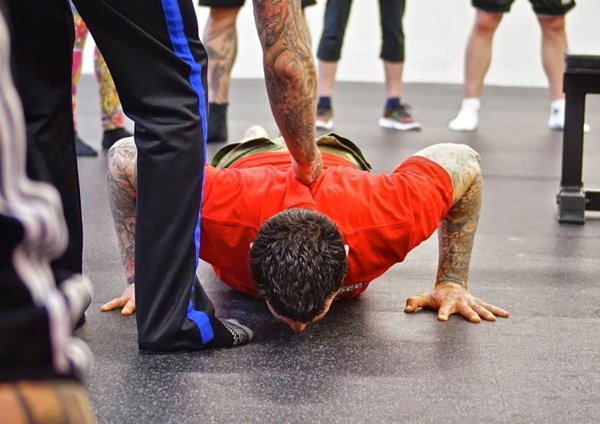
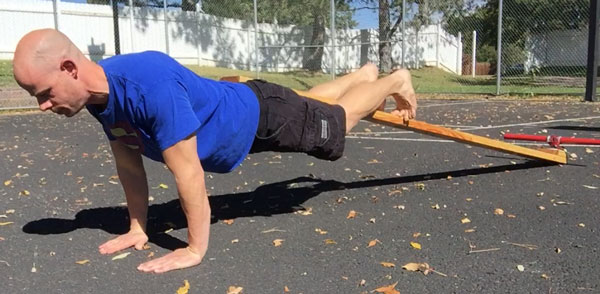
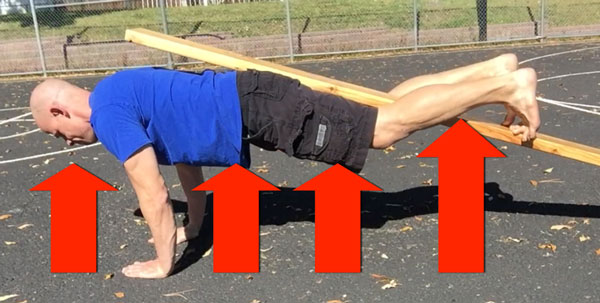
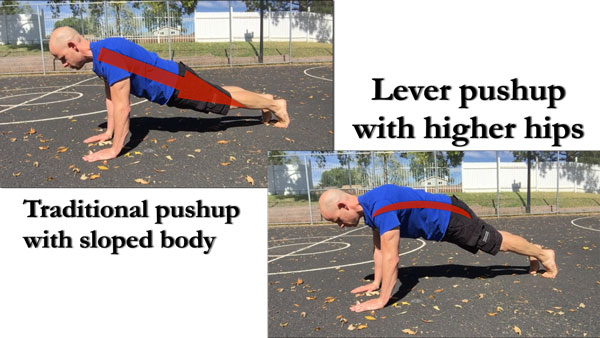
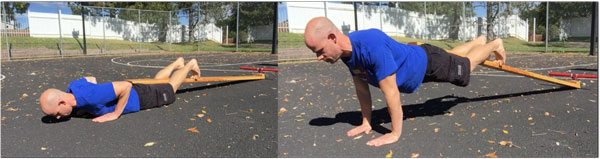
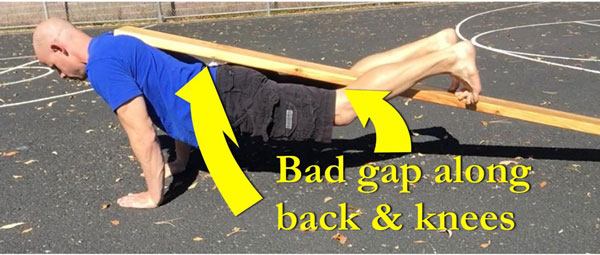
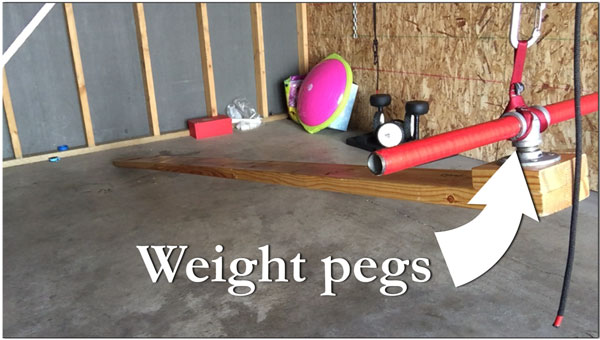
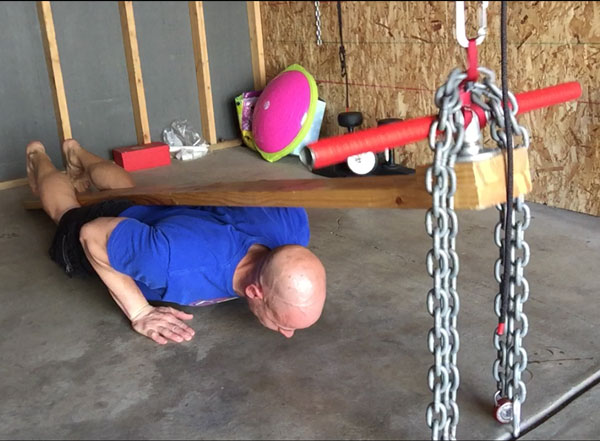
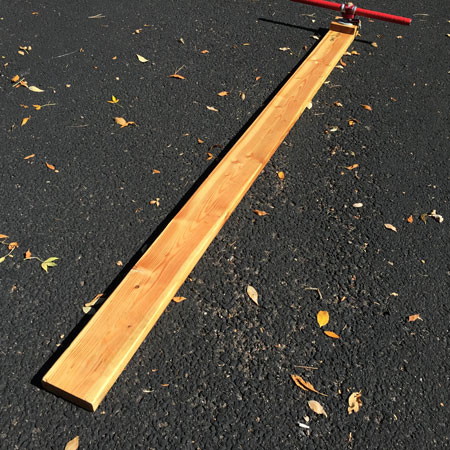
The struggle to load the push-up…

She may not look like much, but that simple plank of wood solves many issues that have plagued anyone who’s tried to add resistance to a standard push-up.

In the time of 10-15 B.C. (Before Calisthenics) I used to do a lot of weighted bodyweight exercises. Most moves were pretty simple, like using a dip belt to load pull-ups, but push-ups were always a struggle for me. I’ve used weight vests, weighted backpacks, stretch bands and stacking weight plates on my back. While all of these methods did produce more resistance, that hard work came at a steep price. Loading the back or neck produced a lot of stress on the spine which felt unnatural and awkward. In some cases, like with sandbags or plates, the weight was difficult to load on my back, plus the load was always prone to shift forcing me to compromise my technique. Using items like bands or chains caused loading on sensitive pressure points like the neck or lower back.

Weight vests seemed to be an ideal solution, but they were expensive and hard to adjust. Even adjustable weight vests required opening numerous pockets and removing small weights. It just wasn’t worth the hassle so I seldom adjusted the load. Despite my effort, I always felt most methods didn’t work very well. I wanted some serious resistance and a plate on the back or a chain around the neck only brought marginal difficulty.

I figured there had to be a better way, so I started to meditate on the ways progressive calisthenics makes push-ups harder. One of the classic methods is to do push-ups on the knees and then make the lever of the body longer by doing them on the toes. So I asked myself, is it possible to further extend the lever of the body out beyond the toes?

That question was the inspiration the Push-up Lever.

What is a Push-up Lever?

The Push-up Lever is the world’s first complete push-up amplification device. Unlike methods that simply load more resistance on pushing muscles, the push-up lever amplifies all of the technical requirements of the push-up. This includes not only the muscles in the arms and chest, but also improving the strength in the core, hips, and legs. It also requires greater scapular control and even more tension in the feet. Many people claim they are sore in their abs and hips the next day after trying it for the first time.

The beauty of the lever is it doesn’t place any excess weight or pressure on your spine, but instead places it on your hips, which can handle the load in a much safer way and with far more control. It’s also something you can easily adjust by sliding where your hips are on the lever. The more you extend the lever out beyond your toe,s the more difficult it makes your push-up.

The further you slide the board up your hips the easier the move becomes!

Not only is the lever easier to use and adjust, but it can challenge even the strongest athletes. This is because it makes the traditional push-up more difficult in 2 ways. It makes the lever of your body longer so you have to work against more resistance. It also makes your whole body lift against gravity. So not only are you working with a mechanical disadvantage but you’re also lifting more of your own body weight.

The Lever forces you to lift your entire body directly against gravity, not just your upper torso.

You can use any long slender object as a push-up lever. Pipes, barbells and even small trees can suffice, but I much prefer a 2 x 4 or a 2×6 plank of wood. Make sure any board you use is straight and not warped. Also look out for splinters. You may wish to sand it down and varnish it for a nice finished look.

How do you use a push-up lever?

Using the push-up lever requires a slightly different technique than a standard push-=up. Since the board rests on your hips, you need to slightly elevate your hips so they are the same height as your shoulders throughout the full range of motion. It can take a little bit of practice to use this type of push-up, however I find it to be natural and very useful.

Push Up Comparison

Also, be sure you have the strength to do your push-ups from the floor up. If you struggle to maintain control of your push up while “kissing the baby” with your chest to the floor, you may want to work on the lower range of your push-up for a few weeks before giving the push-up lever a try.

To use a push-up lever, simply lay down as you would in a push-up position and place the board against your hips at the appropriate length. Wrap your feet around the board so you’re “hugging” it with your thighs and the back of your knees. Some people prefer to use a flat foot against the board but I’ve always found more control through dorsi-flexing my feet and pressing my toes straight into the board.

Push-Up Lever Up and Down

Place your hands in the position you would normally do a push-up with and make your entire body tight, especially your quads, hips, and core. From there, simply do a push-up while pressing your hips up against the board and holding it tight with your legs. The first few times you do this you might feel like you’re sticking your butt up in the air, but I promise you’ll quickly become used to the new position.

Beware of the pressure from the lever pushing your hips down causing your back to sag.

If you’re using the lever at the half point of the board you should have a gap between your upper back and the lever as you push upwards. If the board is touching against your upper back you’ll need to lift your hips up even more to prevent the pressure of the lever going to your spine.

Notice the end of the board against my upper back and the gap between the board and my hips and knees. This places the pressure against my shoulders and causes pressure along the spine.
Here the gap between the board and the upper back is seen while my hips and legs are locked into the lever.

As you lower yourself down to the floor you want to “lead with your chest” so your hips stay at the same height of your shoulders through the full range of motion. Ideally, both your chest and hips should arrive at the ground at the same time and then lift up at the same rate of speed.

Once you have the technique down you can use the push-up lever for any push-up variation you normally use. Wide push-ups, close push-ups, alternating push-ups, medicine ball push-ups, etc.

Want even more resistance?

The classic push-up lever will offer a substantial amount of resistance and challenge to your classic push-ups. If you’re of the masochistic type and want even more resistance you can use the lever to safely add actual weight through the power of leverage.

This is done through adding weight pegs on one end of the lever with a small carabiner to suspend it off of a set of suspension straps or gymnastics rings.

PushUpLeverWeightPegs

In this position, you’ll use the lever backwards as the weight is suspended above and forward of your body. You’ll use the pivot point very close to your feet but still keep the load of the lever on your hips.

Be aware that it won’t take much weight to significantly load your push-ups. Most of the guys I’ve introduced this set up two will use no more than 10 to 15 pounds of weight. I’ve had powerlifters max out through as little as 40 pounds!

These chains only weigh about 12 pounds but they feel like a 225# bench press!

Using the lever in this way is the same as before where you will place yourself underneath and tighten your legs around the lever and push yourself up off the floor while driving your hips into the board.

While the push-up lever can be a great addition to your push-up program, it’s in no way a substitute for good old fashioned progressive calisthenics. When I first discovered it I made the mistake of using the lever for most of my workouts while neglecting the progressive steps towards the one arm push-up. Even though the lever helped me grow much stronger, I still had to fight to rebuild some of the muscle control and coordination I had lost from neglecting the advanced push-up techniques. Ultimately, the push-up lever is just one more tool for your toolbox. It can help you get stronger, but you still have to do the work.

***

Matt Schifferle a.k.a. The Fit Rebel made a switch to calisthenics training 5 years ago in an effort to rehab his weight lifting injuries. Since then he’s been on a personal quest to discover and teach the immense benefits of advanced body weight training. You can find some of his unique bodyweight training methods at RedDeltaProject.com and on his YouTube channel: RedDeltaProject.

Filed Under: Progressive Calisthenics, Tutorial Tagged With: homemade fitness equipment, Matt Schifferle, progressive calisthenics, push-up, Push-Up Lever, pushup, simple gym equipment

Primary Sidebar

Featured Products

previous arrow
GetStrongBookCover
ConvictConditioningBookCover
StreetWorkoutBookCover
ExplosiveCalisthenicsBookCover
StrengthRulesBookCover
next arrow

Categories

Progressive Calisthenics Certification Logo
Click here for more information or to register for the PCC workshop

Get Strong Workouts TriadXP App
Get Strong Workouts App

Recent Posts

  • Top 5 Reasons Why an In-Person Workshop is the Best Way to Supercharge Your Training
  • HYBRID STRENGTH TRAINING IS HERE!
  • My Calisthenics Journey to the PCC
  • The Handstand Press: Complete Control Through the Handstand
  • The Get Strong App is Here!

Dragon Door Publications

Dragon Door Publications

Recent Comments

  • bross dandon on The Case for Curved Handstands
  • Johnny Flewellen Jr. on Strength for Life
  • Dan Earthquake on The Pursuit of the Daily Minimum
  • Johnny Flewellen Jr. on The Pursuit of the Daily Minimum
  • Johnny Flewellen Jr. on Yoga, Calisthenics and the Journey of a Lifetime
FOLLOW US ON TWITTER!

Copyright © 2025

Dragon Door Publications / The author(s) and publisher of this material are not responsible in any manner whatsoever for any injury that may occur through following the instructions or opinions contained in this material. The activities, physical and otherwise, described herein for informational purposes only, may be too strenuous or dangerous for some people, and the reader(s) should consult a physician before engaging in them.