• Skip to main content
  • Skip to primary sidebar
  • Home
  • Contributors
  • Resources
    • Q&A with Paul “Coach” Wade
  • Workshops
  • Products
  • Forums
  • Articles
  • Blogs
    • RKC Blog
    • Strong Medicine Blog
  • Archives

PCC Blog

Progressive Calisthenics - The Official Blog for the PCC Community

Tutorial

Developing Powerful Abs with the Dragon Flag

April 22, 2014 By Adrienne Harvey 32 Comments

PCC Team Leader Adrienne Harvey Dragon Flag in Sweden

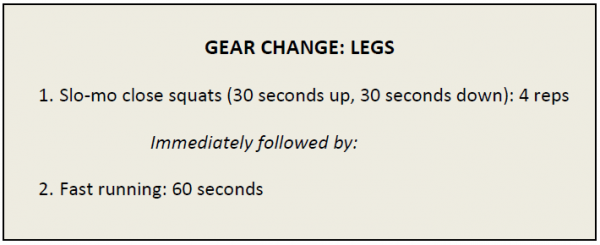
Anyone who’s familiar with extreme calisthenics already knows the infamous human flag exercise; the dragon flag variant, however, is an equally awesome move that fewer people are aware of. It looks cool, it’s commonly associated with Bruce Lee, and there’s so much that can be learned by working up to and practicing it. The other great thing about the dragon flag is that learning to do one means learning how to create an incredible amount of tension throughout your whole body—an essential skill for all advanced calisthenics. While there are many different paths to the dragon flag, the multi-faceted one shared below has worked well for a few clients and myself. Some of these drills led me to the dragon flag before I was ever really trying for it. Oddly enough, even though they require very maximal effort, I’ll usually leave dragon flags for the end of the workout, or focus on them at a separate time of day from my main workout. Regardless, it’s also a good idea to be warmed up. The Trifecta from Convict Conditioning 2 using the bridge, L-sit, and twist is a great sequence to practice before and after your calisthenics work, especially high tension moves like the dragon flag!

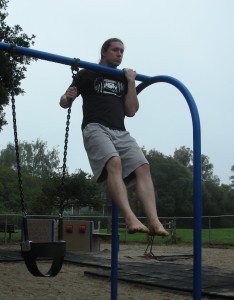
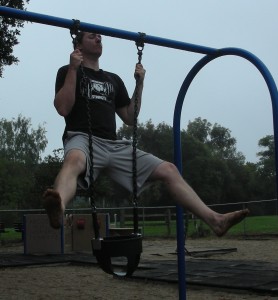
It seems like all forms of the flag require an extreme level of tension. Whenever I catch myself not properly respecting that fact on any flag progression, I remember watching Danny Kavadlo psych himself up for one of his human flag demonstrations—that fierce-looking (and sounding) process is nearly as impressive as the feat itself! But the good news is that since most serious bodyweight enthusiasts will naturally already have some of the requisite abdominal strength, the dragon flag may be a little bit “easier” to achieve than a full human flag. It certainly requires a little less skill since it’s usually performed on a solid bench, or from the ground with a low bar, instead of self-suspended in the air while gripping a pole!

Al Kavadlo performs a Dragon Flag on a pole
Al Kavadlo performs a dragon flag on a pole

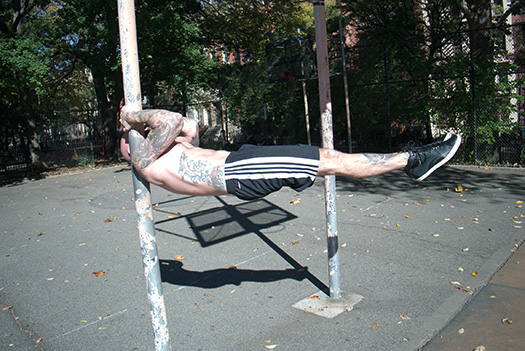
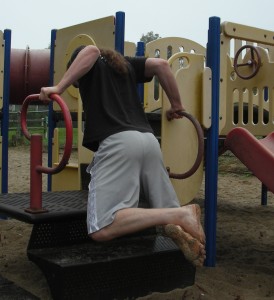
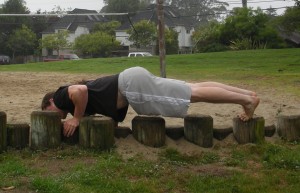
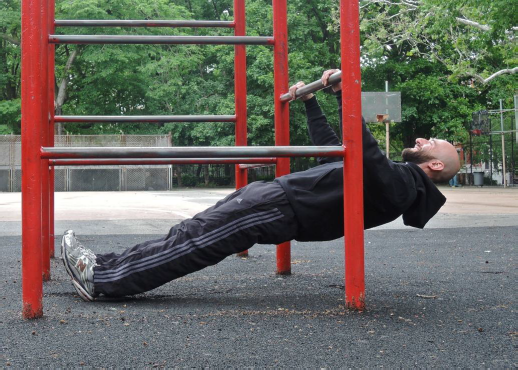
The dragon flag can also be performed on a pole, but it requires a bit of pain tolerance (pick which trap you want to jam the side of the pole into) and extra time practicing the correct grip—plus you’ll also have to fight the rotation from that off-centered pole! For comfort and simplicity—especially at the beginning—using a bench, a well-secured very low bar, or similar set up is best for learning the dragon flag. Certain types of very simple ab stations on fit trails (look for a flat platform with a low bar attached at one end) can also be appropriate for flags, though I would recommend padding the surface under your shoulders.

Fit Trail ab bench

For safely make sure that whatever you are using, grabbing, and pushing against is sturdy and can support your entire body weight or more.

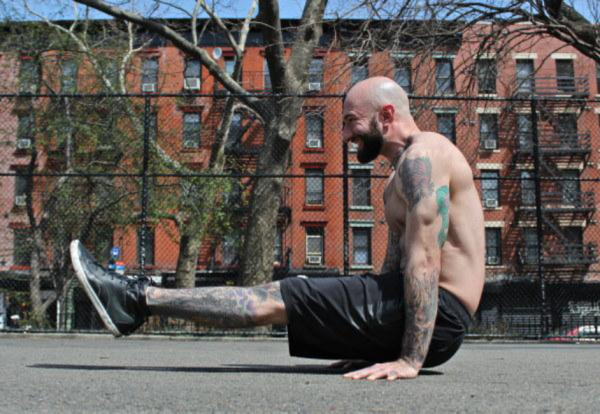
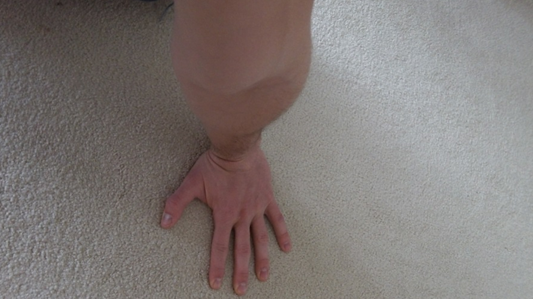
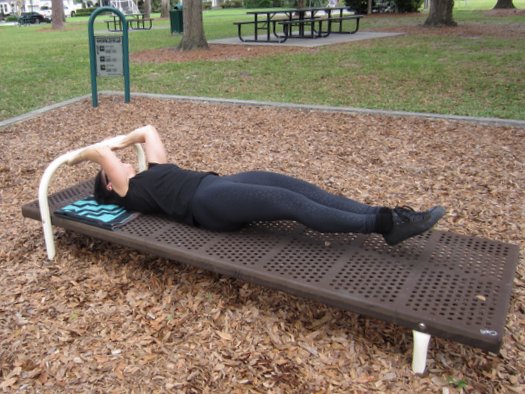
Alternately, on a flat bench, you can choose to place your hands on the sides of the bench (usually near the ears, but everyone’s placement will be slightly different) or behind your head as shown below:

Hand position choices for dragon flags on a bench

Since the dragon flag requires a lot of tension, proprioception and skill, I’ve used multiple steps and strategies to progress towards it. Many of these moves are good for warming up when you’re able to do the full flag too.

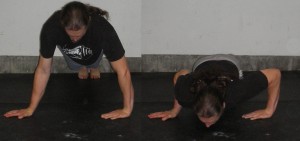
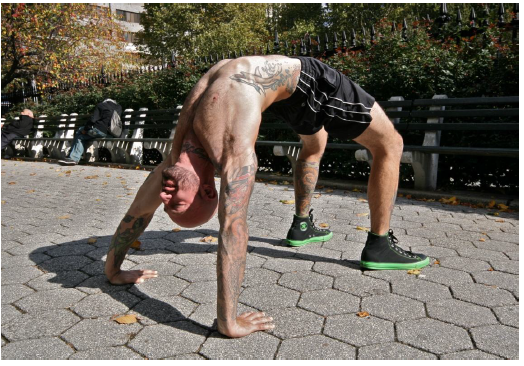
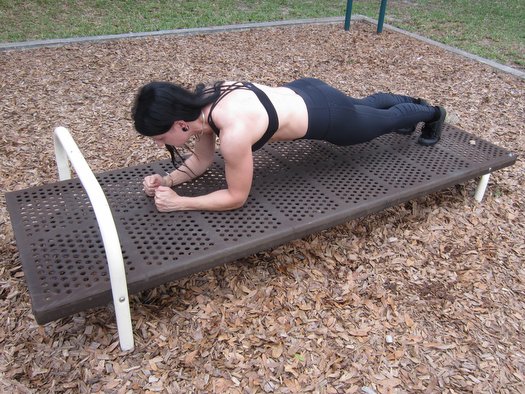
1. The “Hardstyle” plank: The ability to really own the full body tension in this intense version of the plank is crucial. To me the dragon flag feels like an extra serious, less unsupported Hardstyle plank. (Think of doing a plank on just your arms.) The Hardstyle plank differs from the regular variety because the whole body is tensed, the elbows are pulling towards the toes really engaging the abs, and the heels are pushing outwards as well. Similarly, the glutes are engaged too—as they are in the dragon flag!

Hardstyle Plank

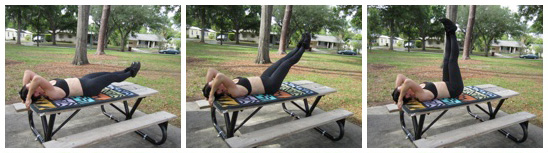
2. Lying leg raises from the floor—while these are a LOT easier than a dragon flag, remaining tense with your legs just a few inches off the ground while fully engaging your abdominals will really help you towards the goal of the dragon flag.

Flat Leg Raises Demonstration

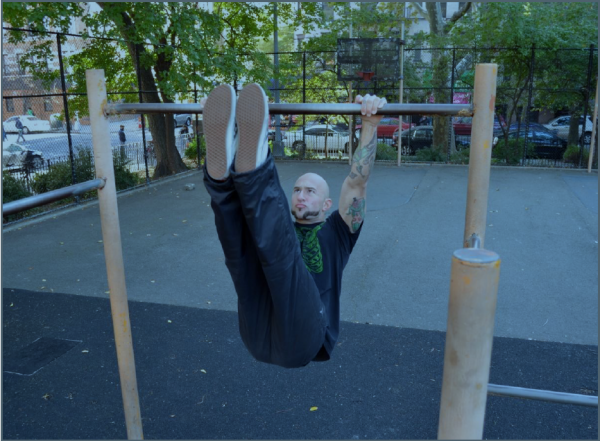
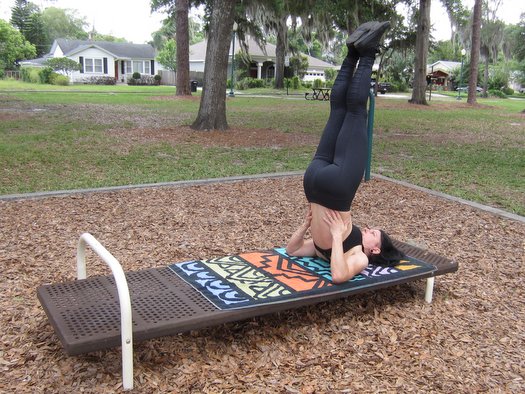
3. A yoga-like shoulder stand—learning to balance up on your shoulders and NOT your neck will help you get into the right position at the midpoint of the dragon flag, or the starting point of the negative version. Familiarity with the feeling at this position can help insure that you’re keeping the body in a straight line as you descend, and eventually ascend too. The more balanced you can be at this midpoint, the more chance you have for a little “rest” between the grueling ascent and descent of the full dragon flag.

Shoulder stand demonstration

4. Tuck-flags or roll-ups (I’m sure someone has a better name for this drill). As we know from many other bodyweight exercises (L-sits, front and back bar levers) if we shorten the length of our legs, then the more favorable leverage makes the move much easier. While in a tuck position, use your abs to slowly pull your tucked body up off the floor onto your shoulders while firmly gripping the bench or very low bar, slowly lower back down until your abs are almost screaming! This move is not to be done quickly, and is surprisingly difficult if performed correctly—especially for reps! Gradually straighten the legs more and more to increase difficulty.

Tuck raises demonstration

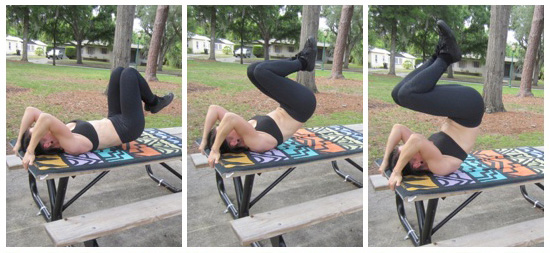
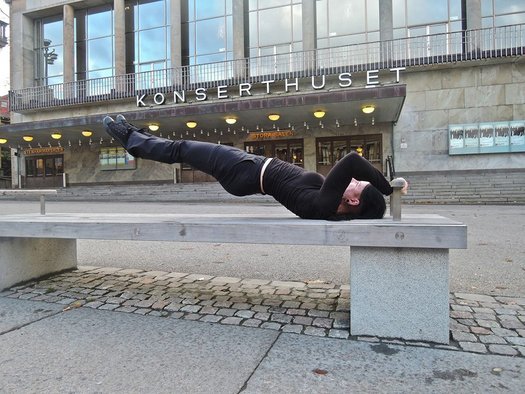
5. Negative dragon flags. Grasp the bench or very low bar and begin from the shoulder-stand-like top position. After making sure you’re resting on your shoulders, not your neck, tense the whole body (torso, glutes, legs, etc.) and try to lower yourself slowly, and under control without bending at the hips. You may feel like you’re supporting most of your body through your arms at first, but try to mitigate that feeling by really keeping the body tight during every second of your descent. This takes an amazing amount of tension. The closer your legs get to the ground, the more difficult the move becomes. Try to maintain the straight body position and the tension as long as you can without just dropping your legs at the bottom of the movement. The abs, glutes, legs and everything in between are strongly engaged (I’ve even managed to cramp up one or both feet while practicing these!)

Negative dragon flags

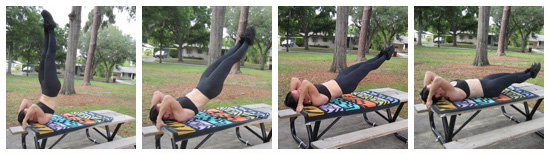
6. Full dragon flags up from the ground, towards the shoulder-stand-like position, then descending. It’s very easy to accidentally cheat these on the way up, as your hips will want to fold to help you out. Instead, think of maintaining a slightly flatter version of a hollow position while focusing on keeping the body as one solid plank. I think the most difficult part of this move is initiating the movement from the ground. The first few seconds feel nearly impossible on some days!

Steps 1-4 can be practiced together, but practicing the negative flags and full flags is incredibly taxing. I typically won’t do more than 1-2 per set for negatives, and only 1 full dragon flag per set, for a session total of 3-5 sets. That’s ten reps total for the day at most. You may be able to work up to more over time, but this move takes practice, patience, and long term dedication, so best to ease in gradually.

While some may dismiss moves like the dragon flag and human flag as “party tricks,” these very cool looking moves are rewarding to conquer as they challenge our patience along with building strength, skill, and control. Thankfully, these hard-won concepts will carry over directly and indirectly to many other bodyweight drills, skills and feats of strength.

 ***

About Adrienne Harvey, PCC Team Leader, RKCII, CK-FMS, Primal Move Nat’l Instructor: Originally RKC Certified in 2010, and RKC Level 2 certified in 2011, kettlebell and bodyweight training have been crucial in Adrienne’s personal quest for fitness. A core member of the PCC team, Adrienne loves sharing her knowledge with small groups and individuals. She also loves to develop recipes and workout programs to further support performance, body composition, and of course—FUN.  Go to http://www.giryagirl.com for more information about Adrienne!

Filed Under: Progressive Calisthenics, Tutorial Tagged With: abdominal training, abs, Adrienne Harvey, dragon flag, full body tension, human flag, tension, tutorial

The Case for Curved Handstands

December 3, 2013 By Logan Christopher 24 Comments

sig-klein-handstandAsk any gymnast or circus performer about doing handstands and they’re likely to tell you that a straight handstand is the only way to do it. It’s the perfect form, and anything else is wrong.

I disagree! Let me tell you why.

Recently on this site was an article all about the straight handstand and the benefits of doing them in that manner. I don’t disagree with those points, but wanted to give a different opinion on why the curved handstand is a viable option as well.

Are Curved Handstands Dangerous?

First off, let’s talk about the claim that doing a curved handstand is going to hurt your back. Just like anything else, it can happen, but if you’re smart about it, they’re completely safe.

I think this myth is simply a result of people doing straight handstands for other reasons, and then not knowing why that is the case.  To think that bending your spine is going to hurt you is ridiculous.

Push too far with bridging exercises and you can tweak your back, but doing them right you’ll develop more flexibility and strength.

When doing a handstand if you let gravity just pull your legs over without maintaining any core tightness, it can take you into a position that you’re not ready for. Doing too much of can certainly cause you to strain your back.

Instead maintain tightness, and build up what you do over time. Just like any other exercise.

Art2 - OHBalAre Straight Handstands Necessary for Higher Level Skills?

The straight handstand can help you do harder skills but it is not necessary.

I have heard people say that you need perfectly straight alignment to hold a one arm handstand. Tell that to Professor Paulinetti, the man who basically invented the one arm handstand.

You see, old school hand balancers, did all their handstands with curves in their backs. All of them! And they pulled of amazing skills.

They treated the straight handstand as an advanced variation of the handstand. This harder skill was something to practice later on after you could stand on your hands.

Over time, hand balancers transitioned away from the curve to the straight position you see commonly today. Part of this was for aesthetic reasons. It’s more pleasing to the eye, and for things like gymnastic competitions, you’re judged on this.

Another part is that a straight handstand does help you to achieve more difficult skills. By beginning with it you can build those habits from the beginning. This is a smart thing to do if you plan on taking your hand balancing skills far.

To prove this point, in the future, I’d like to build up to the one hand handstand in a curved position like the old timers did.

What About The Beginner or Recreational Athlete?

Don’t plan to be paid to do hand balancing professionally? Not a gymnast? Would you just like to be able to hold a freestanding handstand? If that’s the case I don’t think going for the straight handstand is necessarily for you.

If you ask anyone to hold a handstand that has never done it before, what will you see? When they kick up, before they fall down almost instantly, they’ll be in a curved position.

The curved handstand is a more natural position. It takes a lot of effort to get a perfect line in your handstand because it is unnatural. To tighten the muscles as needed to form a straight line is significantly more difficult, and not to mention, it takes additional shoulder flexibility, that many people don’t have.

If you choose, you can practice the curved handstand. You’re likely to gain the skill faster than someone going after a straight handstand. You’ll be freestanding in a shorter amount of time, which is of course dependent on how much you practice. Then from there you can practice other hand balancing skills and work on straightening out later if you choose.

Or you can practice a straight handstand from the beginning. It will take longer with more practice time. But once you have it you’ll be good to go onto other more advanced skills.

It is a choice you can make.

Sure, a straight handstand is better, in that it is more advanced. Just like a 315 lb. snatch is better than a 225 lb. one. But that doesn’t make the curved handstand wrong.

Reverse Handstand SideHow to Learn the  Straight or Curved Handstand

If you’re going to do handstands the starting place is against the wall. But depending on which of these two you want to go for you’re going to do them differently.

If you choose to go with the curved handstand then when doing wall handstands your back can face the wall. Kick-up into position then hold for time.

If you choose to go with a straight handstand you’ll want to face the other way. The reason for this is that this orientation forces you into a straighter position, especially as you inch your hands closer and closer to the wall.

In either style you build endurance by holding for time and maintaining your position. Then when it comes to freestanding handstands this skill set should be built in as you learn to balance out in the open.

So let’s take a poll. Do you do curved or straight handstands? Even if its just against the wall, what are you going for? Answer in the comments below.

***

About Logan Christopher: Logan Christopher has been called a physical culture renaissance man as he is accomplished in a wide range of strength skills from kettlebell juggling, performing strongman stunts, and bodyweight exercises. He is the author of numerous books including Secrets of the Handstand and The Master Keys to Strength & Fitness. In addition, he’s spent the last several years going deep into mental training to find out what it takes to really excel and tactics that can help people instantly improve their exercises. You can find out more about all this at http://www.legendarystrength.com/.

Filed Under: Progressive Calisthenics, Tutorial Tagged With: curved handstands, handstands, Logan Christopher, opposite handstands, straight handstands, tutorial

A Look at the 3 Way Kick

October 1, 2013 By Matt Schifferle 8 Comments

matt_shifferle1There is nothing like a strong pair of legs.

You can keep your strong core, wide shoulders and massive arms. My experience has taught me that all of the strength and conditioning in the world is practically worthless without a strong set of legs.

But hold the phone, strong muscles alone won’t build strong legs. True strength for the field, court or mountain requires much more than a lot of horsepower in the engine. In order to fully unleash your lower body strength you must also possess the following:

– Balance and control

Strong muscles without balance and control is like putting a massive engine in a car with bald tires and worn out brakes. Either you’ll never use all of that power or you’ll end up crashing. Control ensures you can use all of the power you have and use it in the most effective way.

– Flexibility

For every muscle you contract there is one that must lengthen. When the muscles are tight and resist lengthening you’re literally fighting your own tension. Becoming even a little more flexible ensures that you’ll have less resistance holding you back in everything you do.

– Strength and stamina in supporting muscles

When it comes to leg strength, we tend to focus on the bigger muscles in the legs like the quads, hamstrings, glutes and calves. These are important for sure, but what about some of the smaller and more subtle muscle groups like the ones in the feet and hips? While not the biggest or most powerful lower body muscles, weakness in these smaller muscles can greatly handicap the bigger muscles.

Calisthenics is a very effective way to condition all three of these characteristics. It’s impossible to even attempt moves like lunges and single leg squats without developing balance, flexibility and strength in the supporting muscles.

That being said, it doesn’t hurt to further develop those weak links in the lower body chain. Doing so can make your weakest link so strong that your entire body can reach new levels of performance.

The following video showcases an exercise which is great at developing your balance, flexibility and strength.

This exercise does wonders at unlocking some of the lower body strength that’s been dormant in your lower body. Just running through this routine a few times before each leg workout will leave your legs and hips feeling brand new within a few weeks. It’s also a great cool down afterward to refocus your mind.

***

Matt Schifferle a.k.a The Fit Rebel made a switch to calisthenics training 5 years ago in an effort to rehab his weight lifting injuries. Since then he’s been on a personal quest to discover and teach the immense benefits of advanced body weight training.  You can find some of his unique bodyweight training methods at www.RedDeltaProject.com.

Filed Under: Flexibility, Progressive Calisthenics, Tutorial Tagged With: 3 way kick, calisthenics, Fit Rebel, leg training, lower body strength, Matt Schifferle, power, tutorial, video

My Journey to the Back Lever

August 13, 2013 By Angelo Gala 10 Comments

Photo1
It frequently catches me off guard when budding fitness enthusiasts ask me to teach them flashy drills such as kettlebell juggling, physio-ball air squats and kipping butterfly pull-ups. Sure these exercises may look impressive, however each complex movement pattern requires a level of physical competency and advanced coordination that isn’t just given away. All too often, these requests come from the same people who struggle with executing ten standard push-ups. Very rarely do people care about the benefits provided, they’re simply romanced by the “fun factor.” Demonstrate to the same person a back lever and you may see a pair of glazed eyes appreciating the skill, but not quite aware of the work required to get there.

If you are unfamiliar with the back lever, picture hanging from a pull-up bar, pulling your feet all the way to the bar, then sliding them in between your hands and rotating backwards until your chest is parallel to the floor below. The back lever finishes with a hip and knee extension that suspends your body into a plank formation while hanging from your hands. Sound fun? I thought so! But it can also do wonders for your strength, mobility and proprioception.

Working through the progressions will open up your shoulders, stretch your chest and strengthen the supporting musculature of your scapulae like no other. Once you are mobile enough to rotate your chest to parallel, the real core training begins. The back lever will simultaneously develop unbelievable amounts of strength and stability on both sides of your body. You can say goodbye to those weighted back extensions since this version of the lever will hit both your lower back and upper back musculature all while developing the awareness to align your spine in vertical, inverted and horizontal positions.

I was lucky enough to have some decent shoulder mobility and a very supportive baseline of strength when I began training this calisthenic. Here is the progression that worked for me:

Static Hang:
Starting from absolute scratch, you should develop the hand strength to hang from a pull-up bar for 30-60 seconds. If you can’t hang for that long, trying to support yourself as you flip upside down isn’t a great idea. You can practice hanging from both hands and eventually one hand at a time to develop your grip strength evenly on both sides.

Hanging Leg Raise (HLR):
To execute this requisite core exercise, pull down on the pull-up bar with both hands while simultaneously lifting your legs as straight as possible up toward the bar. Shoot for at least ten reps before you move on from here.

Skin the Cat / German Hang:
After developing strength from the HLR, it’s time to wiggle your feet in-between your hands and rotate backwards until you can look straight ahead. The finish position, known as the German hang, should look similar to your hanging start position with your legs dropping towards the ground, except your arms will be stretched behind your body. Initially you may find that you do not have the shoulder mobility to come around full circle or the fear factor may be just too great – that’s ok! Try performing a few rotations at a time, gradually increasing the amount of rotation on each attempt. Static holds in your deepest expression of the exercise as well as dynamic repetitions of the move will help loosen up tight muscles. Be sure to keep your shoulders active (squeeze the shoulder blades together and down towards your bum) as it will keep your arms attached to your body. Trust me, this is a good thing.

Photo2
Here we see a German hang and a standard bar hang side by side.

Tuck Back Lever:
Using the skin the cat technique, roll through your arms attempting to align your chest to parallel with the ground. After you pull through, tuck your knees tightly to your chest and lift your upper back to spot the ground ahead of your body. Your target here is to work up to a 20-30 second hold before you move on. Progressing your tuck lever is as simple as pushing your upper thighs away from your chest in an attempt to align your knees under your hips. Understand that this will increase the difficulty of the move exponentially. If aligning your knees under your hips feels sketchy and unmanageable, then slowly pull your knees only a few inches from the tuck position at a time. Be patient and work up to thirty second holds a few inches at a time.

Congratulations!  You are well on your way to getting the move under your belt and by now I’m sure that many people have stopped to stare at the insanity of your acrobatics!

Photo3
Single Leg Tuck Back Lever:
Once you can hold a tuck position with your knees stacked directly under your hips, you can alternate extending one leg at a time. In the beginning, it’s perfectly alright to send one leg back with the knee significantly bent. Soon enough you will be able to lock out your leg in its entirety. Keep in mind that your legs hold a significant chunk of your body weight so move slow or you might find yourself unexpectedly falling into a German hang. Don’t forget to work both sides evenly as preventing imbalance should be a goal in any fitness program. Thirty seconds per leg should be your target range of proficiency here as well.

Photo4
Full Back Lever:
We made it! It’s time to work on the full expression! Using leverage to your advantage will be the key to your success when practicing the full back lever. To execute, skin your cat until you can align your torso to about 45 degrees with your head angled towards the ground. From here, keep your knees tucked and begin to extend your hips. Once you feel stable, slowly straighten your knees until your body is fully extended into one long line angled roughly forty-five degrees from the ground. Keep your entire body as tight as possible. If you can hang here without too much issue, lift your chest to help drop your hips, moving your body position closer to parallel to the floor. The more parallel you become, the more you will feel gravity’s pull and the harder you will have to work.

All in all, I learned the progressions to this move and bagged it after almost exactly one month of work. I can’t promise the same rate of success as everyone’s starting strength and mobility will be different. As for programming, I practiced my back lever progressions three or four days a week. At least two workouts were specifically geared towards building volume in the different tuck positions with a target of three to seven attempts per workout. I worked up to owning each position for thirty seconds but started many of the holds with barely the ability to tolerate ten seconds. Other days I would skin the cat as a dynamic warm-up or finish my workouts with several sets in the German hang position so I consistently worked on improving requisite shoulder mobility and got comfortable going upside down. Keep practicing and be patient. Continued exposure to the demands of the back lever will get you there as soon as your body is ready for it

Give this a go, good luck and keep me posted on your progress!

Photo5

***

About Angelo Gala, RKC / PCC Team Leader: Angelo Gala has been a fitness professional in the Boston area for greater than 11 years. He is a Certified Strength and Conditioning Specialist through the NCSA, and has studied the Pranavayu system of yoga under David Magone.  He is a Dharma friend at the Sakya Center of Buddhist Studies in Cambridge, MA where he completed a 1 year intensive study of Mangalam Yantra Yoga under the guidance of Lama Migmar Tseten. Go to http://www.dragondoor.com/angelo-gala/ for more info.

Filed Under: Progressive Calisthenics, Tutorial Tagged With: Angelo Gala, back lever, bar lever, calisthenics, instructor, journey, PCC, progressive calisthenics, shoulder mobility, tutorial, yoga

Odd Object Training with Bodyweight?

July 23, 2013 By Logan Christopher 12 Comments

There’s a method of training with weights called odd object lifting. While a barbell is made to be lifted, with its small diameter handle that is easy to grip, and the weight being perfectly balanced, most of what is encountered in the real world is not.

If you’ve ever moved furniture you know this to be true. While an item may not be all that heavy, its size and shape can prove very difficult to maneuver.

Thus if you want to become strong the use of odd objects is suggested. This means lifting things that are harder to lift like rocks, stones, barrels and the like. The idea being that this will force your stabilizing muscles to work much harder. Often your grip is taxed much more. Plus your form in lifting these odd objects will be different than how you’d handle a barbell.

But what does this have to do with bodyweight training? Can we take this idea of odd object training and apply it to bodyweight exercises?

Well, I was reading Raising the Bar by Al Kavadlo the other day. There’s a single sentence in there that got me thinking.

“Training on odd objects can sometimes offer unique challenges and benefits.”

This sparked my thinking about this more so in this article I’m going to go deeper on how to use odd objects in your bodyweight training.

Most pull-up bars are just like the barbell. Its perfectly straight and has a thin handle to make the exercise as easy as possible. So what happens when you do your pull-ups on things besides a normal pull-up bar?

Try it on a tree branch. The thicker grip will make it harder to do. Plus here you won’t be able to wrap the thumbs around. Depending on the strength of the branch there may be some sway as you do the exercise (of course you’ll want to make sure the branch can easily support your weight before you jump on it).

Tree Branch Pullup
The thicker grip will make chin-ups more challenging.

You could modify this even more with a tree. What if one hand hangs on a branch while the other is closer to the base of the tree, where the branch comes out. This will be an uneven pull-up and depending on how wide your hands are apart could also be an archer pull-up.

This same thing can be done on many monkey bars. Look around at the thick bars and the angles you can use.

Uneven Pullup
An uneven chin-up with one hand on the thick bar and one on a chain.
Not only is the grip tough here on two chains, but I was forced to straddle the legs.

And don’t just think pull-ups. Levers, hanging leg raises and dips can be done on different bar setups too.

Wide Dip
Feel the stretch with wide dips.

Here you’ll gain some similar benefits as those odd objects can bring. The exercise will become harder as certain parts of your body will need to work more. The great thing is if you spend some time working on the odd bars when you go back to a regular bar its going to feel that much easier.

Bars aren’t the only way you can get this effect. What about pushups? Although you could use a variety of pushup handles you may be able to find objects to do pushups on too.

This pushup is done with offset hands at different heights.

Plus this same effect can be accomplished on the flat floor just as well. Instead of always doing pushups in your perfect, ideal form, change them up.

Alter hand placement. Go closer, go wider, go offset. Turn one or both hands out to the side. Turn one hand backwards as you keep on forwards. Try this while they’re both wide.

No objects are necessary. Try this pushup with both hands pointing in the same direction.

The great hand balancer Professor E.M. Orlick taught handstands just like this. Don’t just keep trying to add time to holding a normal handstand. Instead alter your hand position (among many other things). Once again go closer, go wider, or offset.

Doing an open fist handstand. Harder than flat hands but easier than fully on the fists.

When you train in this manner, since almost all of it will be harder than the normal version, when you get back to that regular pushup or handstand it will be that much easier.

While consistency with the basics is necessary and a good thing to do, one of the best ways to improve that is to “complexify” what you’re doing. This “odd object” like training will allow you to do just that. Sometimes you need to go outside the normal and play around with as many variations as you can.

***

About Logan Christopher: Logan Christopher has been called a physical culture renaissance man as he is accomplished in a wide range of strength skills from kettlebell juggling, performing strongman stunts, and bodyweight exercises. He is the author of numerous books including Secrets of the Handstand and The Master Keys to Strength & Fitness. In addition, he’s spent the last several years going deep into mental training to find out what it takes to really excel and tactics that can help people instantly improve their exercises. You can find out more about all this at http://www.legendarystrength.com/.

Filed Under: Progressive Calisthenics, Tutorial Tagged With: bodyweight exercise, Logan Christopher, odd object training, pull-up variations, Raising the Bar, strength training, tutorial

Tight is Right

June 18, 2013 By Mike Gillette 3 Comments

blue Oz

Photo courtesy of Mike Gillette

Control… Tension… Control-able Tension… These are the success-essentials for bodyweight mastery. If you (or your clients) lack the ability to “tighten that which needs to be tightened,” then the structural integrity of your exercise-specific postures will be soft, saggy and sad. What you (or your clients) need is the ability to generate head-to-toe tension at will.

If you’ve been training for any length of time, particularly those of you who wield kettlebells, then you have already been teaching yourself how to generate tension. Bracing the body while under dynamic or asymmetric loads is a very effective self-teaching tool when the subject at hand is tension-generation.

But what about your clients? Particularly your new clients? Is there a way to expedite the development of intentional body control so they too can reap the benefits of bodyweight strength-development?

Absolutely.

The following Body-Control Drill sequence is perfect for beginners and simple to administer in a group exercise setting. Once all participants are in the starting position, you will provide a series of instructions. You will be leading your trainee(s) through a process of tightening and relaxing different parts of the body. In addition to the benefit of learning how to generate tension on demand, you are also teaching your clients to respond to your cues. This will make you more effective at teaching them advanced movements down the road. Here’s how you run the drill…

TO BEGIN: Have your trainee(s) stand in a neutral position with feet shoulder-width apart, hips over heels and head over hips. The arms should be resting comfortably at the sides. Shoulders are back and the head is level with eyes cast “on the horizon”.

Points-of-Performance:

  • Do not exceed 5 seconds of tension at a time. Two contractions per isolated body part are sufficient.
  • Trainees must be cued to “breathe through” the contractions. They are NOT to hold their breath.
  • Coaches must be careful not to “burn out” clients in the performance of this drill. Done with intention, this drill can be grueling.
  • As the coach you are in charge of quality-control. If there is a slacker in your group, then poke, prod or do whatever you need to in order to get them to tighten up to your satisfaction. In general you will be able to assess your athletes visually, but there will be times when you have to go “hands-on”. (Note: When I work with females, I make a fist and gently bump the area in question. This prevents the appearance of hand contact which looks or feels like I am squeezing/grabbing them. If it’s a male athlete I do the same thing, I just don’t bump as gently).
  • This is just a drill. Use it where and when it makes sense, but stay focused on the bigger picture.

Step 1: “Grab the floor with your feet and hold” ….. “Now release”

Step 2: “Tighten your lower legs and hold” ….. “Now release”

Step 3: “Tighten your upper legs and hold” ….. “Now release”

Step 4: “Tighten up from your feet through your upper legs and hold” ….. “Now release”

Step 5: “Tighten your glutes and hold” ….. “Now release”

Step 6: “Tighten your midsection and hold” ….. “Now release”

Step 7: “Tighten up your glutes and midsection and hold” …. “Now release”

Step 8: “Tighten your shoulders and chest and hold” ….. “Now release”

Step 9: “Tighten your arms and hold” ….. “Now release”

Step 10: “From head to toe, tighten your entire body and hold”… “Now release”

That’s it. It’s an easy drill for you to administer and easy for your clients to understand. And using this drill as a basic framework, you can apply variations. Your clients could perform it seated, while holding a broomstick or a length of rope, they could even perform it supine at the end of a workout.

***

About Mike Gillette: Former SWAT Commander and Executive Bodyguard, Mike Gillette is a relentless student of the human factors which allow people to succeed despite overwhelming odds. His research and experiences have taken him through many different worlds and disciplines. They have ultimately produced a body of knowledge which has been put to use by clients ranging from high-risk professionals operating in extraordinary circumstances, to ordinary people who want to make extraordinary changes in their lives…

Find him on Facebook!


Filed Under: Progressive Calisthenics, Tutorial Tagged With: body control, bodyweight exercise, full body tension, Mike Gillette, tension, tutorial

Five for 5

May 28, 2013 By Paul "Coach" Wade 46 Comments

Summer is knocking at the door, boys and girls. (Allegedly.) Everyone is outside, hanging out in the golden rays, whiling their hours away in sun-soaked fun and romantic adventure. (Allegedly.) Summer lovin’. It’s like a scene from Grease, I tells ya. And why the hell not? A spell in the sunshine promotes Vitamin D synthesis, improves mood, and boosts immunity. It may even increase lean tissue-building testosterone levels. (Allegedly.)

Seriously, there are some times you want to lock yourself away in your cell and perform hours and hours of calisthenics—and there are times you definitely don’t. There are times you want to get a quick, productive workout under your belt, so you can go out and enjoy life instead. For a lotta folks, summer is one of those times.

My hands are up, officer; I’ve been guilty of long, draining, excessive workouts throughout my career. But I have also experimented with very brief, efficient, training sessions—and I want to share a few of the tactics I’ve personally used for super-short workouts. Specifically, I’m gonna give you five types of session that will keep your motivation high, keep you strong, flexible and tough—and all for the temporal investment of a mere five minutes. (Yeah, you read that right. Five minutes.)

I want you crazy kids to enjoy summer. Think you can’t get a viable training session done in five minutes? Read on, Macduff.


The S4 Method

This right here is my personal favorite strategy for a quick, effective workout. It’s simple, too—provided you can view a clock or wristwatch. For any movement or body-part, you warm up, then perform: a minute of a strict bodyweight strength exercise; a 60 second muscular hold for stamina and control; a minute of a fast calisthenics exercise; and a final stretch. (Strength, Stamina, Speed and Stretch—four “S” qualities. S4, get it?)

So the method looks like this:

paul_pic1

How quick and simple is that? You just knock out each of these for one full minute. Non-stop activity, with no rest in-between exercises. That’s it!

If you think this is not effective, I challenge you to try it. Here’s how it might work for midsection. You warm up for a minute with some abdominal tension, leg swings and hip rolling; then—eye on the clock—jump up and grab the overhead bar. For sixty seconds you grind out slow, smooth, perfect leg raises. (Ten reps is about right, champ.)

paul_pic2

By now, you are grimacing—but you still got some life in ya, right? So drop to the floor and press out into an L-hold—now stay there for sixty seconds.

paul_pic3

By the end of this (if you manage it) your legs will be trembling, and your gut will be in agony. But the show ain’t over, bud. Hook your feet under something; you have one minute to pump out as many bent-leg sit-ups as you can stomach. (Pun intended.) You are going for speed—military style.

paul_pic4

 USCMC image (LCpl Esteban Gallegos)

By now your midsection is spent, and you will be pretty much snapping up using everything you have. The minute—which will seem endless—finishes, somehow. Your body just wants to curl up in pain right now, but I want you to do the opposite—roll onto your stomach and straighten your arms, pushing up into a cobra stretch.

paul_pic5

This hold is a strange mix of relaxing—as it decompresses your confused and tangled, deep-fried muscles—and painful, as the time mounts up. One minute of this, and you walk out a free citizen—if you can walk at all!

Sure, this workout is too tough for most athletes. But as with all progressive calisthenics, you can tailor it to your own level. Can’t do leg raises? Knee raises or lying leg raises. Not loved by the L-hold yet? Bent-leg holds or jackknife holds work the same. Too shot to do the sit-ups? Throw a b-ball at the wall and catch it on the rebound for a minute (an underrated gut exercise).

Even the time aspect is variable. A minute is unthinkable for these exercises? Start with 30 seconds for each and build up a few seconds each session.

The S4 method works with pretty much anything. Want some upper-body push action?

paul_pic6

Again, with the PCC “toolbox” you can vary the difficulty in dozens of ways. For example, beginners might sub dips for kneeling push-ups. The elbow lever could be swapped for easier prone statics like planks, wall planks or raised elbow levers (see the PCC Instructor’s Manual for even more options). Fast push-ups could be subbed for incline push-ups, focusing on pumping out rapid-fire reps in the top range. Stretch out on a doorway for an easier pec stretch.

S4 works for legs, too:

paul_pic7

If you are working on unilateral or asymmetrical exercises, it’s best to alternate sides each rep. Again, you can use different difficulty levels, or different techniques—S4 stands a lot of tweaking.

Strength, control, speed and mobility. That’s three simple, five-minute workouts right there that very few advanced athletes could manage—trust me.


Gear Change Sets

Fancy a change? A workout new and fresh, free from the baggage of your long-term program? It’s a good idea to try novel exercises. It’s another cool idea to change your sets and reps. But how many athletes think about radically changing their speed? Or, how about changing your speed as much as possible…in a single set?

This is the basic idea behind Gear Change sets. You begin with a handful of slow-mo reps, and finish with a bunch of max speed reps. There are many ways you can approach this. A great one is to shoot for 4 slo-mo reps—that’s 30 seconds up, 30 seconds down—immediately followed by a minute’s worth of a very high-speed, explosive exercise for the same body-part. For example, after 4 slo-mo squats, I used to perform tuck jumps for a minute (if you are outside, a maximum speed run for 60 seconds is probably even better).

So here’s a potential Gear Change workout for the legs:

paul_pic8


paul_pic9

Ever combined slo-mo squats with running? Murder.

Pick the right movements for your ability, and you have an amazing five minute body-part workout right there. But for Christ’s sake, always start each slo-mo rep at the bottom—or you may find yourself doing a 30 second negative squat you cannot push up out of. Slo-mo reps are tough, so don’t try slo-mo with an exercise unless you can do at least twenty strict reps with it at regular speed.

The method works for any body-part. For midsection, you could follow 4 slo-mo leg raises with squat thrusts for 60 seconds. After slo-mo push-ups or pull-ups, you might apply a minute of intense bag work or shadow boxing. You get the idea.

This slow-to-fast method is an amazing way to train. Through the complete elimination of momentum, the slow moves are tougher than you imagine (until you try ‘em). They just seem to hit the muscles in a new way, activating deeper fibers we don’t reach by bouncing mindlessly through reps, like so many folks seem to do. Very slow reps also really teach your brain something about the movements you are using; leverage, joint tracking, movement angles, weight shift. Subtle qualities of bodyweight motion, easy to miss at regular speed, now scream at you. When you are done with them, your muscles feel totally numb—and asking them to switch to their highest gear is a true challenge.

The Gear Change set also replicates real life. There would have been times when our ancient ancestors had to move very slow with high tension—maybe dragging a carcass back to the cave—then they were forced to suddenly fight off a predator trying to steal their prize. Slow to fast. Survival today is no different; imagine a soldier in the desert carrying heavy weapons or equipment, suddenly having to run for cover in a firefight.

Don’t get me wrong. Gear Change sets (like the other ideas here) are not meant to form the basis of your long-term training program. But they sure are fun, effective and instructive once in a while.


The H.P.A.S. Protocol

This is a beaut of a workout. I’m gonna call it HPAS, coz “Half Pyramid Antagonistic Super-sets” is too hard to say (at least for me). The premise—as always—is real straightforward. Pick two exercises for opposing muscle groups. Begin by doing each for 10 reps, then each for 9 reps, then 8 reps and so on, until you get down to one rep per set—and you do all this without stopping.

Here’s one potential workout:

paul_pic10

paul_pic11

paul_pic12

Few exercises go together better than regular push-ups and Aussie pull-ups.

Back to back antagonistic superset madness! On sale NOW!!

Can all this be done in five minutes?—if you use brisk reps with no pauses, yeah. But it’s not easy, and most folks will have to seriously build up to this. (There’s a good goal, huh? I’m looking at you, Jack.)

The HPAS Protocol is a perfect example of how short sessions can be both powerful and productive. Very popular in jails. If you can follow the above workout, you will have scorched every muscle in your upper bod, knocked out 20 sets, and got a helluva cardio workout, too.

This workout is proof that you don’t need to be in the gym for hours to make progress. In calisthenics—as in life—it’s quality that counts, not quantity. A hundred thousand rhinestones won’t make you rich, son; but a handful of diamonds sure will.


“The Century”

The Century is the rapidly-becoming-classic PCC certification test. It is designed to display technical ability in combination with an advanced level of conditioning, but it can also be a damn fine workout in its own right. In case you haven’t heard of The Century (where you been, dude? Under a rock?!), it’s so-called coz it features one-hundred nonstop reps in a single set:

paul_pic13

PCC-certified super-achievers will probably be sick of training for The Century, but it’s still a good staple to return to from time-to-time. Not only is it great to get back to the basics, but a hundred reps of the good stuff will leave your circulation and energetic system supercharged.

Beware though—if you want to crack this sucker in five minutes, you better have taken some Super Soldier Serum this week, kid. It can be done, though.


Al Kavadlo owns The Century in under 2 minutes 39 seconds.
Can you come close to that?


The Bridge

One final suggestion. You want the best five minute bodyweight workout money can buy? Hold a bridge for five minutes.

paul_pic14

I’m not kidding. The bridge has so many benefits, it’s crazy. It is the best bodyweight exercise in the world. A long hold will increase total-body strength and endurance—not just in the showy muscles, but in the vital deep tissues and tendons. It will increase flexibility, mobilize the ribcage, hip flexors and stomach wall, and disperse adhesions and calcifications in the shoulders. It bulletproofs the spine and lower back and drastically reduces knee pain. The inverse head position increases circulation to the noggin, releasing endorphins, inducing calm, and improving brain health. The bridge rocks.

I know what you’re thinking. Just one exercise? That’s an imbalanced workout, for sure! No way, José. In the real world, most eager athletes do so much for the front of their bodies—the showy pecs, biceps, abs and quads—that throwing a little extra meat to the under-loved posterior chain cannot hurt one bit.

Besides, the bridge is one of the all-time bodyweight classics, no different from pushups, squats or pull-ups. If you can’t hold a bridge for five minutes, there’s no way you can call yourself in great shape, no matter what else you can do.


Lights Out!

There you go—a killer series of five-minute summer training tactics, just for you.

So, what are your plans tonight, buttercup? What’s that? In a little while, you’re gonna eat, grab a shower, then head out for the evening?

Sounds great!

…before that, you’ve got five minutes to spare for old Coach, right?

My thanks go out to Al Kavadlo (PCC Lead Instructor) for generously contributing such cool pics to illustrate this article. This is not the first time Al has donated pics (and advice) for free to promote the bodyweight cause—thanks Al!

***

About Paul “Coach” Wade: Paul Wade is the author of five Convict Conditioning DVD/manual programs. Click here for more information about Paul Wade, and here for more information on Convict Conditioning DVD’s and books available for purchase from the publisher.

Filed Under: Progressive Calisthenics, Tutorial Tagged With: Al Kavadlo, bodyweight exercise, bridge, bridging, calisthenics, Century Test, Convict Conditioning, creating workouts, fitness, HPAS Protocol, Paul Wade, progressive calisthenics, S4 Method, short workouts, tutorial, workout

One Arm Bridge, Twists and the Valdez

April 30, 2013 By Logan Christopher 8 Comments

In my previous article I covered some advanced versions of the wrestler’s bridge exercise to build both more neck and spine strength, as well as dynamic flexibility.

Now its time to turn on the gymnastic bridge.

By itself the bridge requires a high degree of flexibility. The truth is when your flexibility is great, then holding the position isn’t too hard. It requires more strength when you don’t have the flexibility to do it, because you can’t quite get to lock out.

If you’re not there yet, keep at it. Make sure to read Convict Conditioning to build your bridge.

And what I want to cover here is an advanced variation not covered in that book, that takes your flexibility, and stability, to another level. Here is a short series of progressions you can do. The video shows each one and you can read more about them below.

One Arm Bridge Hold

Get into a gymnast bridge and lockout your arms. Shift your weight slightly to one side then raise up the other arm off the ground. Hold for time. If you can get a minute you’re doing great.

Work both sides equally. You can come down and rest between sets or shift back to two hands, then onto the other arm.

One Arm Bridge Twist

There are several versions of this move that just change it up slightly.

To start with get into you’re your one arm bridge. Rotate your torso towards that arm as you kick your opposite side leg over until you come to a position where you’re on all fours.

Note that your hand may need to twist on the ground as you turn.

After you get to all fours you can then rotate back.

Work to both sides. You’ll likely find one side is better than another. This is usually more because of flexibility than strength. Also notice that it requires an even greater degree of shoulder and wrist flexibility plus shoulder stability through an interesting plane of motion.

One Arm Bridge Twist from Sitting

Now we’re going to do the same thing starting from a sitting position. For description purposes I’ll describe this from the position of having the left hand on the ground.

Start with your left hand on the ground, pointing away from your body. Your left leg will be straight and your right leg bent and close to your body. Raise your hips up and onto that arm as you bridge over. Your hand has to do a 180 as you come into a bridge position. Once in position you can place your right hand on the ground.

Try coming up with the same or opposite arm back to a sitting position.

Valdez

This is a move from gymnastics that is usually reserved for women as they tend to have more flexibility. Still it can be worked up to, if you’re willing to put in the time.

This combines the previous exercise, the one arm bridge twist from sitting, with a kick over done in seamless fashion. In the beginning you may need to break it down into sequential steps and of course both should be solid before attempting to put them together. You actually begin kicking up with the leg even before your second arm touches the ground.

I’ve pulled this one off before, but not in many years. Without working on it recently, I haven’t quite got the flexibility and control required for it.

So if you’re ready for some more intense bridge work start working in this series. If you can do all this, just holding a bridge will never be a problem again.

***

About Logan Christopher: Logan Christopher has been called a physical culture renaissance man as he is accomplished in a wide range of strength skills from kettlebell juggling, performing strongman stunts, and bodyweight exercises. He is the author of numerous books including Secrets of the Handstand and The Master Keys to Strength & Fitness. In addition, he’s spent the last several years going deep into mental training to find out what it takes to really excel and tactics that can help people instantly improve their exercises. You can find out more about all this at www.LegendaryStrength.com.

Filed Under: Progressive Calisthenics, Tutorial Tagged With: advanced, bridge, calisthenics, Logan Christopher, One arm bridge, tutorial, twists, valdez, video

The L-hold Tutorial

April 16, 2013 By Aleks Salkin 15 Comments

aleks1

The L-hold (also known as the L-sit) is one of the 7 static holds included in the PCC syllabus. Like all statics, L-holds are phenomenal for tendon strength and powerful, total-body co-ordination—but don’t expect to see them performed in gyms around America anytime soon.

My own recent exploration of the L-hold started off somewhat embarrassingly – with a locked-up lower back. After botching my first dance with heavy pullovers, my lower back felt like a piece of wood – stiff and immovable (note to interested parties: common sense would dictate not to arch your back while doing pullovers. My common sense was evidently on a smoke break at the time. Don’t arch your back if you do them). I couldn’t do anything. I couldn’t do pistols, I couldn’t do L-holds, I couldn’t even hinge at the hips without feeling like I was going to catapult face first into the ground.

I was in trouble with a capital “TROUB”.

Fortunately, I had a hunch that there was a simple solution to this sudden bout of inflexibility, and the answer lie in strengthening my low back’s next door neighbor: my abs.

I chose the L-hold because hanging leg raise variations were unbearable at the time, and because of the high promises made about L-holds in Convict Conditioning 2: “Cure bad hips and low back inside and out.” Could it really be that simple? Would the L-hold break its promise when I most needed it to deliver? There was only one way to find out, and fortunately the progression sequence Paul Wade laid out in Convict Conditioning 2 was just what the doctor ordered. I started with bent leg holds and found that pumping my legs between progressions increased the difficulty and skyrocketed my strength and blood flow to my low back all at the same time. To make a long story short, within a few short days my back was as good as new. In this post, I’m going show you how I approached mastery of the L-hold.

First and foremost, you are going to need two things: strength in the form of strong shoulders, lats, triceps, and (of course) abs. Be sure you’ve cut your teeth on dips, one-arm pushups and their progressions, handstands, pull-ups, and leg raises before you tackle this move. Second, you are going to need some good active flexibility, or as Coach Wade refers to it in CC2 “Tension flexibility”, in your hips and legs. Whereas passive flexibility is essentially yielding to the force of gravity to improve your range of motion, active flexibility uses muscle tension to kick gravity to the curb and move in an advanced range of motion against the Earth’s otherwise unforgiving pull.

L-hold domination

To begin with, start on some sort of raised surface rather than on the floor: paralettes, kettlebell handles (careful!), or a sturdy desk will do the trick. For the sake of variety, consider practicing them on all these surfaces. While I have no hard proof of it, getting good at a this or any skill in a variety of contexts may very well make you better at the movement overall.

To keep your shoulders happy, keep them pushed down as far away from the ears as possible, and keep your “elbow pits” forward for all the steps in each series. Let your shoulders round forward – flare your shoulder blades – and hold that position tight. Keep your gaze straight ahead.

aleks2

Nope! Chest is too wide and back is arched. You may not pass go.

aleks3

Bingo! Back is flexed, chest is sunken, abs are tight. You have redeemed yourself.

Aleks4

Make your elbow pit point the same direction as your fingers.

Your goal is to work up to 20 second holds on each progression before moving on. However, because you’ll achieve that goal by getting stronger before focusing on endurance, I’ll give you a tool to get a taste of the next progression in the series to help build your strength faster and work your way toward the advanced L-hold more time efficiently. Not only will you be building static strength, but you will also be building dynamic strength, thereby giving you some built-in variety and the ability to feel out the movement a bit better.

When your arms start shaking and you are making ugly faces and grunting to get through your sets, you’ve already gone too far. If you’re working yourself into the ground you’re building fatigue, not strength. Knock it off.

You’re going to start with the bent leg hold. Prop yourself up on your raised surface, bend your legs to about 90 degrees, and…well, hold it. Hold it for as long as you (semi) comfortably can, take a break, and repeat.

Your journey through the progressions will go in this order.

1) Bent leg holds

–>Bent leg-to-straight leg

2) Straight leg holds

–> straight leg-to-N-holds

3) N-holds

–> N-holds-to-L-hold

4) L-hold

And if you want to take the first small step toward V-holds, you can add in this gem

==> L-hold-to-advanced L-hold

5) Advanced L-hold

Check out the video for the deeper details to kicking gravity in the face L-hold style. Note that during the dynamic variations I’m controlling my leg movement, not letting it control me (i.e. bouncing around and losing balance). Don’t move on until you can do the same.


Programming will be different from person to person. If you’re a rank beginner, you can get by initially with just two days a week of work. I say “initially” because the L-hold is not as taxing as movements such as hanging leg raises and Dragon Flags, so practicing them daily should become your goal.

The following programs are examples. You may progress faster, you may progress slower. Use these programs as templates, not gospel, and you will find that you have a solid base to work from and progress should roll in faster than you can spell “transverse abdominis.”


Beginner program:

Week 1: Don’t overthink it – keep your effort level at around 50%-80%. No need to go balls-to-the-wall just yet.

Monday: Bent leg holds

Thursday: Bent leg holds to straight leg holds

Week 2:

Monday: sets of bent leg holds and bent leg-to-straight leg holds

Thursday: Straight leg holds


After this, three days a week should be no problem. If that’s still overdoing it, stick with two days a week and progress as slowly as you need to. You don’t get a medal for racing through the progressions.


Intermediate program:

Week 1:

Monday: straight leg holds + bent leg-to-straight leg holds

Wednesday: bent leg holds

Friday: straight leg-to-N-holds

Week 2:

Monday: N-holds + straight leg-to-N-holds

Wednesday: straight leg holds

Friday: N-holds to L-hold

And if you’re more advanced and want to work on these daily, here’s an advanced program.


Advanced program:

Week 1:

Monday: (warm up: bent and straight leg holds) N-holds + N-hold-to-L-hold

Tuesday: (warm up: bent and straight leg holds) N-holds

Wednesday: (warm up: bent-to-straight leg holds) N-holds-to-L-hold + L-holds

Thursday: (warm up: bent-to-straight leg holds) N-holds

Friday: (warm up: bent-to-straight leg holds) L-hold-to-advanced L-hold

Week 2:

Monday: (warm up: straight leg holds) N-hold-to-L-hold

Tuesday: (warm up: straight leg holds) L-holds

Wednesday: (warm up: straight leg holds and N-holds) L-holds + L-holds-to-advanced L-holds

Thursday: (warm up: straight leg holds to N-holds) L-holds

Friday: (warm up: N-holds) Advanced L-holds

Congratulations! You have just kicked the L-hold’s ass! And now your abs are punch proof. But they’re not punch proof enough – not if you’re reading this anyway. For the average exerciser a full L-hold is a laudable accomplishment. But you’re not average, otherwise you wouldn’t be here reading this. The time to go above and beyond is nigh. Stay tuned. The V-hold is calling your name. And it will soon be time to answer the call.

***

About Aleks Salkin: Aleks Salkin is a calisthenics and kettlebell fanatic and Primal Move Fundamentals instructor currently headquartered out of Haifa, Israel. In addition to his love of old school strength training, he is also a devotee of intelligent flexibility training and tension flexibility in particular. Aleks grew up scrawny and unathletic until he was exposed to Pavel and his training methodologies in his early 20s. He currently spends his time spreading the word of strength and health both in person to his clients and online via his website and Facebook page. He is available for online coaching for select, dedicated individuals, and enjoys crushing weakness wherever it tries to hide. Find him online at http://www.alekssalkin.com/

Filed Under: Progressive Calisthenics, Tutorial Tagged With: abdominal training, abs, Aleks Salkin, bodyweight, calisthenics, Convict Conditioning, L-hold, L-sit, Paul Wade, tutorial, workout

  • « Go to Previous Page
  • Page 1
  • Interim pages omitted …
  • Page 5
  • Page 6
  • Page 7

Primary Sidebar

Featured Products

previous arrow
GetStrongBookCover
ConvictConditioningBookCover
StreetWorkoutBookCover
ExplosiveCalisthenicsBookCover
StrengthRulesBookCover
next arrow

Categories

Progressive Calisthenics Certification Logo
Click here for more information or to register for the PCC workshop

Get Strong Workouts TriadXP App
Get Strong Workouts App

Recent Posts

  • Top 5 Reasons Why an In-Person Workshop is the Best Way to Supercharge Your Training
  • HYBRID STRENGTH TRAINING IS HERE!
  • My Calisthenics Journey to the PCC
  • The Handstand Press: Complete Control Through the Handstand
  • The Get Strong App is Here!

Dragon Door Publications

Dragon Door Publications

Recent Comments

  • bross dandon on The Case for Curved Handstands
  • Johnny Flewellen Jr. on Strength for Life
  • Dan Earthquake on The Pursuit of the Daily Minimum
  • Johnny Flewellen Jr. on The Pursuit of the Daily Minimum
  • Johnny Flewellen Jr. on Yoga, Calisthenics and the Journey of a Lifetime
FOLLOW US ON TWITTER!

Copyright © 2025

Dragon Door Publications / The author(s) and publisher of this material are not responsible in any manner whatsoever for any injury that may occur through following the instructions or opinions contained in this material. The activities, physical and otherwise, described herein for informational purposes only, may be too strenuous or dangerous for some people, and the reader(s) should consult a physician before engaging in them.