• Skip to main content
  • Skip to primary sidebar
  • Home
  • Contributors
  • Resources
    • Q&A with Paul “Coach” Wade
  • Workshops
  • Products
  • Forums
  • Articles
  • Blogs
    • RKC Blog
    • Strong Medicine Blog
  • Archives

PCC Blog

Progressive Calisthenics - The Official Blog for the PCC Community

bridge

Back to Basics: 6 Moves to Master Before Moving Forward

November 4, 2014 By Eric Buratty 35 Comments

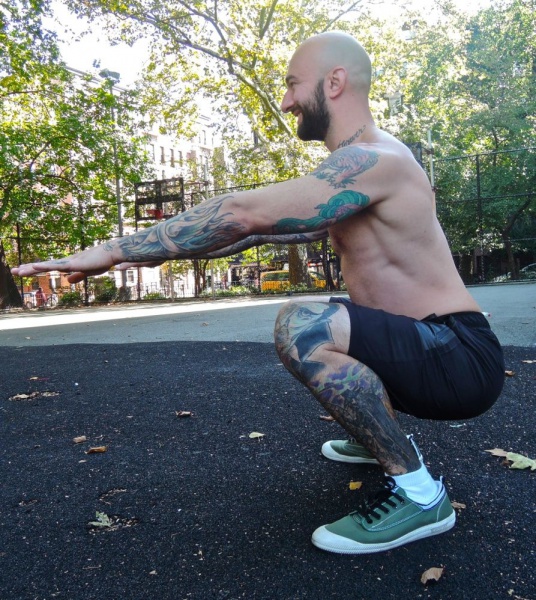
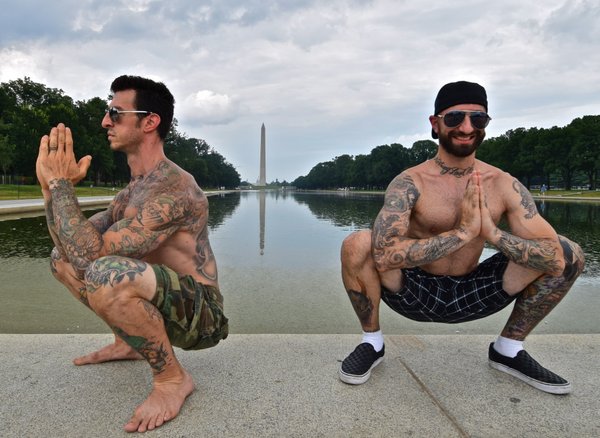
Kavadlo Brothers Squat

Everybody wants to go straight to the advanced moves, but ain’t nobody want to make time for getting better at the basics!

Here at PCC, we get it. Your mind was just blown away from someone’s Facebook picture or YouTube video performing some sexy, ninja-like move that you want to try, too. This simply means you’ve been inspired to either try a calisthenics move (which is cool), or convert your training efforts exclusively toward calisthenics all together (even cooler).

But, like everything else people are good at in life, such graceful displays of strength, control and power require a considerable amount of time and practice to master. Not to mention the patience involved will humble anyone who might already have a strong fitness background from other disciplines (e.g., weight training, dancing and yoga).

That said, before moving on to some of the more advanced variations of calisthenics moves, EVERYONE needs to become proficient in the following basic positions.

1. Full-Depth Squat
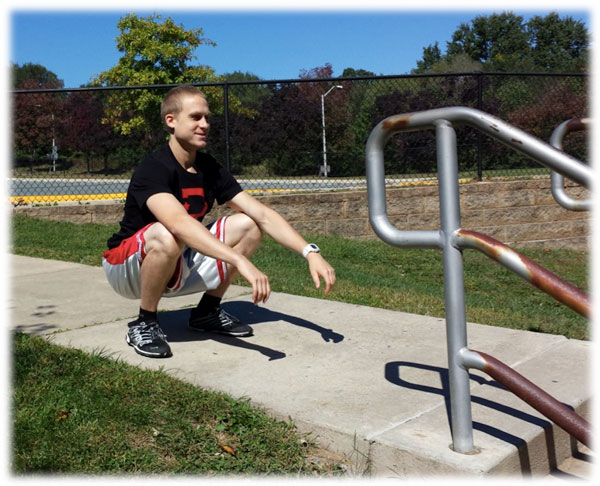
Eric Buratty Squat

Also known as an “ass-to-grass” squat, this is a basic human resting position that involves maximal bending of your hips and knees. NO ONE has any business loading this movement pattern until they can achieve full range-of-motion with their own bodyweight, and still remain upright from a postural perspective.

Calisthenics Transition: Foundation for Progressing the Squat Chain (i.e., working up towards pistol and shrimp squat variations)
Recommended Practice: Sit in this position for 5-10 minutes daily. The more favorable times to do so are upon waking for the day, before bed, whenever on a rest day and before or after a tough workout. Feel free to shake up social conformity any time you have the opportunity to squat—especially when waiting in line or shopping out in public.

2. Supine Hollow Body
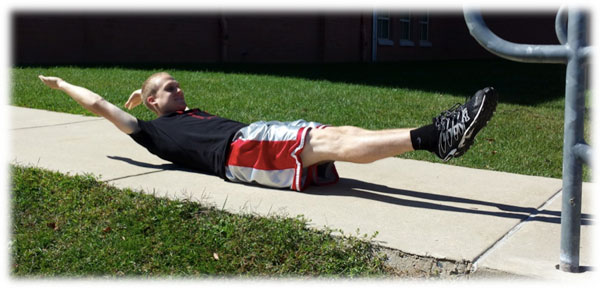
Eric Buratty Supine Hollow Position

The hollow body is the ultimate educator on the principle of whole body tension. A challenging core workout on its own, this position teaches you the principles of progression in all of calisthenics. More specifically, it allows you to feel the effect of lengthening or shortening the body as a lever for resistance, so you can adapt your training on a given day accordingly. Without understanding the principles of progression in calisthenics, you will only be setting yourself up for failure—and even injury.

Calisthenics Transition: Foundation for Precision and Control Required in Handstand, Front/Side/Back Levers
Recommended Practice: Maintain this position for a total of 2 minutes on training days involving handstands, front/back levers and human flags. Use as part of a warm-up, or superset with the aforementioned moves as active recovery during a workout (e.g., 8 sets of 15 seconds, 6 sets of 20 seconds, 4 sets of 30 seconds).

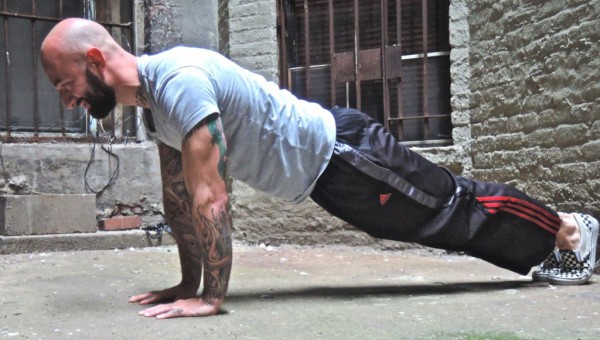
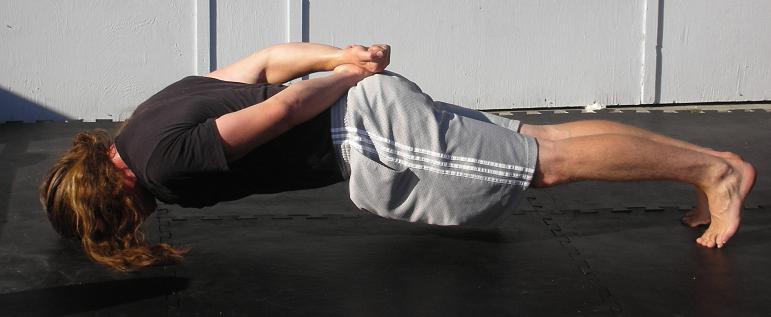
3. Hollow Body Leaning Push-Up Plank
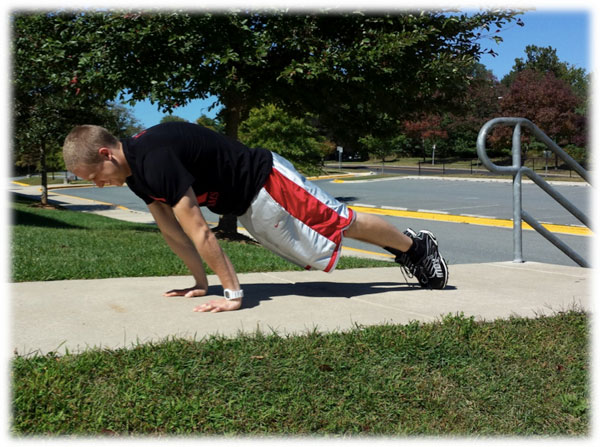
EricBuratty Hollow Leaning Plank PushUp

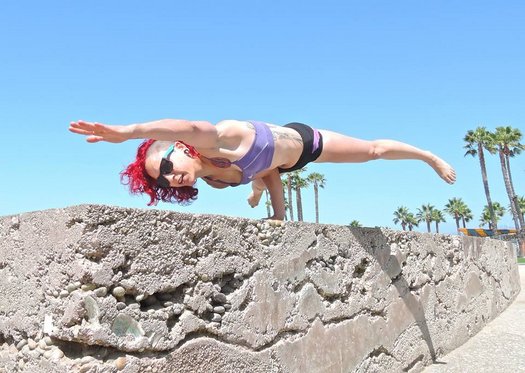
By “leaning” into a standard push-up position, you’ll reach a higher level of total body tension that forces you to have greater balance and control over your body. The ability to achieve this position also serves as an excellent confidence booster for when you start experimenting with moves that involve less point(s)-of-contact with the ground.

Calisthenics Transition: Foundation for Progressing Midsection Floor Holds (e.g., N/L/V-Sits, Side Planks, Planche, Manna), Inversions and Elbow Levers
Recommended Practice: Use as part of a warm-up on workout days involving midsection floor holds, as a “finisher” on workout days involving push-ups or as active recovery on workout days involving vertical and horizontal pull-ups. Work up to holding this position for a solid 2 minutes without form breakdown.

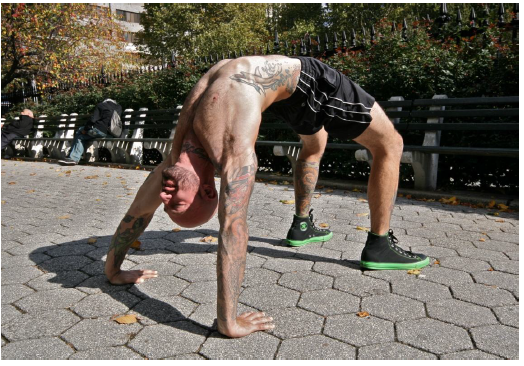
4. Hollow Body Backbend
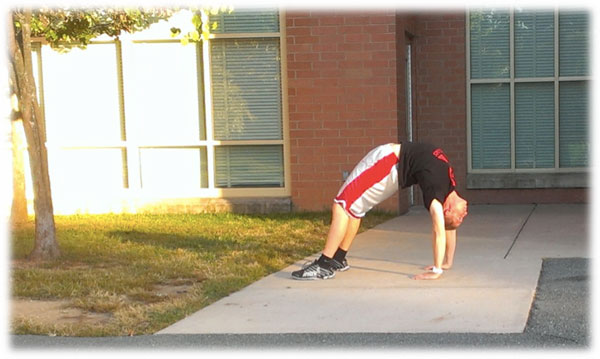
Eric Buratty Hollow Body Backbend

When it comes to improving overall mobility, look no further than backwards bending (AKA “bridging”). Insert “do you even backbend?” parody for “do you even lift?” here. Known for its extremely therapeutic benefits on the muscles and tendons of the entire body, you can further enhance the quality of this position by putting the lower body into as much extension as possible and concentrating on pushing the shoulders past the hands. What you’re left with is a more “hollowed” version in the basic family of bridging that opens new doors for achieving stronger three-limb holds, geckos, stand-to-stands, walkovers and eventually, arched “Mexican” handstands.

Calisthenics Transition: Foundation for Progressing Handstands
Recommended Practice: Work up to holding this position for at least a solid minute after every workout you do. Given the powerful stretch that occurs in common problem areas for Americans from performing this movement (i.e., spine, shoulders and hips), you might even want to start devoting an entire training session to bridging throughout the week.

5. Hollow Body Dead Bar Hang
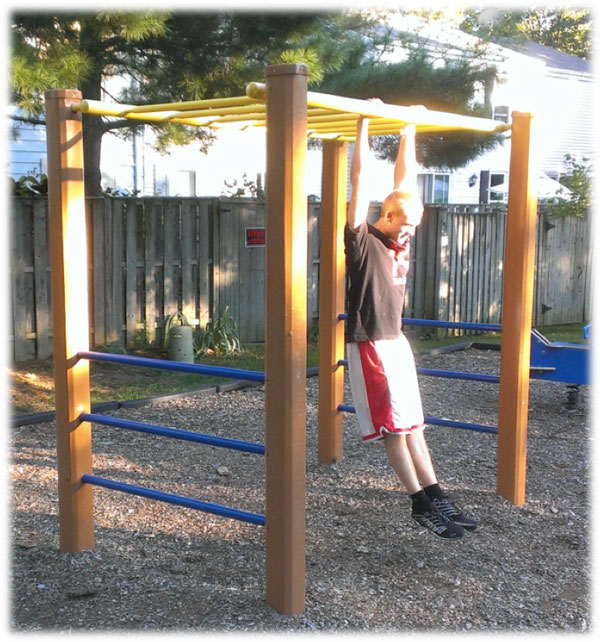
Eric Buratty Dead Hang Hollow

Similar to the full-depth squat mentioned above, passive hanging is another type of human resting position. When you take the passive hang one step further and connect the scapular muscles with the rest of the body, you’re left with this active hang that’s visually appealing and graceful. This happens to be one of the best positions for activating the core, as it decompresses the entire spine and puts the shoulders into a healthy stretched position with straight arms. With consistent practice of this deceptively challenging hang, you might “accidentally” become stronger at pull-ups AND start revealing your Diamond-Cut Abs.

Calisthenics Transition: Foundation for Progressing Pull-Up Chain & Leg Raise Chain
Recommended Practice: Hang from any straight bar (or any freestanding object for that matter) that allows you to put your body into a fully extended, hollow position, and maintain the position for a total of 1-2 minutes daily. This can either be done before or after a workout to facilitate warm-ups and cool downs—or as a nice complement to an active recovery day away from your regular training.

6. Hollow Body Bar Support
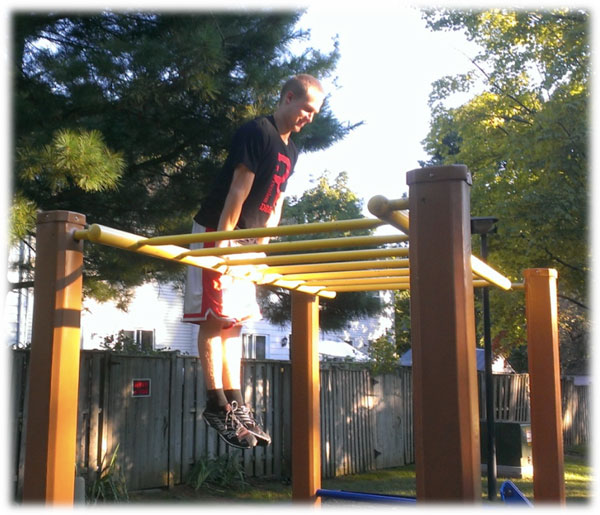
Eric Buratty Hollow Bar Support

As with the other “hollow” positions above, you’re pretty much forced into a state of total body tension with the bar support—which will lead to stronger reps on any related movement you’re preparing to train. In this instance, the ability to support yourself over a bar in a straight arms, locked out, elbows forward position is definitely a good indicator that you’re ready to reach the top of the dipping chain and beyond. Who ELSE is ready to work towards their first straight-bar muscle-up?!

Calisthenics Transition: Foundation for Progressing Straight Bar Dips & Top of Dipping Chain (i.e., Muscle-Up)
Recommended Practice: Use as part of a warm-up on workout days involving the dipping chain—or as active recovery on workout days involving vertical and horizontal pull-ups. Work up to holding this position for a solid minute at a time without form breakdown.

In no particular order, there you have six positions to master before you get slammed in the face with a serious slice of humble pie.

Why do we want to emphasize these isometric positions before worrying about reps and transitions anyway?

Simply put, it’s so we know where our body is in free space and when its position changes. That way, when we reflect on those workout days where our bodies felt ginormously heavier, we might be able to identify which positions felt strong and which ones felt stronger, so we know where to improve on next time.

I’ll end with one of my favorite training-related quotes which comes from Gymnastics Coach Christopher Sommer: “Save the nonsense. Bad form simply means bad attitude. Plain and simple. It means that you did not care enough to do it right.”

To acknowledge this quote from a PCC standpoint, always focus on becoming stronger than yesterday but not as strong as tomorrow! 😉

***
Eric Buratty brings five years of experience to the DC Metro Area as a Certified Personal Trainer, Progressive Calisthenics Instructor, Nutrition Consultant and Sports Injury Specialist.
For more information about Eric, check out his website, EricBurattyFitness.com.
Filed Under: Progressive Calisthenics, Tutorial Tagged With: bodyweight exercise, bridge, calisthenics basics, calisthenics positions, Eric Buratty, foundation calisthenics, hanging hollow position, hollow position, skills training, squats, tutorial

Elbow Levers For Superhero Strength

August 5, 2014 By Grace Kavadlo 26 Comments

Grace Menendez One Arm Elbow Lever

Growing up, I was a scrawny, geeky kid who spent my free time reading comic books, fantasizing about having mutant powers and dreaming of looking shredded like my heroes in the stories. The first time I ever saw an elbow lever, the kid in me got excited. I’d always wanted to be a superhero, and this was the closest thing to flying that I’d ever seen. I had to try it myself!

Unfortunately on my first attempt, instead of flying I ended up face planting instead! After scarfing that slice of humble pie, I did what any intelligent athlete would do: I took a step back and started practicing foundational movements to help me earn my wings!

#1 – The Plank

As played out as this exercise may seem, it is the perfect place to start. The plank position puts you in the same plane of movement as a lever and helps you build the necessary core strength. Emphasize keeping an open chest while broadening through the collar and retracting the shoulder blades down and back. “Zip-up” your mid-section by squeezing your glutes, engaging your quads and evenly distributing the weight between the top and bottom of the body. Eventually when you can hold the pose for 2 minutes, experiment with gecko plank variations, which involve lifting a leg and/or arm.

Grace Menendez Gecko Plank

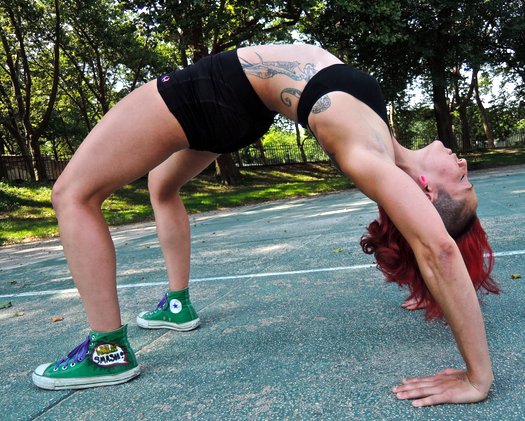
#2 – Back Bridge

In a culture where flexion is the norm (sitting for prolonged periods, driving, etc.) the bridge liberates the spine from excessive upper back arching, as well as from a variety of other back pathologies. How does this apply to levers? In order to hold the body upright, you need to have a flexible upper back and strong spinal muscles–and the bridge addresses both! Take your time with this movement as it can be very intense for beginners. There are less difficult variations you can practice like the straight or table bridge, neck bridge, etc.

Grace Menendez Bridge

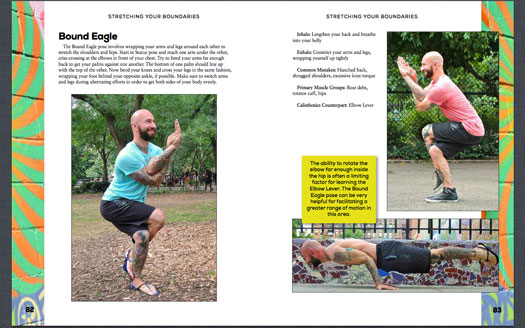
#3 – Bound Eagle

One of the gnarliest sensations you need to get past when first practicing this move is getting used to having your elbows jammed in your guts! If you have never tried it before, go ahead and try! Not as easy or comfortable as you thought? No sweat! Master PCC Al Kavadlo, suggests in his book Stretching Your Boundaries (definitely a must-have for every regular calisthenics practitioner) a helpful preparatory pose could be the Bound Eagle. This pose can help you gradually develop the flexibility needed to turn your elbows inward.

Stretching Your Boundaries Bound Eagle

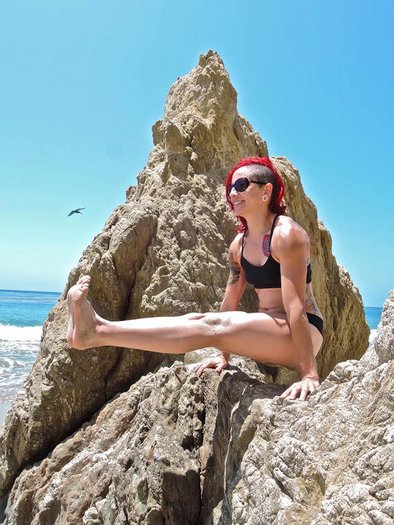
#4 – Midsection Holds

Speaking of jamming your elbows into your midsection, the L-Sit progressions are ideal to get your abdomen prepped to take all your bodyweight. These holds involve tensing almost every muscle in your body, specifically the abdominal region, much like you’ll need to in order to perform a successful elbow lever. Start with a tucked L-sit and progress from there. I also like to include the frog stand here as it emphasizes lifting the chest while balancing on the hands just like in the lever!

Grace Menendez L-Sit At Beach

Grace Menendez Fingertip Frog Stand

#5 – Elevate yourself

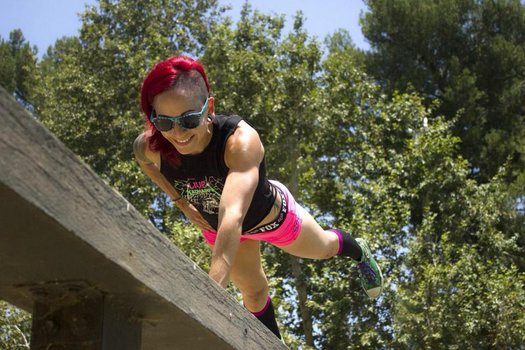
Start practicing your elbow lever on elevated surfaces like plyo boxes, tables, counters, park benches, paralletes, etc. Be creative; the sky’s the limit! Start by letting your legs hang over so your form will resemble less of a straight line and more of an arch. As you get stronger, just like in your midsection holds, you can work from a tuck to a straddle and eventually that perfect expression of the pose with long extended legs!

Grace Menendez Elevated Straddle Elbow Lever

Grace Menendez Elevated Elbow Lever

#6 – Get Grounded

If you’ve mastered step 5 and you’re ready to attempt the elbow lever on level ground, you may still find it difficult to completely clear your legs from the floor. It may be helpful at this point to use a wall-assisted regression, in which you press one or both feet into the wall to spot yourself. From there, it’s just a matter of taking a leap of faith and going for it. If you’ve done the work, it should come without too much of a struggle.

Grace Menendez Elbow Lever On Ground

#7 – Next Level Levers

What’s great about progressive calisthenics, is that even after you are finally able to perform the elbow lever, there are even more advanced variations to be conquered! You can try doing an elbow lever on your fingertips, or even just one arm. Be patient during the earlier steps and focus on form. It takes consistency and synergy for your body to learn this unique movement!

Elbow levers are truly the stuff of Superheroes. They take skill, courage, and strength to perform properly! Don’t be shy! Embrace your inner hero and get your lever on!

Grace_POW

***
Grace Menendez, PCC, HKC is a personal trainer, group exercise instructor and massage therapist located in Los Angeles. For more information about Grace, check out her website, www.DieselGrace.com

Filed Under: Progressive Calisthenics, Tutorial Tagged With: abdominal training, abs, Bound Eagle, bridge, crow stand, elbow lever, elbow lever progressions, Grace Menendez, how to, L-sit, midsection training, plank

Get Stronger by Improving Your Back Flexibility

March 18, 2014 By Keira Newton and Jarlo Ilano 19 Comments

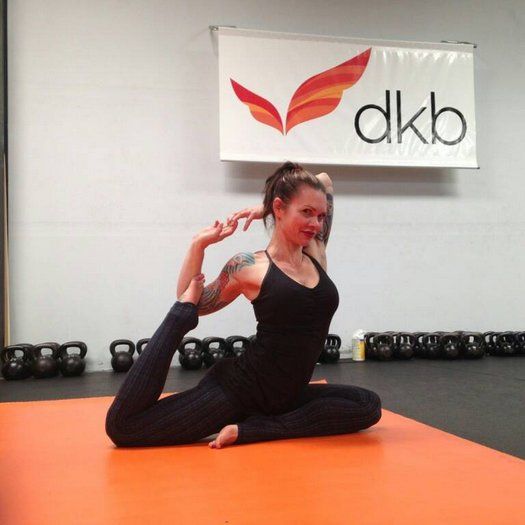
Master RKC Keira Newton Spinal Flexibility

We get frustrated when flexibility work is just an afterthought in an athlete’s program, something done for only a few minutes after the main workout without a lot of thought or effort. The truth is that proper and focused flexibility training especially for your spinal flexibility, can help you get stronger!

Getting stronger from stretching sounds great, doesn’t it?

How is that? One of the ways flexibility work can make you stronger is immediately apparent in terms of form and technique. If you are so bound up in your upper back that you can’t pull your shoulders back in a proper line, your pressing is not going to be as strong, whether it’s pressing a kettlebell or your bodyweight in a handstand.

For instance, Keira remembers when she first started working seriously on her flexibility, that although her shoulders were pretty mobile, her upper back wasn’t. By working on that specifically, she was able to improve her shoulder positioning, and found her pressing strength immediately improved, as well as her hand balancing. Being able to extend correctly at the upper back placed her shoulders in a much better mechanical advantage and she was able to use her strength from a better foundation.

She also recalls one of her teaching sessions with an experienced RKC who was having trouble with her pull-ups. Keira gave her some corrective thoracic mobility exercises and she went from barely doing one, to doing sets of multiple reps. The flexibility work put her in a better position for her pull and she broke out of that plateau. She was working hard and putting a lot of effort in her pulls, but her mobility was holding her back. Once that was freed up, she was able to gain so much more from her efforts.

High tension techniques for strength and power are great. There’s no denying that those techniques work for getting people as strong as possible, but you have to balance out that tension with proper mobility to get the most out of your body. It’s not the act of stretching that will give you strength, but it’s the new options your body will have to get in the best positions to utilize the power and strength that you already have.

A Flexible Spine is a Powerful Spine

There’s a reason the word “backbone” is associated with strength and courage. A strong and flexible back is the foundation for power in the upper body, just as the hips are for the lower body. Thoracic spine (mid-back) mobility affects how well you can use your shoulder girdle and arms, by placing them either in resting positions of weakness or strength.

A kyphotic (flexed) thoracic spine puts your shoulders well forward of the vertical midline of your body and away from your power posture. It’s like trying to push from an unstable platform. You won’t be able to use your strength properly no matter how powerful your muscles.

Most of our full body rotation comes from the thoracic spine, so when you think of rotational work, that involves a great deal of thoracic function. Stiffness here reduces not just your mobility but your ability to apply the proper leveraging and angles for a lot of different strength skills.

Below we will show you comprehensive routines for improving your spinal mobility for forward bending, rotations, and backbending. You’ll probably find that some of the moves here will be easier for you while others will jump out and kick you in the butt! (Guess which ones you should work on more…)

We advise you to go through all of these movements and discover for yourself what you need to improve the most.

Forward Bending Sequence

Forward bending involves spinal joint and hip flexion, and the associated flexibility of the muscles and other soft tissues of the posterior chain. It can be difficult to isolate one specific cause as the key issue if you have tightness. While it’s very easy to say you have tight hamstrings, the fact is that the sensation of tightness in the hamstrings may very well come from an issue in your low back.

This sequence is a demonstration of “covering all the bases,” with a comprehensive approach that can be pared down as you practice and figure out what you need to work on for yourself. A quick run-through of the sequence can give you a baseline as well, and act as a measure for progress.

We begin with a full spinal flexion movement, from your neck all the way to your pelvis. You want to round out as much as possible, then move into full extension (back bending). Though the emphasis is on the forward bend, you’ll want to move into extension as a break in between. It takes the spine through a full range of motion and is a good warmup for the sequence.

In the squat, point your toes out at around 45 degrees. This positioning assists in helping you round out your lower back and go into a posterior pelvic tilt (the pelvis tucking under you). Get your chest between your knees and tuck your chin down, as well as letting your tailbone sink down. Play with rocking back and forth between your toes and your heels. Then sit back and drop down even further. Next, jump into a push-up position. Then drop your hips down to the floor and lift your chest up and out, locking your elbows out if possible. Remember to look up as well, for extension throughout the entire spine.

Do ten repetitions, or more if you feel up to it.

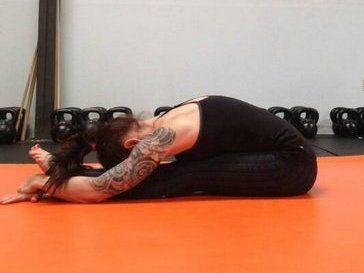
Master RKC Keira Newton Forward Bend SeatedNext is a standing forward bend, where you bring your hands to one side and keep them on the ground as you stand up. This is a combined forward bend and rotation. Another variant is to sit back into the opposite hip. So if your hands are to the right of your body, you’ll sit back to the left. Spend a couple minutes going between one side and the other.

The last move in the forward bending sequence is the seated forward bend. With this move, you’ll add a rotation to the forward bend, just as you did in the standing forward bend. With your legs locked out straight in front of you, pick a side and fold forward at a diagonal on that side. Move in and out of the stretch at least ten times on each side, as well as straight forward, and hold the stretch on one side for upwards of a minute.

Back Bend Preparation

Backbending (spinal extension) can be a very uncomfortable and difficult motion for many people. When you add up all the hours we sit, drive, and are parked in front of the computer, you’ll see how rarely we get into backbending positions during our normal daily activities. So it’s no surprise that a full backbend like the bridge posture can be so daunting.

With this in mind, it helps to go through a thorough preparation before going to the limits of your spinal extension range of motion.

The first emphasis is on the thoracic spine (your midback), and improving extension and rotation in this region. Improving mobility in this part of the spine prevents undue strain on the lower back by distributing the motion throughout the spine rather than all on the lower back. In the first exercise in this video, you’ll see that Keira has to emphasize the motion, not straight down but also forward, as her shoulders are so flexible that she isn’t moving at the spine. When she improves her direction of force, you can see that the stretch is now where it needs to be. Work on this for three sets of one minute each.

Next is thoracic rotation, which is essentially extension at the side of the spine you are rotating towards. This in combination with sidebending takes you to the end-range of the extension motion. So you’ll be working on all the structures that need to be pliable for a good backbend.

Keira is demonstrating two movement variations: the first is up on forearms and knees with the back starting in a neutral position, and the second is more on the back of the upper arm and shoulder with the torso bending to the side. When you try these out, you’ll notice that the second variation places you in a sort of pre-stretched position, so you won’t be moving as far. You may skip the first variation if you are already flexible, but even then, the first one is a good warm-up to do. Play with shifting your weight more onto your knees or your arms to find the best angle for you. Start with three sets of 30 seconds on each side.

Last in this video is a more direct back bend preparation and is adapted from a sequence taught by Jarlo’s Ashtanga yoga teacher, Cathy Louise Broda at http://www.purpleyoga.com. It starts with a kneeling back bend, then works on the hip flexors, quadriceps, and shoulder bridges, to fully warm up and prepare the body for more intense spinal extension postures.

In the kneeling backbend, it is key to elongate and lift the spine as you lean back. Pushing your hips forward and lifting your chest up and back will create this “open” spine, and will prevent a jammed up feeling in the low back. Relaxing your hips and buttocks will be difficult at first, but that is another key to a good backbend. 10 – 12 slow repetitions here will do you well.

Next up are lunge stretches with rotation to the side of the front knee. Adding rotation to this position adds depth to the stretch and is a great concept to employ in almost any exercise. You don’t have to do this in full splits like Keira is showing, just go into as deep a lunge as you are comfortable. The effect is still the same. Do three sets of 30 seconds on each side.

The camel pose in yoga is a backbend with arm support, and can allow you to improve your backbending technique with relatively little strain. With the support of your arms you can stay in the position a bit longer than you could just bending back. Remember the details of pushing your hips and chest away from each other to open up your spine. Work up to three sets of 30 seconds on this posture, as that’s a good amount of time to experience this position.

Following the camel is the kneeling quadriceps stretch. If your knees bother you in this position, you can sit on a small stool or a few cushions to take some pressure off. If this doesn’t help, don’t force it and try a standing or side lying quad stretch instead. You’ll be able to do this later, but don’t hurt your knees and put yourself out of commission. The key point here is to avoid a low back arch. Keep your back flat, so the forces of the stretch will be on the upper thighs and not on your back. Take your time and gradually lean back further when you can do so without pain. Three sets of 30 seconds to a minute will work well here.

Lastly, shoulder bridge practice starts you on a more active backbend and is a great way to get a lot of repetitions in with good technique. You’ll pull all of what you’ve practiced so far in the sequence and work on a smooth spinal curve, relaxed hips, and good mobility and strength in the quads. Choose the shoulder bridge variation that works best for you, and perform a couple sets of 10 repetitions to improve your bridge.

Full Bridge

In the full bridge, or “wheel pose” in yoga, you’ll need good flexibility in your shoulders, hips, and the entire back. But you’ll also need proper technique. Important details here are to create that smooth curve and arch, like an archway in a building that can support weight evenly, and simply looks good. You can tell when a person does a bridge and there is a sharp angle in one part of the spine – in that case, there will be more of a strain rather than a curve that distributes forces evenly.

Master RKC Keira Newton Back BendFor a proper bridge, your arms and legs are the support structures and your hips and back should be relaxed and open. Your chest should be projected up and back, toward the top corner of the wall behind you, and your hips should be lifted up and forward, toward the top corner of the wall in front of you. This aiming in opposite directions creates that “openness” in the spine. Breathing should be steady and even, and you should hold the position for 5 to 10 breaths. Again, don’t force things. Take your time and improve steadily.
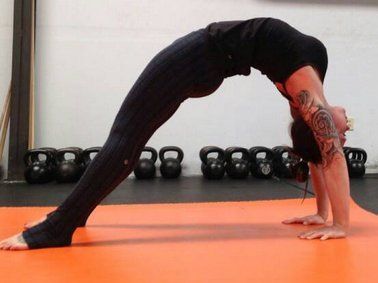
Master RKC Keira Newton Back Bend 2As you improve you can play with shifting your weight more toward your feet or toward your hands. You’ll find which way is more difficult, and that’d be what you need to work on! It will also lead you back to which of the preparation exercises to focus on. It may be the thoracic extension, or your hip flexors and quads if they are holding you back.

Invest in Your Flexibility

What we’ve shared above will improve your back flexibility and consequently improve your body positioning for every exercise and skill you practice.

It does take time and patience to increase your flexibility, especially if it’s been long neglected. But the payoff is well worth the effort. Set aside some time in your routine to make flexibility a priority and you will be more than happy with the benefits in your strength and power.

***

Keira Newton is an accomplished trainer with many certifications including that of Master RKC, Feldenkrais, FMS, and Z Health. Her combined knowledge of strength training along with flexibility and mobility work has helped hundreds of her clients at dkb Fitness and seminar students to help them achieve their maximum potential.

Jarlo Ilano,PT, MPT, OCS has been a Physical Therapist since 1998 and is a Board Certified Orthopedic Clinical Specialist. He has special interests in the neck and back, shoulder, and flexibility work, combining his clinical expertise with his own training in martial arts and yoga to provide practical and cutting edge knowledge for GMB Fitness.

Filed Under: Flexibility Tagged With: back flexibility, bridge, flexibility, Jarlo Ilano, Keira Newton, strength, stretching, thoracic spine, thoracic spine mobility, yoga

ABSOLUTE BEGINNERS: 4 New Year Goals for Total Noobs

January 7, 2014 By Paul "Coach" Wade 132 Comments

 My bodyweight brothers and sisters!
My bodyweight brothers and sisters!

Welcome to the world’s finest bodyweight strength blog—and welcome to 2014! I really hope this year turns out to be something really special for all of ya.

New Year means a time for new fitness and conditioning goals—at least for a lot of folks. A brand-spankin-shiny new year is a perfect time for a fresh start…and God knows, millions of people need it. Two-thirds of Americans are overweight or obese; only 20% get regular exercise; and, horrifically, it has been estimated that less than 10% of the population can perform a full pullup. That’s only one in ten! (I think.)

Many folks are so goddam outta shape, they just have no clue how to make a start in calisthenics. So they put it off…sometimes, forever.

If that’s you—or someone you care about—then this blog is my New Year challenge for YOU. I’m often guilty of writing for experts. Why? Coz the bodyweight community is a remarkable one; it’s typified by smart, mature, knowledgeable, advanced athletes. I love you all, but this post’s not for you. It’s for the noobs.

What’s a “noob”? Well, in terms of bodyweight training:

  • If you can barely do a handful (or less) of sloppy pushups;
  • If a strict, full pullup is outta the question;
  • If a full, deep squat is impossible or feels like it’s ripping your knees apart;
  • If getting up off the couch leaves you out of breath;
  • Or if any of the above apply to you;

…then yer a noob, kid. So if you are a desperate neophyte, an interested but confused lurker, or a collapsed ex-athlete—listen up!

Four Fundamentals in Strength Calisthenics

In this post I’m going to give you FOUR basic goals to get working on. You don’t need more than that—the more goals you set, the more your willpower gets spread around ‘em, so the less likely you are to meet any of them. Research also shows that the more inconvenient New Year goals are, the less likely they are to get met. So all these exercises, and their regressions (i.e., easier versions) can be performed in a tiny space, in the comfort of your own home. You don’t need jack s*** to start today. You don’t need to buy my book. You don’t need a pullup bar. You don’t need a gym membership or new sneakers. All you need is a little courage to accept my challenge, a few minutes time, and enough space to lay down. Everybody has that much, right?

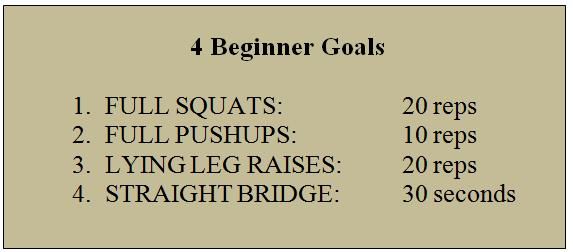
Here are the goals:

noobs_textbox1All techniques are to be executed with perfect form.

To a dedicated athlete, these four are modest goals; easy, in fact. But they are also incredibly important; the average de-conditioned American would be unable to meet these standards…amazingly, given the decline of fitness in our schools, even the average teen would struggle! So let’s get to work on these fundamentals. If these basics are beyond your reach, you stand zero hope in hell of going any further in strength or fitness. And if you really ARE new to strength training, don’t give me any of that “shouldn’t I be lifting weights?” bulls****. If you can’t do ten pushups perfectly, you got no business laying down on a bench press. Likewise, if full bodyweight squats are impossible, then perching under a loaded barbell or leg press for messy, incomplete reps is only going to wreck your knees.

Bodyweight comes first!

The Four Techniques

1. Full Squats:

Full squats generate strength in the entire lower body—quads, hamstrings, calves, glutes, shins, everything. They also build mobility in two areas that badly need it, the knees and ankles, while strengthening the lower back. To put it bluntly, they are essential, whether ya like it or not.

Full squats means all the way down until the hamstrings are resting on the calves!

You can’t do twenty full squats until you can do one full squat RIGHT. So begin by focusing on deep motion. I don’t care how weak or rusty your knees are—you can begin building motion using no weight on the knees at all. Lie on your back or shoulders, with your legs straight up, and bend your knees as fully as you can that way. (These are called shoulderstand squats.) As your mobility improves, try deep squats the right way up; use a partner or a sturdy object to help pull yourself out of the hole. Over time, use the assistance less…build to solo half-squats, and ¾ squats. Soon full squats won’t seem so tough. Once you can do your first set of 5-10 full squats, just add a perfect rep every so often. You’ll hit twenty reps real soon.

2. Full Pushups

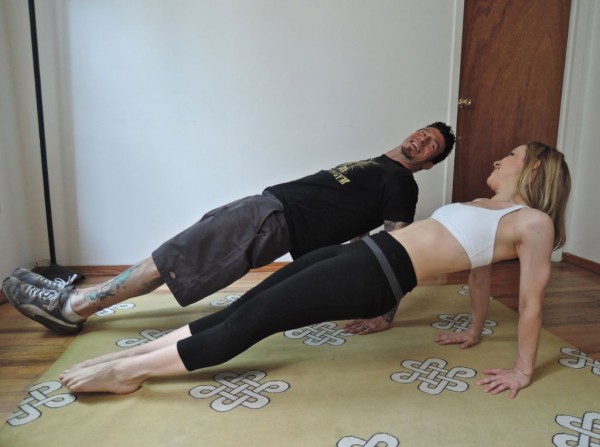
Keep your back and legs straight and aligned—you’ll get all the benefits of planks, but without the boredom!

Hey, ten pushups is easy right? Everyone can do that, right?

Wrong.

Most people—even coaches who should know better—do them wrong. If you do them the right way—my way—they are tough as hell. For a start, most folks rush their pushups. I want you to eliminate ALL momentum (if momentum is doing the work, your muscles aren’t, right?). I want you to take two seconds up, two seconds down, with a moment’s pause at the bottom position. Secondly, you need to go deep—go down until your sternum is a fist’s width from the floor: no less. (Use books or an object like a softball to guide you, at first.) Third, don’t bounce! When you descend so that your sternum touches your books, it should touch them as lightly as you would kiss a baby on the forehead. This technique (“kiss-the-baby”) is murder, forcing you to control your body FULLY. What else is strength, but control?

Doing pushups this way makes them brutal and incredibly productive as an exercise. If they are too hard for ya, begin doing them on an incline, or even against a wall. Once you find a pushup technique you can perform five reps in, add a rep every workout or two until you can do ten, then make things harder.

3. Leg Raises

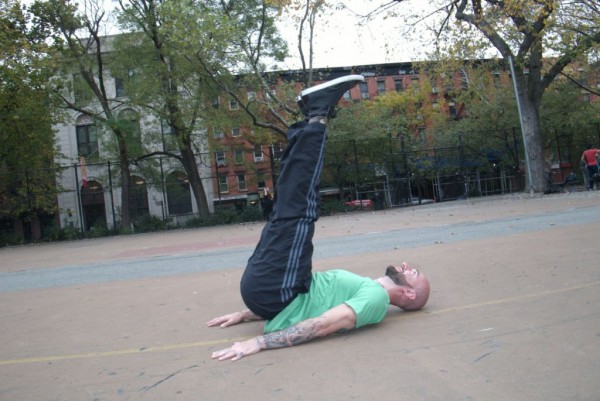
Forget what you have probably been told about working “abs”…isolating the muscles, tensing, and performing lots of sets of teeny crunches or machine exercises. Real, functional strength—from hanging on a bar to picking up a fridge—requires not just strong abdominals, but an iron “anterior chain”—that means your hips, abs, intercostals, serratus, obliques and even the deep muscles of the quads. For strengthening your anterior chain perfectly, God gave you a gift—leg raises!

Isolation is for hermits, kid.

As usual, begin easy. Start with lying knee raises; build to twenty reps. Then extend the legs a little. Then you can try one–leg leg raises, with the knees locked. Pretty soon, twenty strict leg raises will be within reach, and your abs will be harder than those pathetic crunches could have ever got ‘em. Damn, you’ll be doing these suckers hanging in no time. Six-pack from Hell, here we come…

4. Straight Bridge

The straight bridge is a wonderful exercise for noobs to aspire to master. Whereas leg raises work the entire anterior chain—the muscles at the front of the bod—the straight bridge works the posterior chain. It builds the spinal erectors, reduces low back pain, bulletproofs the spine, trains the hamstrings, and helps heal bad knees. Because the arms are pushing behind the body, this type of bridge also strengthens the “lats” of the back, and the muscles around the shoulder blades—an awesome benefit for those who don’t have a pullup bar. Straight bridges also give ya triceps of steel kid—no more kickbacks necessary.

Once again, alignment is what’s up.  Athletes make the straight-body position look easy. It ain’t.
Once again, alignment is what’s up. Athletes make the straight-body position look easy. It ain’t.

Normally I wouldn’t advise beginners to perform bridges—I think the time and energy is better spent on pulling work, typically on a low horizontal bar. That said, if you don’t have access to a bar, straight bridges can be a good way to work the back muscles.

Bridging can be demanding—so start easy. Commence with short bridges (with the shoulders on the floor), then move to table bridges (straight bridges, but with the knees bent). When ten seconds of perfectly aligned form is easy, start adding seconds—build to 20 seconds, then move to something harder. If straight bridges are too easy, try them with one leg lifted off the floor. That will teach you what your hamstrings were made for.

How to Train for these Goals

How do you go about training to achieve these goals? For a start, if you are de-conditioned, you need to get an okay from a doc before you start training hard (that’s the legal s*** outta the way). When you start, start slow. This is absolutely key—never throw yourself full tilt into a new training program. Start with exercises that are about half your full ability, and add work s-l-o-w-ly—a rep here, better form there, a harder exercise somewhere else. This approach will allow your joints and soft tissues time to adapt and get stronger, preventing joint pain. (Joints adapt to stress slower than muscles.)

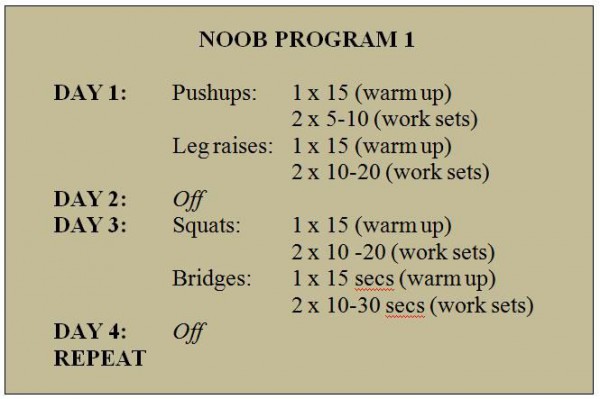
As a noob, you really need to keep your programming easy and simple at first. I advise performing two exercises per session, with a day off in-between. Warm up with a gentle, ten minute walk, and perform one set of a lighter version of each exercise you are doing, also as a warm up. (For example, if you are doing incline pushups, warm up with wall pushups; if you are doing flat pushups, warm up with incline pushups. Got it?) After the warm up, perform two hard “work” sets of each exercise. Don’t go til failure, keep your form as perfect as possible, and rest between sets long enough to get most of your strength back. Such a program would look like this:

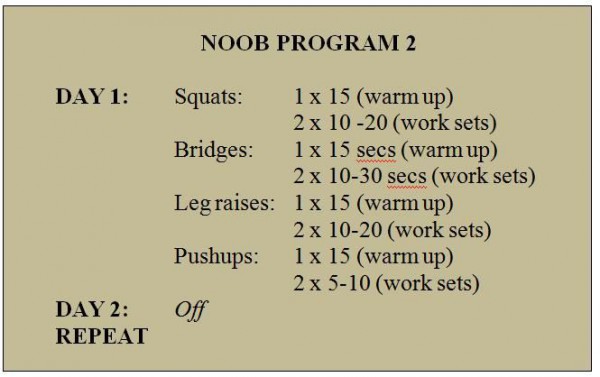
noobs_textbox2If you get sore, or stop making progress, add more rest days. If this seems easy, reduce rest days—but only if you keep making progress. If this seems like way too little, or you get fitter real fast, try the exercises all together:

noobs_textbox3Take a day off in between workouts, or more if you need to. Some will say this is not enough work. It is. Trust me, if your numbers are going up, if you are making progress weekly, you are doing better than 95% of those suckers with expensive gym memberships. More detailed programming info is included in Convict Conditioning. For motivation and to keep ya on the straight and narrow, try to write down your training sessions in a logbook, ‘kay?

I’m too fat for bodyweight workouts!

No, you aren’t. Obese would-be ninjas need bodyweight training as much or more than slimmer folks—they just need to start with easier exercises.

I’m going to tell ya a well-known “secret” now…calisthenics and weight-loss go together like love and marriage. Once your body recognizes it is regularly struggling to heft its own weight up and down, the subconscious mind kicks in and will help you shed those useless pounds. I’ve seen this happen hundreds of times, and it will work for you too if you give it a chance.

Yes, nutrition will play a role, of course. You gotta start dealing with your weight at the same time you start bodyweight training: it’s no goddam use saying; “I’ll work out when I get to such-and-such a weight”, or; “I’ll start eating right when my training gets off the ground”. Start training AND eating well right now.

The Next Step: Moving to Intermediate Level

Okay. Let’s say you have worked for a few weeks—or months—to meet these fundamental requirements. Congrats, kid! You did it. You are now stronger and more mobile than the average American! Well done.

Whazzat…? You feel better? You have added muscle, and firmed up? You are hungry for MORE? You want to know how to take the next step, and work towards becoming an intermediate bodyweight athlete?!

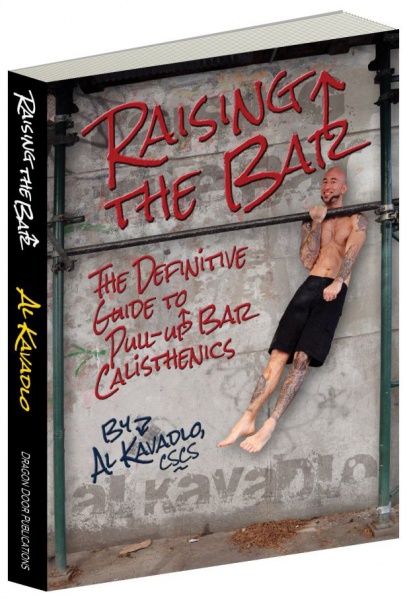
Now your arms, back, waist and legs are stronger, you’re qualified to begin studying at the ultimate bodyweight training college—the School of the Bar! You gotta get hanging. This article is too short to discuss bar training and techniques. Luckily, Al Kavadlo has got you covered. With John Du Cane, Al has put out the super-acclaimed Raising the Bar…the master text-book of hanging training techniques.

noob_RTB
Despite what you might think, I’m not a Dragon Door “affiliate” or any of that crap, and I don’t get paid one cent for promoting Al’s book.  It’s just too damn good not to mention. Raising the Bar includes every bar calisthenics technique under the sun—from Australian pullups and archer pullups, to muscle-ups and Korean dips, plus bonus floor training and pressing methods. Best of all, Al’s system is designed for bar athletes of all capabilities; whether you can do a hundred pullups, or if you can barely hang on to the bar, this book will get you stronger, safely.

Anyhow, I hope that gives some of you new fish some food for thought. You know somebody who needs to get started training? Be a true friend and email them a link to this post TODAY, so we can start helping them as soon as possible.

***

Got questions? Just holler at me in the comments, and I’ll do what I can to answer ya. Any experienced athletes who have advice for noobs (we are ALL ex-noobs, remember!), I’d also love to hear what you got to say, so please make a comment.

I need you all to step up this year—bodyweight is rapidly becoming the biggest movement in fitness, and I need you hidden geniuses out there to support us, and help tip it over the edge. I want lotsa ideas, questions, tips and feedback. So get typing, Jack!

***

Paul “Coach” Wade is the author of five Convict Conditioning DVD/manual programs. Click here for more information about Paul Wade, and here for more information on Convict Conditioning DVD’s and books available for purchase from the publisher.

Filed Under: Motivation and Goals Tagged With: beginner, beginner goals, bridge, bridging, calisthenics, Convict Conditioning, fitness, how to start, leg raises, Paul Wade, push-ups, squats, straight bridge

The PCC and….Love?

June 25, 2013 By Peter D'Epiro 11 Comments

petedepiro2

It was back into the trenches Monday morning after attending the inaugural PCC over the weekend.  To say this course was phenomenal is an understatement.  The Kavadlo brothers (Al and Danny) set the tone for the weekend with their positivity, humility and accessibility.  Further enhancing the vibe were John du Cane, Al and Danny’s co-instructors Adrienne Harvey and Steven Low, and all of the students who spent the weekend cheering, coaching and supporting one another.  I have rarely experienced a class, conference or certification with such an amazing atmosphere and amazingly accessible group of instructors in my years in this industry (don’t want to age myself, but somewhere in the immediate vicinity of 20 years…).

This praise is independent of the actual course content, which was absolutely spectacular.  An organized and systematic series of well thought out progressions for some of the most challenging bodyweight strength techniques out there.  These movements/exercises/techniques are accessible to fitness professionals and clients of all levels because of the thorough progressions for each.

All of which brings me back to the title…love?  Where does that fit into this picture, or this course? As is often the case in the field of fitness and performance training after a class or conference, I returned home motivated and inspired by the wealth of new information and resources I learned…as well as humbled by my great inability to perform so many of these techniques, despite throwing weights around in the gym for over 25 years.  There is the age-old process a professional in our field goes through after an educational program of any type: does this fit into my philosophy and methodology? If so, where and how?  How will I incorporate this into my personal training program?  How will I incorporate it into my clients’ training programs when I return to work Monday morning and going forward?

Logic and precedent suggest that I set about answering these questions when I returned home Sunday evening.  For perhaps the first time ever I didn’t do that though.  The content of the PCC is so unique and accessible to all populations that something entirely different happened.  Like so many others, I not only took a break from work to attend this course, I also left my family at home, including my 10-year-old son.  It’s safe to assume I wanted to reconnect and spend a little quality time with him when I first got home…and before I needed to shift my focus to returning to work the next morning.

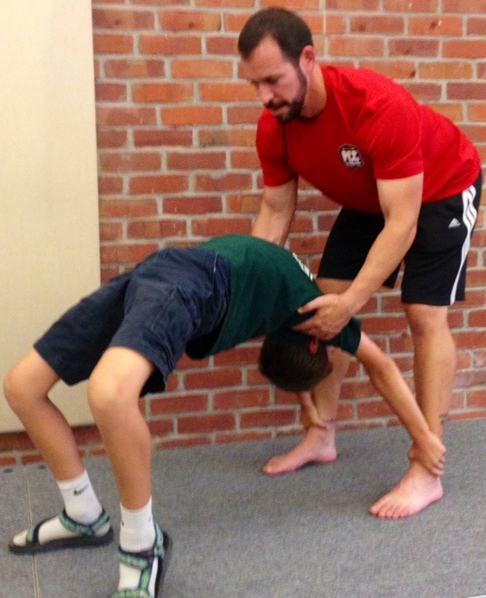
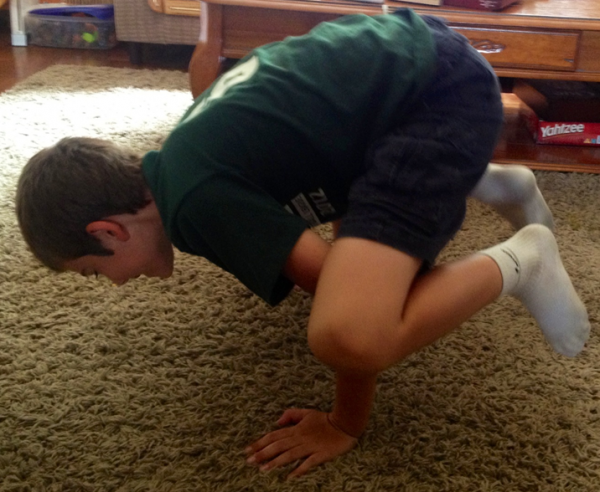
Something unique and special happened right after I settled in at home…before giving it much thought I found myself saying to my son, “Hey buddy, want to see a couple of the cool things I learned this weekend?”  Always gracious, and perhaps a little curious about what dad had been doing all weekend he obliged me.  Next thing you know I had my son’s hands firmly wrapped around my ankles as I spotted him and he pressed his way into his first bridge!  From there I showed him one other move that was a little more balance than strength oriented, the frog stand.  As he spent the remainder of the night on the floor trying to pop up into a bridge or a frog stand every so often father and son had reconnected and our bond was strengthened by our new shared pursuit (and I’m sure he enjoys the fact that his gumby-like 10 year old mobility allows him to perform some of these moves better than me at this point!).

petedepiro1

So…the PCC and love?  I don’t yet know exactly how I will incorporate this phenomenal approach to training into my own programming, or that of my clients.  What I do know is that school is out tomorrow for my son, little league is officially over, and summer is upon us.  My son and I have already scouted out the local schools and parks for the best playground equipment for our needs and have found our “spot” for the summer.  We are both equally excited to go workout together.  He is excited because it feels like playing to him and he gets to play with dad.  I am excited because I get to play with my son while sneakily introducing him to strength training and laying the foundation for a fitness lifestyle for the remainder of his life, while also challenging myself with some of the toughest strength moves I have ever tried to master.  My son is the center of my universe, he is my love, and it is the unconditional love he shares with me that humbles and sustains me.

For all the praise I can easily heap upon the PCC course and its content, none is greater than the way it has and will strengthen the love between this father and his son.  I have a new “gym” at one of the local middle schools…and I officially have a new workout partner, he’s 10 and he’s my best buddy!  I suppose I could put on my business cap and start working on the possibilities and opportunities for bringing the PCC system of training to the TV watching, Xbox playing, inactive youth in my area, but right now I have a date to go outside and “play” on the monkey bars with my son!

***

About Pete D’Epiro: A fitness & performance coach in the San Francisco Bay Area for 20 years, Pete specializes in training the unique population that is the Silicon Valley executive/entrepreneur as well as junior athletes ranging from middle school to Division I scholarship athletes.  Pete also volunteers his time to Stew Smith’s non-profit Heroes of Tomorrow, providing free training to candidates preparing for careers in military special operations, law enforcement, & fire.  Most days of the year Pete can be found at the world-class training facility, Evolution Trainers (www.evolutiontrainers.com), in Mountain View, California.

Filed Under: Motivation and Goals, Workshop Experiences Tagged With: bodyweight exercise, bridge, family, father and son, monkey bars, PCC, Peter D'Epiro, play, playground, strength training

Five for 5

May 28, 2013 By Paul "Coach" Wade 46 Comments

Summer is knocking at the door, boys and girls. (Allegedly.) Everyone is outside, hanging out in the golden rays, whiling their hours away in sun-soaked fun and romantic adventure. (Allegedly.) Summer lovin’. It’s like a scene from Grease, I tells ya. And why the hell not? A spell in the sunshine promotes Vitamin D synthesis, improves mood, and boosts immunity. It may even increase lean tissue-building testosterone levels. (Allegedly.)

Seriously, there are some times you want to lock yourself away in your cell and perform hours and hours of calisthenics—and there are times you definitely don’t. There are times you want to get a quick, productive workout under your belt, so you can go out and enjoy life instead. For a lotta folks, summer is one of those times.

My hands are up, officer; I’ve been guilty of long, draining, excessive workouts throughout my career. But I have also experimented with very brief, efficient, training sessions—and I want to share a few of the tactics I’ve personally used for super-short workouts. Specifically, I’m gonna give you five types of session that will keep your motivation high, keep you strong, flexible and tough—and all for the temporal investment of a mere five minutes. (Yeah, you read that right. Five minutes.)

I want you crazy kids to enjoy summer. Think you can’t get a viable training session done in five minutes? Read on, Macduff.


The S4 Method

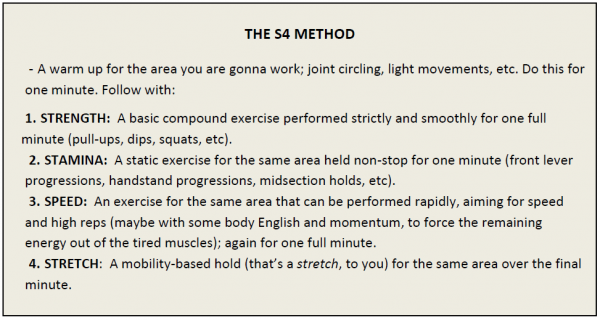
This right here is my personal favorite strategy for a quick, effective workout. It’s simple, too—provided you can view a clock or wristwatch. For any movement or body-part, you warm up, then perform: a minute of a strict bodyweight strength exercise; a 60 second muscular hold for stamina and control; a minute of a fast calisthenics exercise; and a final stretch. (Strength, Stamina, Speed and Stretch—four “S” qualities. S4, get it?)

So the method looks like this:

paul_pic1

How quick and simple is that? You just knock out each of these for one full minute. Non-stop activity, with no rest in-between exercises. That’s it!

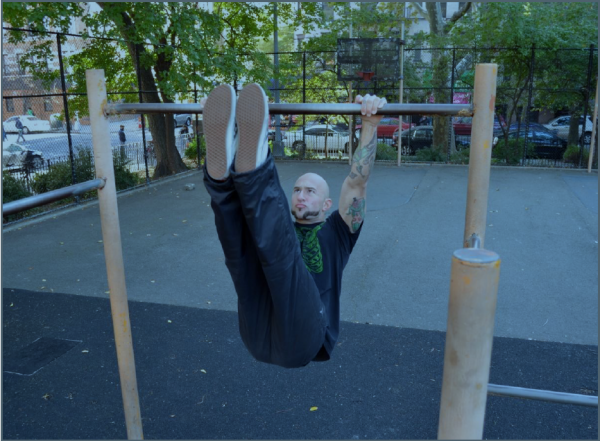
If you think this is not effective, I challenge you to try it. Here’s how it might work for midsection. You warm up for a minute with some abdominal tension, leg swings and hip rolling; then—eye on the clock—jump up and grab the overhead bar. For sixty seconds you grind out slow, smooth, perfect leg raises. (Ten reps is about right, champ.)

paul_pic2

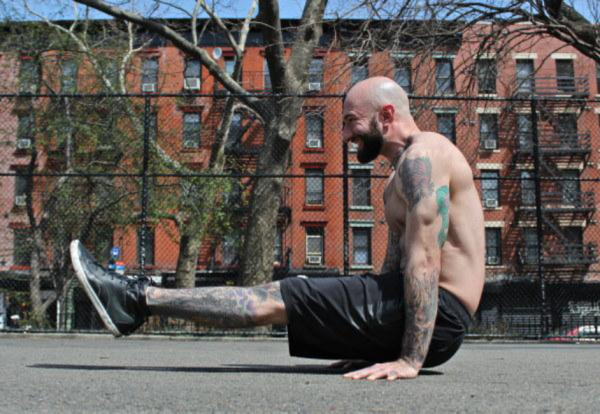
By now, you are grimacing—but you still got some life in ya, right? So drop to the floor and press out into an L-hold—now stay there for sixty seconds.

paul_pic3

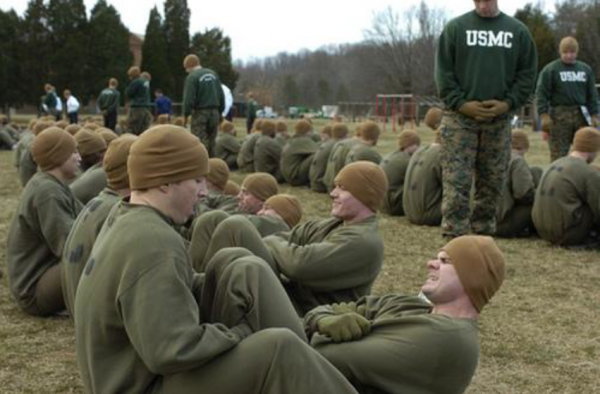
By the end of this (if you manage it) your legs will be trembling, and your gut will be in agony. But the show ain’t over, bud. Hook your feet under something; you have one minute to pump out as many bent-leg sit-ups as you can stomach. (Pun intended.) You are going for speed—military style.

paul_pic4

 USCMC image (LCpl Esteban Gallegos)

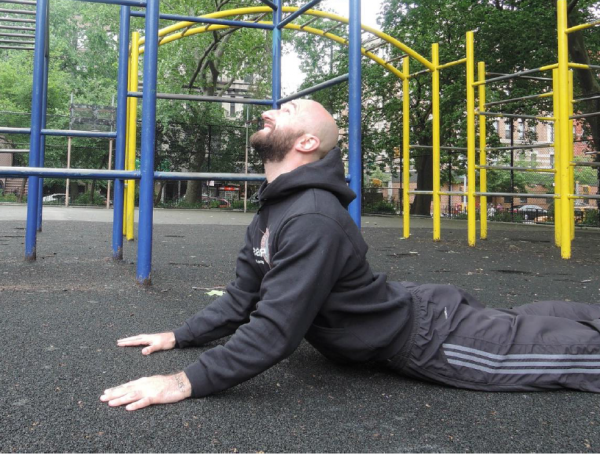
By now your midsection is spent, and you will be pretty much snapping up using everything you have. The minute—which will seem endless—finishes, somehow. Your body just wants to curl up in pain right now, but I want you to do the opposite—roll onto your stomach and straighten your arms, pushing up into a cobra stretch.

paul_pic5

This hold is a strange mix of relaxing—as it decompresses your confused and tangled, deep-fried muscles—and painful, as the time mounts up. One minute of this, and you walk out a free citizen—if you can walk at all!

Sure, this workout is too tough for most athletes. But as with all progressive calisthenics, you can tailor it to your own level. Can’t do leg raises? Knee raises or lying leg raises. Not loved by the L-hold yet? Bent-leg holds or jackknife holds work the same. Too shot to do the sit-ups? Throw a b-ball at the wall and catch it on the rebound for a minute (an underrated gut exercise).

Even the time aspect is variable. A minute is unthinkable for these exercises? Start with 30 seconds for each and build up a few seconds each session.

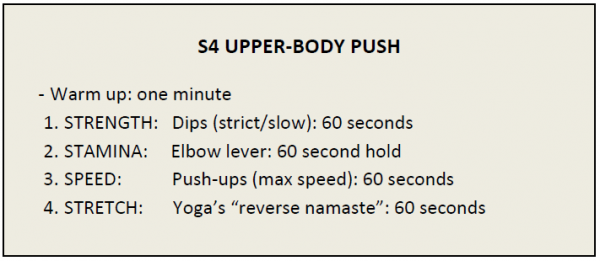
The S4 method works with pretty much anything. Want some upper-body push action?

paul_pic6

Again, with the PCC “toolbox” you can vary the difficulty in dozens of ways. For example, beginners might sub dips for kneeling push-ups. The elbow lever could be swapped for easier prone statics like planks, wall planks or raised elbow levers (see the PCC Instructor’s Manual for even more options). Fast push-ups could be subbed for incline push-ups, focusing on pumping out rapid-fire reps in the top range. Stretch out on a doorway for an easier pec stretch.

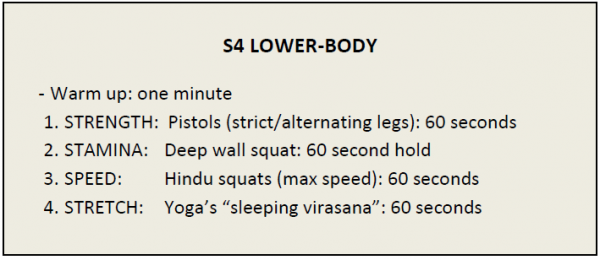
S4 works for legs, too:

paul_pic7

If you are working on unilateral or asymmetrical exercises, it’s best to alternate sides each rep. Again, you can use different difficulty levels, or different techniques—S4 stands a lot of tweaking.

Strength, control, speed and mobility. That’s three simple, five-minute workouts right there that very few advanced athletes could manage—trust me.


Gear Change Sets

Fancy a change? A workout new and fresh, free from the baggage of your long-term program? It’s a good idea to try novel exercises. It’s another cool idea to change your sets and reps. But how many athletes think about radically changing their speed? Or, how about changing your speed as much as possible…in a single set?

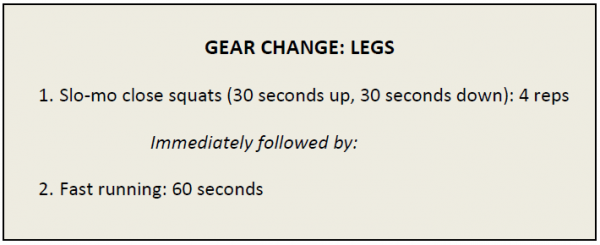
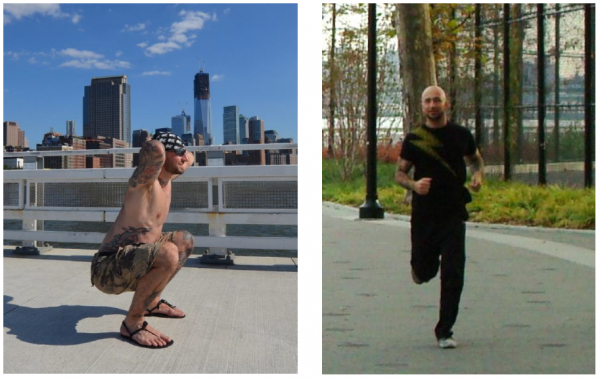
This is the basic idea behind Gear Change sets. You begin with a handful of slow-mo reps, and finish with a bunch of max speed reps. There are many ways you can approach this. A great one is to shoot for 4 slo-mo reps—that’s 30 seconds up, 30 seconds down—immediately followed by a minute’s worth of a very high-speed, explosive exercise for the same body-part. For example, after 4 slo-mo squats, I used to perform tuck jumps for a minute (if you are outside, a maximum speed run for 60 seconds is probably even better).

So here’s a potential Gear Change workout for the legs:

paul_pic8


paul_pic9

Ever combined slo-mo squats with running? Murder.

Pick the right movements for your ability, and you have an amazing five minute body-part workout right there. But for Christ’s sake, always start each slo-mo rep at the bottom—or you may find yourself doing a 30 second negative squat you cannot push up out of. Slo-mo reps are tough, so don’t try slo-mo with an exercise unless you can do at least twenty strict reps with it at regular speed.

The method works for any body-part. For midsection, you could follow 4 slo-mo leg raises with squat thrusts for 60 seconds. After slo-mo push-ups or pull-ups, you might apply a minute of intense bag work or shadow boxing. You get the idea.

This slow-to-fast method is an amazing way to train. Through the complete elimination of momentum, the slow moves are tougher than you imagine (until you try ‘em). They just seem to hit the muscles in a new way, activating deeper fibers we don’t reach by bouncing mindlessly through reps, like so many folks seem to do. Very slow reps also really teach your brain something about the movements you are using; leverage, joint tracking, movement angles, weight shift. Subtle qualities of bodyweight motion, easy to miss at regular speed, now scream at you. When you are done with them, your muscles feel totally numb—and asking them to switch to their highest gear is a true challenge.

The Gear Change set also replicates real life. There would have been times when our ancient ancestors had to move very slow with high tension—maybe dragging a carcass back to the cave—then they were forced to suddenly fight off a predator trying to steal their prize. Slow to fast. Survival today is no different; imagine a soldier in the desert carrying heavy weapons or equipment, suddenly having to run for cover in a firefight.

Don’t get me wrong. Gear Change sets (like the other ideas here) are not meant to form the basis of your long-term training program. But they sure are fun, effective and instructive once in a while.


The H.P.A.S. Protocol

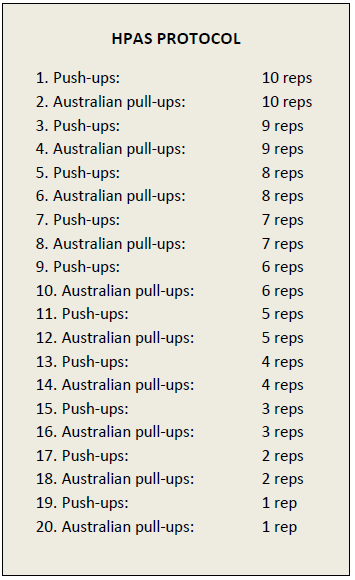
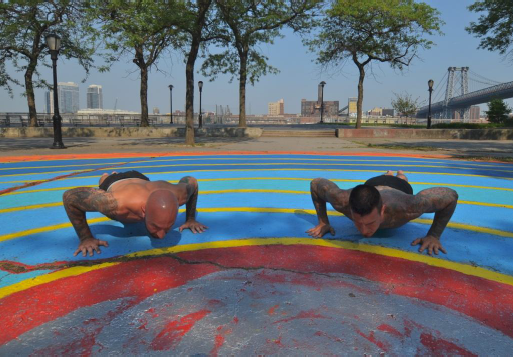
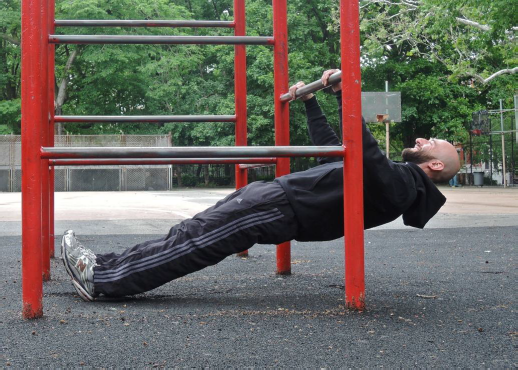
This is a beaut of a workout. I’m gonna call it HPAS, coz “Half Pyramid Antagonistic Super-sets” is too hard to say (at least for me). The premise—as always—is real straightforward. Pick two exercises for opposing muscle groups. Begin by doing each for 10 reps, then each for 9 reps, then 8 reps and so on, until you get down to one rep per set—and you do all this without stopping.

Here’s one potential workout:

paul_pic10

paul_pic11

paul_pic12

Few exercises go together better than regular push-ups and Aussie pull-ups.

Back to back antagonistic superset madness! On sale NOW!!

Can all this be done in five minutes?—if you use brisk reps with no pauses, yeah. But it’s not easy, and most folks will have to seriously build up to this. (There’s a good goal, huh? I’m looking at you, Jack.)

The HPAS Protocol is a perfect example of how short sessions can be both powerful and productive. Very popular in jails. If you can follow the above workout, you will have scorched every muscle in your upper bod, knocked out 20 sets, and got a helluva cardio workout, too.

This workout is proof that you don’t need to be in the gym for hours to make progress. In calisthenics—as in life—it’s quality that counts, not quantity. A hundred thousand rhinestones won’t make you rich, son; but a handful of diamonds sure will.


“The Century”

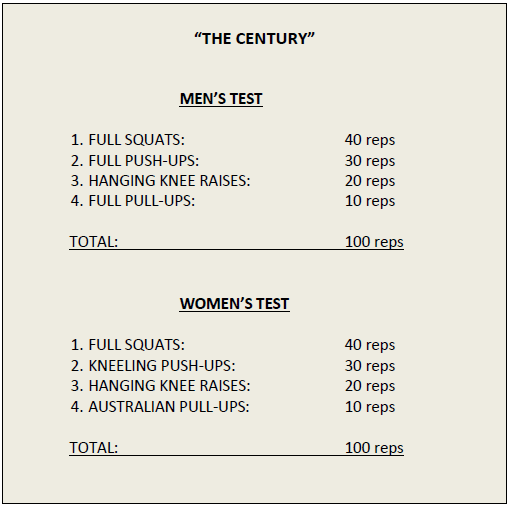
The Century is the rapidly-becoming-classic PCC certification test. It is designed to display technical ability in combination with an advanced level of conditioning, but it can also be a damn fine workout in its own right. In case you haven’t heard of The Century (where you been, dude? Under a rock?!), it’s so-called coz it features one-hundred nonstop reps in a single set:

paul_pic13

PCC-certified super-achievers will probably be sick of training for The Century, but it’s still a good staple to return to from time-to-time. Not only is it great to get back to the basics, but a hundred reps of the good stuff will leave your circulation and energetic system supercharged.

Beware though—if you want to crack this sucker in five minutes, you better have taken some Super Soldier Serum this week, kid. It can be done, though.


Al Kavadlo owns The Century in under 2 minutes 39 seconds.
Can you come close to that?


The Bridge

One final suggestion. You want the best five minute bodyweight workout money can buy? Hold a bridge for five minutes.

paul_pic14

I’m not kidding. The bridge has so many benefits, it’s crazy. It is the best bodyweight exercise in the world. A long hold will increase total-body strength and endurance—not just in the showy muscles, but in the vital deep tissues and tendons. It will increase flexibility, mobilize the ribcage, hip flexors and stomach wall, and disperse adhesions and calcifications in the shoulders. It bulletproofs the spine and lower back and drastically reduces knee pain. The inverse head position increases circulation to the noggin, releasing endorphins, inducing calm, and improving brain health. The bridge rocks.

I know what you’re thinking. Just one exercise? That’s an imbalanced workout, for sure! No way, José. In the real world, most eager athletes do so much for the front of their bodies—the showy pecs, biceps, abs and quads—that throwing a little extra meat to the under-loved posterior chain cannot hurt one bit.

Besides, the bridge is one of the all-time bodyweight classics, no different from pushups, squats or pull-ups. If you can’t hold a bridge for five minutes, there’s no way you can call yourself in great shape, no matter what else you can do.


Lights Out!

There you go—a killer series of five-minute summer training tactics, just for you.

So, what are your plans tonight, buttercup? What’s that? In a little while, you’re gonna eat, grab a shower, then head out for the evening?

Sounds great!

…before that, you’ve got five minutes to spare for old Coach, right?

My thanks go out to Al Kavadlo (PCC Lead Instructor) for generously contributing such cool pics to illustrate this article. This is not the first time Al has donated pics (and advice) for free to promote the bodyweight cause—thanks Al!

***

About Paul “Coach” Wade: Paul Wade is the author of five Convict Conditioning DVD/manual programs. Click here for more information about Paul Wade, and here for more information on Convict Conditioning DVD’s and books available for purchase from the publisher.

Filed Under: Progressive Calisthenics, Tutorial Tagged With: Al Kavadlo, bodyweight exercise, bridge, bridging, calisthenics, Century Test, Convict Conditioning, creating workouts, fitness, HPAS Protocol, Paul Wade, progressive calisthenics, S4 Method, short workouts, tutorial, workout

One Arm Bridge, Twists and the Valdez

April 30, 2013 By Logan Christopher 8 Comments

In my previous article I covered some advanced versions of the wrestler’s bridge exercise to build both more neck and spine strength, as well as dynamic flexibility.

Now its time to turn on the gymnastic bridge.

By itself the bridge requires a high degree of flexibility. The truth is when your flexibility is great, then holding the position isn’t too hard. It requires more strength when you don’t have the flexibility to do it, because you can’t quite get to lock out.

If you’re not there yet, keep at it. Make sure to read Convict Conditioning to build your bridge.

And what I want to cover here is an advanced variation not covered in that book, that takes your flexibility, and stability, to another level. Here is a short series of progressions you can do. The video shows each one and you can read more about them below.

One Arm Bridge Hold

Get into a gymnast bridge and lockout your arms. Shift your weight slightly to one side then raise up the other arm off the ground. Hold for time. If you can get a minute you’re doing great.

Work both sides equally. You can come down and rest between sets or shift back to two hands, then onto the other arm.

One Arm Bridge Twist

There are several versions of this move that just change it up slightly.

To start with get into you’re your one arm bridge. Rotate your torso towards that arm as you kick your opposite side leg over until you come to a position where you’re on all fours.

Note that your hand may need to twist on the ground as you turn.

After you get to all fours you can then rotate back.

Work to both sides. You’ll likely find one side is better than another. This is usually more because of flexibility than strength. Also notice that it requires an even greater degree of shoulder and wrist flexibility plus shoulder stability through an interesting plane of motion.

One Arm Bridge Twist from Sitting

Now we’re going to do the same thing starting from a sitting position. For description purposes I’ll describe this from the position of having the left hand on the ground.

Start with your left hand on the ground, pointing away from your body. Your left leg will be straight and your right leg bent and close to your body. Raise your hips up and onto that arm as you bridge over. Your hand has to do a 180 as you come into a bridge position. Once in position you can place your right hand on the ground.

Try coming up with the same or opposite arm back to a sitting position.

Valdez

This is a move from gymnastics that is usually reserved for women as they tend to have more flexibility. Still it can be worked up to, if you’re willing to put in the time.

This combines the previous exercise, the one arm bridge twist from sitting, with a kick over done in seamless fashion. In the beginning you may need to break it down into sequential steps and of course both should be solid before attempting to put them together. You actually begin kicking up with the leg even before your second arm touches the ground.

I’ve pulled this one off before, but not in many years. Without working on it recently, I haven’t quite got the flexibility and control required for it.

So if you’re ready for some more intense bridge work start working in this series. If you can do all this, just holding a bridge will never be a problem again.

***

About Logan Christopher: Logan Christopher has been called a physical culture renaissance man as he is accomplished in a wide range of strength skills from kettlebell juggling, performing strongman stunts, and bodyweight exercises. He is the author of numerous books including Secrets of the Handstand and The Master Keys to Strength & Fitness. In addition, he’s spent the last several years going deep into mental training to find out what it takes to really excel and tactics that can help people instantly improve their exercises. You can find out more about all this at www.LegendaryStrength.com.

Filed Under: Progressive Calisthenics, Tutorial Tagged With: advanced, bridge, calisthenics, Logan Christopher, One arm bridge, tutorial, twists, valdez, video

Advanced Bridging Variations

February 19, 2013 By Logan Christopher 24 Comments

As a kid I was always skinny. I mean very skinny. Entering high school I weighed less than 100 lbs. I played football there and lifted weights though I wasn’t really good at either.

The truth is I only really started seeing results in my strength and body when I got into bodyweight exercises about the end of school. After a year or two of consistent work in bodyweight training I ran across an old friend. His first statement to me:

“Wow! Your neck filled out.”

Guess what I had been doing? Various forms of bridging. Looking back I’ve been doing these exercises for about ten years now; and in this article I want to share with you some variations. If you’ve been doing Convict Conditioning for awhile you may be able to get started with these, because the truth is all these are more advanced than the basic holds.

Weighted Bridging

I started adding weight to my bridges because I was getting bored with long static holds. My best ever hold was ten minutes in a hands free wrestler’s bridge. I know I could have gone further but I didn’t want to. What can I say? I get bored easily and 10 minutes is about my maximum attention span.

I first did this with people, but I started using weight simply because I didn’t always have a person to sit or stand on me. In the beginning I’d pull over a light kettlebell and hold it. Then two kettlebells. Eventually I had to move inside a power rack as getting the weight into place proved harder than the hold.

I don’t recommend going this far for most people I just wanted to see how far I could take it and follow in line with guys like George Hackenschmidt who supported big weights in this position. If you work up to even a light weight you’ll probably have more than enough neck strength for your daily life, unless you’re involved in sports or martial arts.

To give you an idea of what can be achieved this video shows my current best hold. It’s a very brief support of over 600 lbs. split over the barbell and Bud Jeffries sitting on me. I plan to take this support to over half a ton in the future.

Neck Plank

As the wrestler’s bridge became too easy and I had to do something to make it harder, so the same was true of the front bridge. I experimented with adding weights but my favorite came from extending the leverage. For this you start in the front bridge position and walk your legs back while keeping your forehead on the ground. It’s like a plank position where only your forehead and toes are on the ground, with the stress being on your neck (and your abs as well to some degree) hence the name.

lchristopher2


Dynamic Bridging

The static holds are great and make up a large part of bridging. But they’re not the only things you can do.

The next couple exercises are dynamic in nature and thus train the body in a slightly different way. Both involve going from the front to back bridge position albeit in different ways. Check out this video to see both in action.

Bridge Kickovers

This move takes a good degree of strength, flexibility and acrobatic ability all at the same time. You must start in a wrestler’s bridge with the hands on the ground.

To get started I like to rock three times from my toes to chest, kicking with one leg hard, on the third go. The leg kicks up and over, then the other comes to follow it. You’ll land in a front bridge position although it’ll be far from perfect. From here you can kick one or both legs back to end in the wrestler’s bridge once again. When you’re first starting out one rep at a time is fine. When you get good you can go back and forth very quickly.

Only progress to the hands free version if you have lots of practice and are sure your neck can take it. It is significantly tougher to do. If you don’t quite make it over you may end up spinning and coming down in an awkward manner which you want to avoid.

Either of these variations can be made progressive by kicking off of a raised stable surface.

Bridge Twists

This final bridging exercise involves twisting from a back to a front bridge. This works every single muscle in your neck as you go to the sides, as well as some interesting spine action taking place.

This is great for improving your flexibility and is commonly done by wrestlers. As before, be sure to start with your hands and become great at that before moving to the hands-free position.

You’ll also find it easier if you stay more towards the back of your head.

That should give you some new variations to play with. Don’t try to do these all at once. In fact, I’ve found that a little bridging goes a long way. If you have any questions be sure to ask below. Also if you’d like to see me write more on gymnastic bridge variations (on top of these wrestler’s bridging exercises) for you to play with, then let me know.

—

Logan Christopher has been called a physical culture renaissance man as he is accomplished in a wide range of strength skills from kettlebell juggling, performing strongman stunts, and bodyweight exercises. He is the author of numerous books including Secrets of the Handstand and The Master Keys to Strength & Fitness. In addition, he’s spent the last several years going deep into mental training to find out what it takes to really excel and tactics that can help people instantly improve their exercises. You can find out more about all this at http://www.LegendaryStrength.com.


Filed Under: Progressive Calisthenics Tagged With: advanced, bridge, bridge progressions, Legendary Strength, Logan Christopher

Primary Sidebar

Featured Products

previous arrow
GetStrongBookCover
ConvictConditioningBookCover
StreetWorkoutBookCover
ExplosiveCalisthenicsBookCover
StrengthRulesBookCover
next arrow

Categories

Progressive Calisthenics Certification Logo
Click here for more information or to register for the PCC workshop

Get Strong Workouts TriadXP App
Get Strong Workouts App

Recent Posts

  • Top 5 Reasons Why an In-Person Workshop is the Best Way to Supercharge Your Training
  • HYBRID STRENGTH TRAINING IS HERE!
  • My Calisthenics Journey to the PCC
  • The Handstand Press: Complete Control Through the Handstand
  • The Get Strong App is Here!

Dragon Door Publications

Dragon Door Publications

Recent Comments

  • bross dandon on The Case for Curved Handstands
  • Johnny Flewellen Jr. on Strength for Life
  • Dan Earthquake on The Pursuit of the Daily Minimum
  • Johnny Flewellen Jr. on The Pursuit of the Daily Minimum
  • Johnny Flewellen Jr. on Yoga, Calisthenics and the Journey of a Lifetime
FOLLOW US ON TWITTER!

Copyright © 2025

Dragon Door Publications / The author(s) and publisher of this material are not responsible in any manner whatsoever for any injury that may occur through following the instructions or opinions contained in this material. The activities, physical and otherwise, described herein for informational purposes only, may be too strenuous or dangerous for some people, and the reader(s) should consult a physician before engaging in them.