• Skip to main content
  • Skip to primary sidebar
  • Home
  • Contributors
  • Resources
    • Q&A with Paul “Coach” Wade
  • Workshops
  • Products
  • Forums
  • Articles
  • Blogs
    • RKC Blog
    • Strong Medicine Blog
  • Archives

PCC Blog

Progressive Calisthenics - The Official Blog for the PCC Community

progressive calisthenics

PCC Australia – The Experience of The Century

March 25, 2014 By Darren Manser 26 Comments

Darren_ManserWhen I signed up for the first ever PCC Australia, I knew I had my work cut out for me. I didn’t find out about the event until fairly late,  so I only had 3 weeks to get ready for The Century.

The first time I attempted the test, I completed the 100 reps in 8 minutes and 50 seconds. Not bad. I’ll be able to shave those 50 seconds off in the next three weeks, I thought. I decided to send Andrew Read from Dragon Door Australia an email to make sure I was doing it right. Andrew responded to my email very quickly.

“100 repetitions need to be completed within 8 minutes.  Once you start the exercise you cannot stop until the desired reps are completed.  You must complete ALL ten chin ups in a row.”

Crap, Crap, Crap. I thought I was able to stop throughout the set.

Three weeks out my max rep chin ups was a whopping eight reps. And that was fresh, with no hanging knee raises before.  How the hell am I going to do 10 chin ups AFTER holding onto the bar to do 20 hanging knee raises–especially at the end of three days of attempting all sorts of new and interesting techniques?

I then stumbled across Coach Wade’s article about kicking ass in the Convict Conditioning certification. Ideally you need to do 50% more for each activity prior to the weekend.

How the hell was I going to do that? I decided I was just going to keep doing the Century. I’d stop all other training and simply practice the test.

In the beginning I did the century morning and night for two days straight.  What a stupid idea!  As a result of me being 105kg (231lbs), I’m way too heavy to jump into that much volume.  I was now way too sore and the PCC was getting way too close.

After a couple of days with no training, it was time to rethink the strategy and start again.

My new strategy was to do as much work as I possibly could whilst staying as fresh as I could so I decided to do ladder super-sets.  I combined the squats and the push-ups and then the hanging knee raises and the chin ups.  I based the ratios on what was coming up in the PCC.  It looked something like this:

Squat:      4, 8, 12, 16, 20

Push up:  3, 6,   9, 12, 15

Squat:      4, 8, 12, 16, 20

Push up:  3, 6,   9, 12, 15

Squat:      4, 8, 12, 16

Push up:  3, 6,   9, 12

Squat:      4, 8, 12

Push up:  3, 6,   9

This adds up to a total of 184 squats and 138 push ups.  All done with excellent form (at the time I thought I was doing a brilliant job, that was of course until I did the PCC and realized how you can polish every little technique to get more out of it).

The ladders for the hanging knee raises and the chin ups looked like this.

Knee Raises: 2, 4, 6, 8

Chin ups:       1, 2, 3, 4

Knee Raises: 2, 4, 6, 8

Chin ups:       1, 2, 3, 4

Knee Raises: 2, 4, 6

Chin ups:       1, 2, 3

Knee Raises: 2, 4

Chin ups:       1, 2

Knee Raises: 2

Chin ups:       1

Total hanging knee raises: 60 reps

Total chin ups: 30 reps

Ideally I would rest for a couple of minutes in between ladders, although sometimes the morning permitted this and sometimes it didn’t.  Oh yeah, I forgot to mention that I have 6 children and I also run my own Natural therapies business, as a Naturopath, Acupuncturist and Kinesiologist.  So between my sets I would lift up my 3 youngest children (Bodhi 4, Tyson 3 and Ruby 15 months) up onto the chin up bar, so they could hang.  Or I would hold their feet and they would do a handstand.

I would do the routine three or four mornings in a row and then have a rest day. I made a deal with myself that I wouldn’t test myself again with the chin ups before the weekend. I simply didn’t have enough time to recover from a training session like that.  I was however, hoping and praying that the adrenaline from the event and the other attendees cheering would help raise me over the bar.

Finally, it was off to Melbourne for me.

The Course was AMAZING.  On the first morning, the first thing we did was the hollow position.  We drilled this again and again.  Then we applied that position to almost everything that we did.  WOW!! It is totally amazing how much better a push up feels whilst doing this. I even feel my poor little abdominals now whilst push-upping.

Then onto the next exercise, then the next exercise.  Every single section we did across the weekend, I had a first.  There was not one activity that I didn’t improve on.

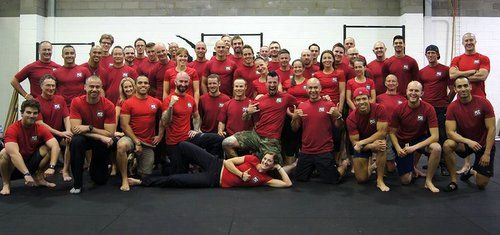
The weekend flew.  The generosity of both Al and Danny was definitely one of the highlights of both the course and my life.  The support from the other attendees was amazing.

Sunday afternoon we arrived at the Century test.  There were a lot of fine looking specimens in the room.  My heart rate was jacked.  My palms were sweaty.  How on earth was I going to hang onto the bar–let alone do the test?  I had a massive feeling of letting down Al and Danny if I couldn’t do it.  I also thought I was letting down my kids, particularly my boys.  (I want to be a good role model for them).

As I watched the other people do the Century I was inspired.  Some people were amazing.  Some people were only just getting through.  A couple of others were not making it.  Then for some reason I thought, “The best thing I can do is the best that I can do.”  If I hadn’t prepared enough then that’s my fault.

Finally it was my turn to test.  I decided to take it nice and easy.  I started with getting to 30 squats and decided to have a rest in the top position.  (Once you start the set you can’t move your feet with the squats, shift your hand and lift your bum in the push ups or let go of the bar with the hanging knee raises and the chin ups.  Although you are allowed to let go of the bar in between the hanging leg raises and the chin ups).  Then I did another 10 squats until Andrew, my counter, says, “You’re done with the squats.” This caught me off guard – for some reason I thought I had to do 50. No complaints here!

On to the push ups! I waited maybe 30 seconds to allow my heart rate to fall slightly and then started my set.  I moved to 15 reps.  I stopped in the top of the push up position, took  a few breaths, then did 5 more repetitions to make 20.  Then 10 singles from 20 to 30.  YES!!!! The push ups were now done.

From the push ups I moved straight across to the hanging knee raises.  I wanted to get them done as quickly as possible so that I could have a long recovery before the pull-ups. I’d been practicing hanging knee raises a lot in the last three weeks and I actually got through them easier than I expected. All that was left was the pull-ups!

I had a lot of time left on the clock, so I took full advantage of it. I shook out the tension in the arms as much as I possibly could. I caught my breath and let my heart rate slow down. Before I knew it I was down to one minute and it was time to start the pull-ups.

I positioned my hands on the bar and started my first few repetitions. When I made it to 6 repetitions, I remember thinking, “I can’t believe it, only four to go!”  I pulled really hard  again – now only three repetitions left.  Pulled hard again for number eight.  Two to go!!! By this time the other two people who were testing at the same time I was had already finished.  All the people were now cheering for me.  Pulled hard once more, and I only had one repetition to go.

An image of my 4 year old son pops in my head.  I decide that I’m going to do the last rep for him.  I yell out a massive “Come on” to psych myself up.  The crowd is cheering so loudly, Danny and Al both walk over and are standing in front of me, willing me to complete the last repetition.  Andrew, my counter, was cheering too.  I pulled as hard as I possibly could whilst only thinking about my son.  I must do it for him.  Somehow, some way I get over the bar.  Everyone cheers.  Al and Danny are both jumping up and down.  They come over to me and high-five me and give me a big hug.  I have tears in my eyes.  What the hell just happened?  How the hell did that happen?  What an amazing feeling.  I was then presented with my official instructor shirt and my certificates.  Then went outside and cried.  I did it!

So what did I learn from this process?

Ideally I should have been 15kg (30lbs) lighter.  This would have made all of the movements and the test a great deal easier.  More practice before the event would have been good, too.  Now that the course is over I am so motivated to incorporate this into my lifestyle, not just as a work out. I am really looking forward to what is possible.

The whole PCC course was amazing.  The presenters, Al Kavadlo and Danny Kavadlo were AMAZING with their knowledge and their time.  All in all this was THE best course I have ever done.  I would thoroughly recommend anyone to do this course.

I would like to say a massive thank you to John Du Cane, Paul Wade, Al Kavadlo, Danny Kavadlo and Andrew Read.  You have all changed my life in one way or another.  I love you all.
PCCAustraliaOfficial

Filed Under: Workshop Experiences Tagged With: Al Kavadlo, Andrew Read, Australia, bodyweight, calisthenics, Century Test, certification, Darren Manser, Dragon Door Australia, PCC, progressive calisthenics, Progressive Calisthenics Certification Workshop, workshop experience

The Missing Link to the One-Arm Push Up

February 18, 2014 By Todd Cambio 21 Comments

Al Kavadlo One Arm Push Ups

I love body weight exercises.  I think they should be the basis of any training program.  Body weight movements can be used for warming up, for cooling down, for flexibility and mobility.  Then, once you learn these movement patterns, they can be progressed to truly test one’s individual strength.  Things like pistol squats, pull-ups, handstand push-ups and one-arm push-ups are incredible exercises, which is one of the reasons I gravitated towards Convict Conditioning.   This book has been instrumental in bringing my skill set to the next level.  I use it to train myself as well as my clients.  It has helped me clearly structure a periodized workout plan for my clients with clear goals and progressions.

When I design my training programs, I train opposing muscles groups or movement patterns.  For every action – there is an equal and opposite reaction.  For example, we all know that the push up is a fantastic upper body strength exercise – but when overused, it can cause some issues.  The big muscle groups like the upper pectorals; shoulder and the internal rotators of the arm and shoulder can become shorter and tighter than the external rotators and scapula retractors.  This tightness can possibly cause a forward rounding posture and possible neck and shoulder injuries.  So to make sure I don’t cause these possible issues, I always have an opposite movement paired with the exercise, in this case, the body row.  This is my push/pull relationship method of training.

The body row is the sister exercise to the push up, however, it is much less utilized.  It also incorporates almost all the same muscle groups as the push up.  The exception is that the prime movers are the back of the body (posterior chain) as opposed to the front (anterior chain) of the body.  Most of the attention goes to the Pull Up as the ultimate body weight back exercise, which is of course an awesome exercise, but until my clients are strong enough to do them correctly, the Body Row rules the roost!

So, what is that missing link you may ask?  It’s the Body Row.  Actually, since we are talking about the One-Arm Push Up, it’s the One-Arm Body Row!

In fact, as I progress up the ten steps in Convict Conditioning Push Up Series, I progress up my own steps to a one-arm body row.

In Convict Conditioning, the horizontal pull is what I call a body row.  I use the Lebert Equalizers for my horizontal pulls because I can add some great variety to the pulls as well as bring them with me to where ever I want to train, inside or outside.  Always having a place to do a pull up is sometimes an issue.  So, if I am outside and want to add in some pulls, I can.

The Body Row is similar to Convict Conditioning’s Pull Up Series Step Two, but with a different tool.  Here is the point where I branch off from the Pull Up Series and add a few alternative steps with the Equalizers that translate to a better one-arm push up.

I will not go into great detail about each body row movement because I am sure if you are following Convict Conditioning, you get the main points on proper form.  I will point out the basics though, which are pretty straightforward.  When you get into your starting position with the Equalizers (EQ), dig your heels into the ground and fire your glutes to keep your hips locked and aligned.  Grab the black grips with a firm hold to fire the forearms.  Keep a neutral spine as you pull yourself off the ground.   When you progress to the single arm body rows, it is much like a single arm kettle bell swing in that your body will want to rotate on you.  Do your best to keep your shoulders parallel to the floor.  Your core will get quite a workout here too!

Convict Conditioning Push Up Steps with correlating Body Row Movements:

Step 4 – Half Body Row – Mirrors the Half Push Up (the ball under the glutes is to help cue you to keep your hips up)

Todd Cambio Half Body Row Todd Cambio Half Body Row

Step 5 – Full Body Row – Mirrors Full Push Up

Todd Cambio Half Body Row Todd Cambio Half Body Row

Step 6 –Single EQ Chin up – Mirrors Close Push Ups

Todd Cambio Half Body Row Todd Cambio Half Body Row

Step 7 –Single Leg EQ Body Row – Mirrors the Uneven Push Up

Todd Cambio Half Body Row Todd Cambio Half Body Row

Step 8 – One Arm Half EQ Body Row – Mirrors the One Arm Half Push Up

Todd Cambio Half Body Row Todd Cambio Half Body Row

Step 9 – One Arm EQ Body Row – Mirrors the One Arm Push Up

Todd Cambio Half Body Row Todd Cambio Half Body Row

So there you have it, a push/pull relationship that not only enhances your one-arm push up but also increase your overall body weight strength.

Todd M. Cambio, CSCS, HKC is the owner of Precision Fitness in Westerly, RI. He is a strength and conditioning coach that specializes in sports performance and obstacle course race training. Todd is a Certified Strength and Conditioning Specialist, a Spartan Group X Obstacle Course Coach, a published author and Master Body Weight Trainer & Presenter for Lebert Fitness. See what Todd is up to by visiting www.ToddCambio.com.

Filed Under: Progressive Calisthenics Tagged With: bodyweight row, Convict Conditioning, core strength, one-arm push-ups, progressive calisthenics, push-pull, Todd Cambio

Handstands Will Make You Better at Everything

February 4, 2014 By Mike Fitch 28 Comments

Mike Fitch Handstand

Yeah, it’s a bold statement, but hear me out. The mechanics of successfully performing a handstand will amp up all of your other exercise endeavors, making you stronger, more stable, and better coordinated, while the discipline required to master the move will make you a better human being overall. It will force you to take a long, hard look at the time you are willing to invest in reaching a specific goal.  It will also allow you to win money in a bar bet, steal the spotlight at any wedding and of course get the girl (or guy). Results may vary on the last three.
For thousands of years, athleticism has been demonstrated through feats of bodyweight strength and skill, with fit individuals judged not just by their bodies’ tone, but by how skillfully they could use their bodies.  Even in the golden age of bodybuilding, Arnie and the boys were known to challenge each other post workout with hand balancing and bodyweight strength contests.  We then saw a lull in these activities, with the popularization of the fixed-axis weight-lifting machine and single-plane isolation “robot training,”  but luckily for you and me (and the human race), the idea of skills practice and self-mastery is making its way back into fitness.

My favorite field, progressive bodyweight training, includes a multitude of exercises that are always sure to elicit an envious “I’ve always wanted to do that!”  Pistol squats, muscle-ups, human flags, HAND BALANCING – these moves are sure to catch the eye of any fitness enthusiast.  And the great thing is that any of these feats are possible to learn with the proper progression training, time commitment, and, most importantly, consistency.

Just as it takes a baby about 12 months of daily conditioning and practice to eventually stand on their own, it can take an adult months or years of repeated practice to build the neural grooves associated with a perfect handstand.  Are you willing to invest that kind of time?  I can guarantee that it will be one of the most humbling and gratifying journeys that you’ll experience.

While performing a great handstand is certainly a worthy goal unto itself, you’ll find that the skills you build in the process will transfer over into your other training, making you a better athlete and enhancing your quest toward a better body. Here are some examples of the tremendous carry-over you’ll see:

The Kinetic Chain

Let’s start with a simplified definition of the very complex concept of the kinetic chain: everything in our body is connected to everything else.   A handstand is a prime example of the connectivity of the kinetic chain, with each position, alignment, and movement requiring constant communication and neuromuscular efficiency in order to maintain that perfect balance. If just one thing changes during our hand balance, such as flexing our toes instead of extending them, then our body must immediately adjust to this new shift. 

Hand balancing is, obviously, performed on your hands, so that’s a great place to start thinking about how everything is connected.  Your fingers are some of the densest areas of nerve endings on the body, and have the best tactile feedback and positioning capability. Kicking up into your handstand initiates a sort of neuromuscular “super highway,” with all of those little finger receptors sending and receiving information throughout the body.  Your body’s communication must be perfectly orchestrated to keep you in balance, like a super effective emergency dispatcher taking calls, sending reinforcements, and keeping you safe (aka preventing you from crashing onto your head.)

The body has to adjust to the hand placement in relation to the shoulders; to the elbows being over the wrists but under the shoulders; and the hips, where are the hips in relation to the shoulders?; and it goes on.   So if we do this efficiently, and amp up our body’s abilities to communicate and make minute adjustments in a flash, you may already see how handstand training can benefit other athletic goals. But, I promised that handstands will make you better at everything, so let’s keep on going. 

Al Kavadlo Performs a Handstand

 Internal Tension

A tense body is a strong body.  Why is it so easy to balance a ruler or a bat vertically on your hand? Because the object is rigid, with no bends or “leaks.” Whether you are lifting your own body or grinding out a 1000 pound deadlift, the concept is the same – you need to create a rigid structure from which you can pull, push, lift or balance.  In Progressive Calisthenics, there is no room for any part of your body to lose connection or leak tension, and you learn very quickly about any leaks in your chain.  Mastering total body tension will not only accelerate your handstand training, but will be directly applicable to most of your other training as well.
 Grip Strength

In addition to “tense the whole body,” you’ll hear a lot of HB coaches tell you to “grip the ground.”   In our foot we have the luxury of a heel which plays a clever game of leverage to make walking and standing fairly easy tasks. Unfortunately, we don’t have the same advantage in our hands. So, the fingers must DIG into the ground, countering the body’s tendency to over balance (topple over), or let up to counter an underbalance.  It’s this constant battle between the finger extensors and flexors trading off between the rolls of agonist and antagonist that keeps us upright.   And along the way you’ll be conditioning for some brutal forearm strength.

Shoulder Stability

Few exercises can compare to a handstand for building shoulder stability. And let’s face it, nobody is going to be staring in amazement while you’re performing more band internal/external shoulder rotations.

 The shoulder – so incredible, so complex, and so commonly abused – can be an important source of power, but also a source of hidden weakness impacting your training in ways you don’t even realize.  Over repetition syndrome, poor form, and especially faulty postures can create imbalances that lead to injury or instability. But even if you don’t feel pain, if your body senses a weakness in the shoulder, it will automatically restrict the amount of power passing through that joint, and can actually dial down the surrounding muscle excitation.  I’m going to assume that everyone would rather be tapping into all of their strength for their efforts. As the saying goes, “you can’t shoot a cannon from a canoe.”

In Hand Balancing, the shoulder is the first line receiving all of that information from the sensors in the hands and forearm musculature, reacting to the head and hands below and the rest of the body above.  The muscles at the shoulder joint have to fire up like a synchronized light show to adjust to the constantly changing center of gravity over such a limited base of support, from the deeper muscles like Supraspinatus, Infraspinatus, Teres Minor, and Subscapularis (rotator cuff), to the bigger and more powerful Lats, Pecs, and Delts.  Even with the elbow completely locked, the heads of the Bicep and Triceps that cross the shoulder joint play a role in stabilizing the shoulder.  And that’s not even mentioning the other muscles that keep your Scapula strapped to your back.

 Simply put, handstands will make you stronger through increased activation and stabilization.

Free Standing Handstand

Spinal Stabilization

Handstands require not just spinal, or core, stabilization, but true multi-planar stabilization involving inversion of the body.

 Now, I realize there are many views on spinal stabilization and some debate over its efficacy and “functional” carryover to life or sport  (“You have to draw in to activate TVA!”  “No, bracing is the only way!”  “Let’s fight!”).  But we can probably all agree that the surrounding musculature of the spine (ie the core) needs to be able to properly stabilize to protect the spinal cord, and that the spine needs to be able to fight gravity’s constant pull, distributing the load while generating force and, more importantly, accepting external forces (whether that’s gravity, or a linebacker). It flexes, extends, rotates, laterally flexes and in the case of the handstand, stays perfectly still, and STABLE. 

When we are upright, we know that the core musculature should be firing to allow for gait pattern as in walking or running, or bending over to snatch up a kettlebell. But get inverted and everything changes.  The anchor or base is now the shoulder girdle, sitting on top of those mechanically disadvantaged hands. So now the spinal stabilizers have to figure out how to balance the pelvis over the shoulders, with the big legs riding on top.  This is true multi-planar stabilization! In a hand balance, all of the spine’s muscular units have to play their part to keep the spine in perfect alignment – i.e. spinal stabilization.
GETTING STARTED: TUTORIAL

I am constantly asked, “What’s the key to learning handstands?”  And there is a clear answer:  “To get good at handstands, you practice handstands.”   There is no other weighted exercise that will make you better at handstands – you just need to put in the time to practice the handstand-specific progressions and conditioning exercises. It IS skill specific training.

So here’s the part where you get to see what you’re made of.  Are you willing to put the time in to taking this challenge on? Are you ready to approach it with discipline, practicing often, even daily if necessary? You are no longer trying to merely increase your reps;  now you are working to improve yourself, master difficult skills, and achieve long-term goals.

I can tell you from my own experience that the handstand can be an allusive opponent.  I first learned an arch-back style handstand, which is common for most beginners, before I was challenged by a gymnast friend to learn the flat back style.  That process of re-educating took months! It was probably a year before I could easily switch between the two, along with other body positions, and stay up for multiple minutes. I learn more about Hand Balancing every single day and am humbled by it constantly.  I’m certainly a lot better now than I was a few years ago, and I definitely have more goals yet to reach.  It’s clear to me that it’s a life-long practice.  There’s no turning back now.

 Intro to Handstand Conditioning: The Wall-Assisted Handstand

Begin your handstand training with the simple Wall Assisted Handstand.  It may seem like the most basic conditioning exercise, but remember, a baby has to crawl before he could stand. The exercise itself is as simple as it sounds, but I have some tips to help make it wildly successful for you:

  1. First of all, you should have your front, not your back, facing the wall.  Otherwise you’re automatically training in an arch back handstand.  While the arch back is a legitimate handstand in itself, the mechanics are different and you may not get the same benefits I mentioned earlier.

  2. Follow these steps to get yourself safely into place:   Start by facing away from the wall. Bend forward and place your hands on the ground at roughly shoulder width.  Place your feet on the wall and walk them up until the body is elongated.  Walk your hands towards the wall until they are about 6 inches or so away from the wall (this may vary – just find a distance that feels comfortable psychologically).  The toes should be pointed with the top of the foot flat on the wall.

  3. Once in position, SET the body:  Grip the ground with your fingertips.  Lock the elbows completely, driving down into ground, creating as much space as possible between your toes and the ground.  When you successfully fire the traps, the space between your ears and shoulders will close.  Squeeze the glutes and quads, and draw in or brace the abdominal wall. Make sure not to hinge at the hips.

  4. Don’t forget to breathe!

  5. Time yourself to see how long you can hold this perfectly tensed handstand.  Your goal is to first work up to one minute, then two. Once you can hold for two minutes, begin bringing your hands closer and closer to the wall.

  6. And here’s an important Bonus Tip:   If you’re not used to twisting or summersaulting out of a handstand, be sure to leave enough strength to get back DOWN the wall!

Wall Walking Handstand

Expect to be humbled by this isometric conditioning.  But keep up with your handstand practice, and it will absolutely fast track your way to being better at EVERYTHING!

For more information on Hand Balancing, check out our new 5-part video series, Hand Balancing for the Bodyweight Athlete, available as downloads or on DVD.

Mike Fitch is the Founder/President of Global Bodyweight Training, a fitness company providing training, education, and promotion of bodyweight training disciplines, as well as creator of the popular Animal Flow program. Mike’s current interests lie in exploring how bodyweight training disciplines can be integrated with skills-based practices, and multi-planar, fluid movement. He’s been featured in Men’s Health, Shape, and Fitness Magazine, as well as on The Doctor’s, Good Morning America, and LIVE with Kelly and Michael.

Filed Under: Progressive Calisthenics Tagged With: carryover, coordination, hand balancing, handstands, Mike Fitch, progressive calisthenics, skill training, strength training

The Top Ten PCC Blog Posts of 2013

December 31, 2013 By Al Kavadlo 8 Comments

Al_deep_squat

The Progressive Calisthenics Certification made its mark on the fitness world in 2013 and I am very excited to have been a part of it. It’s almost hard to believe that this blog has been up and running for an entire year, yet on the other hand, it’s amazing to think that in such a small amount of time, the PCC has already grown into an international phenomenon. Next year, we will be holding PCC workshops in a half dozen different countries!

I am proud of every one of the nearly 50 posts we shared this year on the PCC blog, so it was hard to assemble this list. With that in mind, let’s take a look back at my top ten PCC blog posts of 2013 (in no particular order):

We’ll start with the most popular post this blog has ever seen, Paul Wade’s Ten Commandments of Calisthenics Mass.

And let’s not forget my counterpoint to that piece: Building Strength Without Mass.

My brother and fellow PCC Master Instructor Danny Kavadlo shared his personal experiences with Bodyweight Training.

PCC Team Leader Adrienne Harvey gave us her unique perspective on PCC Sweden.

A fantastic motivational piece from Dragon Door Founder and CEO John Du Cane on How to Be Successful at Anything.

Another classic post from Coach Wade, this time discussing the Tao of PCC.

PCC Team Leader Logan Christopher made a case for Curved Handstands.

PCC Senior Instructor Steven Low gave us this great piece on the Marriage of Bodyweight Methods.

PCC Team Leader Angelo Gala shared his Journey to the Back Lever.

And last but not least, this touching father and son calisthenics story from Peter D’Epiro.

Thanks to all of you who read this blog and support the PCC movement! I can’t wait to see what next year has in store for the PCC and the entire bodyweight strength training community.

We’re Working Out!

Al

Al_one_hand

***

About Al Kavadlo: Al Kavadlo is the lead instructor for Dragon Door’s Progressive Calisthenics Certification. Recognized worldwide for his amazing bodyweight feats of strength as well as his unique coaching style, Al is the author of three books, including Raising The Bar: The Definitive Guide to Pull-up Bar Calisthenics and Pushing The Limits! Total Body Strength With No Equipment. Read more about Al on his website: www.AlKavadlo.com.


Filed Under: Progressive Calisthenics Tagged With: Adrienne Harvey, Al Kavadlo, Danny Kavadlo, John Du Cane, Logan Christopher, Paul Wade, PCC, Peter D'Epiro, progressive calisthenics, Steven Low, top ten of 2013

I Am Not A Gymnast

September 17, 2013 By Al Kavadlo 23 Comments

When people see me performing bodyweight feats of strength like freestanding handstand push-ups or the front lever, they often ask a familiar question:

“Are you a gymnast?”

I don’t blame them for the misunderstanding – gymnastics is the only context most people have for what they’ve witnessed. However, there is so much more to the world of bodyweight training than gymnastics!

Though I’ve never been one to dwell too heavily on labels, I am most certainly not a gymnast. I am a fitness enthusiast who specializes in Progressive Calisthenics. To the casual observer, this may seem like a minor distinction. Allow me to elaborate.

Gymnasts participate in formal gymnastics, a highly-specific, competitive sport involving strict rules and guidelines. I participate in Progressive Calisthenics, an open-ended, individualized fitness modality centered around the concept that one’s own body weight (and the proper manipulation of leverage) can provide ample resistance for strength training, regardless of one’s current fitness level.

Of course the two things do have something major in common: Both can get you in the best shape of your life without the need for weights or very much equipment.

al_Straddle planche

The mindset is probably the biggest difference: I train to be strong, robust and healthy. I train to make day-to-day physical tasks easier. I train for enjoyment. Gymnasts train to win – oftentimes at the expense of their health and fitness.

Competitive athletics are funny like that. Professional athletes are the fittest people in the world, but they are frequently forced to train through injuries. Many wind up pushing their bodies beyond what they can safely handle. The irony is that these people may get to be the best in the world for a brief, shining moment, but will often suffer for it later. The higher the high, the lower the low.

I prefer to take the middle ground. If I feel pain, I back off. If I need rest, I take it. By using this approach, I’ve managed to avoid any serious injuries or major setbacks in my training, despite over twenty years of strength work.

I have tremendous respect for the sport of gymnastics. Pro gymnasts are some of the strongest people on the planet. Their tenacity and dedication to their sport is second to none. My most impressive moves like muscle-ups and back levers are considered entry-level skills in gymnastics the same way that push-ups and squats are entry level moves in calisthenics training. A pro gymnast’s warm-up is more grueling than some of my workouts.

AlKavadlo-backlever

These athletes provide inspiration and motivate me to continually challenge myself, but I have no interest in being a gymnast. I train for fun and function. My only competition is within myself. The joy of movement matters more to me than whether or not my toes are perfectly pointed.

Progressive Calisthenics and gymnastics are two different things, each with their own set of pros and cons. If you want to learn the sport of gymnastics, there are people way more qualified to teach it to you than I am.

PCC is for exercise enthusiasts and fitness professionals who want to utilize bodyweight training to get stronger, feel better and move more freely. At PCC, we focus on how to progress and regress universal movement patterns for everyday people. We encourage fun over formality; presence over perfection.

Regardless of what you choose to call it, bodyweight strength training offers something for everyone. Whether you do gymnastics, calisthenics or any other bodyweight-strength modality, we are all more alike than we are different, and we all share one thing in common:  The need to challenge ourselves and test our physical potential.

al_not_gymnast2

With the right amount of effort, it’s amazing what the human body can achieve.

***

About Al Kavadlo: Al Kavadlo is the lead instructor for Dragon Door’s Progressive Calisthenics Certification. Recognized worldwide for his amazing bodyweight feats of strength as well as his unique coaching style, Al is the author of three books, including Raising The Bar: The Definitive Guide to Pull-up Bar Calisthenics and Pushing The Limits! Total Body Strength With No Equipment. Read lots more about Al on his website:www.AlKavadlo.com.

Filed Under: Motivation and Goals Tagged With: Al Kavadlo, bodyweight exercise, injury prevention, PCC, physical culture, planche, progressive calisthenics

10 Hot Bodyweight Exercises You Should Be Training

September 10, 2013 By Alex Zinchenko 39 Comments

Alex1Ok, so you got serious about this “progressive calisthenics” thing. And now your head explodes from endless dilemmas: should you train this or that? What’s better: the planche or the one-arm push-up? Should you be working on one-arm chin-up or front lever pull-ups? Possibilities are limitless while our resources are definitely limited. You can’t think “screw it”, and train with every technique at once. You must choose something if you want to make any meaningful progress. So what should you choose? Let me give you 10 hot calisthenics exercises you should spend time training (in no particular order).

1. Handstand

If you don’t train this exercise you are missing out big time. This would be my number one priority. Why the handstand? Well, if you can stand on your legs, shouldn’t you be able to stand on hands? Not convinced? Ok, then here is what I can tell you from experience. The handstand develops your upper body like nothing else. There’s simply no substitution. It makes your shoulders and arms more stable and robust. You’ll definitely feel the newly gained strength and stability in all other pushing movements. For example, all my training clients benefited from implementing handstand training into their routines and increased their pushing numbers (some of them had a 20% increase, which is great, in my opinion). Anyway, no matter what your goal, you should strive to learn the handstand as soon as possible. And, of course, it looks awesome. If you are struggling to learn the skill here are 10 tips that will help you.

Alex2

2. Handstand Push-Ups

I differentiate handstand push-ups into two types:

  • Wall-Assisted Handstand Push-Ups [WA HSPU]
  • Free-Standing Handstand Push-Ups [FS HSPU]

They are two quite different things. When we are talking about WA HSPUs we are talking about an almost purely strength move. Balance is not an issue here, while FS HSPUs will require decent balance and stability as well as proficiency in the handstand. No matter what you prefer, it is good idea to train both. Once you get good at them you can increase difficulty in one of these ways:

  • Increase range of motion;
  • Add a weighted vest;
  • Move to one arm work.

Ideally, you should end with weighted full ROM one-arm handstand push-up.

3. Chin-Ups/Pull-Ups/One-Arm Chin-Up

Alex3

Everybody knows these exercises. You can call them whatever you want, but you can’t deny the fact that chin-up is one of the best lat and biceps builders known to man (if not the best). It is an essential pulling movement pattern and it should be practiced a lot. I won’t get deep into details here, but for the regular chin-ups your main technique points are:

  • Back should be arched
  • Shoulder blades together
  • Chin up until chest touches the bar

Also it would be a good idea to practice chin-ups on different apparatus. Do them on bars, monkey bars, rings, towels etc. This will add spice to your training.

Another interesting thought would be to perform them every day (of course, assuming you can do at least 10-12). Try doing 30-50 Chin-Ups total (in as many sets as needed) every day for the next 3-4 weeks and you can be amazed with your new set of guns and barn door back.

When you are able to perform at least 15 chin-ups it will be a good time to slowly introduce one-arm chin-up work. My main tip would be to get into it very slowly. You don’t want to experience intolerable elbow pain, right? Anyway, I believe that the one-arm chin-up is definitely an exercise you need to master someday.

4. Pistol

You can’t ignore your leg training unless you desire that set of toothpicks you can often see in commercial gyms. There is an exercise that can help you not to look that stupid. It is one-legged squat a.k.a. the “pistol”. You know that it works your legs from all angles and pretty well. But there’s a problem with the pistol. Once you can do 10 reps in the exercise it becomes more endurance oriented rather than strength. What to do in such situation? The simplest solution is to add weight. A weighted vest should be ideal. If you don’t have one then you can use a backpack. Here’s the article on how to do it. Also you can use kettlebells, a sandbag, or a barbell. If you have nothing you can grab a stranger (girl, preferably) and put him/her on your shoulders for added resistance.

But what to do if you have nothing at hand, there are no people around and you feel unstoppable urge to train your legs? You can combine pistols with jumps. Try to jump onto a platform from the bottom of the pistol position. Or you can try broad jumps in pistol position. Use your imagination.

5. Planche/Planche Push-Ups

The planche is another awesome gymnastic position/move you can effectively implement in your training routine. Is it essential? Probably not. But it is a very good test of your straight arm scapular strength. It works your delts, upper chest, lats and biceps quite decently. Also it’s a staggering sight to see a human being holding their body parallel to the ground on straight hands.

Here are a couple of tips:

  • Most people don’t have the necessary flexibility in the wrists so it will be a good idea to turn your hands a bit sideways.
  • Always perform this skill with your elbows locked. Otherwise, it is not a planche.
  • Don’t overdo it. If you want to train it more than two times per week don’t go even close to failure. Otherwise, you’ll feel very annoying pain in your forearms.

Once you master the specific planche position it is good idea to try push-ups in it. For example, once you can hold an advanced tuck planche for at least 10 seconds you can try to add push-ups in this position.

6. Front Lever

Alex4

The front lever is another useful skill in our arsenal. It works arms and back while torching your core. Many people think that it is easy. Obviously, they are fooling themselves. You’ll need lots of time to master the skill especially if you are 80+ kg and tall.

Again, as with the planche you want to keep your elbows locked. And also you don’t want to overdo it for the same reasons.

A good tip for mastering the front lever is to use a “false grip” while performing it. More on this later in the article.

7. Human Flag

Everybody loves the human flag. It’s a core killer as well as test of upper body strength and stability. There are lots of tutorials on the human flag out there. What can I add? Here are couple of thoughts:

  • Don’t start training the human flag before the handstand is mastered.
  • Learn the human flag on Swedish bars first (or use some kind of ladder). Then move to pole version.

8. Push-Ups/One-Arm Push-Up

What’s so hot about push-ups? Not much. Purely the fact that they lead to the one-arm push-up. And the one-armer is hot by any stretch of the imagination.

Alex5

A lot can be said about this move but I’ll concentrate on technique points. For me a one-arm push-up “counts” only if:

  1. feet are not wider shoulder width;
  2. shoulders are parallel to the ground;
  3. body is perfectly straight looking from the side;
  4. twist of the body is MINIMAL looking from the top.

You may ask: “is it even possible?” Yes, it is. But it will require lots of patience and hard work to achieve. Maybe even more than any other complex bodyweight skill. If you need some more inspiration here you can find 10 tips for mastering the Perfect One-Arm Push-Up.

9. Back Lever

Alex6

The back lever is not a very hard skill but it is essential for learning the planche. Also there are lots of other skills that use this position so it will be smart to spend some time learning it. The most important thing I’d like to share with you is what to do when the back lever is mastered. The most basic thing you can do is to learn Back lever pull outs. You get into the inverted hang position, then lower down into the back lever position, hold it for a second and pull yourself back into inverted hang. Repeat for desired amount of reps.

 10. Muscle-Up

I can’t leave this article without mentioning the muscle-up. You can hear or read different things about this skill. Some people say that it is essential and you should master it as soon as possible. Others (usually brainwashed with modern bodybuilding) argue saying that it’s useless because you combine pulling and pushing. They state that you can’t load the pulling and pushing pattern as much as you could if you split them.

Nevertheless, I believe that muscle-up is one of the skills you must learn. And I’m talking about controlled muscle-up here, not the kipping one.

There are two points I’d like you to concentrate on:

  • Use a “false grip”—with the thumbs over the bar, rather than wrapped around it. Watch some videos on YouTube on this subject. One exercise that will help you here is false grip chin-ups.
  • The main struggle is the transition part. There are three exercises that will help: Russian dips, chest-over-bar pull-ups (pull yourself very high) and muscle-up negatives.

It’s beyond the scope of this article to explain these exercises in detail, but if you want me to explain them just leave a comment and I’ll try to make it happen.

Another interesting thing about the muscle-up is that ring muscle-ups are actually easier than bar muscle-ups. Why? Due to the fact that you can pull the rings to sides during the transition phase.

Closing Thoughts

Of course, you’ll need much more than this article to create a reasonable program. My goal was to show you what exercises would develop your body and what you should focus on while programming your training. What now? You must absorb the knowledge and use it. Thanks for reading.

If you have a fitness-obsessed friend, you can do a good thing and share this article with him or her.

Play rough!

Alex Zinchenko

P.S. If you have any thoughts regarding the topic, let’s chat in comments.

***

It is a pleasure for the PCC to present Alex Zinchenko—the Ukraine’s hottest personal trainer! Alex is a strength addict, coach and author of the Rough Strength blog, where he shares his crazy ideas regarding training and nutrition. He is honest as toothache, straightforward like a train and dares to believe that heavy calisthenics, kettlebell and sandbag training along with intermittent fasting can deliver you all the results you want.


Filed Under: Progressive Calisthenics Tagged With: Alex Zinchenko, back lever, bodyweight exercise, calisthenics, front lever, handstand, human flag, muscle up, outdoor training, PCC, pistol, planche, progressive calisthenics, pull-ups

My Journey to the Back Lever

August 13, 2013 By Angelo Gala 10 Comments

Photo1
It frequently catches me off guard when budding fitness enthusiasts ask me to teach them flashy drills such as kettlebell juggling, physio-ball air squats and kipping butterfly pull-ups. Sure these exercises may look impressive, however each complex movement pattern requires a level of physical competency and advanced coordination that isn’t just given away. All too often, these requests come from the same people who struggle with executing ten standard push-ups. Very rarely do people care about the benefits provided, they’re simply romanced by the “fun factor.” Demonstrate to the same person a back lever and you may see a pair of glazed eyes appreciating the skill, but not quite aware of the work required to get there.

If you are unfamiliar with the back lever, picture hanging from a pull-up bar, pulling your feet all the way to the bar, then sliding them in between your hands and rotating backwards until your chest is parallel to the floor below. The back lever finishes with a hip and knee extension that suspends your body into a plank formation while hanging from your hands. Sound fun? I thought so! But it can also do wonders for your strength, mobility and proprioception.

Working through the progressions will open up your shoulders, stretch your chest and strengthen the supporting musculature of your scapulae like no other. Once you are mobile enough to rotate your chest to parallel, the real core training begins. The back lever will simultaneously develop unbelievable amounts of strength and stability on both sides of your body. You can say goodbye to those weighted back extensions since this version of the lever will hit both your lower back and upper back musculature all while developing the awareness to align your spine in vertical, inverted and horizontal positions.

I was lucky enough to have some decent shoulder mobility and a very supportive baseline of strength when I began training this calisthenic. Here is the progression that worked for me:

Static Hang:
Starting from absolute scratch, you should develop the hand strength to hang from a pull-up bar for 30-60 seconds. If you can’t hang for that long, trying to support yourself as you flip upside down isn’t a great idea. You can practice hanging from both hands and eventually one hand at a time to develop your grip strength evenly on both sides.

Hanging Leg Raise (HLR):
To execute this requisite core exercise, pull down on the pull-up bar with both hands while simultaneously lifting your legs as straight as possible up toward the bar. Shoot for at least ten reps before you move on from here.

Skin the Cat / German Hang:
After developing strength from the HLR, it’s time to wiggle your feet in-between your hands and rotate backwards until you can look straight ahead. The finish position, known as the German hang, should look similar to your hanging start position with your legs dropping towards the ground, except your arms will be stretched behind your body. Initially you may find that you do not have the shoulder mobility to come around full circle or the fear factor may be just too great – that’s ok! Try performing a few rotations at a time, gradually increasing the amount of rotation on each attempt. Static holds in your deepest expression of the exercise as well as dynamic repetitions of the move will help loosen up tight muscles. Be sure to keep your shoulders active (squeeze the shoulder blades together and down towards your bum) as it will keep your arms attached to your body. Trust me, this is a good thing.

Photo2
Here we see a German hang and a standard bar hang side by side.

Tuck Back Lever:
Using the skin the cat technique, roll through your arms attempting to align your chest to parallel with the ground. After you pull through, tuck your knees tightly to your chest and lift your upper back to spot the ground ahead of your body. Your target here is to work up to a 20-30 second hold before you move on. Progressing your tuck lever is as simple as pushing your upper thighs away from your chest in an attempt to align your knees under your hips. Understand that this will increase the difficulty of the move exponentially. If aligning your knees under your hips feels sketchy and unmanageable, then slowly pull your knees only a few inches from the tuck position at a time. Be patient and work up to thirty second holds a few inches at a time.

Congratulations!  You are well on your way to getting the move under your belt and by now I’m sure that many people have stopped to stare at the insanity of your acrobatics!

Photo3
Single Leg Tuck Back Lever:
Once you can hold a tuck position with your knees stacked directly under your hips, you can alternate extending one leg at a time. In the beginning, it’s perfectly alright to send one leg back with the knee significantly bent. Soon enough you will be able to lock out your leg in its entirety. Keep in mind that your legs hold a significant chunk of your body weight so move slow or you might find yourself unexpectedly falling into a German hang. Don’t forget to work both sides evenly as preventing imbalance should be a goal in any fitness program. Thirty seconds per leg should be your target range of proficiency here as well.

Photo4
Full Back Lever:
We made it! It’s time to work on the full expression! Using leverage to your advantage will be the key to your success when practicing the full back lever. To execute, skin your cat until you can align your torso to about 45 degrees with your head angled towards the ground. From here, keep your knees tucked and begin to extend your hips. Once you feel stable, slowly straighten your knees until your body is fully extended into one long line angled roughly forty-five degrees from the ground. Keep your entire body as tight as possible. If you can hang here without too much issue, lift your chest to help drop your hips, moving your body position closer to parallel to the floor. The more parallel you become, the more you will feel gravity’s pull and the harder you will have to work.

All in all, I learned the progressions to this move and bagged it after almost exactly one month of work. I can’t promise the same rate of success as everyone’s starting strength and mobility will be different. As for programming, I practiced my back lever progressions three or four days a week. At least two workouts were specifically geared towards building volume in the different tuck positions with a target of three to seven attempts per workout. I worked up to owning each position for thirty seconds but started many of the holds with barely the ability to tolerate ten seconds. Other days I would skin the cat as a dynamic warm-up or finish my workouts with several sets in the German hang position so I consistently worked on improving requisite shoulder mobility and got comfortable going upside down. Keep practicing and be patient. Continued exposure to the demands of the back lever will get you there as soon as your body is ready for it

Give this a go, good luck and keep me posted on your progress!

Photo5

***

About Angelo Gala, RKC / PCC Team Leader: Angelo Gala has been a fitness professional in the Boston area for greater than 11 years. He is a Certified Strength and Conditioning Specialist through the NCSA, and has studied the Pranavayu system of yoga under David Magone.  He is a Dharma friend at the Sakya Center of Buddhist Studies in Cambridge, MA where he completed a 1 year intensive study of Mangalam Yantra Yoga under the guidance of Lama Migmar Tseten. Go to http://www.dragondoor.com/angelo-gala/ for more info.

Filed Under: Progressive Calisthenics, Tutorial Tagged With: Angelo Gala, back lever, bar lever, calisthenics, instructor, journey, PCC, progressive calisthenics, shoulder mobility, tutorial, yoga

Five for 5

May 28, 2013 By Paul "Coach" Wade 46 Comments

Summer is knocking at the door, boys and girls. (Allegedly.) Everyone is outside, hanging out in the golden rays, whiling their hours away in sun-soaked fun and romantic adventure. (Allegedly.) Summer lovin’. It’s like a scene from Grease, I tells ya. And why the hell not? A spell in the sunshine promotes Vitamin D synthesis, improves mood, and boosts immunity. It may even increase lean tissue-building testosterone levels. (Allegedly.)

Seriously, there are some times you want to lock yourself away in your cell and perform hours and hours of calisthenics—and there are times you definitely don’t. There are times you want to get a quick, productive workout under your belt, so you can go out and enjoy life instead. For a lotta folks, summer is one of those times.

My hands are up, officer; I’ve been guilty of long, draining, excessive workouts throughout my career. But I have also experimented with very brief, efficient, training sessions—and I want to share a few of the tactics I’ve personally used for super-short workouts. Specifically, I’m gonna give you five types of session that will keep your motivation high, keep you strong, flexible and tough—and all for the temporal investment of a mere five minutes. (Yeah, you read that right. Five minutes.)

I want you crazy kids to enjoy summer. Think you can’t get a viable training session done in five minutes? Read on, Macduff.


The S4 Method

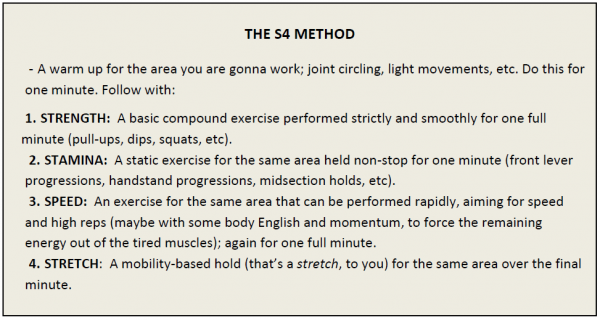
This right here is my personal favorite strategy for a quick, effective workout. It’s simple, too—provided you can view a clock or wristwatch. For any movement or body-part, you warm up, then perform: a minute of a strict bodyweight strength exercise; a 60 second muscular hold for stamina and control; a minute of a fast calisthenics exercise; and a final stretch. (Strength, Stamina, Speed and Stretch—four “S” qualities. S4, get it?)

So the method looks like this:

paul_pic1

How quick and simple is that? You just knock out each of these for one full minute. Non-stop activity, with no rest in-between exercises. That’s it!

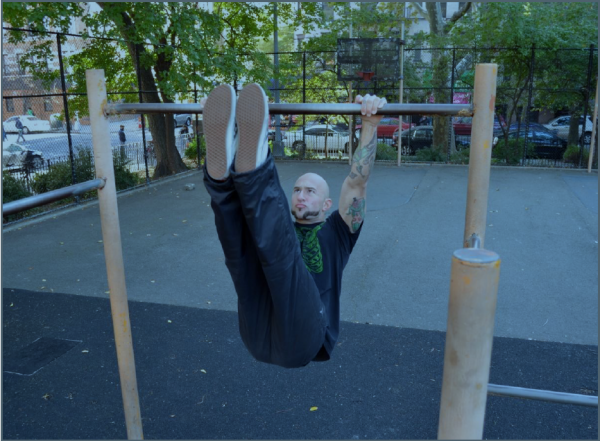
If you think this is not effective, I challenge you to try it. Here’s how it might work for midsection. You warm up for a minute with some abdominal tension, leg swings and hip rolling; then—eye on the clock—jump up and grab the overhead bar. For sixty seconds you grind out slow, smooth, perfect leg raises. (Ten reps is about right, champ.)

paul_pic2

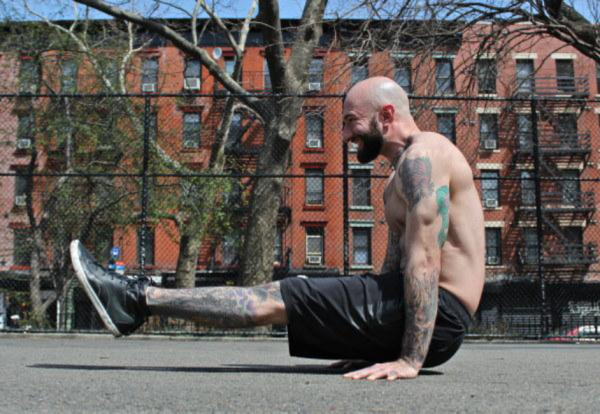
By now, you are grimacing—but you still got some life in ya, right? So drop to the floor and press out into an L-hold—now stay there for sixty seconds.

paul_pic3

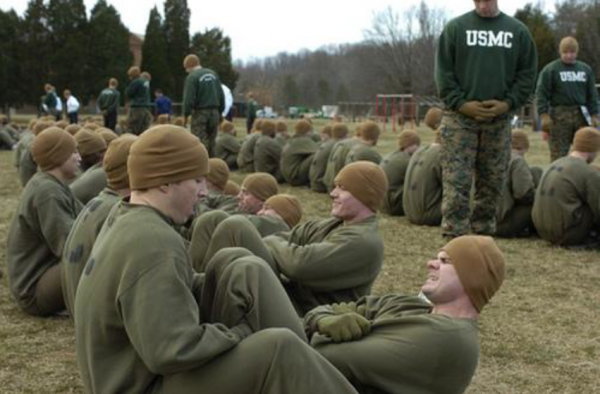
By the end of this (if you manage it) your legs will be trembling, and your gut will be in agony. But the show ain’t over, bud. Hook your feet under something; you have one minute to pump out as many bent-leg sit-ups as you can stomach. (Pun intended.) You are going for speed—military style.

paul_pic4

 USCMC image (LCpl Esteban Gallegos)

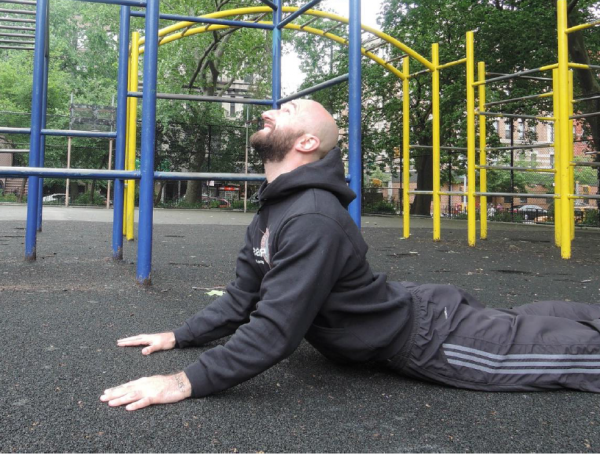
By now your midsection is spent, and you will be pretty much snapping up using everything you have. The minute—which will seem endless—finishes, somehow. Your body just wants to curl up in pain right now, but I want you to do the opposite—roll onto your stomach and straighten your arms, pushing up into a cobra stretch.

paul_pic5

This hold is a strange mix of relaxing—as it decompresses your confused and tangled, deep-fried muscles—and painful, as the time mounts up. One minute of this, and you walk out a free citizen—if you can walk at all!

Sure, this workout is too tough for most athletes. But as with all progressive calisthenics, you can tailor it to your own level. Can’t do leg raises? Knee raises or lying leg raises. Not loved by the L-hold yet? Bent-leg holds or jackknife holds work the same. Too shot to do the sit-ups? Throw a b-ball at the wall and catch it on the rebound for a minute (an underrated gut exercise).

Even the time aspect is variable. A minute is unthinkable for these exercises? Start with 30 seconds for each and build up a few seconds each session.

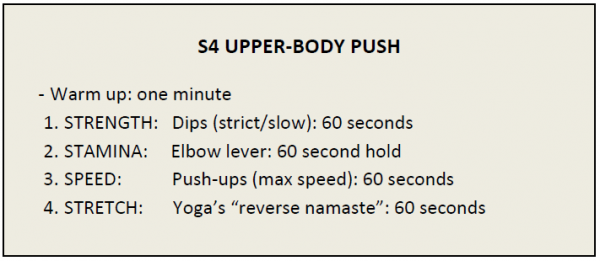
The S4 method works with pretty much anything. Want some upper-body push action?

paul_pic6

Again, with the PCC “toolbox” you can vary the difficulty in dozens of ways. For example, beginners might sub dips for kneeling push-ups. The elbow lever could be swapped for easier prone statics like planks, wall planks or raised elbow levers (see the PCC Instructor’s Manual for even more options). Fast push-ups could be subbed for incline push-ups, focusing on pumping out rapid-fire reps in the top range. Stretch out on a doorway for an easier pec stretch.

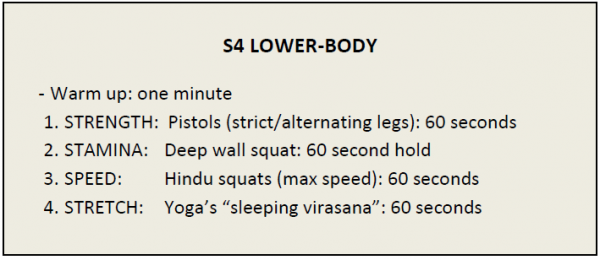
S4 works for legs, too:

paul_pic7

If you are working on unilateral or asymmetrical exercises, it’s best to alternate sides each rep. Again, you can use different difficulty levels, or different techniques—S4 stands a lot of tweaking.

Strength, control, speed and mobility. That’s three simple, five-minute workouts right there that very few advanced athletes could manage—trust me.


Gear Change Sets

Fancy a change? A workout new and fresh, free from the baggage of your long-term program? It’s a good idea to try novel exercises. It’s another cool idea to change your sets and reps. But how many athletes think about radically changing their speed? Or, how about changing your speed as much as possible…in a single set?

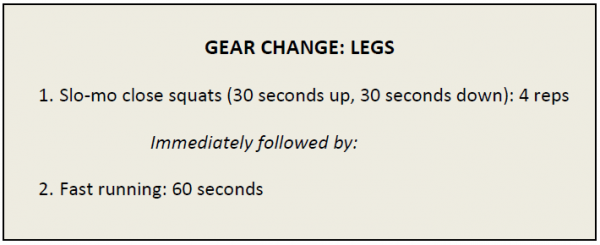
This is the basic idea behind Gear Change sets. You begin with a handful of slow-mo reps, and finish with a bunch of max speed reps. There are many ways you can approach this. A great one is to shoot for 4 slo-mo reps—that’s 30 seconds up, 30 seconds down—immediately followed by a minute’s worth of a very high-speed, explosive exercise for the same body-part. For example, after 4 slo-mo squats, I used to perform tuck jumps for a minute (if you are outside, a maximum speed run for 60 seconds is probably even better).

So here’s a potential Gear Change workout for the legs:

paul_pic8


paul_pic9

Ever combined slo-mo squats with running? Murder.

Pick the right movements for your ability, and you have an amazing five minute body-part workout right there. But for Christ’s sake, always start each slo-mo rep at the bottom—or you may find yourself doing a 30 second negative squat you cannot push up out of. Slo-mo reps are tough, so don’t try slo-mo with an exercise unless you can do at least twenty strict reps with it at regular speed.

The method works for any body-part. For midsection, you could follow 4 slo-mo leg raises with squat thrusts for 60 seconds. After slo-mo push-ups or pull-ups, you might apply a minute of intense bag work or shadow boxing. You get the idea.

This slow-to-fast method is an amazing way to train. Through the complete elimination of momentum, the slow moves are tougher than you imagine (until you try ‘em). They just seem to hit the muscles in a new way, activating deeper fibers we don’t reach by bouncing mindlessly through reps, like so many folks seem to do. Very slow reps also really teach your brain something about the movements you are using; leverage, joint tracking, movement angles, weight shift. Subtle qualities of bodyweight motion, easy to miss at regular speed, now scream at you. When you are done with them, your muscles feel totally numb—and asking them to switch to their highest gear is a true challenge.

The Gear Change set also replicates real life. There would have been times when our ancient ancestors had to move very slow with high tension—maybe dragging a carcass back to the cave—then they were forced to suddenly fight off a predator trying to steal their prize. Slow to fast. Survival today is no different; imagine a soldier in the desert carrying heavy weapons or equipment, suddenly having to run for cover in a firefight.

Don’t get me wrong. Gear Change sets (like the other ideas here) are not meant to form the basis of your long-term training program. But they sure are fun, effective and instructive once in a while.


The H.P.A.S. Protocol

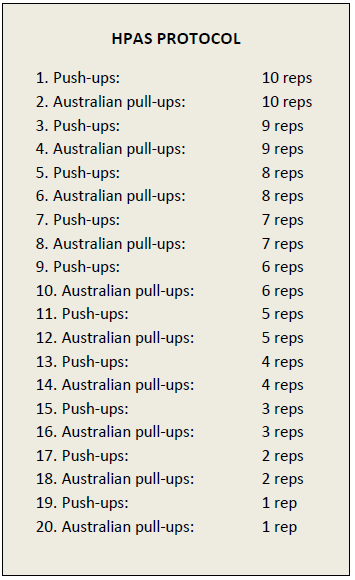
This is a beaut of a workout. I’m gonna call it HPAS, coz “Half Pyramid Antagonistic Super-sets” is too hard to say (at least for me). The premise—as always—is real straightforward. Pick two exercises for opposing muscle groups. Begin by doing each for 10 reps, then each for 9 reps, then 8 reps and so on, until you get down to one rep per set—and you do all this without stopping.

Here’s one potential workout:

paul_pic10

paul_pic11

paul_pic12

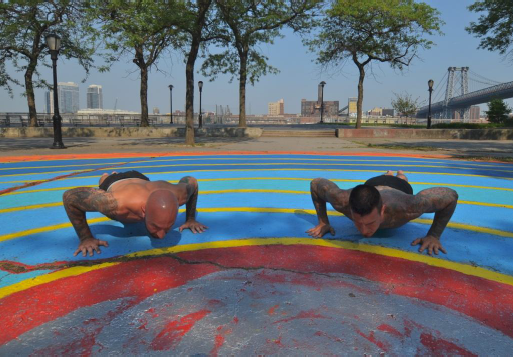
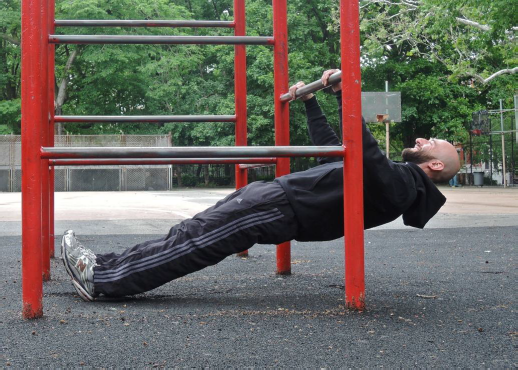
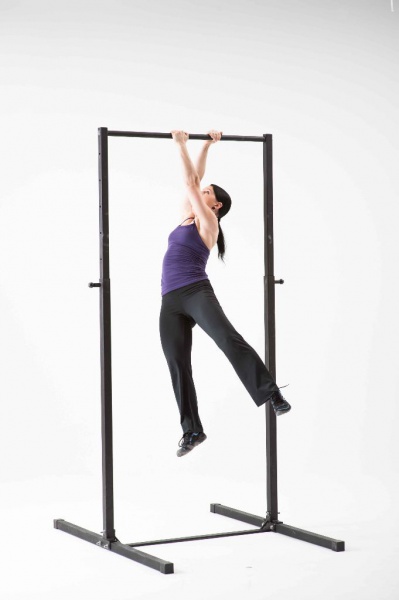
Few exercises go together better than regular push-ups and Aussie pull-ups.

Back to back antagonistic superset madness! On sale NOW!!

Can all this be done in five minutes?—if you use brisk reps with no pauses, yeah. But it’s not easy, and most folks will have to seriously build up to this. (There’s a good goal, huh? I’m looking at you, Jack.)

The HPAS Protocol is a perfect example of how short sessions can be both powerful and productive. Very popular in jails. If you can follow the above workout, you will have scorched every muscle in your upper bod, knocked out 20 sets, and got a helluva cardio workout, too.

This workout is proof that you don’t need to be in the gym for hours to make progress. In calisthenics—as in life—it’s quality that counts, not quantity. A hundred thousand rhinestones won’t make you rich, son; but a handful of diamonds sure will.


“The Century”

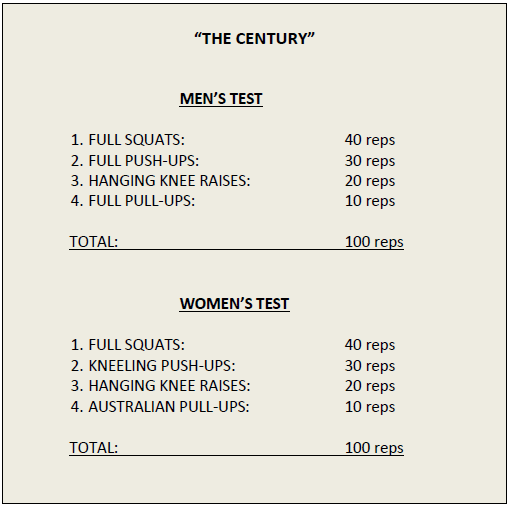
The Century is the rapidly-becoming-classic PCC certification test. It is designed to display technical ability in combination with an advanced level of conditioning, but it can also be a damn fine workout in its own right. In case you haven’t heard of The Century (where you been, dude? Under a rock?!), it’s so-called coz it features one-hundred nonstop reps in a single set:

paul_pic13

PCC-certified super-achievers will probably be sick of training for The Century, but it’s still a good staple to return to from time-to-time. Not only is it great to get back to the basics, but a hundred reps of the good stuff will leave your circulation and energetic system supercharged.

Beware though—if you want to crack this sucker in five minutes, you better have taken some Super Soldier Serum this week, kid. It can be done, though.


Al Kavadlo owns The Century in under 2 minutes 39 seconds.
Can you come close to that?


The Bridge

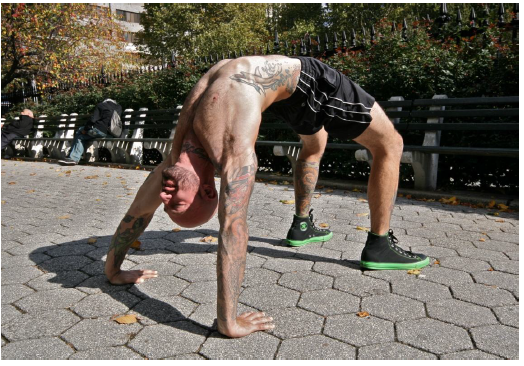
One final suggestion. You want the best five minute bodyweight workout money can buy? Hold a bridge for five minutes.

paul_pic14

I’m not kidding. The bridge has so many benefits, it’s crazy. It is the best bodyweight exercise in the world. A long hold will increase total-body strength and endurance—not just in the showy muscles, but in the vital deep tissues and tendons. It will increase flexibility, mobilize the ribcage, hip flexors and stomach wall, and disperse adhesions and calcifications in the shoulders. It bulletproofs the spine and lower back and drastically reduces knee pain. The inverse head position increases circulation to the noggin, releasing endorphins, inducing calm, and improving brain health. The bridge rocks.

I know what you’re thinking. Just one exercise? That’s an imbalanced workout, for sure! No way, José. In the real world, most eager athletes do so much for the front of their bodies—the showy pecs, biceps, abs and quads—that throwing a little extra meat to the under-loved posterior chain cannot hurt one bit.

Besides, the bridge is one of the all-time bodyweight classics, no different from pushups, squats or pull-ups. If you can’t hold a bridge for five minutes, there’s no way you can call yourself in great shape, no matter what else you can do.


Lights Out!

There you go—a killer series of five-minute summer training tactics, just for you.

So, what are your plans tonight, buttercup? What’s that? In a little while, you’re gonna eat, grab a shower, then head out for the evening?

Sounds great!

…before that, you’ve got five minutes to spare for old Coach, right?

My thanks go out to Al Kavadlo (PCC Lead Instructor) for generously contributing such cool pics to illustrate this article. This is not the first time Al has donated pics (and advice) for free to promote the bodyweight cause—thanks Al!

***

About Paul “Coach” Wade: Paul Wade is the author of five Convict Conditioning DVD/manual programs. Click here for more information about Paul Wade, and here for more information on Convict Conditioning DVD’s and books available for purchase from the publisher.

Filed Under: Progressive Calisthenics, Tutorial Tagged With: Al Kavadlo, bodyweight exercise, bridge, bridging, calisthenics, Century Test, Convict Conditioning, creating workouts, fitness, HPAS Protocol, Paul Wade, progressive calisthenics, S4 Method, short workouts, tutorial, workout

How Training with Progressive Calisthenics and Kettlebells Prepared Me for the Unknown at an Intense 2 day Photoshoot

March 26, 2013 By Adrienne Harvey 7 Comments

 Adrienne,Photo200-0852

You may remember an earlier post on the PCC blog describing an example of how the “Good Behavior” routine from Convict Conditioning could easily accommodate kettlebell training. One of the absolute highlights of this past week was participating in a rigorous two day–two FULL days–photoshoot for the upcoming Dragon Door book, Neuro-Mass by Jon Bruney. While I had had a few days to look over the extensive collection of unique kettlebell, bodyweight, and specialized equipment drills and exercises, what I would be asked to specifically perform was somewhat of a mystery. Fortunately, the strength, flexibility, and coordination from long-term training with Convict Conditioning’s progressive calisthenics, and basic kettlebell work prepared me very well for this highly-varied shoot.

Even though my at-home and outdoor workouts are not especially spectacular on their own, it’s the long-term consistent practice of meticulous movement patterns and reasonable, safe strength challenges which add up solidly over time. This somewhat conservative approach helps me to maintain my strength and physique while avoiding injury. With a heavy schedule of workshops, travel, and instructing, there simply isn’t time for injury, which is all the more reason for strategic training and knowing when to back off. The approach in Convict Conditioning is absolutely perfect for the situation. Not to mention, when traveling, it’s rare that I even have to leave the privacy of my hotel room in order to finish my workout for the day. In all honestly there’s usually more useful floor (and wall) space in the room than a typical “fitness center.”

Many people ask if Convict Conditioning on its own is “enough.” Generally speaking, the short answer is yes, absolutely. The long answer is yes, but what is your specific goal? While my hybrid training with Convict Conditioning and kettlebells was entirely to credit for allowing me to shine at two days of unknown (and highly athletic) drills performed meticulously at relatively low reps for photos, I will need to do the actual Neuro-Mass routines for their full effect. Same with your sports and the specific skills required for them.

 Adrienne, barPhoto330.2A-1261

One of my absolutely most favorite new drills from Neuro-Mass is the pull-up bar walk. All the grip work from Convict Conditioning 2 along with the coordination I’ve gained from inching towards the 1-arm chin up with so much isolateral work really prepared me for that drill in particular. So much that I was able to go forwards and backwards with ease. Jon Bruney has now recommended that we all man or woman-up and work towards going forwards and backwards with this interesting drill. I also like it as it brings the fun and coordination challenge of “monkey bars” to the gym with something as simple as a pull up bar.

The strength and coordination gained from Convict Conditioning as a whole also allowed me to successfully perform (on the first try!) an incredibly cool and difficult drill–this drill is so cool that I’ve been specifically asked to not describe it before Neuro-Mass is published! Before trying it, I had no idea if I’d even be able to do it at all! Consistent practice of Progressive Calisthenics and the seemingly simple workouts from Convict Conditioning had absolutely prepared me for the unknown!

***

About Adrienne Harvey, RKCII, CK-FMS, Primal Move Nat’l Instructor:  I started studying kettlebell training over three years ago and became RKC Certified in October of 2010, and became an RKC Level 2 Instructor in July 10th of 2011.   Kettlebell and bodyweight training have been absolutely crucial in my personal quest for fitness, and I love sharing these ultra-effective modalities with small groups and individuals.  Similarly, developing recipes to further support performance, body composition, and general enjoyment is another passion.

Go to http://www.giryagirl.com/ for more information about Adrienne.

Filed Under: Progressive Calisthenics Tagged With: Adrienne Harvey, calisthenics, fitness training, kettlebells, Neuro-Mass, photoshoot preparation, progressive calisthenics, strength training

The Tao of PCC by Paul Wade

March 12, 2013 By Paul "Coach" Wade 57 Comments

I am the man who wrote the book, Convict Conditioning. I am not a perfect man, and my book is not a perfect book; but I hope that when people judge the book, they will say that it got much more right than it got wrong.

They certainly couldn’t say that about the man.

Without improving, evolving, moving forwards, we are nothing. There is no standing still in life—you are either moving forward, or you are losing ground. That’s why I was so excited to be able to contribute to PCC. There is no doubt in my mind that PCC will do for bodyweight training what the RKC has done for kettlebells. And that would be incredible.

A lot of folks have asked me how PCC will be different from Convict Conditioning. I can sum that up in one word: KAVADLO. Al Kavadlo is, for my money, the greatest progressive bodyweight training coach on earth. PCC, as a total system, is much bigger than Convict Conditioning alone because it has been expanded by Al’s methods, tools and tactics. His “new-school” has met my “old-school”, and PCC is the result. PCC is as much Al’s baby as mine—maybe more so. It is flat out false to assume that the PCC is just a “Convict Conditioning cert”. People who love Convict Conditioning will love PCC, because Convict Conditioning forms just a part of PCC. But PCC is more than just Convict Conditioning.

Much more!

PCC: A Black Belt in Bodyweight

Perhaps the most important difference between PCC and Convict Conditioning is the fact that PCC is about principles, not techniques. Convict Conditioning is very easy for athletes to pick up and understand, because it presents six groups of ten techniques. PCC goes deeper than this. Anyone who has ever studied a martial art knows that they need to learn scores of techniques to achieve a black belt; but the closer you get to true mastery, the more you come to understand that it’s not the techniques that matter—nobody can remember a hundred techniques in a fight. What matters are the principles you absorb.

PCC is like this; you will drill and explore dozens of key techniques at the cert workshop; and the PCC Instructor’s Manual analyzes and illustrates over one-hundred and fifty exercises! But at the heart of PCC are the principles of bodyweight progression. Once you grasp these principles, you can make any calisthenics exercise progressive: from a rehab level, right up to epic Bruce Lee-level bad-assery. This is what it’s all about. Some people have accused Convict Conditioning of being too dogmatic; too rigid. Nobody could say the same about PCC, because it’s based on principles, not set exercises paired with progression standards. There is so much more flexibility built in.

(By Giga Paitchadze - Creative Commons License)

(By Giga Paitchadze – Creative Commons License)

Though they play an important role in the early stage, the techniques should not be too mechanical, complex or restrictive. If we cling blindly to them, we shall eventually become bound by their limitations. —Bruce Lee

 The punches and kicks—the 14 chains

A martial artist seeks to absorb principles, but he or she can only absorb the general by accumulating the specific—lots and lots of individual punches, kicks, throws, etc. The road to calisthenics mastery ain’t no different. Bodyweight athletes still need to learn individual techniques. They still need to learn about chains—i.e., technical progression sequences. It’s important to note that the fundamental movement-types in Convict Conditioning are all still present in the PCC system; however they have been expanded and added to. The seven fundamental movement chains in PCC are:

1. Push-ups—building to—one-arm push-ups

2. Pull-ups—building to—one-arm pull-ups

3. Handstand push-ups—building to—full handstand push-ups (between chairs)

4. Horizontal pull-ups—building to—“torquers” (one-arm, one-leg Australian pull-ups)

5. Dips—building up to—strict muscle-ups

6. Leg-raises—building to—strict rollovers

7. Squats—building to—wushu pistols

Anyone who knows Convict Conditioning well will see that all the major movements are here (save bridges, which I’ll address in a sec). Two new movement chains have been added to the system; the first is the horizontal pull-up. The basic form of this exercise will be well (and painfully) known by Convict Conditioning exponents, but here the progressions have been jacked up to an advanced level to add more symmetry to upper-body work (the vertical handstand push-ups and vertical pull-ups are antagonistic opposites; now the horizontal push-up has an antagonistic “buddy” in the horizontal pull-up). Complete dip progressions—missing from CC—have also been included, with these culminating in one of the most popular of Al’s bar moves: the uber-cool muscle-up (known as a sentry pull-up to CCers).

al_blacknwhite

 The muscle-up—part pull-up, part dip—is an advanced technique in the PCC dipping chain.

Where CC progressions can still be found in the PCC system, they are often approached differently, thanks to Al’s input. For example hanging straight leg raises are real popular in jails: but we got the feedback from athletes on the outside that they were just too easy. So we have expanded and advanced the progressions, making the advanced techniques much, much harder. One-leg squats have also been made harder. Everything is at a higher turn of the spiral. More progression options have been included for pull-ups and push-ups. Extra handstand pushups variations have been included.

As I have said, the PCC system is much larger than Convict Conditioning. Convict Conditioning is really about building raw muscle and motive power by utilizing fairly basic, fairly brutal, pulling, pushing and leg movements. But bodyweight strength training is about more than that—static holds, for example. Whereas Convict Conditioning didn’t include full progressions for static holds, PCC does. The system includes 7 static chains:

1. Press holds—building to—the elbow lever

2. Midsection holds—building to—the L-hold

3. Bridge holds—building to—the gecko bridge

4. Handstands—building to—the frog-press handstand

5. The back lever—building to—the full back lever

6. The front lever—building to—the full front lever

7. The side lever—building to—the press flag

That’s a pretty damn impressive roll-call of techniques: and very few men or women outside of professional gymnastics could complete all seven. Fewer still could assimilate or teach chains for all seven. But this knowledge is part of the PCC system thanks to Al’s know-how, and has been integrated into PCC because I’ve been asked so often about these holds; athletes want to learn about old school hand-balancing, flags, elbow levers, and so on. Fans of bridges wanted to know how I would include them as a form of static hold. All this is contained in the PCC system. This doesn’t mean you can’t begin using these “holds” as “moves”—levering up from a bridge into a handstand, for example. Remember, everything is about principles, not dogma. Once you understand how to work with the techniques, you can expand; you can explore. You learn the form, you absorb the form, you discard the form.


al_blacknwhite_2

 A bodyweight powerhouse, Al Kavadlo is no stranger to static holds. Perfection!

 The PCC Instructor’s Manual will cover all 14 chains in-depth (it’s over 600 pages), but it will only be available to athletes who attend the PCC event. The certification workshop itself cannot cover all 14 chains—over 150 exercises—but it has been painstakingly designed to cover the key techniques, training methods, and the principles behind progression.

The eleven training modules and two seminars over the three-day workshop will revolutionize you: no matter what your level of development. Sure, you may not come away able to perform expert hand-balancing, elbow levers, front-levers, one-arm pull-ups and human flags, but I promise you this: you WILL come away knowing exactly how to get there—or get someone else there—in the best way possible.

Ralph Waldo Emerson—the great Patriot, and possibly the greatest essayist of all time—said this:

As to methods there may be a million and then some, but principles are few. The man who grasps principles can successfully select his own methods. The man who tries methods, ignoring principles, is sure to have trouble.

Come and join us in the PCC community. The principles you need to maximize your bodyweight potential are waiting here for you.

 —

Paul Wade is the author of five Convict Conditioning DVD/manual programs. Click here for more information about Paul Wade, and here for more information on Convict Conditioning DVD’s and books available for purchase from the publisher.

Filed Under: Progressive Calisthenics Tagged With: Al Kavadlo, bodyweight, Convict Conditioning, Kavadlo brothers, Martial Arts, Paul Wade, PCC, PCC Workshop, progressive calisthenics

  • « Go to Previous Page
  • Page 1
  • Interim pages omitted …
  • Page 5
  • Page 6
  • Page 7
  • Page 8
  • Go to Next Page »

Primary Sidebar

Featured Products

previous arrow
GetStrongBookCover
ConvictConditioningBookCover
StreetWorkoutBookCover
ExplosiveCalisthenicsBookCover
StrengthRulesBookCover
next arrow

Categories

Progressive Calisthenics Certification Logo
Click here for more information or to register for the PCC workshop

Get Strong Workouts TriadXP App
Get Strong Workouts App

Recent Posts

  • Top 5 Reasons Why an In-Person Workshop is the Best Way to Supercharge Your Training
  • HYBRID STRENGTH TRAINING IS HERE!
  • My Calisthenics Journey to the PCC
  • The Handstand Press: Complete Control Through the Handstand
  • The Get Strong App is Here!

Dragon Door Publications

Dragon Door Publications

Recent Comments

  • bross dandon on The Case for Curved Handstands
  • Johnny Flewellen Jr. on Strength for Life
  • Dan Earthquake on The Pursuit of the Daily Minimum
  • Johnny Flewellen Jr. on The Pursuit of the Daily Minimum
  • Johnny Flewellen Jr. on Yoga, Calisthenics and the Journey of a Lifetime
FOLLOW US ON TWITTER!

Copyright © 2025

Dragon Door Publications / The author(s) and publisher of this material are not responsible in any manner whatsoever for any injury that may occur through following the instructions or opinions contained in this material. The activities, physical and otherwise, described herein for informational purposes only, may be too strenuous or dangerous for some people, and the reader(s) should consult a physician before engaging in them.