• Skip to main content
  • Skip to primary sidebar
  • Home
  • Contributors
  • Resources
    • Q&A with Paul “Coach” Wade
  • Workshops
  • Products
  • Forums
  • Articles
  • Blogs
    • RKC Blog
    • Strong Medicine Blog
  • Archives

PCC Blog

Progressive Calisthenics - The Official Blog for the PCC Community

strength

Strength for Life

January 30, 2018 By Marc Ayala 5 Comments

Marc Ayala Strength For Life

It’s a new year, and gyms across the country are flooded with folks who’ve made the decision to change their lives. Unfortunately, these pursuits often start off well, but end up gradually fading away – often, before February even begins.

There are myriad possibilities for why so many of these efforts don’t achieve their goal; unfortunately, the first thought is often that the person is lazy, unmotivated, etc. While that may be the case for some, I have found that there is a factor that seems to be even more significant: the lack of a deep understanding of the process.

The fitness industry has done a poor job in terms of educating those that have a true desire to improve their physical being. New gym members are left to fend for themselves among the sea of machines and exercise equipment. To all of those afflicted by this current state of the fitness industry, I propose the following potential solution: strength training. Not the sort of strength training that is so often thrown into discussions of diet and health as an afterthought. I am referring to the deliberate, gradual improvement of your ability to exert force onto the world around you. This has the potential to change your body, bolster your confidence, and open doors that you thought to be cemented shut.

What We Want

We all want to be able to look in the mirror and have an instant, unmistakable sense of pleasure and contentedness with our appearance. When we think that we look good, we assume that others probably think that we look good as well. And nothing boosts this pleasure more quickly than a compliment from a friend or colleague.

We want to be independent. Not in the sense of paying your own bills and coming home at any hour of the day, but a sense of real physical independence: the ability to be able to shovel out your car after a snowstorm, walk up a flight of stairs without an escalator or handrail, or to be able to open a pickle jar. In an age where you can find someone or something to do anything for you – for a fee, of course – we are gradually losing our ability to thrive without depending on others. How amazing would it feel to be able to shovel out your entire driveway after a blizzard, then have the strength of body and character to shovel out your elderly neighbor’s driveway and enable them to make it to their grandkid’s first ballet recital?

How We Get It

Strength is the ability to exert force onto our environment and effect change. It is what allows us to explore and manipulate the world at will. Who would ever want to be prevented from living up to their fullest potential by something that they have direct control over? Unfortunately, thanks to the flood of conflicting information in the world, we often have no clue where to look or how to start on this endeavor. Fortunately, with a little bit of patience, a hearty dose of effort, and some good ol’ discipline, the plan that I propose here can get you there. Let’s get started!
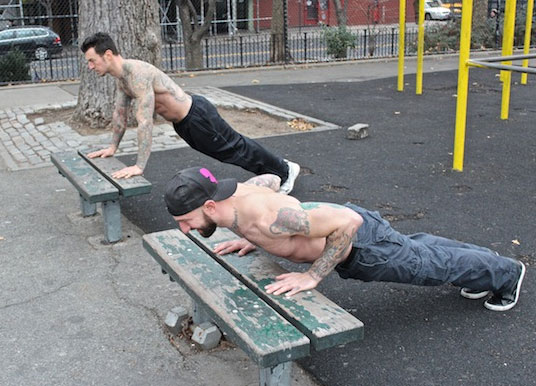
Kavadlo Brothers Raised Pushups

Push Me, I Push Back!

The ability to push through our hands and influence the environment around us is so incredibly important, yet unappreciated until one can no longer do so. The ability to push doors open, push yourself up off of the floor after falling on ice, and countless others are examples of the need for pushing prowess. How do we improve our ability to push? We practice pushing!

Elevated Surface Push-up

Find a box, table, or anything sturdy that is roughly hip-height. If too challenging, use a slightly taller surface. Place your hands onto the edge of the surface with your palms lined up with your shoulders and squeeze it.. Brace your body into a steel beam with legs locked straight, ankles squeezed together, abdominals clenched, head up tall . Lower yourself slowly under full muscular control until the lower part of the chest touches the surface, elbows within 4-inches of ribcage. Return to the starting position slowly, without bouncing off of the surface. Momentum is the enemy here.

Goal: 20 repetitions. Then, use slightly shorter object and build to 20-repetitions. Repeat until using knee-height surface easily.

Standard Push-ups

Begin kneeling in an all-fours position with the hands directly beneath your shoulders. Next, extend one leg at a time back until the toes are dug into the ground and legs locked straight. There should be a straight line from your ankles to your shoulders when viewed from the side. No bellies sagging toward the floor, no bent knees, no drooping head. Lock your legs straight and try to feel the muscles on the fronts of the thighs tighten. Squeeze the butt muscles and tighten the abdominals as if bracing for impact. Pull the back of the head toward the ceiling, without lifting the chin. It should feel as if you are giving yourself a double-chin. Now, squeeze the floor and slowly lower yourself until your chest gently kisses the floor.. Slowly push into the floor and ascend until full arm extension.

Goal: 20+ repetitions

After becoming proficient in these three foundational pushing motions, you will have now earned more definition in your arms, shoulders, and chest, as well as the ability to push back when the world pushes you. Congratulations! You have earned it.
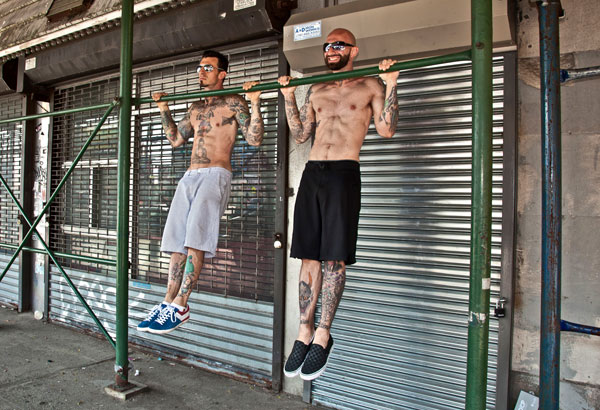
Kavadlo Brothers Pullups NYC

Pull Yourself Together

There is nothing like the ability to wrap your hands around the world around you and pull yourself through, over, and beyond. See that tree branch? See if you can pull yourself up into the tree and afford yourself a bird-like view of the world around you, only accessible to those with the strength to handle anything that the world presents to them. As a nice side effect, you’ll also build a serious set of arms. Time to pull!

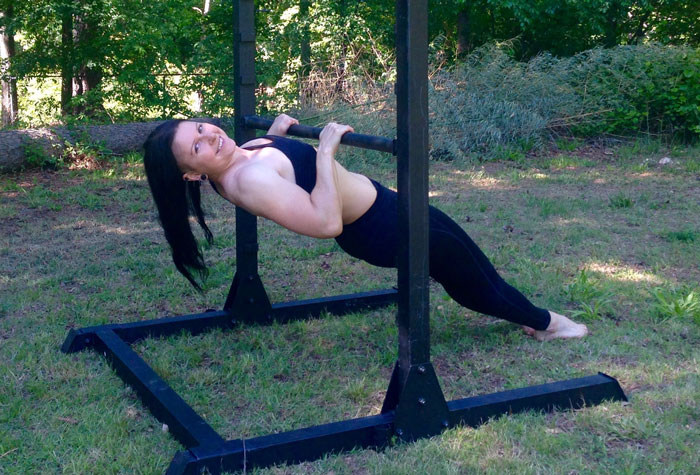
Australian Pull-ups

Find a sturdy table, a horizontal bar, or any other object that is between hip and sternum-height that you can grip with your hands and hang from. Grab the object and walk your feet under it until your lower ribs are under the edge of the object. At this stage, your legs should be straightened, arms should be straightened, and hips should be elevated and perfectly aligned with the knees and belly-button. Pull the lower chest to the edge of the surface and pause firmly against the surface. If these are too challenging, use a taller surface.

Goal: 20 repetitions

Negative Pull-Ups

Stand on chair or similar object in front of the Pull-Up bar and take a narrow, underhand grip on the bar. Either tip-toe or use a small hop to get the chin over the bar with the elbows fully closed and in tight to the ribs. Hold this position as long as you can, not allowing the shoulders to shrug or the body to swing. Allow yourself to slowly descend toward the ground inch by inch.

Goal: 60-seconds

Pull-Ups

Begin hanging from the bar with fully straightened arms. Next, squeeze the bar as hard as you can and pull like your life depends on it! Going from straightened arms to chin over the bar is an amazing achievement for anybody, no matter which sex or how old. Take pride in the fact that you can maneuver your body around the environment at will. Got any room left in those shirt sleeves now?

Goal: 10+ repetitions
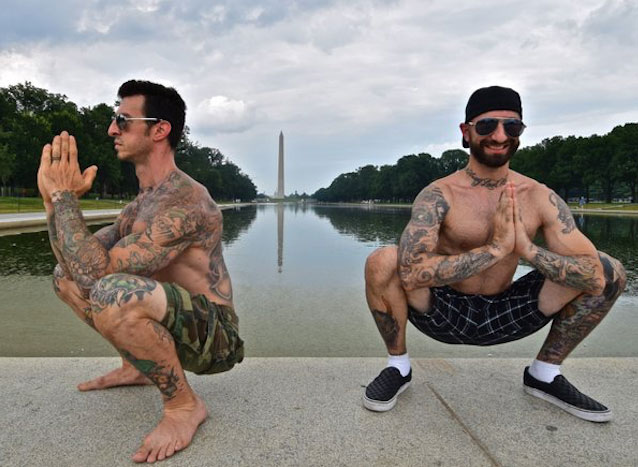
Kavadlo Brothers Squats DC

Strong Legs, Limitless Reach

Legs are the unsung hero that everybody relies upon for quite literally everything that we do, yet put little care into strengthening them. See that mountain? How about hiking to the top and basking in the glory of conquering nature’s skyscraper. Or being able to play tag with your kids?. The legs have an amazing potential for strength, endurance, and versatility. It would be shame to waste that potential. Let’s build those wheels!

Brisk Walking

This is where is all starts. Walking? Really? Yes. The best way to get better at traversing the world with confidence is to practice traversing the world with confidence. Stand up tall like there is a book on your head and you don’t want it to fall. Pike your feet up and never allow them to drag. Let the arms swing by your sides naturally. The swing of the arms is a good sign of the expressiveness of a person. Show the world that you are full of life and vigor! Walking gently builds the endurance in every joint in the body through low stress, high repetition motion.

Goal: 60-minutes

Assisted Squat

The ability to go from a standing position to a campfire squatting position under full control is crucial for maneuvering the world. To achieve the full squat requires a proficient degree of ankle, knee, hip, and spinal mobility, as well as strength. To build this ability, walk up to a door frame or anything that is about hip height that can support you pulling against it. Place your feet slightly wider than hip-width apart, with the toes either facing straight forward or slightly turned out. This will vary person-to-person, so try both ways. With a firm grip on the object, sit your butt backwards toward the wall behind you with the chest lifted proudly, then slowly descend until the backs of the thighs touch the calves. Your heels should be firmly planted into the floor. Your knees should be perfectly lined-up with your feet.

Goal: 60-second hold

Full Squat

Once you have held the bottom of the squat for 60 seconds with the arms straightened out in front of you, attempt to stand up by keeping the chest lifted and straightened the knees and pushing the hips forward toward the object in front of you. Congratulations! You just went from a full squat to a stand. Now, slowly sit back and down into the squat again, pause for two seconds, then stand up. This ability will keep you strong and limber for life, so long as you keep practicing and utilizing it in your worldly adventures. You’ll also build one firm set of legs!

Goal: 25+ slow repetitions

What Now?

So, you can now push back against the world, pull yourself over, around, and through it at will, as well as climb it with ease. What are you going to do with your newfound abilities? The world is out there, waiting patiently for its beauty to be appreciated. The doors of possibility have now been opened! Don’t let them go to waste!

***

Marc Ayala, PCC, is a personal trainer located in Boston. With a love for reading and research, he is constantly on the quest for more knowledge and sharper skills. Marc is passionate about uncovering the physical potential in his clients, pushing them to levels of strength that they never thought possible.
Filed Under: Motivation and Goals, Progressive Calisthenics Tagged With: calisthenics workout, goals, Marc Ayala, PCC, practical strength, strength, workout

Finding Strength in Strength

December 5, 2017 By Steve Llewellyn 12 Comments

Steve Llewellyn bridge

It has been well documented that exercise is good for our physical health but more recently the benefits of exercise have shown to have a great impact on our neurological and mental health.

Stress, anxiety and depression are conditions which are incredibly common in modern day western society. Our bodies and brains are susceptible to becoming overawed by the increasingly demanding pace of our lives as we attempt to manage a career, family life and eating healthily while still finding time to exercise. Add to this the fact that a rapidly increasing number of adults spend two hours commuting to their day job and then spend eight hours or more hunched over a desk–we have more than a few reasons that self-care gets neglected.

And while the general populous are well informed of the psychological effects of traditional cardiovascular pursuits (mostly running), it is less well known that strength training can have a profound effect on the human brain and a recent study made a direct link between resistance training and a decreased risk of dementia.

My own story draws lots of parallels with the points already touched upon.

I am someone who has experienced feelings of depression and generalized anxiety since my teens. I won’t delve into the reasons and just keep it relevant to the article, instead I want to share how strength and fitness has given me the tools to deal with it.

For years I masked these overwhelming thoughts and feelings through self-medication and isolation from situations which were uncomfortable, thus compounding those original triggers and behaviors.

I wanted to change my thoughts, behaviors and environment and escape the mental prison I had built for myself. Self-medicating was the only (albeit temporary) way out I knew. I had also been prescribed various medications which did not help and probably even made things worse.

It was then at the age of 25 that I decided I wanted to join a gym. I figured I could find a new outlet, a new, healthy obsession that built me up instead of dismantling my already frail body and mind.

So, with the support of an old school friend who had recently got back in touch, I took the plunge and signed a contract at a local chain gym.

It was tough going for a few months at least, out of my comfort zone and into a neon lit space full of people who very body conscious and (in my paranoid head) judgemental of skinny newbies invading their sacred space. On closer inspection however, I realized that I was not the only one who was unsure of themselves. There were lots of people pushing weights, sweating on running machines who looked like they were not necessarily enjoying what they were doing but still they were there, putting in the graft because somehow, they knew it was important. This inspired me to not quit when the going got tough, when I didn’t feel like driving to the gym to workout, when I wanted to lie in bed and eat junk food instead.

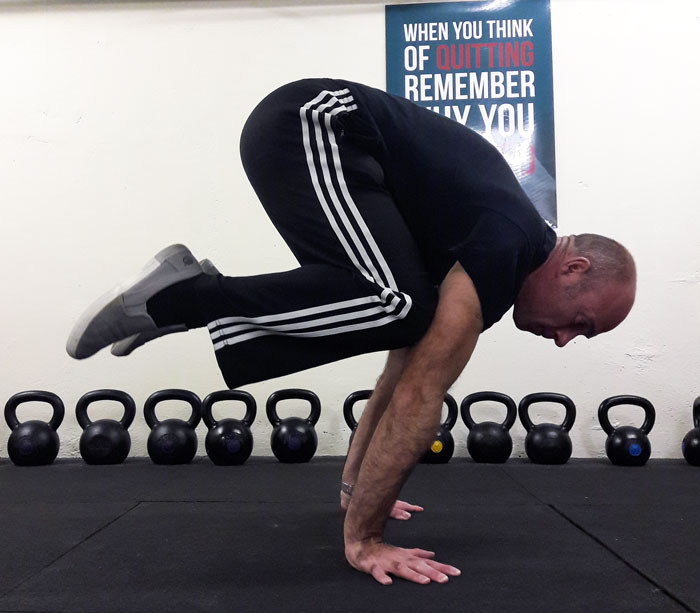
Steve Llewellyn crane hold

But gradually, things began to change. I started to notice an increase in energy levels, my physique was changing, muscles were starting to appear, and my mindset began to shift. My mood was more upbeat and my ‘stress cup’ was bigger. When the dark clouds did gather in my mind, they didn’t stay as long, and I could tell myself that they would pass instead of crumbling under the feelings. I started to give thought to how the weekend binges were having on me and I began to question whether I wanted to stifle my newly acquired gains with the habits I knew so well. The biggest shift was in starting to look forward to working out every other day rather than a thing to fear and dread like some necessary evil that must be endured to feel good about myself.

Over time, I curbed the drinking (no more binges) quit smoking and a new-found sense of belief and confidence took their place thanks to my now fully ingrained ‘gym addiction’. A few years later I discovered the magic of bodyweight calisthenics and from then I knew that I had found something that would keep giving back to me as long as I paid my dues.

As we draw towards the end of another year, men and women everywhere will begin a period of self-reflection, they will question the way they look, the way they perceive themselves and then tell themselves they really ought to start looking after themselves more in the new year. Many will join a gym (not for the first time) and will tell themselves they must go. That’s all good. However, it’s a sad fact that most gyms are full to bursting in January with eager new recruits but by March too many have lost patience or will to succeed and fall off the fitness wagon before repeating the same cycle next year.

The irony is that nobody actually needs a gym membership to improve any part of their health. Part of the beauty of bodyweight calisthenics and all the progressions taught at the PCC require nothing but something to pull on and the floor beneath you. And as Al Kavadlo says, “If you don’t have the floor beneath you then you have much bigger problems”.

Steve Llewellyn dragon flag

Even thirty minutes of brisk walking a day in the fresh air can have a hugely positive effect on both physical and mental wellbeing. These days, my training equipment checklist consists of little more than a skipping rope, a pair of gymnastic rings and a tree in the park to hang them from.

Of course, I am not suggesting that doing a bunch of push ups and pull ups will completely rewire your brain and make the pain of having a mental health difficulty go away. I still have days where I feel low for sure. No, I am saying that training my body gives me the most incredible coping mechanism imaginable, which means I can accept myself, my thoughts and feelings without drowning in them. Strength training has given me self-respect and made me a better husband and father, not to mention a pretty decent body for a guy over 40. I am truly thankful for having found strength in strength. Now, as a coach and personal trainer, my mission is to inspire other men just like me to be the best they can be.


****

Steve Llewellyn is a personal trainer and PCC Instructor from Birmingham, UK who specializes in helping men over 40 discover a passion for becoming stronger, healthier and changing mindset around nutrition and recovery. He runs 1:1 and small group training at The Bodyweight Basement. He can be contacted at bodyweightbasement.co.uk or email: stevellewellyn99@hotmail.co.uk Follow him on Facebook facebook.com/trainersteve99/

Filed Under: Motivation and Goals, Progressive Calisthenics Tagged With: behavior, calisthenics, mental health, mental training, PCC Instructor, progressive calisthenics, Steve Llewellyn, strength, strength training

How to Restore Desk-Damaged Physiques with Calisthenics

May 9, 2017 By Adrienne Harvey 23 Comments

Adrienne Harvey UnDesk Lead Photo

Years ago, well before the PCC, and just after Convict Conditioning began to get extremely popular, I heard Andrea Du Cane say that we shouldn’t live in the posture of our sport. In many cases, we should also not live in the posture of our work.

It seems as though many of our clients (and in some cases ourselves) spend the majority of their working hours seated at a desk looking at a screen, then spend hours staring at a small screen. So, let’s take a moment to work with some do-anywhere calisthenics exercises to help build healthy habits while undoing some of the desk-damage so we can continue to help our students, clients, and ourselves safely build strength.

In 6th grade, a brilliant friend (math genius and fellow computer nerd) and I would get to school early to boot up a lab of dinosaur-era computers. Already at that young age, my friend had the dreaded forward leaning head, hunched shoulders, and rounded upper back from hours and hours of programming. Thankfully, I was still spending a reasonable amount of time playing in the backyard on the monkey bars—while getting regular reminders from Mom to stand up straight and keep my shoulders back—which saved me from the same situation.

But, pulling long hours at work, then tapping at tiny screens has left almost everyone pretty susceptible to bad habits and weaknesses that can hold us back in our calisthenics training—and in our everyday enjoyment of life.

First, for those of us who are instructors, it’s important to remember our scope of practice. If a student or client is in pain or has a medical issue—or even if you’re just unsure about the situation—always refer them to an appropriate medical professional.

As much as it would be great to think that a standing desk would solve all the sitting related problems of the world, some of us have noticed that intense cognitive tasks requiring full concentration and extreme focus just don’t seem to go as well when working at a standing desk. That has definitely been my experience, as my typing speed and overall productivity seem to suffer if I try to do highly mental tasks at a standing desk. So, under the assumption that we or our students/clients will need to work at a desk for a significant period of time most workdays, let’s discuss how we can help.

We already know that it’s important to take breaks from seated work. I’m a huge fan of the Pomodoro technique—it can also boost productivity at the same time. Basically, set a timer for 25 minutes of work, then take a 5 minute break to walk around, do a few movement exercises, then repeat the 25min, 5min cycle four times before taking a longer break.

Poor posture habits while standing and sitting often stem from a lack of core or (as Paul “Coach” Wade would say) midsection strength. It’s also pretty common for people with weak midsections to have or develop back issues. Think of the midsection as a cylinder, if the “front half” isn’t doing its fair share, then the back half will be carrying an extra burden. If the abs aren’t able to hold us upright while standing or seated, then the back has to compensate that much more—often leading to discomfort or worse.

The great news is that instead of doing endless questionable crunches, the PCC and Convict Conditioning methodology emphasize training the midsection specifically, and instruct us to engage it when performing most (if not all) of the other calisthenics exercises. For example, It’s hard to even imagine performing a pistol squat without abdominal involvement—the same is true with any advanced push-up (it’s critical for Neuro-Grip push-ups)—and just about every other exercise in the PCC and Convict Conditioning curriculum.

While many different schools of training have their own approaches to counteracting the very modern problem of too much sitting, in this post I’ll mainly focus on calisthenics strength, and very basic mobility. Nothing too fancy is necessary for most of our general population clients to work on counteracting the dreaded desk body. But, if you are inclined to work more on mobility and flexibility alongside your calisthenics strength, definitely check out Al Kavadlo’s Stretching Your Boundaries.

I think of “un-desking” as having the following components:

  • Unlocking the hips and hip flexors
  • Abdominal/midsection strengthening
  • Stretching and strengthening the shoulders and upper back

Unlocking the Hips and Hip Flexors

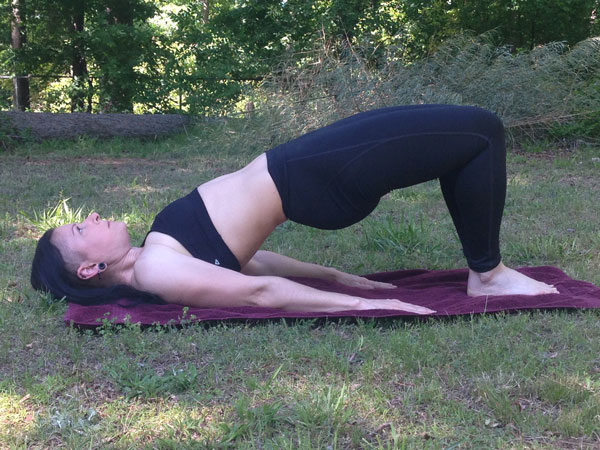
The short bridge (also sometimes called the hip bridge or shoulder bridge) is a regular part of my mobility warm-ups and those I teach to others. It’s accessible for nearly anyone. When practicing the short bridge, the beginner is comfortable and in control as they work towards bringing the hips higher while engaging their glutes.

Start on the ground with your hands at your sides. Push down hard through your heels and strongly activate your glutes to get your hips as high as possible. This is nearly the opposite of slumping over at a desk. It’s sometimes helpful to think of pushing the hips up and over towards your head (but only THINK this, your feet need to stay on the ground).

Adrienne Harvey Short Bridge

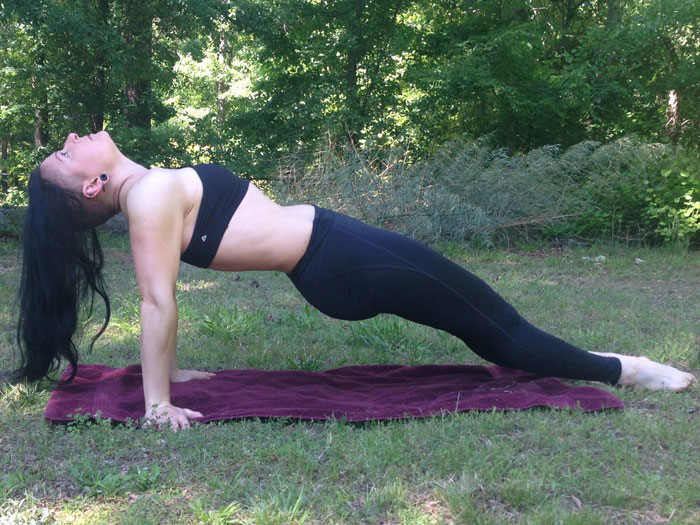
The straight bridge is another extremely valuable early step toward a full bridge in Convict Conditioning that is very useful long after achieving a full bridge. Like the short bridge, you may also know it by other names. Those of use who spend a lot of time typing—and who are also pull-up enthusiasts can greatly benefit from this move. I love it and love to hate it. At the top of this bridge variation, be sure that the shoulders feel rotated back and down. Experiment with different hand positions (fingers facing forward, to the side, backwards) while working to bring your chest and body high off of the ground in a reverse plank position.

Adrienne Harvey Straight Bridge
Remember to try different hand positions when trying the straight bridge: fingers pointing towards the toes, out to the sides, or pointing backwards.

A favorite bodyweight stretch from the RKC curriculum also has great value for calisthenics practitioners. It’s no secret that I love kettlebells as much as I love calisthenics, and I’ve found that including this RKC hip flexor stretch in bodyweight only workout warm-ups can do wonders for bridging. If you find your hip flexors are tight and have never tried this drill before, give it a go! It’s a lifesaver after long car rides, or marathon writing sessions at the computer.

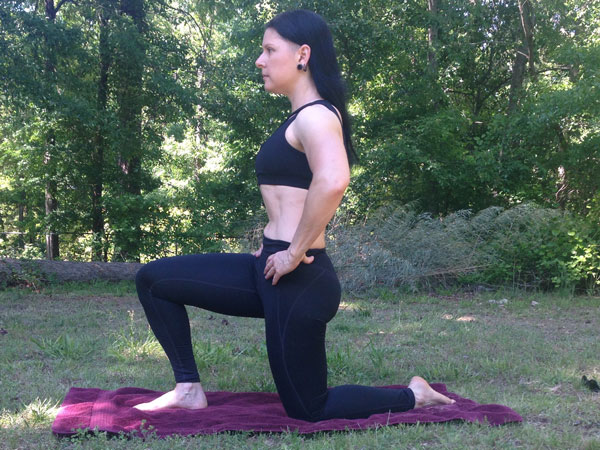
On a padded surface, get in a half-kneeling position. Without pushing forward in any kind of extreme lunge, simply think of tucking your tailbone while strongly activating your glutes. The front of your hip and thigh on the leg with the knee on the mat should feel a strong stretch. Take time with this powerful move and be sure to try it on both sides.

Adrienne Harvey RKC Hip Flexor Stretch

Abdominal/Midsection Strengthening

As mentioned earlier in this post, most if not all of the calisthenics exercises in the PCC curriculum and Convict Conditioning involve the abdominals. But if you or your students are having desk-related issues, focused abdominal strengthening can really help. The leg raise series beginning on the ground all the way up to the most exotic lever strongly impact the abs. Since the midsection recovers quickly, it can be trained much more often than most muscle groups—some may opt to train the midsection daily.

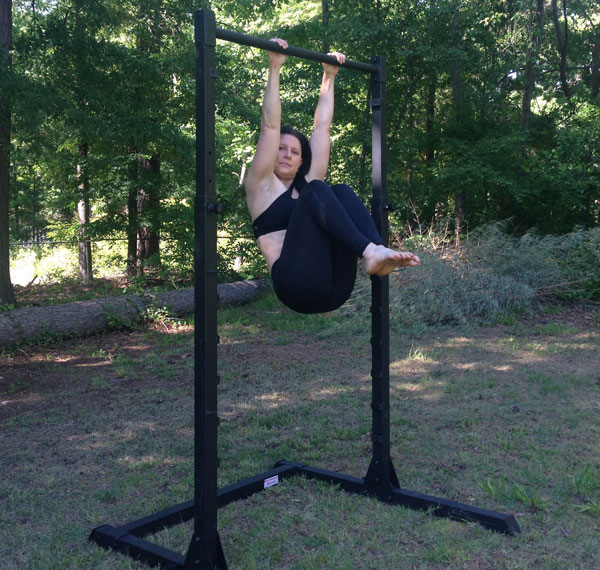
Adrienne Harvey Hanging Knee Raises
Double down on “un-desking” by combining slow and controlled hanging knee raises with a timed active hang. How slow can you go?

Stretching and Strengthening the Shoulders and Upper Back

Weak upper backs and weak shoulders tend to round forward during desk work—but so do the shoulders of active people—especially boxers and pull-up addicts! Spending time hanging from a pull-up bar can not only greatly increase grip strength, but it’s an opportunity to relax and activate the back with dead and active hangs—done for reps, this move is sometimes called a “scap-up” referring to the movement of the scapula. (In a past PCC blog post I outlined several different bar hang grips but in this case, even the most basic bar hang grip will fit the bill.)

Pay particular attention to how your shoulders and upper back are feeling, and if you’re a beginner, take it easy.

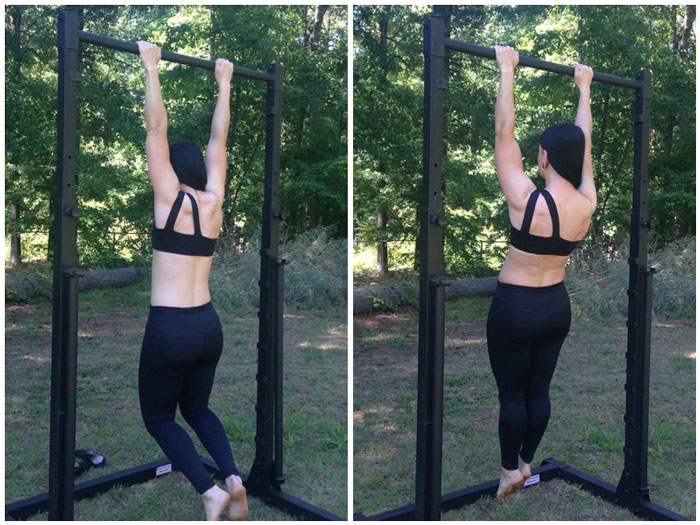
Adrienne Harvey Bar Hangs
The dead hang and active hang look and feel completely different!

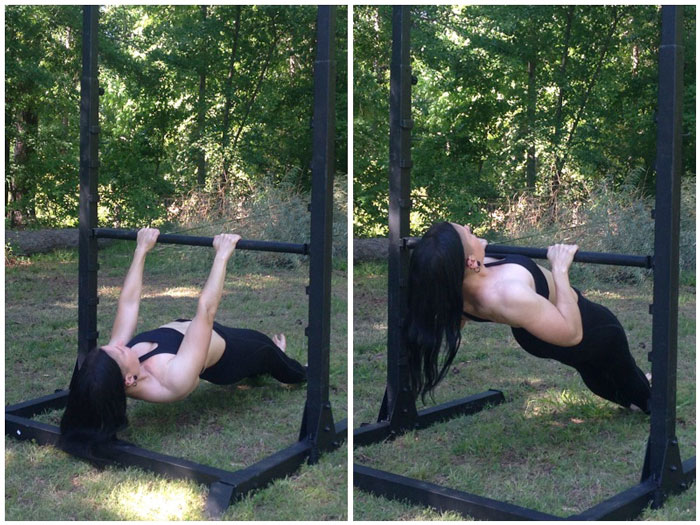
Last but certainly not least, the Aussie pull-up, especially performed to the chest can help remind our shoulders to stay back where they belong. Far from being just a step on the way to the pull-up, the Aussie pull-up (aka bodyweight row) performed slowly with a nearly isometric hold at the top can help posture, upper back strength and lead to better lockouts at the top of standard pull-ups. Be sure to experiment with lower bars of various heights. The Aussie can be further regressed for beginners or deconditioned students by bending the knees. This shortens the lever of the body and places some of the body’s weight on the feet.

Adrienne Harvey Aussie Pullups, Bodyweight Rows

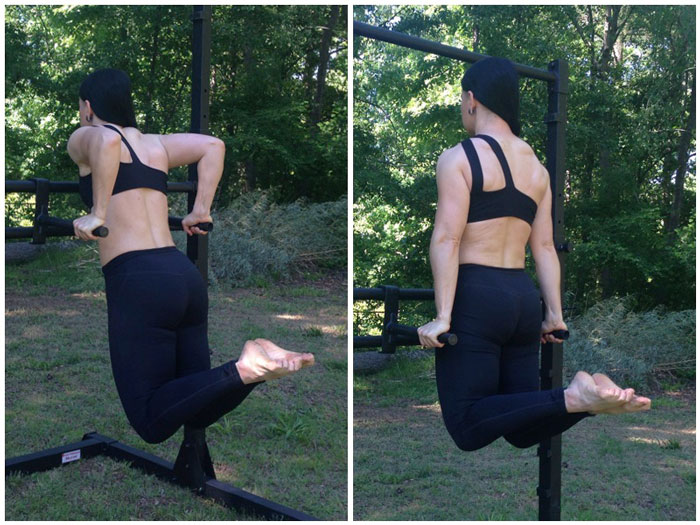
One of the great and occasionally frustrating things about progressive calisthenics is that there are so many options and there’s never time to talk about or do them all! I’ll just briefly mention dips here for intermediate folks, since the delightful chest stretch at the bottom of the dip (don’t dip so low as to risk impingement) is great after a day at the desk. Likewise a strong active hold at the top awakens many of the upper body muscles that suffer when we sit and slouch.

Adrienne Harvey Bodyweight Dips

Example Un-Desk Warm-Up Sequence (repeat for a few rounds if you have time):

Optimally begin by taking a short walk.

  • Short bridges: 5 reps, pausing for height and max tension at the top
  • RKC hip flexor stretch 1-2 per side
  • Dips and/or straight arm holds above dip bars
  • Bar hang alternating between dead hang and active hang (scap-ups) + a few pull-ups if they’re not maximum effort for you. This is not PR time.
  • Aussie pull-ups (aka bodyweight rows) 5 slow reps with max tension at top of each rep.
  • Short Bridge a few test reps to note improvement.

While it would be ideal for all workplace settings to have space for—and the social acceptance of—spontaneous exercise sessions, coming up with minimalist sequences for the work day can at least alleviate some of the issues until you can destroy the stress of the day at the gym or at home.

Bonus Slouch Slayer:

If you’re not sure if/when you’re slipping into a slouch at the desk, Place a mirror to the right or left of where you’re seated. While you work, take a second to catch a glimpse of your profile. Catching myself slouching a couple times was enough to build great upright posture habits at the desk. The moment you catch yourself in a really hunched slouch in that mirror, you’ll be motivated to sit up straighter, check your shoulders, abs, etc. At that point I’d also encourage you to stand up, and try a few of the calisthenics “un-desk” moves.

My home office is always a work in progress, but if I feel like I’m slumping, I’ll place that mirror to my left for a day or two – sure enough that fixes the problem!

****

Adrienne Harvey, Senior PCC Instructor, RKC-II, CK-FMS, has been RKC Certified since 2010, and RKC Level 2 certified since 2011. Kettlebell and bodyweight training have been crucial in Adrienne’s personal quest for fitness. A core member of the PCC team, Adrienne loves sharing her knowledge with small groups and individuals. She also loves to develop recipes and workout programs to further support performance, body composition, and of course—FUN. Go to http://www.giryagirl.com for more information about Adrienne.

Filed Under: Progressive Calisthenics, Tutorial Tagged With: Adrienne Harvey, calisthenics, calisthenics strength, desk neck, posture, progressive calisthenics, sitting, strength, tutorial, undo damage of sitting

The Centerline Principle of Strength & Power

April 26, 2016 By Matt Schifferle 20 Comments

Matt Schifferle Centerline

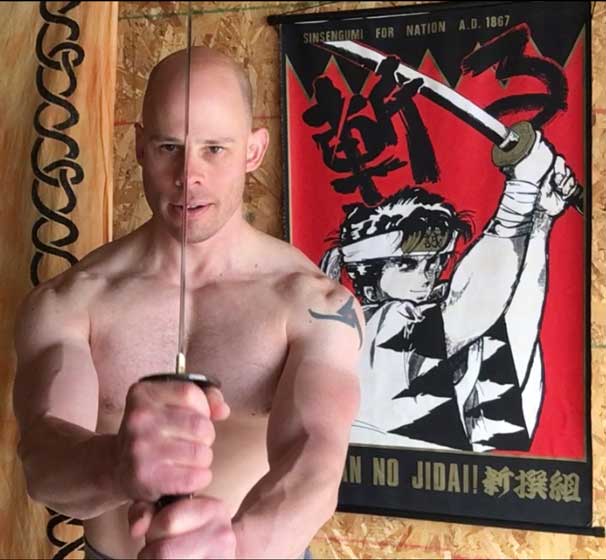
I first learned about the magic of the centerline principle in martial arts. Everything from powerful kicks to dodging punches involved moving in relation to the center of my body as well as the center of my opponent.

As it turns out, the centerline is not only the key to powerful kicks but also developing strength and muscle when applied to progressive calisthenics.

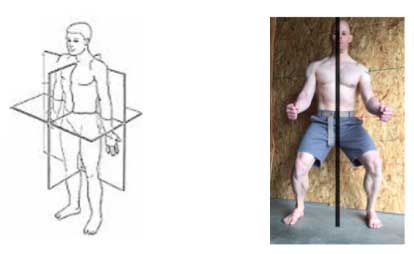
Technically, your body has 3 center lines, one for each plane of movement. The scope of this post is focusing on the centerline that divides your right and left side along the sagittal plane.

Each plane has its own centerline. This article focuses on the frontal plane centerline.
Each plane has its own centerline. This article focuses on the sagittal plane centerline.

Focusing on your centerline is critical towards your strength and muscle building efforts. It opens the door towards developing more muscle control as well as improved performance. It also greatly reduces stress around your joints. Even your balance and agility will greatly improve by directing your muscle tension towards your centerline.

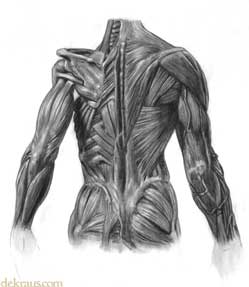
MattSchifferleMusculardiagramThe image to the right shows how the muscles are arranged to direct muscle tension inwards towards the centerline. Almost every muscle has at least a few muscle fibers that direct force inwards towards the spine. This is yet another reason to practice back bridge progressions, as they develop all of the muscles in this image. While the bridge is classically described as a move for the posterior chain, it is also one of the best techniques for developing tension towards the centerline.

Knowing about the centerline is good, but it’s even more important to know how to use it in practical application. Below are three lessons on how to apply the centerline principle in your training.


Lesson #1: Avoid the “splat”

The centerline principal works because it encourages the tension in your muscles to converge between the right and left halves of your body. This serves as a powerful transfer of physical energy up against gravity.

You can find evidence of this even in nature, as anything that has been pushed up against the force of gravity is the result of two converging forces. A common example is the Rocky Mountains here in my home state, which were formed through converging forces deep within the earth pushing upward.

Converging forces push mountains up against the pull of gravity, just as they lift you up as well.

On the contrary, an object that does not have converging force holding it together eventually flattens out. A quick example is dropping a snowball or a glass bottle against a concrete sidewalk. As gravity pulls against the object and it meets an unyielding surface, the matter of the object spreads outwards. This is what I call the “splat effect” and it can happen to your body anytime you are working against gravity.

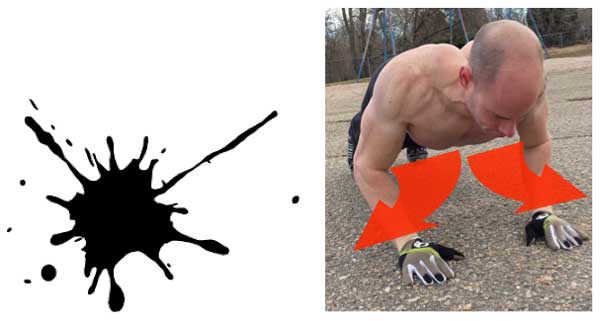
Gravity causes objects to spread out against the ground or floor. In this push up, I have to use my chest muscles to keep my elbows from spreading outwards.

Through directing your muscle tension towards your centerline you gain stability and muscle control so you can more effectively drive yourself up against the pull of gravity.


Lesson #2: Progressively apply force closer to your centerline

Many of the progressions in Convict Conditioning involve moving the hands and feet closer together. Close push-ups and squats are a great example of this. When you employ this style of progression you are putting force in a more direct perpendicular line against gravity. This brings you a host of benefits including greater flexibility, balance, muscle control plus more range of motion in the joints. It also forces you to be stronger since you are pushing your centerline in the most direct vector against gravity for the greatest distance possible.

Going narrow in grip or stance is a great way to make use of the centerline principle.

It’s important to understand that simply pulling your hands or feet closer to your centerline is only part of the progression. You also want to pull your elbows and knees closer in as well. To a certain degree, you can even pull your shoulders and hips in slightly. I like to think of trying to make myself as narrow as possible. This helps me draw myself inward sort of like a guy sucking in his gut on the beach, only now I’m pulling myself in sideways as opposed to front to back.


MattSchifferleScrewLimbsInwardLesson #3: “Screw” your limbs inwards

Many of the muscles in the legs and arms “wrap” around your body’s bones and joints, sort of like stripes on a candy cane. Even muscles that look like they run straight up and down the limb have an origin and insertion point that is slightly offset from one another. The reason for this is to partially create inward torque along the limb as you move about. This inward torque is very important for creating that converging force within the body when doing unilateral movement such as throwing a ball or taking a step.

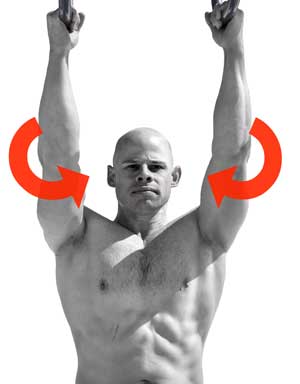
Screwing in your limbs is a little counter intuitive at first because your arms and legs torque in opposite directions to one another. Your right arm and left leg torque in clockwise while your left arm and right leg torque counterclockwise. It’s sort of confusing at first, so I just keep in mind that the knees and elbows both torque inwards. The knees torque in towards your centerline as they bend in front of you, while your elbows toque inwards as they bend behind you.

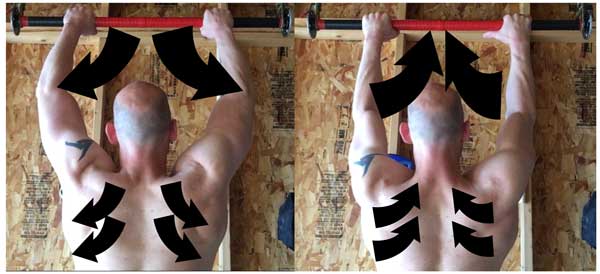
As the elbows torque in or out the tension in the back follows towards or away from the centerline.

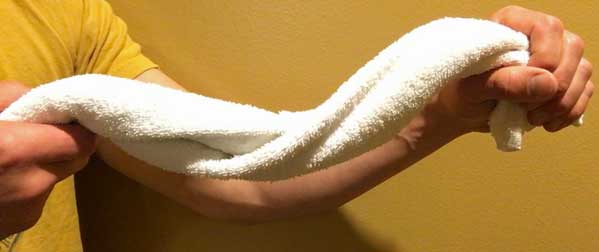
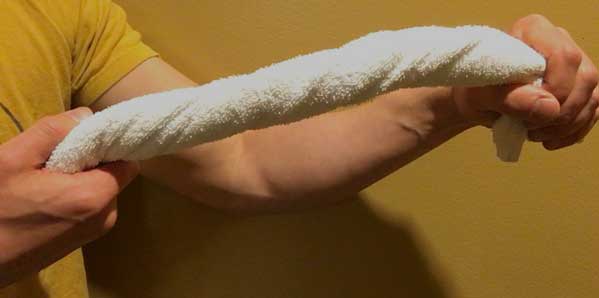
It’s important to note that torquing your legs inwards doesn’t mean your knees cave inwards. When your torque is applied there should be very little lateral movement in both the knees and the elbows. This is why I refer to applying limb torque as “locking up” the limb. It makes it stiff and stable just like twisting a towel makes it stiffer.

MattSchifferleTowel1

Lock it up! Applying torque on your legs or arms will make them more stable. Lock it up! Applying torque on your legs or arms will make them more stable.
If you can apply all three of these centerline lessons you’ll quickly discover more strength, stability, and power than you’ve had before. More importantly, your strength will become more functional and you’ll prevent joint stress that will erode your health and vitality. Just like any aspect of progressive calisthenics, using the centerline principle takes time and practice, so be patient with it. Also, look for opportunities to apply it even if it doesn’t impact the moving limbs. You’ll be amazed at how torquing in your arms can improve abdominal activation with hanging knee raises. Keeping your hands together is also a great way to make narrow and single leg squats more challenging.

Best of luck with your training and let me know if you have any questions down below in the comments!

***

Matt Schifferle a.k.a. The Fit Rebel made a switch to calisthenics training 5 years ago in an effort to rehab his weight lifting injuries. Since then he’s been on a personal quest to discover and teach the immense benefits of advanced body weight training. You can find some of his unique bodyweight training methods at RedDeltaProject.com and on his YouTube channel: RedDeltaProject.

Filed Under: Progressive Calisthenics, Tutorial Tagged With: bodyweight exercise, calisthenics strength, fitness, Martial Arts, Matt Schifferle, PCC, power, progressive calisthenics, strength, tutorial, workout

Strength Cycling for Continuous Improvement

April 7, 2015 By Juan De Jesus 35 Comments

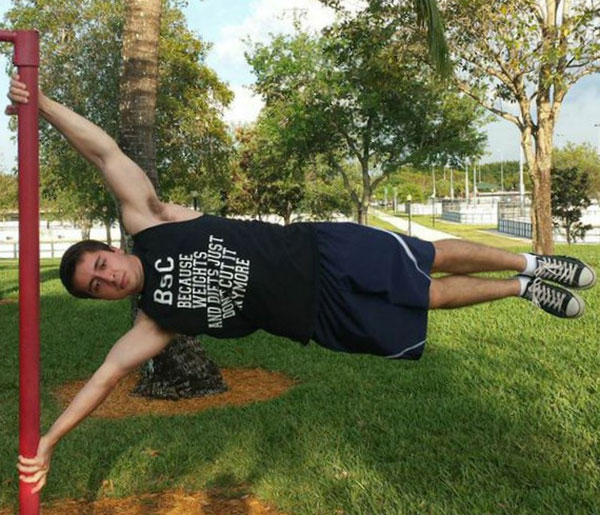
Juan De Jesus Human Flag

Though progressive calisthenics training brings plenty of benefits, ranging from increased flexibility, control, and of course, strength, your body perceives it as a stress. As such, the body builds resistance toward it, which manifests in you getting stronger. Twenty push-ups today might force an adaptation, but twenty push-ups a month later might not.

One way to continue getting stronger on a consistent basis is to pick harder exercises as time goes by (you could begin with band-assisted pull-ups, then full pull-ups, then clapping pull-ups, etc), or by adding reps to your sets (do 3 sets of 30 squats today, 3 sets of 32 next time, etc). Most calisthenics trainers will recommend these two main variables in order to make their workouts harder and induce an adaptation.

At some point, however, our recovery cannot keep up with our want for reps or added difficulty. We’ve all been there: you were supposed to do 15 hanging leg raises today (couple more than last time), but you just could not go past 12. So what do you do?

If you can’t make the reps in one set, I propose simply adding more sets. Look at this cycle:

Juan De Jesus Calisthenics Chart

This is actually a personal example of a 7-week cycle I did with one-arm push-ups. I was only able to manage 3 reps in one set before week 1. Clearly, with such a hard exercise, doing 3 sets and adding reps on a weekly basis would burn me out incredibly fast. So instead, I chose sets of one less rep (sets of 2 reps), and did more and more sets each session! By the time week 3 rolls, doing sets of 3 is actually quite easy (you’ve gotten very strong after a 9 sets of 2!), so you cut the sets down, and begin doing sets of 3. Then add more sets. Repeat as necessary. Deload when you’re feeling fatigued.

I’ve actually started using this template for many of my exercises, and with amazing results! In 6 weeks, I was able to move my handstand push-ups from 4 rep-max (RM) to a 7 RM. For those math geeks out there (like myself), consider a 4RM is about 90% of a 1RM while a 7 RM is close to 82% of a 1RM. So the ratio of your new 1RM to your old 1 RM is of 0.9/0.82 = 1.10. You could say this is akin to boosting your 1RM in a barbell lift by 10% in a measly 6 weeks!

Juan De Jesus Handstand

I obtained a similar result by making my 3RM with one-arm pushups into a 6 RM in 7 weeks. I attribute these exceptional improvements to two main things. First, every session is somehow a bit harder than the one before. (As I mentioned before, your body sees training as a stress. In order to cause strength gains on a weekly basis, you need to train hard, rest well, and make the next session a bit harder somehow.)

Second, because I expect to build up to high volume with many sets, my choice of reps-per-set is conservative at the beginning. So for the first four weeks or so of these cycles, I stay away from failure and really get to concentrate on tension, technique and form. When the cycle gets tough and your sets are much closer to failure, you’ll find strength coming out of nowhere because you built up this foundation at the beginning of the cycle.

Once you’re satisfied with your max, switch to a harder exercise. This is a vital part of progressive calisthenics!

Juan De Jesus One Arm Chin

Note that the idea of adding sets instead of reps in order to get stronger is incredibly flexible. It is more suited towards max-strength exercises (one where you could perform 3-8 RMs) since adding reps on a weekly basis to the sets can be quite difficult when the exercise is so tough. But it certainly does not have to be twice a week as I’ve chosen to do. A routine that works an exercise 3-4 times a week would also work well. Here, you might prefer to just do 1 more set than the session before until you feel confident enough to increase the amount of reps on each set. Then you’d decrease the sets, do sets of more reps, and build back up.

To the beginner student of calisthenics, it is certainly advisable to stick to a few sets, concentrate on form, add reps, and switch to a harder exercise once you’ve squeezed all the strength gains possible from your previous exercise. However, the more seasoned calisthenics enthusiast might need one more tool in order to burst through plateaus. I’ve certainly needed it myself when I find my reps just won’t climb no matter how hard I push. At that point, manipulating the amount of sets might be exactly what you need to bring about continuous strength improvements.

****

Juan De Jesus is a Sophomore at MIT studying Electrical Engineering and Computer Science. His enthusiasm for bodyweight and minimalist training was born in high school with his workout club Body Strength by Calisthenics (BSC) and has stayed with him ever since.

Filed Under: Progressive Calisthenics, Tutorial Tagged With: calisthenics, Juan De Jesus, programming, programming your training, strength, strength training, training, training template, tutorial

The Bodyweight Arm Training Revolution

July 29, 2014 By Matt Schifferle 29 Comments

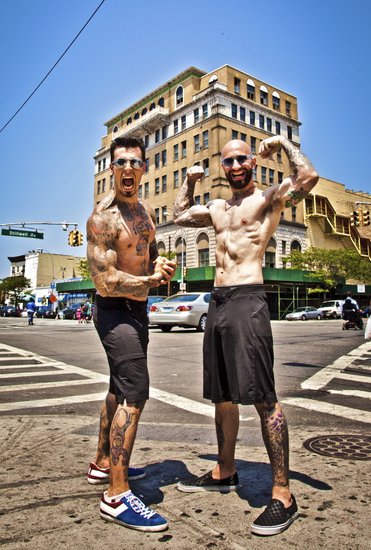
Al and Danny Kavadlo bare their calisthenics arms
PCC Lead Instructors Al and Danny Kavadlo showing off their calisthenics arms.

“Matt I thought we were friends. How could you do this to me?!”

My buddy Tony is standing in front of me, all 295 pounds of him. He’s a powerlifter who considers benching 315 a warm up.

“My biceps feel like they are going to explode. I can hardly get my triceps to relax they are so pumped up. How could you do this to me?” He says with a smile on his face.

Tony’s just gotten a taste of two of my favorite arm blasting exercises. They are simple, efficient and they don’t require a single ounce of iron. They are also somewhat backwards to classical strength training for the biceps and triceps. So when Tony said it was his arm day and wanted something different, I didn’t pull any punches.

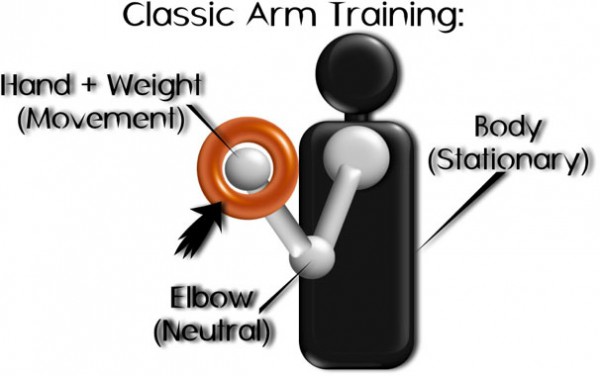
The classic approach to weight lifting work involves holding a weight or cable attachment in the hand. Good technique is classically done with a body that doesn’t move much and a neutralized elbow.

Classic Arm Training Diagram

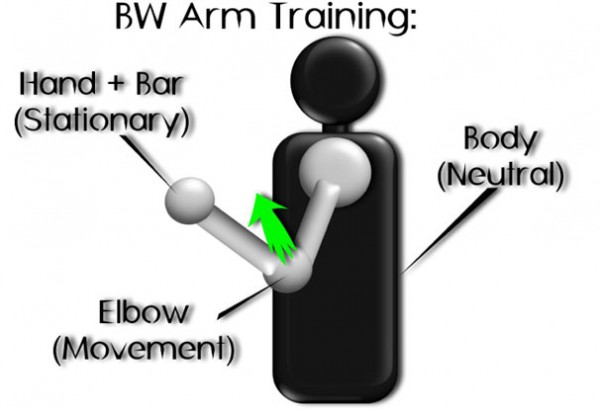
The bodyweight approach works the opposite way. The objective is to lock the hand in place, neutralize the body and move the elbow as much as possible.

Bodyweight Arm Training Diagram

This New Approach Has Some Big Advantages:

Less stress on joints.

The joints of the body typically become more stable and less likely to move into stressful positions when the extremities are against an unmoving object and the body itself moves through space.

More energy on target muscles.

Since there is less energy spent trying to prevent the body from moving (you actually want it moving around) you can spend more effort towards actually performing the movement and working the muscles in the arms.

More functional carry over to pull ups and pressing movements.

The curling exercise is still very much a pull up style movement. The triceps extension is also a style of push up. Just like with pull ups and push ups, you keep your hands in place and move your body using the action of the elbow joint. This is neurologically similar to push ups, dips, rows and pull ups. This means that you’ll program your nervous system to engage your biceps and triceps more during all pushing and pulling exercises. So you won’t just be hitting your arm muscles during these two moves, but you’ll also place more emphasis on those muscles with almost every upper body bodyweight movement in your calisthenics arsenal.

Carry over to Olympic lifting.

Some of my clients who practice Olympic lifting report a carry over to exercises such as cleans. I believe this is due to the fact that both of these moves train you to become more conscious of using your elbow as opposed to just trying to move the hands into an ideal position.

It’s easy to adjust resistance mid-set or even mid-rep.

Both moves have a variety of ways you can adjust the resistance on the fly. You can dial-in the perfect level of resistance and make adjustments as necessary even during those last few reps.

The bottom line is this–by reversing the classical weightlifting arm strategies with calisthenics, you open the door for unbelievable levels of tension applied directly to your biceps and triceps with more comfort and safety. How’s that for a formula for success?

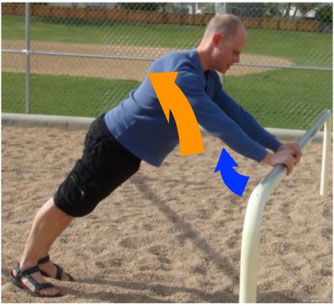
The first exercise is the triceps move known as the Tiger Bend. You can do this move on any elevated platform or edge of a counter. Park benches and sturdy table tops work particularly well.

Place both hands about shoulder width, palms-down with a thumb-less grip. If you’re using a narrow surface, your hands may need to be placed next to each other, which will be fine.

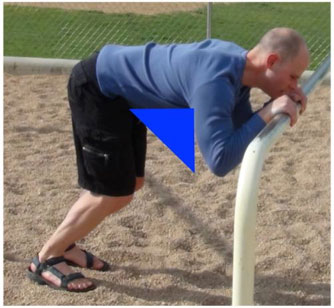
Bend your elbows downward and forward without letting them flare out to the side. The key is to keep your elbows pointing down to the ground, creating a gap between your arm and torso as indicated with the blue triangle in the picture. Tense up your triceps and shoulders as hard as possible, and tense your lats to stabilize your back.

Low Bar Setup Position ArmTraining

Apply resistance by stepping your feet back so some of your weight goes directly to your hands. Once your feet are firmly planted, push directly down with your hands and push your elbows up and away from the surface your hands are pressing down on. (See blue arrow below.) This should cause your body to lift up and back as indicated by the orange arrow. Once your arms are fully straight begin coming back down by bending your elbows down and forwards.

Low Bar Arm Training Top of Movement

Regressions and Progressions:

I love this exercise because it’s so easy to progress and regress it. Moving your feet back will place more weight on your hands and increase the resistance. Moving them closer will do the opposite, making the move easier.

You can also change the resistance by putting your face in a different place in relation to your hands. Bringing your chin between your hands will be easier, while bringing your nose or forehead between your hands will be respectively more difficult. You can also make this move much easier or harder by selecting hand placements at different heights. Just like the push up progressions, the more your body tilts towards the floor, the harder the move will become. Placing the hands on a higher surface will stand your body up more and take away some of the resistance. If you want some additional assistance, you can simply place one foot in front of the other to help lift you into position on those last few reps. Lastly, you can also bend your body in half a little at the hips. Again, this will bring more of your body weight to your feet to make the exercise a little easier. Straightening out your body into one straight line will make the movement more difficult.

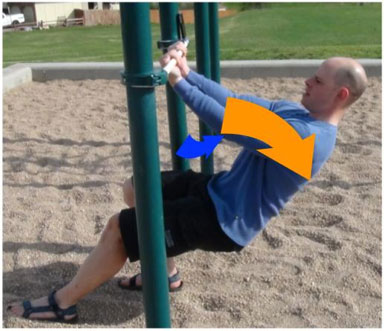
The biceps exercise is very similar, only now you face the other way. Since this is technically a pull up style exercise, so bars or handles you would usually use for moves like Australian pull ups will be ideal.

Place your hands on the back side of the bar with your fingers on top of the bar. Once again, a thumb-less grip may be ideal, but I’ve also used a thumb grip without much trouble.

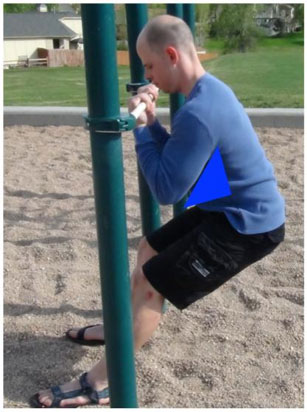
Tense up your biceps and push your elbows away from your rib cage with your hands right next to your chin. It’s still ideal to keep your elbows in front of your torso as you can see from the blue triangle below. This position will ensure maximum tension on your biceps.

Chin Up Position Flexed Bodyweight Arm Training

I recommend using a slight kink in the hips rather than keeping your body straight. This will allow a bit more flexibility in your motion and lend itself to a more natural motion.

Chin Up Position Bodyweight Arm Training

Lower yourself down and back by bringing your elbows out and upward (blue arrow) which will cause your body weight to fall away from under the bar(orange arrow). Return to the starting position by bending your elbows down and forward to maintain that elbow position in front of the ribs.

Performance Tips:

-It’s a good idea to keep tension on your target muscles at all times. It’s tempting to relax at the bottom or top of each rep, but maintaining tension on the muscle is key in maximizing your progress.

– A little goes a long way. If you need to adjust your resistance, just moving your body an inch or two can make all of the difference in the world. Sometimes even moving your feet a couple of inches or slightly straightening your knees can be more than enough.

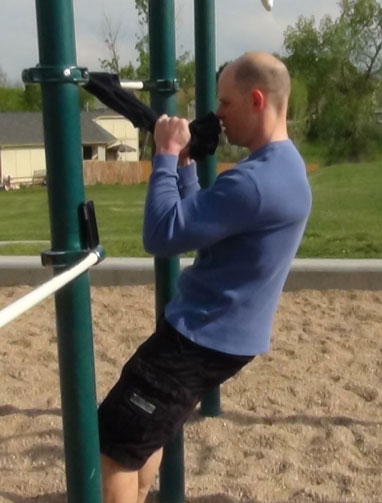
– Towels are a great addition to these moves. They can provide a neutral grip which many people find more comfortable. Plus they are great for building up that grip. Nothing complements your bis and tris like a pair of beefy forearms.

Bodyweight Arm Training Towel Variation

– Once you’re more comfortable with the motion of the exercises, work on tensing other muscles in your body as much as possible. Adding more tension to your back, shoulders, hips, hamstrings and even your chest can bring these moves to a whole new level and your results will follow.

– Be patient and use light resistance for the first few weeks. These moves can take some practice to get everything dialed-in just right. Making the movement of the elbows the focus of the exercise can feel a little strange at first, especially if you’re used to the classic method of curls and extensions. Keep tweaking the position and movement of the elbow, and it will feel natural before too long.

– Listen to your joints. both of these moves can place a massive amount of tension through your biceps and triceps. Sometimes people find their joints need some time to become accustomed to the high degree of tension running through the muscles. It’s always okay to use a shorter range of motion and a lower level of resistance at first to allow the tendons around the elbow to strengthen up. Take your time easing into the exercise over a few weeks. Once they are accustomed to the exercise, feel free to use a big range of motion. By then your elbows will be bulletproof!

Good luck with these two movements. If you have any questions please don’t hesitate to ask in the comments down below.

****

Matt Schifferle a.k.a. The Fit Rebel made a switch to calisthenics training 5 years ago in an effort to rehab his weight lifting injuries. Since then he’s been on a personal quest to discover and teach the immense benefits of advanced body weight training. You can find some of his unique bodyweight training methods at RedDeltaProject.com.

Filed Under: Tutorial Tagged With: arm training, biceps, bodyweight exercise, calisthenics, Matt Schifferle, no gym necessary, outdoor training, strength, triceps

Get Stronger by Improving Your Back Flexibility

March 18, 2014 By Keira Newton and Jarlo Ilano 19 Comments

Master RKC Keira Newton Spinal Flexibility

We get frustrated when flexibility work is just an afterthought in an athlete’s program, something done for only a few minutes after the main workout without a lot of thought or effort. The truth is that proper and focused flexibility training especially for your spinal flexibility, can help you get stronger!

Getting stronger from stretching sounds great, doesn’t it?

How is that? One of the ways flexibility work can make you stronger is immediately apparent in terms of form and technique. If you are so bound up in your upper back that you can’t pull your shoulders back in a proper line, your pressing is not going to be as strong, whether it’s pressing a kettlebell or your bodyweight in a handstand.

For instance, Keira remembers when she first started working seriously on her flexibility, that although her shoulders were pretty mobile, her upper back wasn’t. By working on that specifically, she was able to improve her shoulder positioning, and found her pressing strength immediately improved, as well as her hand balancing. Being able to extend correctly at the upper back placed her shoulders in a much better mechanical advantage and she was able to use her strength from a better foundation.

She also recalls one of her teaching sessions with an experienced RKC who was having trouble with her pull-ups. Keira gave her some corrective thoracic mobility exercises and she went from barely doing one, to doing sets of multiple reps. The flexibility work put her in a better position for her pull and she broke out of that plateau. She was working hard and putting a lot of effort in her pulls, but her mobility was holding her back. Once that was freed up, she was able to gain so much more from her efforts.

High tension techniques for strength and power are great. There’s no denying that those techniques work for getting people as strong as possible, but you have to balance out that tension with proper mobility to get the most out of your body. It’s not the act of stretching that will give you strength, but it’s the new options your body will have to get in the best positions to utilize the power and strength that you already have.

A Flexible Spine is a Powerful Spine

There’s a reason the word “backbone” is associated with strength and courage. A strong and flexible back is the foundation for power in the upper body, just as the hips are for the lower body. Thoracic spine (mid-back) mobility affects how well you can use your shoulder girdle and arms, by placing them either in resting positions of weakness or strength.

A kyphotic (flexed) thoracic spine puts your shoulders well forward of the vertical midline of your body and away from your power posture. It’s like trying to push from an unstable platform. You won’t be able to use your strength properly no matter how powerful your muscles.

Most of our full body rotation comes from the thoracic spine, so when you think of rotational work, that involves a great deal of thoracic function. Stiffness here reduces not just your mobility but your ability to apply the proper leveraging and angles for a lot of different strength skills.

Below we will show you comprehensive routines for improving your spinal mobility for forward bending, rotations, and backbending. You’ll probably find that some of the moves here will be easier for you while others will jump out and kick you in the butt! (Guess which ones you should work on more…)

We advise you to go through all of these movements and discover for yourself what you need to improve the most.

Forward Bending Sequence

Forward bending involves spinal joint and hip flexion, and the associated flexibility of the muscles and other soft tissues of the posterior chain. It can be difficult to isolate one specific cause as the key issue if you have tightness. While it’s very easy to say you have tight hamstrings, the fact is that the sensation of tightness in the hamstrings may very well come from an issue in your low back.

This sequence is a demonstration of “covering all the bases,” with a comprehensive approach that can be pared down as you practice and figure out what you need to work on for yourself. A quick run-through of the sequence can give you a baseline as well, and act as a measure for progress.

We begin with a full spinal flexion movement, from your neck all the way to your pelvis. You want to round out as much as possible, then move into full extension (back bending). Though the emphasis is on the forward bend, you’ll want to move into extension as a break in between. It takes the spine through a full range of motion and is a good warmup for the sequence.

In the squat, point your toes out at around 45 degrees. This positioning assists in helping you round out your lower back and go into a posterior pelvic tilt (the pelvis tucking under you). Get your chest between your knees and tuck your chin down, as well as letting your tailbone sink down. Play with rocking back and forth between your toes and your heels. Then sit back and drop down even further. Next, jump into a push-up position. Then drop your hips down to the floor and lift your chest up and out, locking your elbows out if possible. Remember to look up as well, for extension throughout the entire spine.

Do ten repetitions, or more if you feel up to it.

Master RKC Keira Newton Forward Bend SeatedNext is a standing forward bend, where you bring your hands to one side and keep them on the ground as you stand up. This is a combined forward bend and rotation. Another variant is to sit back into the opposite hip. So if your hands are to the right of your body, you’ll sit back to the left. Spend a couple minutes going between one side and the other.

The last move in the forward bending sequence is the seated forward bend. With this move, you’ll add a rotation to the forward bend, just as you did in the standing forward bend. With your legs locked out straight in front of you, pick a side and fold forward at a diagonal on that side. Move in and out of the stretch at least ten times on each side, as well as straight forward, and hold the stretch on one side for upwards of a minute.

Back Bend Preparation

Backbending (spinal extension) can be a very uncomfortable and difficult motion for many people. When you add up all the hours we sit, drive, and are parked in front of the computer, you’ll see how rarely we get into backbending positions during our normal daily activities. So it’s no surprise that a full backbend like the bridge posture can be so daunting.

With this in mind, it helps to go through a thorough preparation before going to the limits of your spinal extension range of motion.

The first emphasis is on the thoracic spine (your midback), and improving extension and rotation in this region. Improving mobility in this part of the spine prevents undue strain on the lower back by distributing the motion throughout the spine rather than all on the lower back. In the first exercise in this video, you’ll see that Keira has to emphasize the motion, not straight down but also forward, as her shoulders are so flexible that she isn’t moving at the spine. When she improves her direction of force, you can see that the stretch is now where it needs to be. Work on this for three sets of one minute each.

Next is thoracic rotation, which is essentially extension at the side of the spine you are rotating towards. This in combination with sidebending takes you to the end-range of the extension motion. So you’ll be working on all the structures that need to be pliable for a good backbend.

Keira is demonstrating two movement variations: the first is up on forearms and knees with the back starting in a neutral position, and the second is more on the back of the upper arm and shoulder with the torso bending to the side. When you try these out, you’ll notice that the second variation places you in a sort of pre-stretched position, so you won’t be moving as far. You may skip the first variation if you are already flexible, but even then, the first one is a good warm-up to do. Play with shifting your weight more onto your knees or your arms to find the best angle for you. Start with three sets of 30 seconds on each side.

Last in this video is a more direct back bend preparation and is adapted from a sequence taught by Jarlo’s Ashtanga yoga teacher, Cathy Louise Broda at http://www.purpleyoga.com. It starts with a kneeling back bend, then works on the hip flexors, quadriceps, and shoulder bridges, to fully warm up and prepare the body for more intense spinal extension postures.

In the kneeling backbend, it is key to elongate and lift the spine as you lean back. Pushing your hips forward and lifting your chest up and back will create this “open” spine, and will prevent a jammed up feeling in the low back. Relaxing your hips and buttocks will be difficult at first, but that is another key to a good backbend. 10 – 12 slow repetitions here will do you well.

Next up are lunge stretches with rotation to the side of the front knee. Adding rotation to this position adds depth to the stretch and is a great concept to employ in almost any exercise. You don’t have to do this in full splits like Keira is showing, just go into as deep a lunge as you are comfortable. The effect is still the same. Do three sets of 30 seconds on each side.

The camel pose in yoga is a backbend with arm support, and can allow you to improve your backbending technique with relatively little strain. With the support of your arms you can stay in the position a bit longer than you could just bending back. Remember the details of pushing your hips and chest away from each other to open up your spine. Work up to three sets of 30 seconds on this posture, as that’s a good amount of time to experience this position.

Following the camel is the kneeling quadriceps stretch. If your knees bother you in this position, you can sit on a small stool or a few cushions to take some pressure off. If this doesn’t help, don’t force it and try a standing or side lying quad stretch instead. You’ll be able to do this later, but don’t hurt your knees and put yourself out of commission. The key point here is to avoid a low back arch. Keep your back flat, so the forces of the stretch will be on the upper thighs and not on your back. Take your time and gradually lean back further when you can do so without pain. Three sets of 30 seconds to a minute will work well here.

Lastly, shoulder bridge practice starts you on a more active backbend and is a great way to get a lot of repetitions in with good technique. You’ll pull all of what you’ve practiced so far in the sequence and work on a smooth spinal curve, relaxed hips, and good mobility and strength in the quads. Choose the shoulder bridge variation that works best for you, and perform a couple sets of 10 repetitions to improve your bridge.

Full Bridge

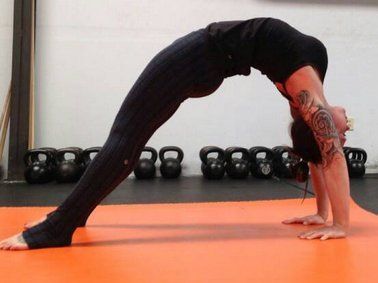
In the full bridge, or “wheel pose” in yoga, you’ll need good flexibility in your shoulders, hips, and the entire back. But you’ll also need proper technique. Important details here are to create that smooth curve and arch, like an archway in a building that can support weight evenly, and simply looks good. You can tell when a person does a bridge and there is a sharp angle in one part of the spine – in that case, there will be more of a strain rather than a curve that distributes forces evenly.

Master RKC Keira Newton Back BendFor a proper bridge, your arms and legs are the support structures and your hips and back should be relaxed and open. Your chest should be projected up and back, toward the top corner of the wall behind you, and your hips should be lifted up and forward, toward the top corner of the wall in front of you. This aiming in opposite directions creates that “openness” in the spine. Breathing should be steady and even, and you should hold the position for 5 to 10 breaths. Again, don’t force things. Take your time and improve steadily.
Master RKC Keira Newton Back Bend 2As you improve you can play with shifting your weight more toward your feet or toward your hands. You’ll find which way is more difficult, and that’d be what you need to work on! It will also lead you back to which of the preparation exercises to focus on. It may be the thoracic extension, or your hip flexors and quads if they are holding you back.

Invest in Your Flexibility

What we’ve shared above will improve your back flexibility and consequently improve your body positioning for every exercise and skill you practice.

It does take time and patience to increase your flexibility, especially if it’s been long neglected. But the payoff is well worth the effort. Set aside some time in your routine to make flexibility a priority and you will be more than happy with the benefits in your strength and power.

***

Keira Newton is an accomplished trainer with many certifications including that of Master RKC, Feldenkrais, FMS, and Z Health. Her combined knowledge of strength training along with flexibility and mobility work has helped hundreds of her clients at dkb Fitness and seminar students to help them achieve their maximum potential.

Jarlo Ilano,PT, MPT, OCS has been a Physical Therapist since 1998 and is a Board Certified Orthopedic Clinical Specialist. He has special interests in the neck and back, shoulder, and flexibility work, combining his clinical expertise with his own training in martial arts and yoga to provide practical and cutting edge knowledge for GMB Fitness.

Filed Under: Flexibility Tagged With: back flexibility, bridge, flexibility, Jarlo Ilano, Keira Newton, strength, stretching, thoracic spine, thoracic spine mobility, yoga

Structuring a PCC Recovery Day

November 5, 2013 By Angelo Gala 5 Comments

angelo1Hey there! How is your training going? Are you making lots of progress on your pistol, handstand push-up and bridge progressions? That’s awesome! How is your body feeling? It’s about time we address the purple and pink striped elephant in the room. Do you take the time to work on skill/technique development and regressions rather than just focusing on cultivating specific strength? How often do you take a day off? Do you include some active recovery or are you inclined to just take it easy and catch up on some youtube or boobtube? Yep, lots of questions coming your way, I know. I’m not trying to poke or point fingers at what you may be or may not be doing. Lets talk recovery and building a happy body that wants nothing more than to rebuild and be better than ever!

I personally LOVE the PCC minimalist approach, especially when it comes to recovery days. But what exactly is a recovery day? Following a simplistic approach to fitness, to me a rest and recovery day incorporates more of what you typically do less of.

Try making a point to emphasize eating and sleeping. Food provides the nutrients and building blocks that support the demands we place on our bodies. When we sleep, are body’s little worker bees put on their hard hats and rebuild our foundation to be bigger and better, allowing our muscles to grow stronger and longer. Catching up with friends and family reminds us of what is important in our lives providing a necessary distraction from the mental grind of vigorous exercise. Light cardiovascular activity is a must. Yes, I said it. I know that High Intensity Interval Training is all the craze right now with plenty of scientific research to back it up but please don’t forget that we need to be easy on our bodies from time to time. 20+ minutes of easy-moderate steady state exercise is a very heart healthy activity to include. Lastly restoring range of motion to our body’s joints and increasing our flexibility will keep our physical body in balance.

If you are wondering where to fit this in, take a step back to look at your weekly training block. How many days in a row are you pushing your body? The acclimated body can go hard for up to three days in a row before it will be asking for a de-loading day. If you are a little more advanced in your age, or have less than 3-5 years of consistent vigorous exercise under your belt, your body may require a break every third day. At a minimum one should back off at least one day a week with a preference of two (maybe three) days depending on your training history. Again, this does not require a total day of nothing on the agenda, just enough of a change of pace to allow the battery to recharge.

Structuring a Recovery Day:

It can be next to impossible to recommend a routine for everyone who reads this article, but I can at least provide some guidelines to help structure a recovery day based on the demands these workouts place on the body.

Recovery can actually to be very intuitive. Many of us are goal oriented and have been working on obtaining certain skills like a back lever or freestanding handstand push-up. Along the journey to these benchmarks we stumble across tight backs, sore shoulders and wrists or maybe even creaky knees. These are all signs from our body telling us that it may require a little extra love and dedicated time where you give back to your self.

Looking specifically at the movements found in the PCC curriculum, we ask a lot out of our shoulders, chest, triceps, forearms and core musculature as we work to support our entire body weight practicing all the push-up, handstand and arm lever variations. Though the single leg squat progressions do not place a significant demand on the lower body compared to a 2x body weight barbell squat, we may find that limits in our mobility hinder our ability to achieve full range of motion in the pistol squat, or at least challenge our confidence in the movement’s execution. If the bottom position of the pistol is easy to obtain, compare it to the shrimp squat, or even the double shrimp? Most likely we will find some difficulty along that journey.

I always structure a recovery workout for my athletes to begin with 20-30 minutes of a steady cardiovascular activity. A few suggestions may be an easy 5k run on a mostly flat to rolling course, a bike ride on the smallest chain ring of your crankset, a steady swim or up to a 5k row focusing on mechanics, cadence and breathe work. The steady cardio is programmed first in our recovery for a few reasons. Most importantly it will generate body heat and prep your soft tissue for manipulation and stretching. Steady cardio creates a calming / meditative effect on the body and mind. It also promotes an environment of self-exploration where you may develop the intuition of what areas of your body may need a little extra attention when it is time to stretch.

After the heat-building phase of the cardio warm-up is complete, it’s time to address some binding in the soft tissue with self-myofascial release techniques (self-massage). For this you can purchase all sorts of tools to address every area of the body such as foam rollers, PVC piping, rumble rollers, tennis balls, a tiger tail and so on. I suggest picking up a lacrosse ball, as it is the most universal tool, you can easily take it anywhere and it can generally apply enough pressure on your trigger points to promote change.

Using the lacrosse ball or roller is theoretically very simple. Pick a muscle group to work on and lay your bodyweight over the tool. Initially you will scan around your soft tissue on the tool looking for any tender spots or pain spots. Once something jumps out at you, stop moving and isolate the discomfort. Try your hardest to not move off the spot, then apply a contract and relax activation with the muscle group you are rolling over. You can do this by either squeezing the muscles you are resting on or moving the stimulated joint through its natural range of motion over and over. This will most definitely cause a bit more discomfort but let me be upfront and completely honest with you. When it comes to restoring / improving mobility or flexibility, its going to be uncomfortable. The more discomfort you can tolerate (aside from sharp pain, which is always bad) the more change you will make. If its not uncomfortable, then you wont be making much if any progress. Your only other option to break up the binding is to get a deep tissue sports massage on a weekly or biweekly schedule. If your budget isn’t big enough to afford regular body work, then get comfortable with being uncomfortable on a lax ball 😛

Personally, I beat my body up enough that I can spend all day doing soft tissue work, so in order to keep ourselves within a reasonable time cap, pick an area on the front side and back side of the shoulders as well as an area both on the front side and back side of the hips. Spend about 5 minutes on each or at least until you feel a bit of the discomfort begin to subside.

Now that we have successfully built requisite body heat and prepped our soft tissues to make change, its time to focus on increasing our flexibility since many exercises in the PCC curriculum require a fair level of specific flexibility. To do this we will work from the ground up.

-Single leg squats require a significant amount of ankle mobility so here we can utilize a standard Standing Calf Stretch focusing on dorsi-flexing our ankle as much as possible. Don’t forget to practice this stretch with the knee straight as well as bent.

angelo2

-To get the outer hips, a Standing Figure 4 Stretch is achieved by crossing one ankle over the opposing knee. From this position, sit back as if you were sitting in a chair while simultaneously reaching your rib cage over the top shin. Do your best to keep your hips as neutral as possible rather than shifting them to help counter balance the posture.

angelo3

-Inner thighs are most accessibly stretched in the Bound Angle Pose. Here push your lower back up against a wall and pull your heels together as close to your inner thighs as possible. For the remainder of the stretch, place your hands on your knees with fingers pointed toward your midline and gradually apply pressure down into your legs as if you could press your knees all the way to the floor.

angelo4

-Stretch the backside of your legs with the traditional Head-to-Knee Pose. From a seated position, extend one leg forward and align the sole of your opposite foot against the inner thigh of your extended leg. From here, square the center of your chest with the knee of your extended leg and lean forward in an attempt to rest your bottom rib on your upper thigh bringing your nose-to-knee.

angelo5

-Half Kneeling Hip Flexor Stretch with a side bend will open the front of the hips as well as prep the spine to bend and twist. Set up in a lunge position with the back knee on the floor. Bind your fingers and stretch both arms over head. From here slide your hips forward until you feel a significant stretch in the hip flexor muscle of the down knee then begin to side bend over the front leg focusing on a long stretch sensation from the top of the hip all the way to the bottom of your armpit.

angelo6

-You are only as young as the mobility of your spine so to improve this, hang tight in the half kneeling position while you twist your opposite elbow over the front knee. Place your hands in a prayer position with fingertips facing forward then press your hands together to engage and deepen the twist.

angelo7

-Heart Opener’s Pose is a great stretch for the mid to lower back, it improves your overhead position and acts as a great prep for bridging. Find your way into this posture by setting up in a quadruped position (kneeling on all fours). Prioritize the stretch in your middle back first by pressing your belly button down towards the floor, arching your spine. Finally, to stretch your shoulders and deepen the back bend, keep your hips stacked on top of your knees while you walk your hands forward until you can rest your forehead or even your chin on the ground.

angelo8

-Address your shoulders with a Butterfly Shoulder Stretch. Again starting in a quadruped position, cross your elbows in front of your shoulders with the tops of your hands pressed against the ground. Stretch your arms away from each other, shrug your shoulders down away from your ears then slowly begin to rock forward until your chest aligns in front of your elbows and you feel a stretch on the outside of the shoulder that is stacked in front.

angelo9

Following this blueprint may not cure all or any of your ailments, but it will certainly aid in your weekly workout recovery. It is easy to get consumed by the exercises that build strength and conditioning while losing sight of benefits gained by slightly backing off the intensity. Try adding this to your program at least once a week and let me know how it affects your progress.

***

About Angelo Gala, RKC / PCC Team Leader: Angelo Gala has been a fitness professional in the Boston area for greater than 11 years. He is a Certified Strength and Conditioning Specialist through the NCSA, and has studied the Pranavayu system of yoga under David Magone.  He is a Dharma friend at the Sakya Center of Buddhist Studies in Cambridge, MA where he completed a 1 year intensive study of Mangalam Yantra Yoga under the guidance of Lama Migmar Tseten. Go to http://www.dragondoor.com/angelo-gala/ for more info.

Filed Under: Flexibility, Progressive Calisthenics Tagged With: active recovery, calisthenics, meditation, PCC, recovery, skill training, strength, stretches, technique, yoga

Building Strength Without Mass

October 29, 2013 By Al Kavadlo 53 Comments

al1 I’ve been getting at least one almost every single day for a while now. In the beginning they were annoying, but after the first few times I actually started to get a kick out of them. I even came to find them flattering. After all, the people who send them are generally well intentioned and often don’t realize they are being rude. Some of them are actually very polite. I’m talking, of course, about emails like this one:

al2_emailIf I had seen the me of today when I was a teen, I probably would have wondered the same thing. After all, the main reason I got into strength training was because I was a scrawny kid who wanted to build some muscle. Fourteen-year-old Al would be very disappointed that after 20+ years of working out I still wasn’t as massive as the Incredible Hulk.

In fact, even though I’m about 30 pounds heavier now than I was at age fourteen (in spite of not growing an inch taller since then), I’m still a fairly small guy. And though my bodyfat percentage sits comfortably in the 8-12% range (I tend to naturally lean out in the summer), at a height of 5’11’’, I’m incredibly small by bodybuilding standards. Good thing I’m not interested in becoming a bodybuilder!
al3 As a kid, however, I desperately wanted to bulk up. Though I managed to beef up to 190 pounds by my early twenties, I eventually came to find that I felt and performed better when I wasn’t carrying so much mass. Though bulky muscle-men seemed ubiquitous to me in my youth, as an adult I soon discovered that to people who weren’t fans of pro wrestling and Arnold movies (which, shockingly, is most people), being overly bulky is a turn-off. It took me a long time to change my perspective, but I’ve since learned to embrace my physique and take advantage of its benefits.

Though there are a few notable exceptions, most advanced bodyweight practitioners tend not to have huge, imposing physiques. Instead, high level calisthenics athletes usually have more of a lean, athletic build. After all, if pound-for-pound strength is the goal, it helps to be relatively light. The higher your muscle to weight ratio, the better off you’re going to be in regard to bodyweight training. Though you definitely need some muscle mass to achieve high levels of strength, it’s more pragmatic to make a little muscle go a long way. At a certain point having too much mass becomes cumbersome. It’s weighs you down more than it helps.

Build Your Foundation

Regardless of whether your aim is to add muscle mass or simply get strong, the first thing you need to do when you begin training calisthenics is build a solid foundation. Though everyone starts at a different place, building to at least 40 bodyweight squats, 30 push-ups, 20 hanging knee raises and 10 pull-ups (those numbers might look familiar) is a prerequisite that should be achievable within a few months (or a few years, depending on where you’re starting).

Women should aim for the same numbers, but with knee push-ups and Australian pull-ups in place of the full ones. This is not an issue of sexism. Biologically, women have a lower propensity for upper-body strength as compared to men. Of course with proper training, women have the potential to develop serious upper-body strength!

al4-adrienne Once you’ve established that baseline of fitness, you’ll have likely built a bit of strength, stamina and muscle along the way. If you aren’t looking to grow your muscles past this point, however, it’s time to start training more advanced exercises and leave the high reps to your warm-ups.

Skill Out

It is often said that strength is a skill, and like any skill, the way that you get better is consistent practice. The goal of a strength workout is not to focus on the quantity of reps, but instead the quality. I recommend sticking with sets of 3-5 reps. However, it is helpful to add additional sets to offset the low rep range and allow for adequate volume. For this reason, I suggest performing 3-5 sets of each movement in a given workout when strength is the primary goal. Remember, you don’t need to do the same amount of volume as you would in a hypertrophy workout. The most you’ll probably ever need to do of a single exercise is 25 reps per workout. We’re not necessarily looking to get a pump, either. In fact, you’ll want to take longer breaks in between sets when you’re doing pure strength work than when the goal is mass-building. I recommend anywhere between 2-5 minutes of rest between sets.

It’s important to understand that strength is as much neurological as it is physical. Whenever you try to get your body to do something that it isn’t used to doing, it has to build a new neurological pathway to make it happen. Even when you ask your body to perform a familiar movement pattern, it will have a hard time if the leverage has been made less favorable than what it’s become accustomed to. Your brain has never had to send that specific message to your muscle before, so it must work very hard in order to arrive there. The message often comes in fuzzy.

Imagine using a machete to chop your way through the thick vines of a jungle. This is how hard your brain must work to get your body to do something for the first time. Now imagine you’ve lived in that jungle for ten years and walked the same few routes over and over, gradually clearing away the brush little by little. Eventually the path would be easy to walk and you’d arrive on the other side much more quickly, and with much less effort.

al-5 The same thing happens in your brain with consistent training. Over time, the pathway becomes clearer and the message arrives faster. The body adapts to whatever stimuli it is consistently exposed to. A body that is regularly called upon to apply force against resistance will get better at doing so.

Lean Machine

Diet may be the single biggest factor that determines whether or not you will increase or decrease in size. If you want to grow, you’ve got to eat a lot. Conversely, if you’re not interested in gaining weight, you shouldn’t be overeating. Though nutrition is a bit more complex than a simple calories-in minus calories-out equation, nobody ever gained significant bulk without the calories to back it up. Conversely, you can’t lose fat without being in a caloric deficit.

Personally, I follow a very simple diet: I eat when I am hungry and stop when I am full. I avoid mindless snacking and stay away from processed foods. I’m not trying to gain mass, but I’m not trying to lose it either. People love to ask me how many grams of protein I consume each day or how I time my carbohydrate intake, but the truth is I don’t concern myself with such trivialities. There is no need for the average person to possess a profound knowledge of nutrition in order to have a lean, strong physique. One need not understand how free radicals and antioxidants work in order to know that eating blueberries is healthy.

al6 Regardless of your ambitions, the most important thing is being consistent with your training. Focus on making regular exercise a part of your lifestyle. Don’t over-analyze the details, especially if you aren’t doing the work physically. Of course if nutritional science is of genuine interest to you, there’s no reason to ignore that yearning.

Just don’t make your life any more complicated than it has to be. When all is said and done, the most important thing is to respect and appreciate the body you have. It’s great to strive for physical perfection, but the journey matters more than the destination.

***

About Al Kavadlo: Al Kavadlo is the lead instructor for Dragon Door’s Progressive Calisthenics Certification. Recognized worldwide for his amazing bodyweight feats of strength as well as his unique coaching style, Al is the author of three books, including Raising The Bar: The Definitive Guide to Pull-up Bar Calisthenics and Pushing The Limits! Total Body Strength With No Equipment. Read lots more about Al on his website:www.AlKavadlo.com.

Filed Under: Progressive Calisthenics Tagged With: Al Kavadlo, Century Test, consistency, diet, muscle mass, skill training, strength, strength training, weight gain, weight loss

Erwan Le Corre talks Bodyweight, Part II

August 6, 2013 By Paul "Coach" Wade 10 Comments


erwan1

Erwan Le Corre is the founder of MovNat.

Erwan Le Corre is an icon in the fitness world. He is considered by many to be the modern-day inheritor of the French tradition of physical education (and that’s quite a compliment when you consider that the French created parkour, free running, and effectively invented the modern military “assault course”). Erwan is the founder of MovNat—an astonishing physical education and fitness system based on comprehensive movement abilities. There are many coaches who try to imitate what he does, but for people who have seen him in action—or learned from him—there will only ever be one Erwan Le Corre!

Paul “Coach” Wade (author of Convict Conditioning) recently got the chance to ask Erwan his opinion on all things bodyweight, on behalf of the PCC community. In Part I of this interview, Erwan shared his thoughts on his heroes, the thinking behind MovNat, and bodyweight efficiency.

In this second and final part of this interview, Erwan opens up about his status as “World’s Fittest Man,” his favorite bodyweight exercises, and performing sit-ups over an eight-lane superhighway!

Paul Wade: Erwan, what are your favorite bodyweight movements?

Erwan Le Corre: Probably the “muscle-up” (this name is just SO weird, what does that mean exactly?!) simply because it is such an explosive movement that demands power but also coordination and balance. It is also adaptable to different environments, not just gymnastic rings, you can do it on a tree branch, a platform, a cable or rope etc…you’re looking up and the next second you’re looking down from an elevated place. To many people it is an inapproachable feat but when you’ve trained to make it almost effortless it’s such a bliss.

But that’s thinking “bodyweight movement” for strength. You know, holding a simple deep squat, and be super relaxed in that position and hold it for a long time, this is maybe the simplest, most enjoyable human movement and position of all. How many people out there can fully squat and hold it minutes in a perfectly relaxed state? There is more to a functional, competent body than just the impressive stuff that demands strength or power.

erwan2_al

Al Kavadlo is a master of the muscle-up!

Paul Wade: Actually, “muscle-up” still seems like a strange name to me—in jail, these were called “sentry pull-ups,” which kinda makes a little more sense!

Do you use progressions in your teaching? (For example, beginning with easier push-ups on the knees, and moving to one-arm push-ups.) If so, could you give us an example?

Erwan Le Corre: Of course! Do you seriously think I’d take a completely deconditioned person (I call them “zoo-humans”) in the woods and say, have them walk in balance across a fallen tree trunk above a raging river? That would be criminal! Where should people start? They start not in natural, unpredictable and complex environments but in controlled, or at least managed environments that are predictable and safe. Or else you don’t have a coaching and physical education system, you have no system and you’re a jackass.

So I place a 2×4 wood beam on the ground and voila, here you go, you’ve got an environment with basic, entry level of complexity but that does challenge the beginner. It demands not just “balance” but “balancing skills” and you start practicing safely and progressively that way. Another example, before you train muscle-ups you train explosive pull-ups, before you train explosive pull-ups you train regular pull-ups, before you train regular pull-ups you train a variety of hangs and hanging traverses (the “side-swing traverse”) etc…

The priority is always the establishment of movement quality and efficiency through technical work. Then you gradually increase volume, intensity and complexity. Gray Cook puts it simply like this, “First move well, then move often.” In most cases motor-skills and conditioning will develop symbiotically. Depending on the movement, and/or the environment complexity, a physical action may demand more motor-control, or more strength and conditioning. I’ve addressed this earlier but I like to hammer it because it is so important. So the way you train sometimes involves both aspects, or may dissociate them. I’ve seen guys who could do tons of pull-ups but were unable to climb on top of the horizontal bar, I mean even after trying a few times. No amount of general conditioning can compensate for a lack of motor-control and technical skill. An hour later they could climb on top 6 different ways after learning the techniques.

I also have seen guys who could do tons of pull-ups unable to climb a horizontal bar even with technical instruction, do you know why? Because the bar was too thick, smooth and slippery for them and they couldn’t hang to it very long, let alone attempting to just pull themselves up, as they simply didn’t have the necessary grip strength to do so. You’re only as strong as your weakest link, and not amount of technical instruction will compensate for a lack specific conditioning or strength. And if you want to know, all these guys were highly trained CrossFitters. Take the test I mentioned above and see how it goes. If it doesn’t go as well as you thought it would, you have two options:

– re-assess the way you train (and maybe the reason you train), and modify your training regimen consequently. Maybe take a MovNat course or certification workshop.

– just forget about it and get back to your routine.

Paul Wade: Erwan, so far I am surprised by how much your thinking has in common with what I would call the “old school calisthenics” approach to training—you make a throwaway comment “you are only as strong as your weakest link,” but very few people will realize how important that understanding really is.

What’s your personal training regime like now, in brief? How many days per week?

Erwan Le Corre: I rely on my intuition. Not everyone is endowed with good intuition about themselves, their body and what’s the best way to train, I am fortunate that I’ve got a lot of experience and I know myself well, I have explored many training modalities and mastered a few. I’m also opportunistic. If I am somewhere with water I might swim, if I’m in a gym my training will be slightly different, or in nature, or at a martial art academy, depending on what a particular place has to offer. Personally, routines are not my cup of tea, but this being said routines and programs are very important for beginners, or when you have a very specific objective, like an event you want to participate in and you want to kick ass, or at least survive. Programming IS part of MovNat. It’s just that at the moment, my training doesn’t follow a particular structure. It’s free, intuitive and opportunistic, and I am mostly maintaining a decent general level of skills and conditioning. It can change tomorrow and I can decide to structure my training again, with particular goals. There’s no rule. I also want to say that it is very important to manage health for longevity.

erwan3

Bodyweight-based training can be opportunistic—use whatever is around you to build your skills and abilities.

 There’s only so much your body can take. Aging is real. You can’t prevent it, but you can decide how fast it goes, and avoid poor lifestyle choices that make you age even faster. Overtraining and under-recovery participate in aging faster, including uncomfortable symptoms such as joint pain etc…At almost 42 I am fortunate that I experience so far very limited symptoms like that, and it has to do with the way I train, in term of movement quality but also the way I treat my body overall. If I were to tell you I train X number of days a week, or X number of hours, or X number of sets and reps, does it actually mean something THAT objective? What is the quality of each movement performed? At what intensity? How prepared is my body? How do I recover? How do I treat myself? You know the latter questions only seem more subjective, but IMO they are actually more objective than any indication of numbers. The body doesn’t know anything about numbers. It only knows about movement patterns and sensations. How you FEEL should be your number one indicator or adequate training and practice. Feel amazing and don’t settle for less. You’ve got one life. At the end of your journey you will have forgotten all the details and numbers of your programs. But you will never forget how they made you feel.

Paul Wade: An amazing attitude—a lot of advanced guys think the same way.

Guys like Demenÿ and Hébert believed that an athlete should have mastery of their body in any environment—underwater, on rough terrain, even high above the ground. You are known for having performed some very unusual feats in this tradition. (For example, Erwan famously had a sit-up competition with Jean Haberey, while both men were hanging from a bridge over an eight-lane superhighway!) Could you tell us some of the thinking behind this please?

Erwan Le Corre: I think lots of people lack motivation to exercise because the purpose behind it is either unclear or too superficial. It can be unclear when you’re aiming at general aspects of “fitness” but without ever really assessing their transferability to real use. Because of this vagueness, you need to focus on something that is more tangible to you, like number of sets and reps. That may be rational in some way, but your mind needs something more substantial and real to be really excited. My mind at least, and that which of people who train with us. Superficial goals like a better looking body are legit, but they are not deeply satisfying.

So I’m not saying that having specific goals that can be measured is unimportant, it actually is very important for a number of reasons, such as assessing progress, the effectiveness of a program and motivation for instance. All I am saying is that when there’s a truly practical goal in mind, let’s say I’m going be able to carry somebody on my back a whole mile, or I am going to train to hold my breath 3 minutes straight so I could dive and rescue someone if needed, or I will become fast at running so I could escape a threatening situation swiftly…you see, these are practical goals. The indications of the one mile firefighter carry or the 3 minutes breath hold only matter because the objectives are practical performance, but if you remove that and just look at “one mile” or “3 minutes” then it doesn’t mean much anymore.

The practical goals go beyond the current perception of what is “functional.” You step on a bosu and do rotational lunges and that’s functional. Fair enough. But what actual practical physical action are you performing? If it is not clear in your mind what you’re trying to replicate, then you might get bored very soon because it won’t click in the back of your head. Practical goals give you, and your training, a deeper sense of purpose, that increases and maintains your drive to exercise hard and consistently. Because you want to acquire real-world physical competency, or to maintain it. You want to know what you are capable of, what you are made of. There’s a sense of reality and realism that is undeniable. You can walk the streets with the self-confidence of a person who knows they won’t be completely helpless to themselves and others if a difficult situation arises. Be useful, know you are. This is a great feeling!

Paul Wade: What, in your opinion, is the biggest barrier to fitness in the modern age?

Erwan Le Corre: Mentalities. There are gyms everywhere, parks everywhere, nature, cities. There are millions of fitness videos online for people who seek motivation, and books or trainers for those who seek knowledge or guidance. But the sad reality is that the average Joe and Jane are real “zoo-humans.” Why on Earth would they even want to move or exercise? Why such a physical punishment when you can be comfy at home and hide your physical suffering with pills and entertainment? Comfort is weakening, but people seem happy to be soft, they joke about it, every TV commercial makes people laugh about useless, helpless human beings who are completely disempowered. There’s a global culture of voluntary disempowerment. It is both a mass-condition and a mass-conditioning.

erwan4

Bodyweight fitness is about more than strength and huge muscles. How is your running? Your climbing, your swimming?

Change this mentality and you will have legions of people who realize that exercising, especially moving in natural ways, is not a chore, not a punishment, not an option, but an expression of their most beautiful human nature. It belongs to all of us regardless of what makes us different. It has the potential to bring us all together. I want to awake in a world crowded with self-actualized, self-empowered individuals. Instead I wake up in a world crowded with dormant minds and lazy, soft bodies. The people who train physically and want to stay healthy and strong within a society that is sick and weak are modern heroes. They may not want to be part of an elite, but in some way they are. But my point is the opposite of trying to create elites. It is rather that everyone would be liberated and empowered. I have created MovNat with this vision in mind. It is quite the romantic, utopian and delusional vision, yet I am innocent enough to believe a change will take place. In my inner world, the change is taking place NOW.

Paul Wade: Wise words, my man. Are there any long-standing myths about strength and fitness training you would like to see vanish from the face of the earth?

Erwan Le Corre: Probably the idea that all there is to fitness and building a body is to grow bigger muscles. It is not really a myth but an overwhelmingly common perception. There is more to building a body than building muscles, and there is more to building a human being than building its body. To me fitness is the level of your energy at every level, physical, mental, emotional and spiritual. This is old school, in the sense that the ancient Greeks thought like that, all the main pioneers of physical education in Europe all thought like that. They didn’t seclude themselves to a purely physical realm. They wanted people to be whole. The mainstream, commercial fitness industry has absolutely no interest in you thinking like that. You don’t make much money on self-actualized people, that’s why.

Paul Wade: You have been called The World’s Fittest Man due to your wide-range of abilities. Any final tips from the World’s Fittest Man?

Erwan Le Corre: This is one of the myths you were mentioning earlier and that needs to be debunked. Christopher McDougall, NYT Best-seller author for “Born To Run” has written in a article he wrote for Men’s Health a few years ago that I may rank as one of the fittest men on the planet. Well, it all depends on what criteria. Few people, I admit, are able to follow me in my “world” and keep up with every type of physical challenge they could encounter, on any terrain. I’ve met many inspiring specialized athletes that all could kick my ass in their specific field of predilection. I’ve met guys who are generalists, like high level CrossFitters, but who forget that reality is specific and that specific training is required for every aspect of competency you want to be ready for. But don’t be mistaken. I couldn’t care less about competition and rankings. I’m not here to prove anything, but to embody my philosophy and spread the MovNat system. All I hope is that MovNat will produce many “fittest guy on Earth.” Most importantly, just train smart and hard and become YOUR fittest, this is what truly matters. The rest is just ego. Don’t neglect areas of your physical competence and potential and leave them under-developed. It’s really a loss for yourself. Become the fittest you can be in all areas of natural human movement is probably the best tip I can share.

erwan5

MovNat students learn to use their bodies in different environments—not just in an air-conditioned gym!

Paul Wade: Erwan, you are a phenomenal example of natural fitness! Thanks for your time.

Erwan Le Corre: Compliment taken. You’re not bad yourself! Resiliency is a beautiful thing. I want to tell people this: whatever you thought or told yourself you were, whatever you are or were told you are, it doesn’t matter anymore the moment you decide to redefine and remodel yourself into the most self-actualized person you can. ON YOUR OWN TERMS. Because if you can’t empower yourself…who will?

 ***

Erwan Le Corre is the founder of MovNat. To find out more about his training approach, head on over to http://www.movnat.com/.

***

Paul “Coach” Wade is the author of five Convict Conditioning DVD/manual programs. Click here for more information about Paul Wade, and here for more information on Convict Conditioning DVD’s and books available for purchase from the publisher.


Filed Under: Motivation and Goals, Progressive Calisthenics Tagged With: advanced, bodyweight exercise, Convict Conditioning, Erwan Le Corre, fitness training, movnat, muscle up, natural movements, no gym necessary, outdoor training, Paul Wade, strength

  • Page 1
  • Page 2
  • Go to Next Page »

Primary Sidebar

Featured Products

previous arrow
GetStrongBookCover
ConvictConditioningBookCover
StreetWorkoutBookCover
ExplosiveCalisthenicsBookCover
StrengthRulesBookCover
next arrow

Categories

Progressive Calisthenics Certification Logo
Click here for more information or to register for the PCC workshop

Get Strong Workouts TriadXP App
Get Strong Workouts App

Recent Posts

  • Top 5 Reasons Why an In-Person Workshop is the Best Way to Supercharge Your Training
  • HYBRID STRENGTH TRAINING IS HERE!
  • My Calisthenics Journey to the PCC
  • The Handstand Press: Complete Control Through the Handstand
  • The Get Strong App is Here!

Dragon Door Publications

Dragon Door Publications

Recent Comments

  • bross dandon on The Case for Curved Handstands
  • Johnny Flewellen Jr. on Strength for Life
  • Dan Earthquake on The Pursuit of the Daily Minimum
  • Johnny Flewellen Jr. on The Pursuit of the Daily Minimum
  • Johnny Flewellen Jr. on Yoga, Calisthenics and the Journey of a Lifetime
FOLLOW US ON TWITTER!

Copyright © 2025

Dragon Door Publications / The author(s) and publisher of this material are not responsible in any manner whatsoever for any injury that may occur through following the instructions or opinions contained in this material. The activities, physical and otherwise, described herein for informational purposes only, may be too strenuous or dangerous for some people, and the reader(s) should consult a physician before engaging in them.