• Skip to main content
  • Skip to primary sidebar
  • Home
  • Contributors
  • Resources
    • Q&A with Paul “Coach” Wade
  • Workshops
  • Products
  • Forums
  • Articles
  • Blogs
    • RKC Blog
    • Strong Medicine Blog
  • Archives

PCC Blog

Progressive Calisthenics - The Official Blog for the PCC Community

Tutorial

Back to Basics: 6 Moves to Master Before Moving Forward

November 4, 2014 By Eric Buratty 35 Comments

Kavadlo Brothers Squat

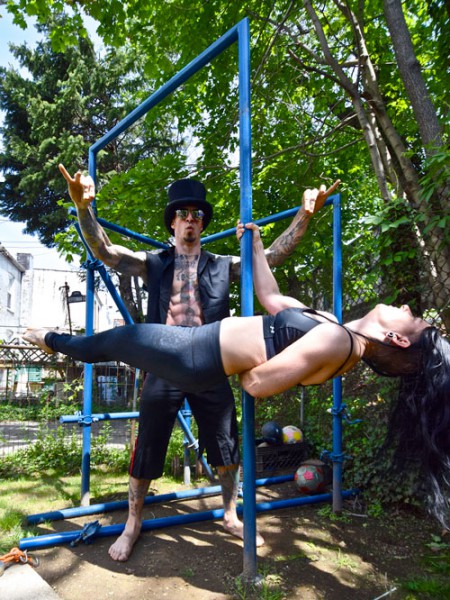
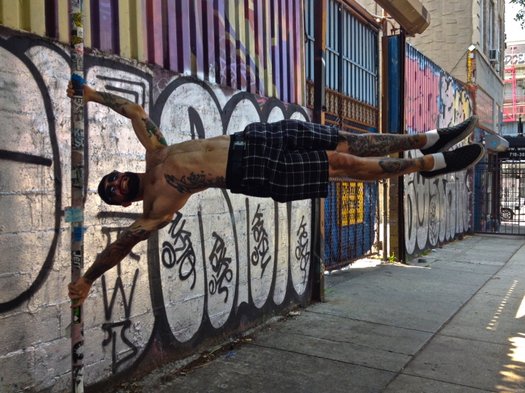
Everybody wants to go straight to the advanced moves, but ain’t nobody want to make time for getting better at the basics!

Here at PCC, we get it. Your mind was just blown away from someone’s Facebook picture or YouTube video performing some sexy, ninja-like move that you want to try, too. This simply means you’ve been inspired to either try a calisthenics move (which is cool), or convert your training efforts exclusively toward calisthenics all together (even cooler).

But, like everything else people are good at in life, such graceful displays of strength, control and power require a considerable amount of time and practice to master. Not to mention the patience involved will humble anyone who might already have a strong fitness background from other disciplines (e.g., weight training, dancing and yoga).

That said, before moving on to some of the more advanced variations of calisthenics moves, EVERYONE needs to become proficient in the following basic positions.
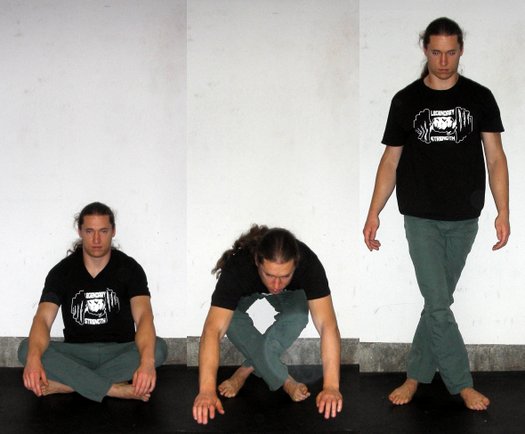
1. Full-Depth Squat

Eric Buratty Squat

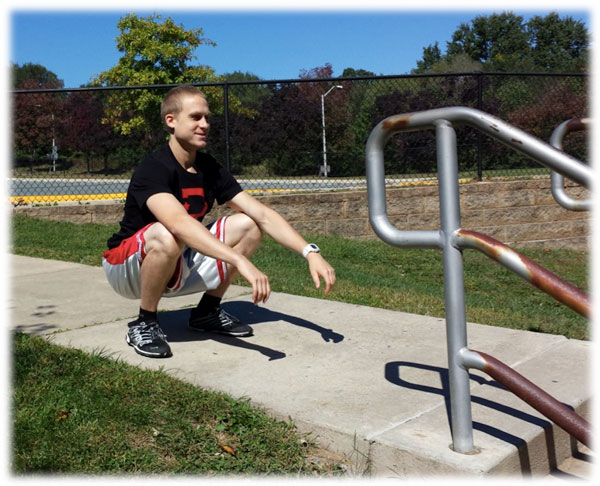
Also known as an “ass-to-grass” squat, this is a basic human resting position that involves maximal bending of your hips and knees. NO ONE has any business loading this movement pattern until they can achieve full range-of-motion with their own bodyweight, and still remain upright from a postural perspective.

Calisthenics Transition: Foundation for Progressing the Squat Chain (i.e., working up towards pistol and shrimp squat variations)
Recommended Practice: Sit in this position for 5-10 minutes daily. The more favorable times to do so are upon waking for the day, before bed, whenever on a rest day and before or after a tough workout. Feel free to shake up social conformity any time you have the opportunity to squat—especially when waiting in line or shopping out in public.

2. Supine Hollow Body

Eric Buratty Supine Hollow Position

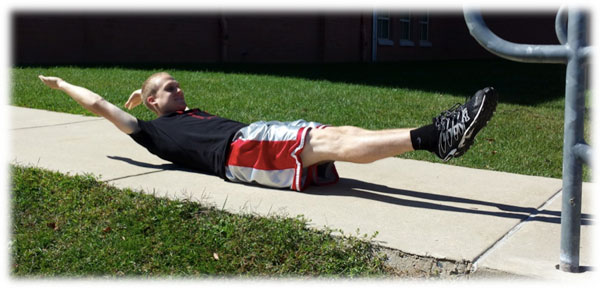
The hollow body is the ultimate educator on the principle of whole body tension. A challenging core workout on its own, this position teaches you the principles of progression in all of calisthenics. More specifically, it allows you to feel the effect of lengthening or shortening the body as a lever for resistance, so you can adapt your training on a given day accordingly. Without understanding the principles of progression in calisthenics, you will only be setting yourself up for failure—and even injury.

Calisthenics Transition: Foundation for Precision and Control Required in Handstand, Front/Side/Back Levers
Recommended Practice: Maintain this position for a total of 2 minutes on training days involving handstands, front/back levers and human flags. Use as part of a warm-up, or superset with the aforementioned moves as active recovery during a workout (e.g., 8 sets of 15 seconds, 6 sets of 20 seconds, 4 sets of 30 seconds).

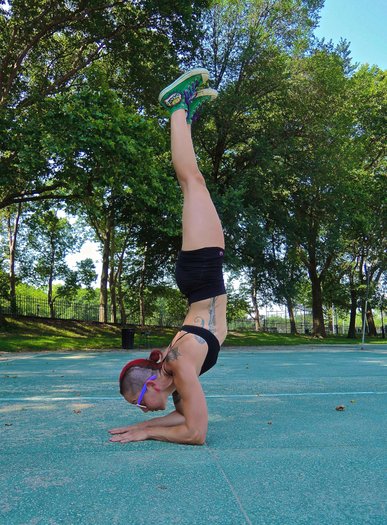
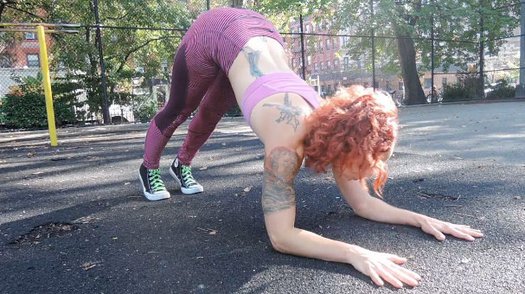
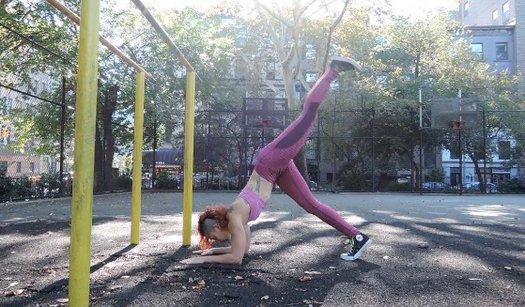
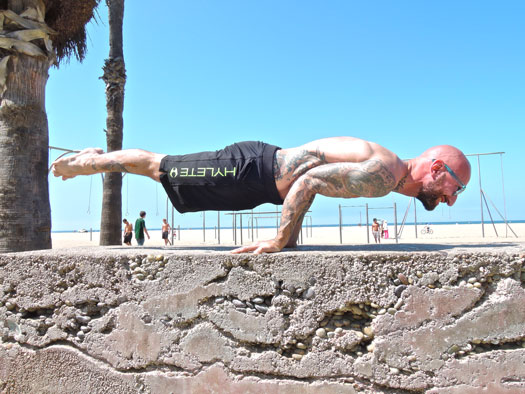
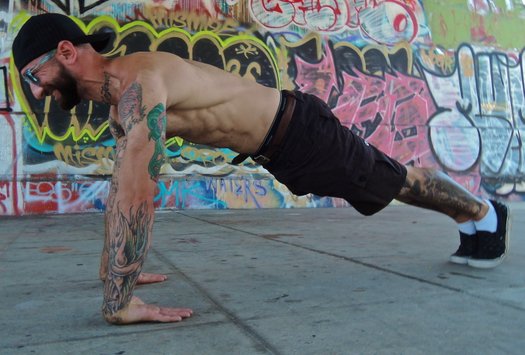
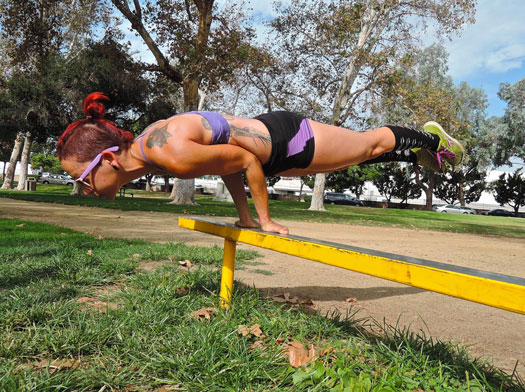
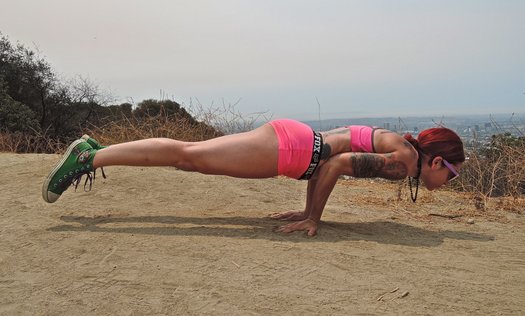
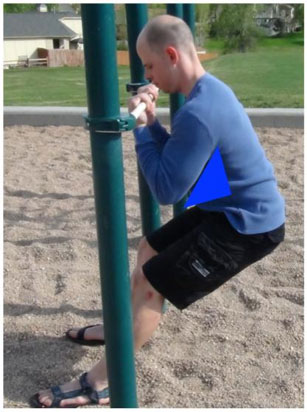
3. Hollow Body Leaning Push-Up Plank

EricBuratty Hollow Leaning Plank PushUp

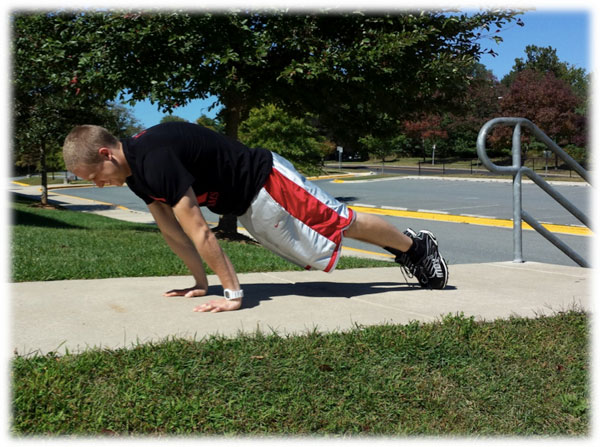
By “leaning” into a standard push-up position, you’ll reach a higher level of total body tension that forces you to have greater balance and control over your body. The ability to achieve this position also serves as an excellent confidence booster for when you start experimenting with moves that involve less point(s)-of-contact with the ground.

Calisthenics Transition: Foundation for Progressing Midsection Floor Holds (e.g., N/L/V-Sits, Side Planks, Planche, Manna), Inversions and Elbow Levers
Recommended Practice: Use as part of a warm-up on workout days involving midsection floor holds, as a “finisher” on workout days involving push-ups or as active recovery on workout days involving vertical and horizontal pull-ups. Work up to holding this position for a solid 2 minutes without form breakdown.

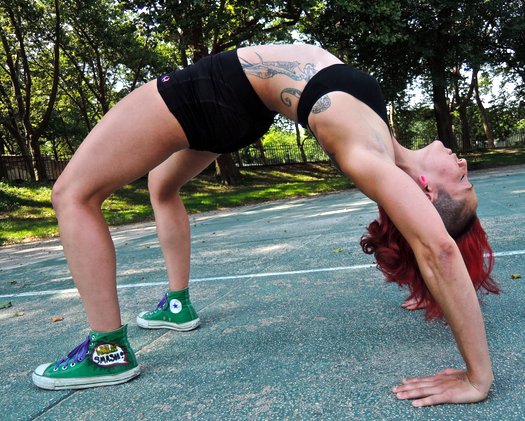
4. Hollow Body Backbend

Eric Buratty Hollow Body Backbend

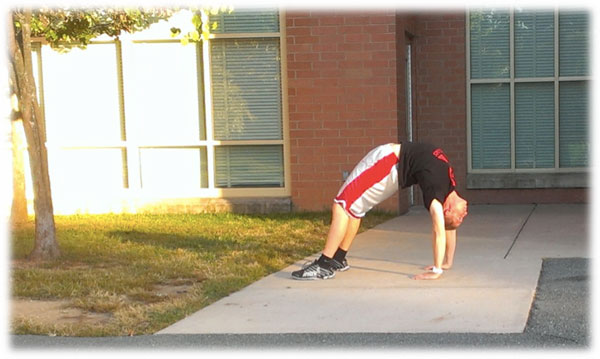
When it comes to improving overall mobility, look no further than backwards bending (AKA “bridging”). Insert “do you even backbend?” parody for “do you even lift?” here. Known for its extremely therapeutic benefits on the muscles and tendons of the entire body, you can further enhance the quality of this position by putting the lower body into as much extension as possible and concentrating on pushing the shoulders past the hands. What you’re left with is a more “hollowed” version in the basic family of bridging that opens new doors for achieving stronger three-limb holds, geckos, stand-to-stands, walkovers and eventually, arched “Mexican” handstands.

Calisthenics Transition: Foundation for Progressing Handstands
Recommended Practice: Work up to holding this position for at least a solid minute after every workout you do. Given the powerful stretch that occurs in common problem areas for Americans from performing this movement (i.e., spine, shoulders and hips), you might even want to start devoting an entire training session to bridging throughout the week.

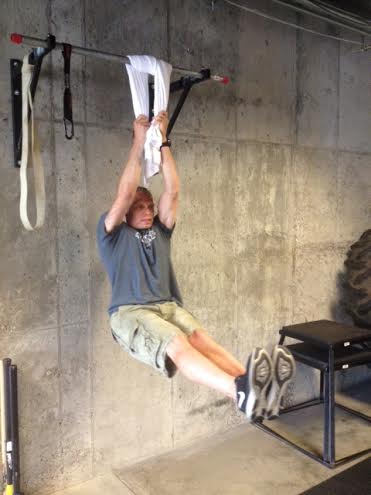
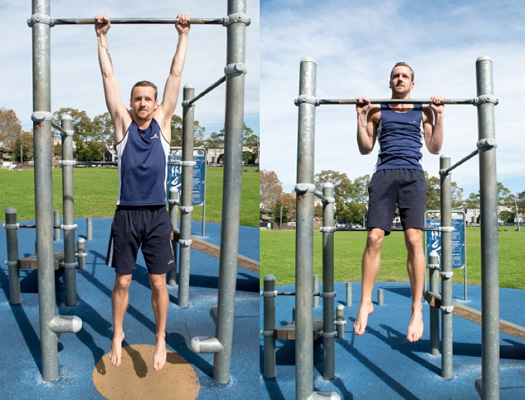
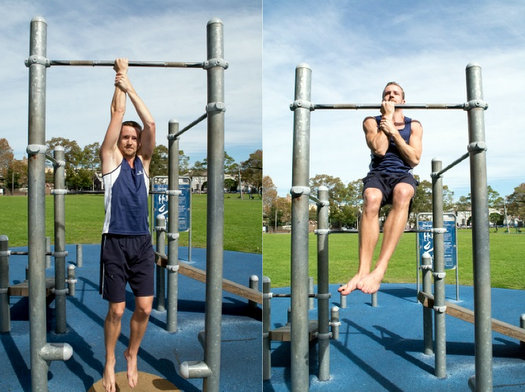
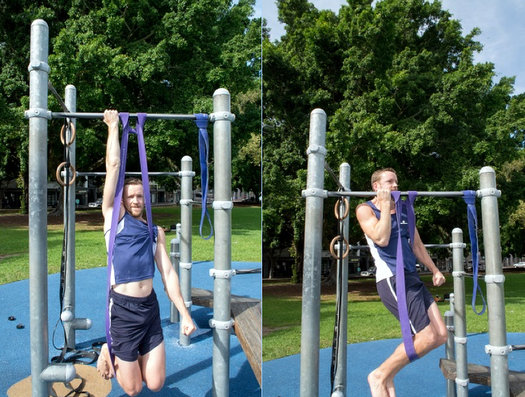
5. Hollow Body Dead Bar Hang

Eric Buratty Dead Hang Hollow

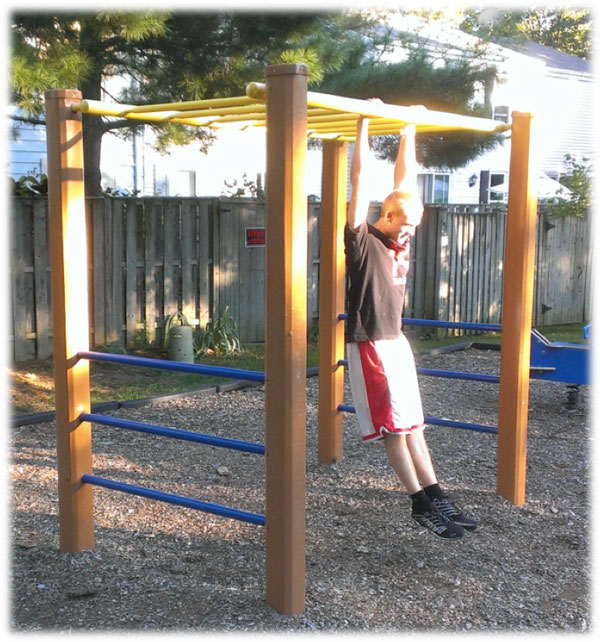
Similar to the full-depth squat mentioned above, passive hanging is another type of human resting position. When you take the passive hang one step further and connect the scapular muscles with the rest of the body, you’re left with this active hang that’s visually appealing and graceful. This happens to be one of the best positions for activating the core, as it decompresses the entire spine and puts the shoulders into a healthy stretched position with straight arms. With consistent practice of this deceptively challenging hang, you might “accidentally” become stronger at pull-ups AND start revealing your Diamond-Cut Abs.

Calisthenics Transition: Foundation for Progressing Pull-Up Chain & Leg Raise Chain
Recommended Practice: Hang from any straight bar (or any freestanding object for that matter) that allows you to put your body into a fully extended, hollow position, and maintain the position for a total of 1-2 minutes daily. This can either be done before or after a workout to facilitate warm-ups and cool downs—or as a nice complement to an active recovery day away from your regular training.

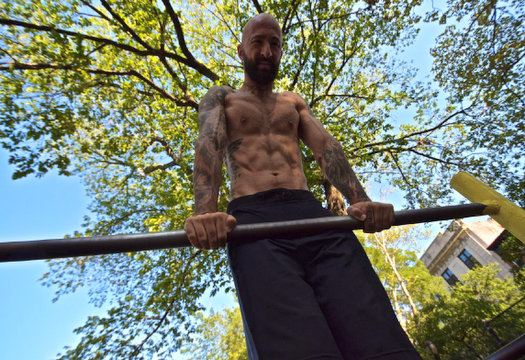
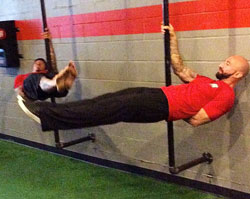
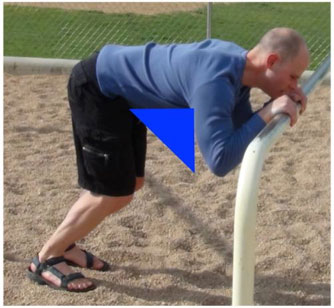
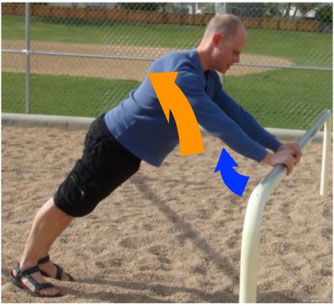
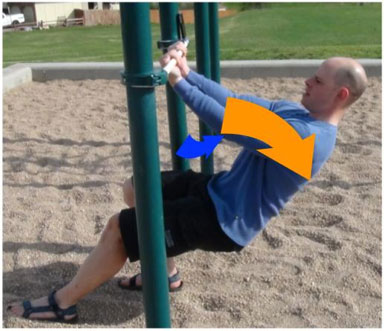
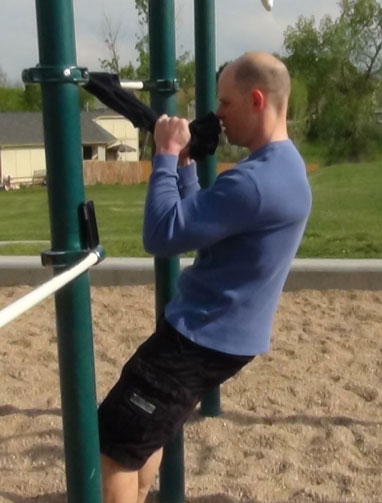
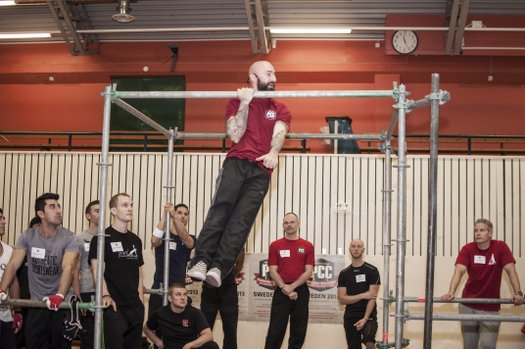
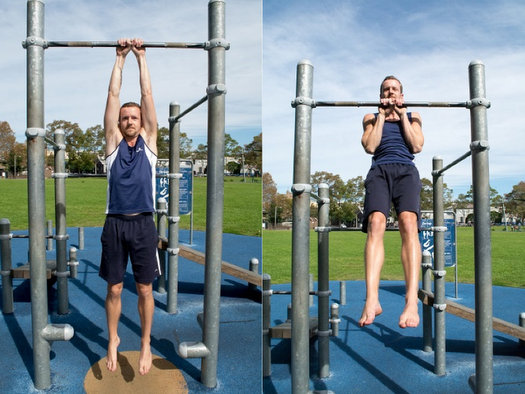
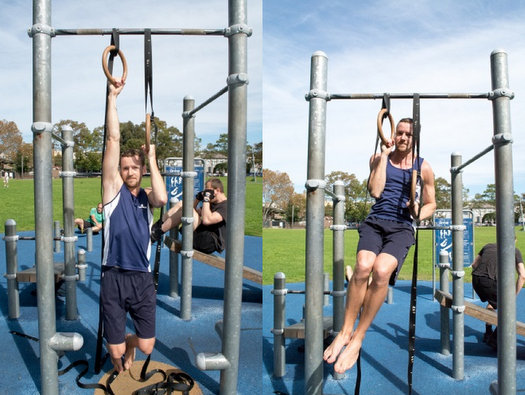
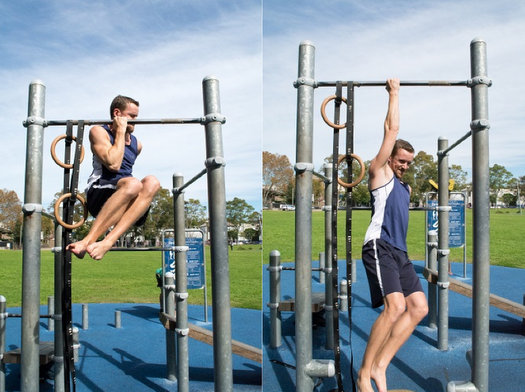
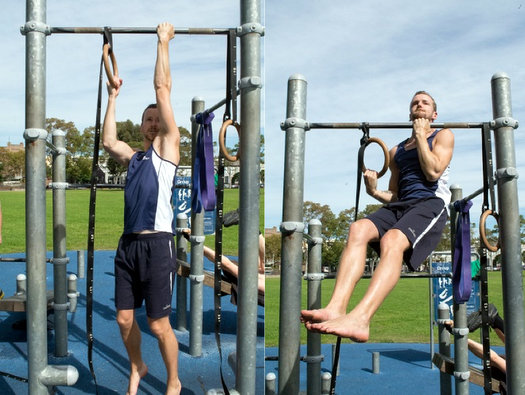
6. Hollow Body Bar Support

Eric Buratty Hollow Bar Support

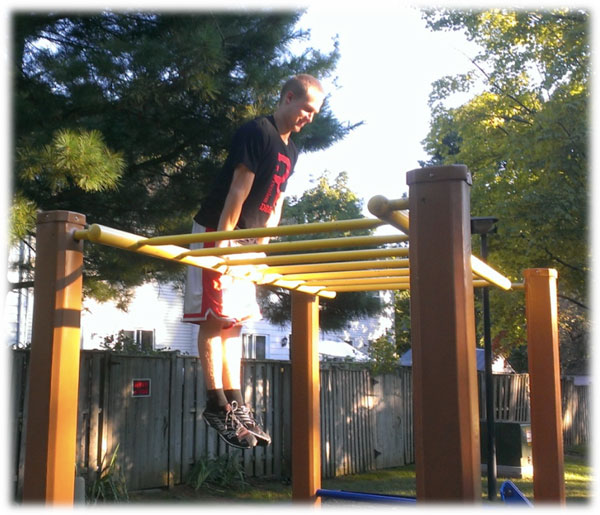
As with the other “hollow” positions above, you’re pretty much forced into a state of total body tension with the bar support—which will lead to stronger reps on any related movement you’re preparing to train. In this instance, the ability to support yourself over a bar in a straight arms, locked out, elbows forward position is definitely a good indicator that you’re ready to reach the top of the dipping chain and beyond. Who ELSE is ready to work towards their first straight-bar muscle-up?!

Calisthenics Transition: Foundation for Progressing Straight Bar Dips & Top of Dipping Chain (i.e., Muscle-Up)
Recommended Practice: Use as part of a warm-up on workout days involving the dipping chain—or as active recovery on workout days involving vertical and horizontal pull-ups. Work up to holding this position for a solid minute at a time without form breakdown.

In no particular order, there you have six positions to master before you get slammed in the face with a serious slice of humble pie.

Why do we want to emphasize these isometric positions before worrying about reps and transitions anyway?

Simply put, it’s so we know where our body is in free space and when its position changes. That way, when we reflect on those workout days where our bodies felt ginormously heavier, we might be able to identify which positions felt strong and which ones felt stronger, so we know where to improve on next time.

I’ll end with one of my favorite training-related quotes which comes from Gymnastics Coach Christopher Sommer: “Save the nonsense. Bad form simply means bad attitude. Plain and simple. It means that you did not care enough to do it right.”

To acknowledge this quote from a PCC standpoint, always focus on becoming stronger than yesterday but not as strong as tomorrow! 😉

***
Eric Buratty brings five years of experience to the DC Metro Area as a Certified Personal Trainer, Progressive Calisthenics Instructor, Nutrition Consultant and Sports Injury Specialist.
For more information about Eric, check out his website, EricBurattyFitness.com.

Filed Under: Progressive Calisthenics, Tutorial Tagged With: bodyweight exercise, bridge, calisthenics basics, calisthenics positions, Eric Buratty, foundation calisthenics, hanging hollow position, hollow position, skills training, squats, tutorial

Convict Conditioning 3: Explosive Calisthenics

October 14, 2014 By Paul "Coach" Wade 300 Comments

Al Kavadlo Danny Kavadlo

Our ancient ancestors were incredible bodyweight athletes. Just a basic grasp of history will make you realize how true this statement is. What’s more, they were explosive athletes: can you imagine the inherent power, the speed, the agility and reflexes it would take for a team of human beings to take down a mighty creature like a rampaging boar, a wildebeest or even a giant mammoth?

Hell, who wouldn’t want to have all that back today? Who wouldn’t want to become that explosive again—for sports, athletics, or maybe even self-preservation in a survival situation? Perhaps just for the natural pride of knowing that you’ve taken your body back to the primal “default” settings you were always meant to have?

Mother Nature gave you this incredible machine for becoming almost Spider-Man explosive. That machine is your own body. But somewhere along the way, something in the fitness world went wrong. We turned our backs on this birthright. Instead, athletes looking to gain qualities like speed, power, and agility started using gimmicks. They are jumping off boxes; using straps and bands; throwing weighted balls around; and dancing around cones. None of this will get you explosive as fast as just moving your body! Your body is really all you need. It was all we ever needed.

Did your ancestors have any of this crap?

Explosive Calisthenics: Convict Conditioning Style

Here’s what we’re gonna do. We’re going to follow a Convict Conditioning approach. We’re gonna field-strip our training: we’ll get rid of the crash mats, the foam pits, wedges, wires and spotters. You just need to find something to hang from—a bar, a branch. No more specialized gear than that. We’re going back to basics, baby!

Forget intricate training schedules with hundreds of exercises programmed into a periodized routine. None of that junk works—it spreads your energy and focus too thin. We are going to use just a handful of movement “chains”—we’ll pick six of the finest, most mind-blowing examples of explosive speed and power on the planet, then we’ll work up to them progressively.

What examples?

The “Explosive Six”

First, don’t get me wrong: slow strength is crucial for the athlete—it builds muscle mass, teaches the soft tissues to resist force, and builds joint integrity. But it shouldn’t be the end of your calisthenics story! In the real world, you gotta be able to use your strength quickly, and with agility. You gotta EXPLODE!

In Convict Conditioning’s “Big Six” I shared with you my philosophy on the world’s greatest bodyweight strength exercises. But there is more to the story. There is also an “Explosive Six” which will turn that strength into incredible power. Take a minute to absorb the Master Steps on this list:

1. The Suicide Jump

Forget box jumps and go old school. This move is long known as a bodyweight feat for only the finest jumpers: Grab a broomstick…and jump over it. Sound easy? Try it, dude—you’ll find out how it got its name.

Danny Kavadlo Suicide Jump
2. The Superman

Also known as the flying Superman, this is possibly the archetypal power pushup: you just bend your arms, and explode your entire body off the ground, before shooting you’re your arms then landing safely. Warning: medicine ball work will not get you there!

Danny Kavadlo The Flying Superman

3. The No-Hands Kip-up

You’ve seen Jackie Chan do it; you’ve seen The Rock do it. Lie on your back and BANG! Whip up onto your feet. But since you’re cooler than those two dudes, I’m gonna teach you to do it with no damn hands.

Al Kavadlo No Hands Kip-Up

4. The Front Flip

Forget the relatively slow Olympic lifting everyone is into these days. Now we are talking speed-strength. Now we are talking perfection of muscular synergy. No running. No steps. From standing, explode 360 degrees and land on your feet like a cat.

Front Flip

5. The Back Flip

Beloved by parkour masters, martial artists and acrobats—if one exercise symbolizes agility, it has to be this one. We all know it—dip down and flip around, landing on your feet without using the hands. But how many have learned it? Mastered it, dominated, it? No funny little plastic cones required.

Back Flip

6. The Muscle-Up

The first five moves in this list build incredible power and speed. But they are performed off the floor. For a balanced power-physique, you need to pull upwards, as well. And for true explosiveness—which works every muscle in the upper-body and trunk—there’s only one choice. Hang from the bar and power up and over!

Al Kavadlo Muscle Up

Knowledge is power

Just take a look at that roll call. It’s pretty elite right?

Let’s dream for a moment. How much raw power would you possess—in every single muscle of your body—if you could bust out all six of these movements? How fast would you be? How conditioned would your responses, your reflexes become? How much would all that power improve and enhance your strength training, your bodybuilding, your sports? Furthermore, how many athletes do you know who can complete all six? Hell, how many human beings in history could? And yet, achieving this incredible level of ability can be done.

…And it might be easier than you think. But you need to open your mind and drop all thinking about modern methods, current gimmicks and trends, and be prepared to go Spartan as Hell. Old, old school.

Don’t be misled into thinking in terms of gymnastics, either. Gymnastics is great, but it’s a sport based on aesthetics and external judgment. What I want to share—progressive, explosive calisthenics—is much more ancient. We’re just moving. Nobody is judging you. I’ll help you find your own way. It doesn’t matter if you put this foot out of alignment, or that arm in the wrong direction. As long as you are building power, you are winning!

Most athletes—even dedicated, impressive men and women—shy away from “big” exercises like these. They assume that only naturally gymnastic folks can do them, and that they gotta start off real young.

BULL!

Any regular man or woman can build up to these exercises! You just need to do so progressively.

I am incredibly proud of my first book, Convict Conditioning. One of the reasons I’m so proud is that the manual persuaded many thousands of folks who were intimidated by incredible strength feats—like the one-arm pullup and pushup—to begin working on these movements by starting easy. Sure, you can’t pull off a one-arm pushup on your first day of training! But you can do wall pushups well, right? And when you’ve been working with them for a while, you can do incline pushups. Then kneeling pushups. Eventually, asymmetrical pushups. And before you know it, you’re on your way: you have experienced—first-hand, not via theory—the fact that progressive calisthenics can unlock your innate strength!

The exact same is true for the legendary explosive movements above. You can achieve each of them—if you know the “secret”. What’s the secret? The correct progressions.

My new book, Explosive Calisthenics is the third volume in the Convict Conditioning series. In it, I’ll be teaching you all the programming theory you need to optimize your power training. I’ll give you my training tips, my “performance hacks” to get you crashing through barriers. I’ll also give you dozens of extra zero-equipment drills to help you in your training. But most importantly, I’ll share with you my progressions. Each movement in the Explosive Six is carefully broken down into ten steps—ranging from “pretty easy” all the way up to the Master Steps above—and beyond. And I promise you, you don’t need a gym, foam mats or a spotter. Just your body, like I said.

I know all you reading this have been thinking about, and working on, your bodyweight strength—and I love you for it. But—if you’re ready—it’s nearly time for us to commence a new journey together. It’s time to shift up a gear—several gears—and transform that strength into power.

It’s time to go back to where we were meant to be, kid.

It’s time to explode.

***

Paul “Coach” Wade is the author of Convict Conditioning, Convict Conditioning Volume 2, the Convict Conditioning Ultimate Bodyweight Training Log, and five Convict Conditioning DVD and manual programs. Click here for more information about the Convict Conditioning DVDs and books available for purchase from Dragon Door Publications.

Filed Under: Motivation and Goals, Progressive Calisthenics, Tutorial Tagged With: back flip, CC3, Convict Conditioning Volume 3, explosive calisthenics, explosive six, flying superman, front flip, kip-up, muscle-ups, no-hands kip-up, Paul Wade, plyometrics, suicide jump exercise

The Forearm Stand: A PCC Hidden Step

October 7, 2014 By Grace Kavadlo 29 Comments

Grace Menendez Forearm Stand

Are you frustrated with conquering the freestanding handstand?

We all want to progress quickly, but the jump from a wall handstand to a free-balancing one can be a huge hurdle! Enter the Forearm Stand – a relatively unknown movement in the PCC world – and a great “hidden step” on your way to the handstand!

When one of my clients recently told me her goal was to nail the forearm stand, I naturally turned to my PCC Instructor Manual, searching for a regression. At over 600 pages, the PCC manual is by far the most comprehensive guide to calisthenics I’ve ever seen, so I was surprised to find barely any mention of the forearm stand!  Luckily, I had plenty of experience with this move from my Yoga training.

Take A Stand

The forearm stand is a great intermediate step between a beginner’s headstand and a freestanding handstand. Known as Pincha Mayurasana (Peacock Pose) in Yoga, this move is great for strengthening your arms and shoulders while also stretching your neck, chest, abdomen and back.

Inversions are also beneficial for improving circulation throughout the body, as well as challenging the practitioner’s balance. Though a difficult move in its own right, the forearm stand is more accessible than a handstand because you have more points of contact to assist in balancing.

Here’s how to nail this move in just 3 easy steps!

#1 Dolphin Pose

This pose is similar to Downward Facing Dog from Yoga but it is practiced on the forearms rather than the hands. Start in a plank position with your forearms shoulder-width apart, then spread your fingers and align your shoulders over your elbows as you gaze between your hands. Slowly begin to walk your feet in towards your hands as you raise your hips towards the sky. If you are new to this pose, you may only be able to walk a few steps before stopping. Your body should resemble as close to an inverted V as possible. Actively press through your hands and forearms to lift your head further off the ground and hold this position for time.

Grace Menendez Dolphin Pose

#2 The Kick-Up

Begin in Dolphin pose and extend one leg up towards the sky. The closer you can walk your feet to your elbows, the more aligned your spine becomes. This alignment allows you to “float” into this pose rather than having to rely on a significant jump. The more mobility you have in your hips and hamstrings, the less difficult this becomes. Push off the base leg as you kick upward with the extended leg. If you are unable to hold the balance at first, I suggest practicing this variation against a wall or other sturdy object until you build the confidence to try it freestanding.

Grace Menendez Dolphin Kick Up

#3 Forearm Stand

Once you are able to kick up and hold for a few breaths, you’re golden! Keep increasing your hold times by simultaneously squeezing your inner thighs and ankles together and pointing your toes towards the sky to create stability throughout your body. The key to finding the “sweet spot” is to grip the ground with your fingers while “wrapping” your triceps around the arm bones and pressing through your elbows as you balance.

Al Kavadlo Danny Kavadlo Forearm Stand

Scorpion Pose and Beyond

Initially when I began practicing forearm stands, I found it easier to hold the pose by bending my knees and allowing my heels to drop as a counterbalance. This is also known as Scorpion Pose. I must warn you this is an intense back bend, however! If you are having difficulty balancing in a regular forearm stand and want to try the scorpion variation, be sure to fit in some preparatory bridge work to warm up your spine.

Al Kavadlo Scorpion Pose

Be patient with yourself and prepare to put in some work if you want to nail this move. You might experience a “crash-landing” when first attempting freestanding forearm stands but by learning to safely fall out, you’ll gain the confidence to keep trying again. If you have the flexibility you can transition into a bridge if you feel yourself tipping over. If not, try to turn your hips and fall to the side. Stay the course and eventually this move will be yours!

Watch the video for more:

***
Grace Menendez, PCC, HKC is a personal trainer and group exercise instructor located in New York City. For more information about Grace, check out her website, www.DieselGrace.com

Filed Under: Flexibility, Tutorial Tagged With: dolphin pose, flexibility, Forearm stand, Grace Menendez, handstand, handstand regression, headstand, hidden step, how to, tutorial, yoga

The Joy of Troubleshooting Progressive Calisthenics

September 2, 2014 By Adrienne Harvey 41 Comments


Adrienne NYC Push-Up

One of the many things I enjoy about teaching at PCC workshops as a Senior PCC Instructor is helping people get past where they’ve been “stuck” on a given progression. This is also very rewarding with my own clients at home, but since I know them so well, it’s a bit easier to predict where they are having trouble. With a room full of new people—most if not all of who are very physically accomplished—the task of helping them troubleshoot their progress takes on a new level of difficulty. And since I don’t know them very well, what I like to do is to help them determine where the “sticking point” really is, and why the problem is occurring.

From there it’s much easier to figure out what needs work. The bigger hope is that by going through this process, the attendee will learn how to evaluate their own future issues and be able to do the same thing for their clients!

Some of the most enjoyable moments at a PCC workshop surround the privilege of watching the “light bulb” come on for someone. While most of the time people assume that someone can’t do a move just for a lack of strength, this isn’t always the case. Other sticking points can be related to coordination, mobility, an unfamiliar movement pattern, a lack of proprioception in a new position (upside down!), fear, or any number of very mental reasons.

The following are a few examples of successful troubleshooting, and the train of thought in each. The first and last are from my own struggles, the middle two are from a recent PCC Workshop. Hopefully these examples will give you ideas to try in your own practice, and if you’re an instructor, with your clients or students.

To Me, There Was a UNIVERSE of Difficulty Between These 2-3 Steps

I am still very much in pursuit of a feet together, straight-leg, full on, no excuses, held for time, press flag. Mainly because you just don’t see women do them, or if you do, it’s in the context of an extreme straddle position, which while it is still very impressive, is not nearly the feat of strength I want to demonstrate. Watching Al and Danny pop up into the human flags at will, and at length at any PCC workshop inspires an incredible amount of very motivating envy.

kickup to chamber press
This is more difficult than it looks…

Having conquered the clutch flag, which I can do on any given day, for time, reliably, and have now coached tons of other men and women to do, I originally approached the press flag with a false sense of security. I took to the first step of “support press” rapidly, and the same with the press hang. Though it took a whole lot of practice to feel comfortable with that unusual grip. I studied the photos in Convict Conditioning Vol 2 a bit obsessively, I watched videos. I found video of a woman in Russia who does not seem to be affected by gravity, but by watching her, gained a LOT of knowledge. I even went so far as to attend a couple “pole fitness” classes (stop laughing) and quizzed some of their most advanced teachers and students about that unusual and at first very not-secure-feeling grip.

While I could do the press hang, and was even able to lift my feet (legs straight and together) reasonably high off the ground after a while, when I tried to kick up into that overhead vertical position to come DOWN to the press flag, some part of my body was putting on the brakes. Suddenly, my grip seemed unsure, just thinking about kicking up with that much force was making my palms sweat right through my trusted “secret weapon” known as “liquid dry hands”. What was going on?

“Just kick up really hard,” the guys said. Then I realized something very significant. While I don’t like to make training very “gender specific” this is one area that’s of obvious concern—center of gravity! Guys typically will have their center of gravity within the upper body (and closer to the pole on a flag) than women who typically will have a lower center of gravity around the hips. That’s certainly the case with me. This explained why kicking hard enough to get my hips high enough to be over my head was causing a little mental distress.

Here’s what I did over the period of several weeks:

  • Increased my confidence in the necessary grip by practicing it more and more, even just hanging there!
  • Practiced the kick-up with and without the grip being in question. I found some bars that were parallel (think gymnastic stall bars, or a welded-in-place ladder) and allowed me to wrap my hands fully around this neutral grip. With increased confidence in this practice grip, I felt ok enough about really LAUNCHING myself into the air at nearly full force! From there I was able to dial back and learn exactly how hard I’d need to kick up.
  • I put it all together and was finally able to kick up while gripping a pole, and stay up there with my feet pointed towards the ceiling. Eventually I became comfortable enough with this that I could find the places where the leverage was and was not so favorable, and found the next areas of STRENGTH I’d need to build up to keep progressing towards the full flag.

She Had All the Strength She Needed…

At a recent PCC, an attendee was obviously more than strong enough to nail an elbow lever, but somehow didn’t know that quite yet. Similar to my own experience with the flag above, we just needed to mentally put two and two together.

First of all, having seen the other moves that this particular attendee could already do, I knew that her abdominal strength was more than sufficient for a great elbow lever from the ground. But, she was struggling on the ground, and having a hard time finding that “floating feeling” balance that’s often a combination of body position and leverage. Fortunately there was a box nearby of nearly the perfect height.

She was able to experiment on this raised platform in two crucial ways that led to two PRs in a row:

  • Standing next to the box, she was able to pay close attention to the position of her arms/elbows and her trunk. She was also able to now see how to “push forward” to balance her body on elbows that were not as bent as they might look when others perform the elbow lever.
  • Once the arms/elbows/chest were in the right place, she slowly but steadily was able to bring her legs up from the ground higher and higher. In the time it took to blink, I saw her absolutely nail a perfect elbow lever then hold it—legs perfectly straight. Then, when John Du Cane came by with his camera, she tried it again and held it for so long that no one could believe that this was her second-ever elbow lever!
A virtuoso performance of the elbow lever by Al Kavadlo

Just be Nearby So I Don’t Feel Like I’ll Fall on My Head

Sometimes all we need is a little confidence or reassurance, and that’s when a training partner, or empathetic instructor can really make a world of difference. This PCC attendee had longed to do a handstand but had a significant amount of fear of falling over—even while using the wall for support. This is very common since we are all much more accustomed to being “right-side up”.

We talked about headstands, crow stands and all those things she was doing very well, then moved towards the wall. What was the issue? Part of it was similar to my own with the progressions towards the human flag. She was afraid of kicking up too hard and falling over. So I got very close to spot (while also being sure not to be kicked), and made her promise to keep her elbows straight.

At first she didn’t kick hard enough, but that first push towards the wall was in itself confidence-building. The next kick was too hard, but no biggie, while staying in communication I helped her steady her feet until she was ready to come down. The next kick up was closer to ideal, and she didn’t need my help at all. She did it again with me nearby once more, then felt confident enough to start practicing them on her own. From that point I saw her do TONS of handstands with the wall during the rest of the breaks that day!

That Elusive Clutch-Lever…

Adrienne Clutch Lever Danny
In this magic show, Danny gets to wear the cool hat, but I’m doing the hard work…

Diamond Cut Abs by Danny Kavadlo coming soon

I was very excited to be asked to appear in some photos for Danny Kavadlo’s upcoming book Diamond Cut Abs, and of course wanted to be in as many cool photos as possible. When they first described the photo seen above, I wanted to make sure it happened no matter what.  Of course it involves the clutch lever and holding it for a bit, so that the synchronized “acting” Danny is doing in the photo would have the desired effect in the photo.

Al and Danny Clutch Lever
NOW it makes sense…

There was just one problem, for some reason I just couldn’t get the clutch lever move that day. I’d done it at home several times, I’d done it after a PCC workshop ages ago when we were all just hanging around, playing with moves and socializing. Today was NOT my day. I was frustrated with myself, and was doing a mediocre job of hiding it. So as we stood there troubleshooting it, I kept applying my secret weapon “Liquid Dry Hands” while listening intently to Al and Danny.

Then Al popped up and did one. Sure enough, right after seeing him DO a clutch lever, the move mentally clicked into place for me. BOOM. I had it. At least that time, but the timing of the photo was off, so we had to do it again, and again, and I started to stop being able to do it. I said, “Al!!! Do it again!” I needed another dose of “monkey see, monkey do” and sure enough, I could do it again. And we got the shot. It’s one of many very cool photos in Diamond Cut Abs which is a really fantastic book.  Can’t wait to see it all in print!

The take-home conclusion from this odd “monkey see, monkey do” situation was simply that I needed to spend more time on this move, to really fit into it and understand—mentally and physically—where I am in space, and how to reliably replicate that feeling on the spot. The prescription = more practice.

How did you move past a sticking point? Have you discovered a special “micro step” of your own? Please share it with us in the comments below!

 ***

About Adrienne Harvey, Senior PCC Instructor, RKC-II, CK-FMS, Primal Move Nat’l Instructor: Originally RKC Certified in 2010, and RKC Level 2 certified in 2011, kettlebell and bodyweight training have been crucial in Adrienne’s personal quest for fitness. A core member of the PCC team, Adrienne loves sharing her knowledge with small groups and individuals. She also loves to develop recipes and workout programs to further support performance, body composition, and of course—FUN.  Go to http://www.giryagirl.com for more information about Adrienne!

Filed Under: Progressive Calisthenics, Tutorial Tagged With: Adrienne Harvey, coaching, mental training, PCC Workshop, progressive calisthenics, skill training, trouble shooting, troubleshooting

Building an Indestructible Body with “Outside the Box” Exercises

August 12, 2014 By Logan Christopher 32 Comments

Al Kavadlo Back Of The Wrists Push-Ups

Push-ups. You move in one plane of motion, up and down.

Squats. The same thing. Pull-ups too.

Everyone here will agree that bodyweight exercises are great, but it’s important to realize that there are many, many different ways of doing them.

If all you ever do are one dimensional exercises, even if you build a lot of strength in them, your overall fitness and athleticism will remain one dimensional.

It’s a sad fact that one of the biggest things holding people back from hitting their training goals are injuries. Yet, with smart training these can largely be avoided. And if you do suffer from pain currently, there are always things you can do to work to improve your situation.

Whether you are rehabbing or pre-habbing (doing work that aims to prevent injuries), these exercises generally are the same.

So, what makes one of these exercises different than a regular exercise?

The focus on building flexibility and/or mobility along with a strength component.

The more mobile you are (up to a point), the more likely you can fully exert the strength of that joint and the surrounding tissue.

The more flexible you are (once again up to a point), the more likely you can fully exert the strength of that joint and the surrounding tissue.

When you recognize that strength must be used in combination with mobility and flexibility, then you see why you need to do more than just “straight line” and conventional exercises. The effects of this type of training help you to build an indestructible body.

Before we begin it is important that you move into these exercises slowly. While they will help strengthen your weak points, remember that you are still working on weak points! The difference between something that is good for you and something that is not, can be separated by very little intensity or volume, so you must ease in slowly. Be smart!

Cross Leg Squats

The knee is a simple hinge joint. As such, so many personal trainers and coaches become deathly afraid if it ever does anything outside of that ability. “If the knees go past the toes in a squat you’re going to wreck yourself!” they say.

But here’s the truth: If your body can move in a way, that ability can be strengthened. And if it is strengthened then you’ll have less of a chance for injury. Not only do cross leg squats work the knees, they stressing them in a plane of movement they don’t normally go—and the ankles get worked too.

Begin by sitting with your legs crossed, then rock your weight forwards and press on the sides of your feet, extending your legs until you come to a standing position. Make sure to try it with your legs crossed both ways.

For assistance you can grab onto a doorknob or other solid object to help. You don’t need to do a lot of reps, but instead work to make this an easy way you can get up from the ground at any time.

Logan Christopher Demonstrates the Cross Leg Squat

Sit to Cossack Squat

Was that last one too easy for you? I’m guessing that’s the case for many people reading here. So try this challenge.

Do a Cossack squat to one side while keeping the heel flat on the floor. Once at the bottom, sit back until your butt is sitting on the floor. Now rock back up to Cossack squat, switch sides and repeat.

If you need assistance use your hands to get back up, but the challenge is to do it without them, while trying to use as little momentum as possible. This takes some deep flexibility, and you may notice that your knees don’t necessarily track your toes.

This video shows it in action as well as the secret I found to performing it after much frustration and failure to do it.

One Arm Twisting Bridge

Let’s move onto the upper body. This is a fairly advanced move that I covered before here on the PCC Blog: One Arm Bridge, Twists, and the Valdez.

It’s so useful I’m bringing it up again. The twist in particular builds shoulder stability and strength in an extended range of motion. It even works the wrists in a flexible manner.

At the same time the spine is in full flexion and then twists. A big “no-no” that I say yes to!

If you can do this, there’s a good chance you don’t have issues with any of the joints mentioned above. If you can’t do it right now, but take the time to build up to it, your body will be that much more indestructible from your work.

Back of the Wrist Pushups

An important thing to realize when doing these “outside the box” exercises is that you can still follow the same rules of progress as you would in all your other training.

Back of the wrist push-ups are a great complement to doing lots of push-ups and handstands. In regular push-ups and handstands, your wrist is extended back. But here, you flex your wrist fully and put the weight on the back of the hand. This builds strength and toughness in the wrists, but also works the elbow joints in a big way.

Start slowly with these, as in kneeling push-ups. You can hold for time or rep them out. Progress to regular push-ups when you’re able to. Remember to go slow.

I decided to see just how far I could progress with this and worked my way up to a back of wrist handstand push-ups.

Adding Indestructible Exercises to Your Program

Here’s the great part about these exercises and the hundred, if not thousands, of other moves like them. You don’t need a whole lot to get the benefits.

Doing a few of these exercises, like a few reps in a single set, will be enough to get better at them, and reap the benefits.

Any of the following will work:

  • Add them to your warm-up.
  • Add them to your cool down.
  • Add them to your stretching program.
  • Add them to your mobility work.
  • Do a few on your off days.
  • Do them as part of a morning wake up routine.

You can work through your entire body or just focus on one area at a time.

If you enjoyed this article let me know in the comments section below. I’d love to share more exercises with you in the future!

***

About Logan Christopher: Logan Christopher has been called a physical culture renaissance man as he is accomplished in a wide range of strength skills from kettlebell juggling, performing strongman stunts, and bodyweight exercises. He is the author of numerous books including Secrets of the Handstand and The Master Keys to Strength & Fitness. In addition, he’s spent the last several years going deep into mental training to find out what it takes to really excel and tactics that can help people instantly improve their exercises. You can find out more about all this at http://www.legendarystrength.com/.

Filed Under: Flexibility, Progressive Calisthenics, Tutorial Tagged With: advanced variations, ankles, back of the wrist push-ups, Cossack squat, flexibility, hips, how to, Logan Christopher, mobility, shoulder mobility, tutorial, unconventional exercises, wrist training

Elbow Levers For Superhero Strength

August 5, 2014 By Grace Kavadlo 26 Comments

Grace Menendez One Arm Elbow Lever

Growing up, I was a scrawny, geeky kid who spent my free time reading comic books, fantasizing about having mutant powers and dreaming of looking shredded like my heroes in the stories. The first time I ever saw an elbow lever, the kid in me got excited. I’d always wanted to be a superhero, and this was the closest thing to flying that I’d ever seen. I had to try it myself!

Unfortunately on my first attempt, instead of flying I ended up face planting instead! After scarfing that slice of humble pie, I did what any intelligent athlete would do: I took a step back and started practicing foundational movements to help me earn my wings!

#1 – The Plank

As played out as this exercise may seem, it is the perfect place to start. The plank position puts you in the same plane of movement as a lever and helps you build the necessary core strength. Emphasize keeping an open chest while broadening through the collar and retracting the shoulder blades down and back. “Zip-up” your mid-section by squeezing your glutes, engaging your quads and evenly distributing the weight between the top and bottom of the body. Eventually when you can hold the pose for 2 minutes, experiment with gecko plank variations, which involve lifting a leg and/or arm.

Grace Menendez Gecko Plank

#2 – Back Bridge

In a culture where flexion is the norm (sitting for prolonged periods, driving, etc.) the bridge liberates the spine from excessive upper back arching, as well as from a variety of other back pathologies. How does this apply to levers? In order to hold the body upright, you need to have a flexible upper back and strong spinal muscles–and the bridge addresses both! Take your time with this movement as it can be very intense for beginners. There are less difficult variations you can practice like the straight or table bridge, neck bridge, etc.

Grace Menendez Bridge

#3 – Bound Eagle

One of the gnarliest sensations you need to get past when first practicing this move is getting used to having your elbows jammed in your guts! If you have never tried it before, go ahead and try! Not as easy or comfortable as you thought? No sweat! Master PCC Al Kavadlo, suggests in his book Stretching Your Boundaries (definitely a must-have for every regular calisthenics practitioner) a helpful preparatory pose could be the Bound Eagle. This pose can help you gradually develop the flexibility needed to turn your elbows inward.

Stretching Your Boundaries Bound Eagle

#4 – Midsection Holds

Speaking of jamming your elbows into your midsection, the L-Sit progressions are ideal to get your abdomen prepped to take all your bodyweight. These holds involve tensing almost every muscle in your body, specifically the abdominal region, much like you’ll need to in order to perform a successful elbow lever. Start with a tucked L-sit and progress from there. I also like to include the frog stand here as it emphasizes lifting the chest while balancing on the hands just like in the lever!

Grace Menendez L-Sit At Beach

Grace Menendez Fingertip Frog Stand

#5 – Elevate yourself

Start practicing your elbow lever on elevated surfaces like plyo boxes, tables, counters, park benches, paralletes, etc. Be creative; the sky’s the limit! Start by letting your legs hang over so your form will resemble less of a straight line and more of an arch. As you get stronger, just like in your midsection holds, you can work from a tuck to a straddle and eventually that perfect expression of the pose with long extended legs!

Grace Menendez Elevated Straddle Elbow Lever

Grace Menendez Elevated Elbow Lever

#6 – Get Grounded

If you’ve mastered step 5 and you’re ready to attempt the elbow lever on level ground, you may still find it difficult to completely clear your legs from the floor. It may be helpful at this point to use a wall-assisted regression, in which you press one or both feet into the wall to spot yourself. From there, it’s just a matter of taking a leap of faith and going for it. If you’ve done the work, it should come without too much of a struggle.

Grace Menendez Elbow Lever On Ground

#7 – Next Level Levers

What’s great about progressive calisthenics, is that even after you are finally able to perform the elbow lever, there are even more advanced variations to be conquered! You can try doing an elbow lever on your fingertips, or even just one arm. Be patient during the earlier steps and focus on form. It takes consistency and synergy for your body to learn this unique movement!

Elbow levers are truly the stuff of Superheroes. They take skill, courage, and strength to perform properly! Don’t be shy! Embrace your inner hero and get your lever on!

Grace_POW

***
Grace Menendez, PCC, HKC is a personal trainer, group exercise instructor and massage therapist located in Los Angeles. For more information about Grace, check out her website, www.DieselGrace.com

Filed Under: Progressive Calisthenics, Tutorial Tagged With: abdominal training, abs, Bound Eagle, bridge, crow stand, elbow lever, elbow lever progressions, Grace Menendez, how to, L-sit, midsection training, plank

The Bodyweight Arm Training Revolution

July 29, 2014 By Matt Schifferle 29 Comments

Al and Danny Kavadlo bare their calisthenics arms
PCC Lead Instructors Al and Danny Kavadlo showing off their calisthenics arms.

“Matt I thought we were friends. How could you do this to me?!”

My buddy Tony is standing in front of me, all 295 pounds of him. He’s a powerlifter who considers benching 315 a warm up.

“My biceps feel like they are going to explode. I can hardly get my triceps to relax they are so pumped up. How could you do this to me?” He says with a smile on his face.

Tony’s just gotten a taste of two of my favorite arm blasting exercises. They are simple, efficient and they don’t require a single ounce of iron. They are also somewhat backwards to classical strength training for the biceps and triceps. So when Tony said it was his arm day and wanted something different, I didn’t pull any punches.

The classic approach to weight lifting work involves holding a weight or cable attachment in the hand. Good technique is classically done with a body that doesn’t move much and a neutralized elbow.

Classic Arm Training Diagram

The bodyweight approach works the opposite way. The objective is to lock the hand in place, neutralize the body and move the elbow as much as possible.

Bodyweight Arm Training Diagram

This New Approach Has Some Big Advantages:

Less stress on joints.

The joints of the body typically become more stable and less likely to move into stressful positions when the extremities are against an unmoving object and the body itself moves through space.

More energy on target muscles.

Since there is less energy spent trying to prevent the body from moving (you actually want it moving around) you can spend more effort towards actually performing the movement and working the muscles in the arms.

More functional carry over to pull ups and pressing movements.

The curling exercise is still very much a pull up style movement. The triceps extension is also a style of push up. Just like with pull ups and push ups, you keep your hands in place and move your body using the action of the elbow joint. This is neurologically similar to push ups, dips, rows and pull ups. This means that you’ll program your nervous system to engage your biceps and triceps more during all pushing and pulling exercises. So you won’t just be hitting your arm muscles during these two moves, but you’ll also place more emphasis on those muscles with almost every upper body bodyweight movement in your calisthenics arsenal.

Carry over to Olympic lifting.

Some of my clients who practice Olympic lifting report a carry over to exercises such as cleans. I believe this is due to the fact that both of these moves train you to become more conscious of using your elbow as opposed to just trying to move the hands into an ideal position.

It’s easy to adjust resistance mid-set or even mid-rep.

Both moves have a variety of ways you can adjust the resistance on the fly. You can dial-in the perfect level of resistance and make adjustments as necessary even during those last few reps.

The bottom line is this–by reversing the classical weightlifting arm strategies with calisthenics, you open the door for unbelievable levels of tension applied directly to your biceps and triceps with more comfort and safety. How’s that for a formula for success?

The first exercise is the triceps move known as the Tiger Bend. You can do this move on any elevated platform or edge of a counter. Park benches and sturdy table tops work particularly well.

Place both hands about shoulder width, palms-down with a thumb-less grip. If you’re using a narrow surface, your hands may need to be placed next to each other, which will be fine.

Bend your elbows downward and forward without letting them flare out to the side. The key is to keep your elbows pointing down to the ground, creating a gap between your arm and torso as indicated with the blue triangle in the picture. Tense up your triceps and shoulders as hard as possible, and tense your lats to stabilize your back.

Low Bar Setup Position ArmTraining

Apply resistance by stepping your feet back so some of your weight goes directly to your hands. Once your feet are firmly planted, push directly down with your hands and push your elbows up and away from the surface your hands are pressing down on. (See blue arrow below.) This should cause your body to lift up and back as indicated by the orange arrow. Once your arms are fully straight begin coming back down by bending your elbows down and forwards.

Low Bar Arm Training Top of Movement

Regressions and Progressions:

I love this exercise because it’s so easy to progress and regress it. Moving your feet back will place more weight on your hands and increase the resistance. Moving them closer will do the opposite, making the move easier.

You can also change the resistance by putting your face in a different place in relation to your hands. Bringing your chin between your hands will be easier, while bringing your nose or forehead between your hands will be respectively more difficult. You can also make this move much easier or harder by selecting hand placements at different heights. Just like the push up progressions, the more your body tilts towards the floor, the harder the move will become. Placing the hands on a higher surface will stand your body up more and take away some of the resistance. If you want some additional assistance, you can simply place one foot in front of the other to help lift you into position on those last few reps. Lastly, you can also bend your body in half a little at the hips. Again, this will bring more of your body weight to your feet to make the exercise a little easier. Straightening out your body into one straight line will make the movement more difficult.

The biceps exercise is very similar, only now you face the other way. Since this is technically a pull up style exercise, so bars or handles you would usually use for moves like Australian pull ups will be ideal.

Place your hands on the back side of the bar with your fingers on top of the bar. Once again, a thumb-less grip may be ideal, but I’ve also used a thumb grip without much trouble.

Tense up your biceps and push your elbows away from your rib cage with your hands right next to your chin. It’s still ideal to keep your elbows in front of your torso as you can see from the blue triangle below. This position will ensure maximum tension on your biceps.

Chin Up Position Flexed Bodyweight Arm Training

I recommend using a slight kink in the hips rather than keeping your body straight. This will allow a bit more flexibility in your motion and lend itself to a more natural motion.

Chin Up Position Bodyweight Arm Training

Lower yourself down and back by bringing your elbows out and upward (blue arrow) which will cause your body weight to fall away from under the bar(orange arrow). Return to the starting position by bending your elbows down and forward to maintain that elbow position in front of the ribs.

Performance Tips:

-It’s a good idea to keep tension on your target muscles at all times. It’s tempting to relax at the bottom or top of each rep, but maintaining tension on the muscle is key in maximizing your progress.

– A little goes a long way. If you need to adjust your resistance, just moving your body an inch or two can make all of the difference in the world. Sometimes even moving your feet a couple of inches or slightly straightening your knees can be more than enough.

– Towels are a great addition to these moves. They can provide a neutral grip which many people find more comfortable. Plus they are great for building up that grip. Nothing complements your bis and tris like a pair of beefy forearms.

Bodyweight Arm Training Towel Variation

– Once you’re more comfortable with the motion of the exercises, work on tensing other muscles in your body as much as possible. Adding more tension to your back, shoulders, hips, hamstrings and even your chest can bring these moves to a whole new level and your results will follow.

– Be patient and use light resistance for the first few weeks. These moves can take some practice to get everything dialed-in just right. Making the movement of the elbows the focus of the exercise can feel a little strange at first, especially if you’re used to the classic method of curls and extensions. Keep tweaking the position and movement of the elbow, and it will feel natural before too long.

– Listen to your joints. both of these moves can place a massive amount of tension through your biceps and triceps. Sometimes people find their joints need some time to become accustomed to the high degree of tension running through the muscles. It’s always okay to use a shorter range of motion and a lower level of resistance at first to allow the tendons around the elbow to strengthen up. Take your time easing into the exercise over a few weeks. Once they are accustomed to the exercise, feel free to use a big range of motion. By then your elbows will be bulletproof!

Good luck with these two movements. If you have any questions please don’t hesitate to ask in the comments down below.

****

Matt Schifferle a.k.a. The Fit Rebel made a switch to calisthenics training 5 years ago in an effort to rehab his weight lifting injuries. Since then he’s been on a personal quest to discover and teach the immense benefits of advanced body weight training. You can find some of his unique bodyweight training methods at RedDeltaProject.com.

Filed Under: Tutorial Tagged With: arm training, biceps, bodyweight exercise, calisthenics, Matt Schifferle, no gym necessary, outdoor training, strength, triceps

Calisthenics Grip Training

July 22, 2014 By Corey Howard 31 Comments

Handshake

I’ll never forget Gary. It’s not that Gary was such an amazing person, in fact he was quite bland. Imagine shaking hands with someone’s limp lifeless, overcooked soggy noodle hand. That was what made him disappointingly unforgettable. We’ve all met someone like that, and it creeps most people out. Shake my hand like you mean it!

On the other side of the spectrum is Rich. Rich has been crowned the World Arm Wrestling Champ many times. After introducing him to my father, my dad said, “that was like sticking your hand into a bunch of bananas! I wasn’t sure I was getting my arm back!” Your handshake says a lot about you. Grip strength says even more.

Al Kavadlo Human Flag
Grip strength is an essential part of many advanced calisthenics exercises, such as the infamous human flag, demonstrated here by PCC Lead Instructor Al Kavadlo.

How can a strong grip help?  First, your grip is the linkage between your body and whatever it is you’re trying to control.  If you’re trying to put heavy objects overhead, a crushing grip can actually tighten the linkage in your shoulder and give you a safer press.  If you’re a calisthenic ninja, killer grip can keep you on the bar for more pull-ups or help your handstands as you grip the ground and drive upward.  But how on earth can you develop card tearing grip strength using only calisthenics?  According to Paul Wade in Convict Conditioning II, finger tip push-ups and towel hangs are all you need.  From my own experience, he’s right!

Finger tip push-ups are simple; just do a push-up on your finger tips!  Well, there’s a bit more to it than that.  This one killer exercise strengthens the entire hand from the fingers up through the forearms.  It’s easy to let your ego get in front of you with this one, so be sure to progress slowly and cautiously. I recommend starting these as incline push-ups.  This enables you to keep your technique spot-on and stay injury free.

Fingertip Setup Hand Position
Make sure you set your hand up with your fingers locked and spread.

It’s important to make sure you set your hand up with your fingers locked and spread.  Try and create a tall wide support structure with your fingers.  Ideally you want your fingers to look like they are flowing right up into your arm, there should be no odd bends or strains.

As you make progress with these just keep moving closer to the floor, and once you’re able to do 8-10 quality fingertip push-ups, try one arm push-ups, or 3 finger push-ups.

AlKavadlo Three Finger Incline Pushup
PCC Lead Instructor Al Kavadlo demonstrates a 3-finger incline one arm push-up, unofficially known as the “Heavy Metal” push-up.

Towel hangs can start out easy, then progress to a battle of will between your body and your mind.  These work amazingly well for developing grip endurance as well as thick muscled forearms.

Again I strongly suggest starting out with a grip training drill you can do fairly well and slowly progress to the harder stuff like one arm hangs, thicker towel hangs, longer hangs, or even pull-ups or leg raises with a towel.  I would also encourage you to pull the shoulders down away from your ears while you hang.  This tightens up the shoulder complex and creates more stability.  Once you can hang for about a minute I’d suggest you bump it up a bit.  Remember, everything can be made more challenging with simple calisthenics tweaks.

Corey Howard Towel Hangs for Grip Strength
I love to use towel hangs for developing my grip!

I caution you about pushing too hard and trying to progress too fast.  Sometimes you can overwork these smaller muscles and not even know it until you have a painful case of tennis elbow.  Remember for most people, grip is the smallest link in the chain.  The last thing you want to do is allow your brain and larger muscles to overpower your grip work and cause an injury.

Grip training can be tricky but the rewards are huge! I can tell you from my own experience, Paul Wade’s combo rocks!  After doing these two movements fairly consistently I’ve had to add a link in my watch, and can no longer slip my wedding ring off for any pull-up work.  My forearms, wrists and fingers have thickened up a bit.  If you increase the size of the motor, most of the time you increase the output as well…. More grip strength!  More pull-ups!  Fire it up!!

***

About Corey Howard, PCC, RKC, CK-FMS: Corey Howard strives to constantly become stronger, and to help others to achieve their fitness goals. He is the owner of Results Personal Training, and can be reached at www.resultsptonline.com or www.coreyhoward.com.

Filed Under: Progressive Calisthenics, Tutorial Tagged With: bodyweight exercise, Convict Conditioning, Convict Conditioning Vol 2, Corey Howard, grip strength, grip training

My Journey Towards the One Arm Pull Up

July 1, 2014 By David Mace 36 Comments

Al Kavadlo performs a One Arm Pull-Up at the PCC in Sweden

I have a confession to make; I’m obsessed with the one arm pull-up! It wasn’t always this way; three years ago I was a skinny runner, who weighed less than 60kg. In April 2012, I stumbled across a book that would change all this – Convict Conditioning by Paul Wade. After reading it, I decided then and there that in my lifetime I would perform a dead hanging one arm pull-up.

Note that this is simply the progressions I have made. The more you train calisthenics, the more you realize there are many different paths to progression, and what may work for one individual may not work for another.

At the beginning of my training, I could perform a handful of full range pull-ups, so I skipped the first few levels (sorry Coach) and went straight into full pull-ups, followed by close hand and then uneven pull-ups. It took me about 3 months to perform 2 sets of 10 strict full range pull-ups; by full range I mean a straight arm at the bottom and my chin over the bar at the top.

David Mace Perfoming Standard Pull-ups
Your arms should be straight at the bottom, with your chin over the bar at the top.
David Mace Performs Close Pull-ups
This time bring your hands next to each other.

After training uneven pull-ups for a few months I hit my first road block; I could perform 2 sets of 9 uneven each arm, but any attempt at half one arm pull-ups was met with failure. Knowing what I know now I would have built in some extra progressions and gradually moved my non-working hand further down my arm.

David Mace Performs Uneven Pull-ups
The uneven pull-up can be made more difficult by moving the non-working hand further down the arm.

Instead of this I found an alternative progression upon the purchase of a set of rings; whereby one arm is on the top ring, with the other arm on a lower ring. This way you can easily increase the distance between arms over time. As both arms are on the rings, your head can go between them, which makes it slightly easier than with one arm on the bar.

David Mace Uneven Ring Pull-ups
Start with your working arm straight; at the top position your chin should be above the hand of your working arm.

My training for this had gone on for a few months when I read a couple of articles from Coach Wade and Al Kavadlo, here on the PCC blog about training for mass and training for strength. I had been toying around with the idea of moving away from strict Convict Conditioning style progressions for a while and this proved to be the catalyst. I split my main training plan into 2 different groups of sets; the first being the hard set, consisting of 2 sets of up to 5 reps, and being the most difficult exercise you can do in the progression whilst you are fresh. After this I perform my working sets, consisting of 4 sets of 5 reps. This new plan allowed me to switch to 2 separate progressions in the same workout, which I’ve found to be extremely effective towards reaching my goal.

For my hard sets I added one-arm negatives. Simply pull yourself up to the bar with both arms, then gradually take one arm off the bar and lower yourself with as much control as possible. Starting with fewer fingers is a good way to progress to this, otherwise the most likely initial outcome will be you dropping straight down. The working sets were made up of my uneven ring pull-ups.

David Mace Performs One Arm Pull-up Negatives
Start at the top position of a one arm pull-up, then lower yourself with as much control as possible.

With uneven ring pull-ups you eventually reach a point where your lower arm is performing a pushing motion, rather than a pull in the top position. This is where it starts to become easier and means it is time to change to a new progression. In this instance I moved my pulling arm back to the bar, then used just the one ring to assist. It’s really important with this exercise that your head follows the path of your pulling arm; this means that your working arm is taking most of the weight and replicates the path you would take for a one arm pull-up. Note that this exercise could easily be performed with a towel or the post of your pull-up bar, if you do not have access to rings.

David Mace Performs Ring-Assisted One Arm Pull-ups
Your chin follows the path of your working arm; whilst your other arm is just assisting.

By this time I had been teaching calisthenics to some of my work mates for around a year. For those who can’t yet perform a full range pull-up, they start with negatives for their hard sets and band assisted pull-ups for their working sets. Exercise bands have some good advantages in that you don’t need anyone to help you, and you know exactly how much assistance you’re getting. They’re very easy to progress with as they have different levels of assistance. Having said that, they have a major weakness in that they assist you a lot at the bottom but not as much at the top. This has worked for a number of people to get full pull-ups though, so I was keen to see how the band would work for the one arm pull-up.

When attempting this you will find that your body naturally wants to twist. Squeeze your core and obliques tightly to help prevent this, but you may need to reset yourself every few reps. What I particularly like about this exercise is it allows me to use just one arm, with no assistance from the other. I now train this exercise in my hard sets and the assisted one arm pull-ups in the working sets.

David Mace Performs Band-Assisted One-Arm Pull-ups
The bottom position your arm should be straight; you haven’t reached full range until your chin is over the bar.

Finally, below is my latest attempt at a jump assisted one arm pull-up. As you can see my left arm is quite a lot weaker than my right, this I’m trying to resolve by only moving onto the next progression once both arms can do it, but my right arm will always be stronger.

Though I forgot to do it when pulling with my left, you may have noticed that both in my video and the picture above, I squeeze my non-working hand as tightly as possible. This is a technique to create extra tension in the working arm, there is a link between the 2 – the more full body tension you can get, the more power you will have. For this reason you should squeeze your non-working arm, core, glutes, and in fact pretty much every muscle in your body as tightly as you can.

I will achieve a dead-hanging one arm pull-up eventually, look out for a video and an update then.

***

David Mace is a full time programmer and a part time calisthenics enthusiast and loves to teach PCC to friends and co-workers. Success for him is measured in helping others (and himself) to achieve their maximum potential and doing things that you once thought were impossible. He can be contacted through his website at www.mpcalisthenics.com, where you can also read his blog, get advice on nutrition, training and life philosophy.

Filed Under: Progressive Calisthenics, Tutorial Tagged With: advanced progressions, Convict Conditioning, David Mace, OAPU, one-arm pull-up, pull-ups, tutorial

Unlocking Your Hips for Pistol Squats

May 20, 2014 By Benji Williford 16 Comments

Benji Williford Bodyweight Pistol Squat

A strong body begins with flexibility, good body mechanics, and then progression. One of the biggest motivators to start calisthenics training is to conquer more advanced feats of strength like the pistol squat. But it is impossible to do pistols without adequate flexibility in the lower body as the hip, knee, and ankle are in deepest flexion at the bottom part of the rep. Before you can walk; you must crawl. Or in this case before you pistol; you must squat. A full range-of-motion squat is nearly impossible for most people when starting out as they spend most of their day sitting. Consequently, this usually results in tight hip flexors, calves, ankles, lower back, and weak glutes.

The first thing that I assess on new clients in regards to squats is their flexibility limitations in the hip and lower body.

“Blessed are the flexible for they will not allow themselves to become bent out of shape!”

~ Adapted from Robert Ludlum

The hip is a heavily muscled area and is made up of a ball-and-socket joint that is formed between the os coxa (hip bone) and the femur. Aside from the shoulder, the hip joint allows for the most range-of-motion than any other joint. If it allows for the most range-of-motion, all of its muscles (along with the leg) should get stretched to foster strengthening throughout the most range-of-motion making skills like the pistol squat obtainable.

The main movements of the hip:

  • Flexion—Lifting the leg forward in front of the body. The major muscles used are the psoas and rectus femoris. Seven other muscles assist comprising of five adductors, sartorius, and the tensor fascia lata. With normal range of motion, the leg can be lifted so that the thigh is within two inches of contacting the lower ribs.
  • Extension—Lifting the leg behind the body. The major muscles used are the hamstrings and the gluteus maximus. This motion also recruits movement from the lumbar region of the spine. With normal range of motion, the knee will rise above the level of the glutes.
  • Adduction—This occurs when the thigh moves across the midline of the body. Hip adductors include the pectineus, the adductors longus, brevis, and magnus, and the gracilis.
  • Abduction—This occurs when lifting the leg out to the side away from the midline of the body. The major muscle used is the gluteus medius. The gluteus minimus and the tensor facia lata also assist.
  • External rotation—This occurs when the leg is rotated outward so that the inner thigh faces forward/up and the knee out to side (away from the midline of the body). Muscles used are the external rotators located beneath the gluteus maximus (which is also an external rotator).
  • Internal rotation—This occurs when the leg is rotated inward so that knee is facing midline of the body. The major muscles involved are the gluteus minimus and tensor facia lata which are assisted by the gluteus medius.

The following video will demo a series of stretches that can be incorporated in a yoga practice, used for static stretches after a workout or any time after warming up the hips and legs with some mobility work. These series of stretches were designed to open up all of the different directions of movements of the hips and consequently the rest of the lower body. Since these stretches will open up the hip flexors, an added benefit is that it can potentially help ease lower back pain too.

Once you have the flexibility to complete a quality rep, it’s time to commit to proper body mechanics on mastering reps and gaining strength on each progression of an exercise. This is where the brain-body connection comes in as the brain sends electrical impulses though hundreds of thousands of chains of nerve fibers to the muscles every time you think about performing an exercise. Moreover, an insulating layer over the nerve fibers made up of protein and fatty substances called the myelin sheath increases every time a muscle pattern is repeated. Developing the myelin sheath with good biomechanics will enable you to perform a skill without as much effort. However, the opposite is also true. If you consistently practice poor biomechanics, it increases the myelin layers to reinforce those bad patterns. This can lead to poor performance and even injury.

Nerve, Neuron, and Myelin Sheath diagram

In short, work on gaining the flexibility required to perform a skill. Practice perfecting the body mechanics needed for the skill while gaining strength and continue to progress.

***

Benji Williford, PCC, RYT, CF-L1 is a Personal Fitness Trainer located out of Eau Claire, WI. Benji believes that, “A successful fitness program is based on positive dialogue between the mind and body.” He can be reached through his website: http://www.benjiwilliford.com, or by email: Benji@ChainReaction-Fitness.com.

Filed Under: Flexibility, Tutorial Tagged With: Benji Williford, flexibility tutorial, hip flexibility, hip mobility, one leg squat, pistol

  • « Go to Previous Page
  • Page 1
  • Interim pages omitted …
  • Page 4
  • Page 5
  • Page 6
  • Page 7
  • Go to Next Page »

Primary Sidebar

Featured Products

previous arrow
GetStrongBookCover
ConvictConditioningBookCover
StreetWorkoutBookCover
ExplosiveCalisthenicsBookCover
StrengthRulesBookCover
next arrow

Categories

Progressive Calisthenics Certification Logo
Click here for more information or to register for the PCC workshop

Get Strong Workouts TriadXP App
Get Strong Workouts App

Recent Posts

  • Top 5 Reasons Why an In-Person Workshop is the Best Way to Supercharge Your Training
  • HYBRID STRENGTH TRAINING IS HERE!
  • My Calisthenics Journey to the PCC
  • The Handstand Press: Complete Control Through the Handstand
  • The Get Strong App is Here!

Dragon Door Publications

Dragon Door Publications

Recent Comments

  • bross dandon on The Case for Curved Handstands
  • Johnny Flewellen Jr. on Strength for Life
  • Dan Earthquake on The Pursuit of the Daily Minimum
  • Johnny Flewellen Jr. on The Pursuit of the Daily Minimum
  • Johnny Flewellen Jr. on Yoga, Calisthenics and the Journey of a Lifetime
FOLLOW US ON TWITTER!

Copyright © 2025

Dragon Door Publications / The author(s) and publisher of this material are not responsible in any manner whatsoever for any injury that may occur through following the instructions or opinions contained in this material. The activities, physical and otherwise, described herein for informational purposes only, may be too strenuous or dangerous for some people, and the reader(s) should consult a physician before engaging in them.