• Skip to main content
  • Skip to primary sidebar
  • Home
  • Contributors
  • Resources
    • Q&A with Paul “Coach” Wade
  • Workshops
  • Products
  • Forums
  • Articles
  • Blogs
    • RKC Blog
    • Strong Medicine Blog
  • Archives

PCC Blog

Progressive Calisthenics - The Official Blog for the PCC Community

abs

Five Tips for Training the V-Sit

February 21, 2017 By Grace Kavadlo 10 Comments

Grace Kavadlo V-Sit

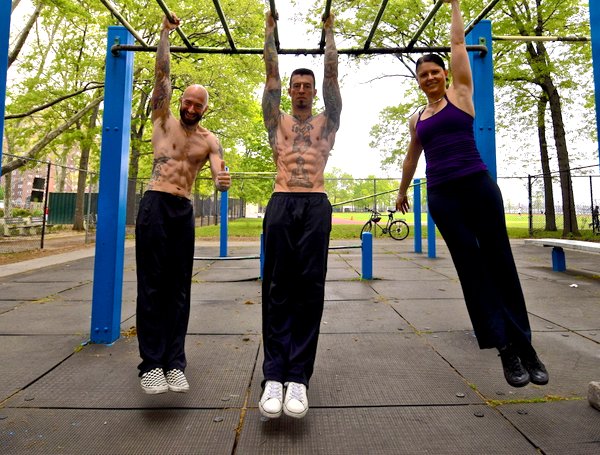
When I attended my first Progressive Calisthenics Certification, learning to hold an L-sit was one of my goals. It’s a tough move, but I surprised myself and was able to nail it for a few seconds that weekend. Of course once I got the L-sit, I needed a new challenge.

Such is the nature of progressive calisthenics.

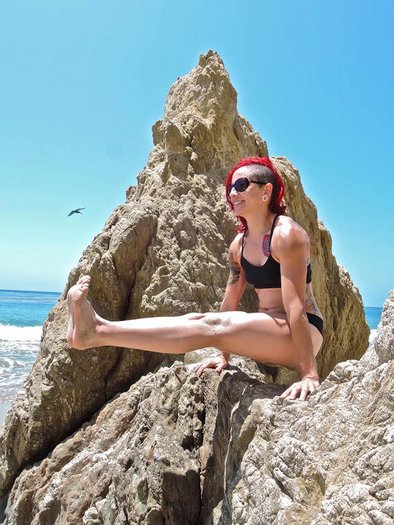
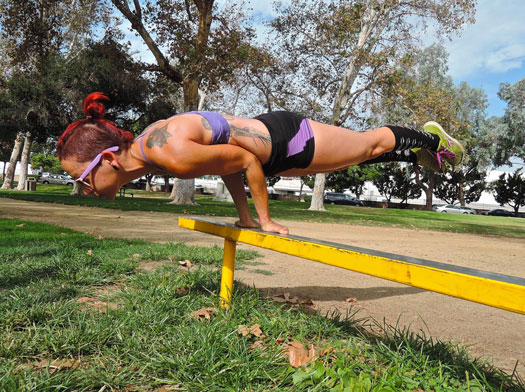
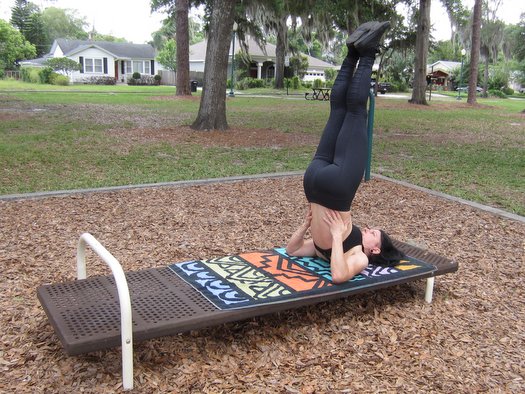
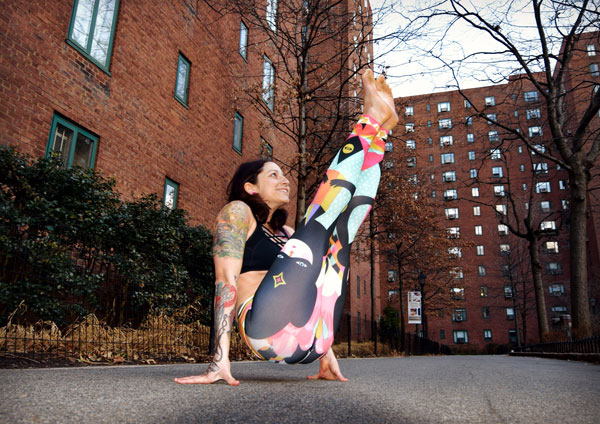
This was how I began my journey toward the V-sit, a move which progresses the L-sit by lifting the legs and hips higher, changing the shape of the body from a position resembling the letter “L” to one that looks like a “V.” Due to the shift in balance and leverage, it’s also a lot harder.

I mean A LOT harder.

It’s been almost 3 years since I went to my first PCC, and I’m just finally starting to get comfortable holding a proper V-sit. Like many advanced calisthenics exercises, training for this move requires a lot of patience. It also forced me to reassess several aspects of my training that I did not realize had been lacking.

Here are 5 things I learned along the way that helped me achieve this difficult feat:

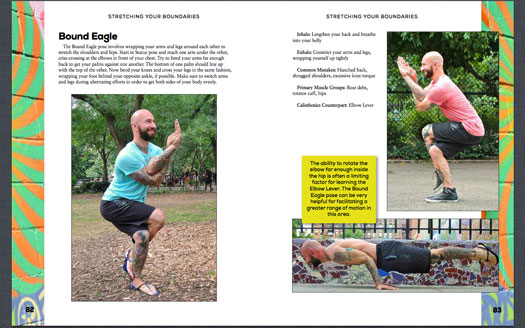
1 – Make A Good “Compression”
Before I started working toward the V-sit, I thought I already had a very powerful core. Whereas conquering the L-sit bolstered my confidence, starting over with the V-sit was a humbling reality check. The two moves may not look substantially different, but the amount of abdominal strength required to perform a V-sit is exponentially greater.

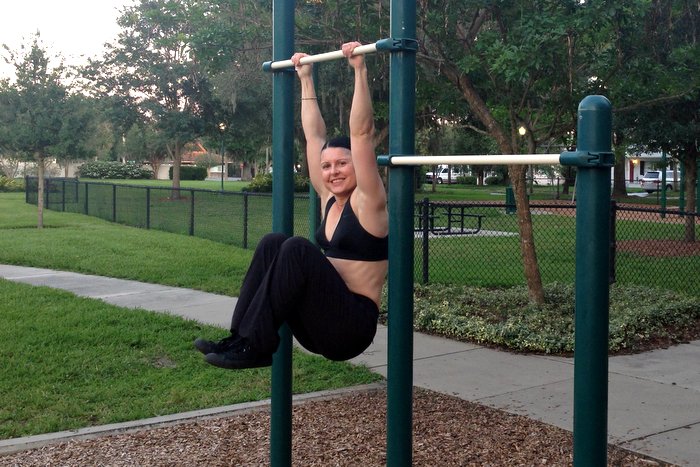
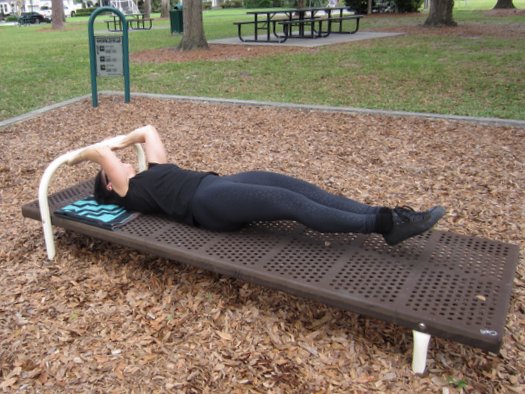
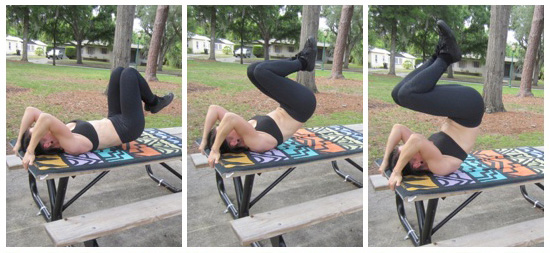
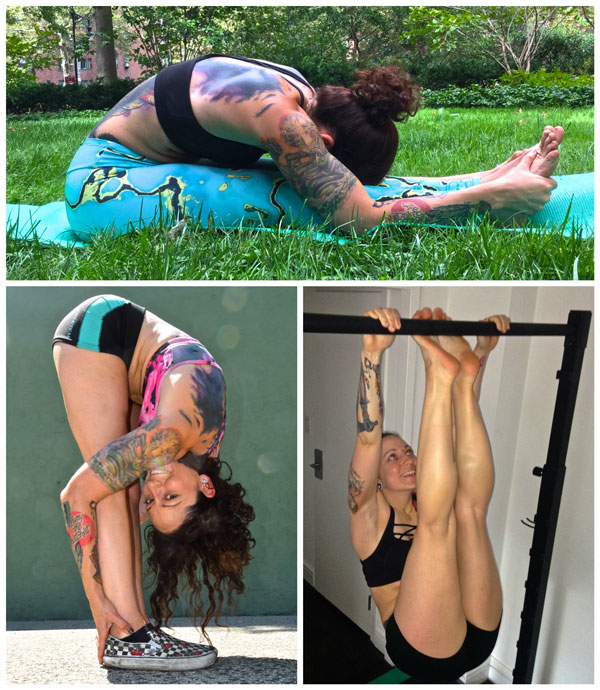
Transitioning from an L-sit into a V-sit is not just about lifting your legs higher – you also need to bring your hips farther forward. This means compressing your trunk by drawing your pelvis toward your sternum, and that requires significant abdominal activation, particularly when your legs are above you in the air. It can help to practice other exercises that involve this type of abdominal compression, like “toes-to-bar” hanging leg raises, to better get a feel for this.

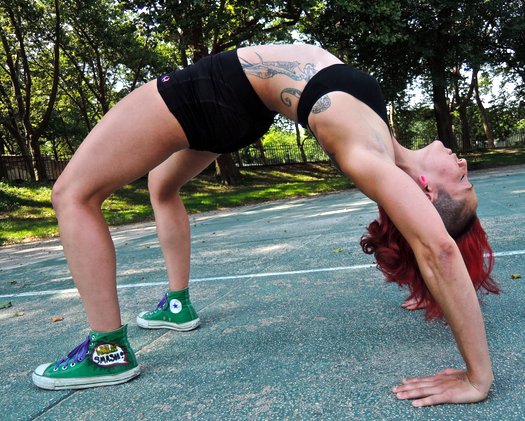
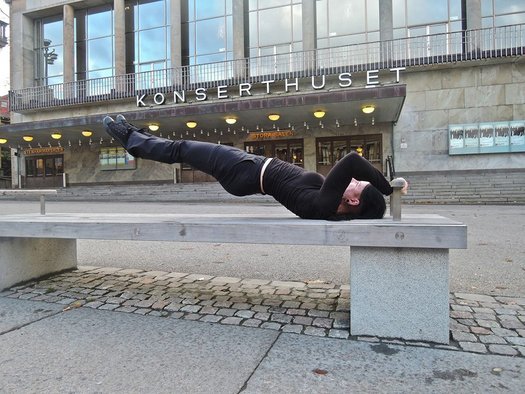
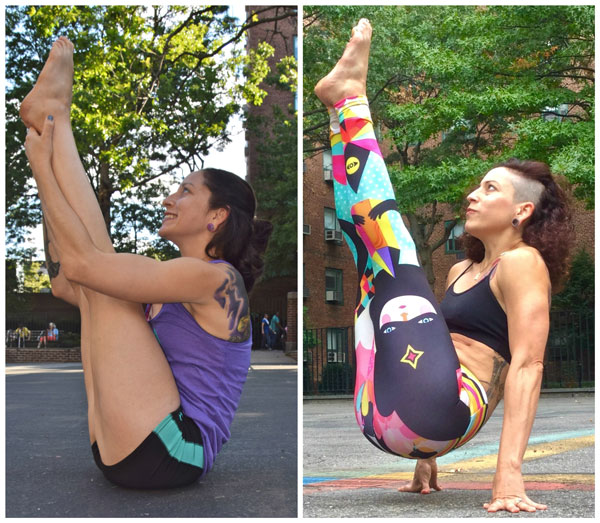
I also recommend the “boat pose” from yoga, as it mimics the V-sit, while allowing you to stay seated on the ground. This makes the exercise considerably less difficult while still letting you get a feel for the body alignment needed for the V-sit.

V-sit Variations Collage 2

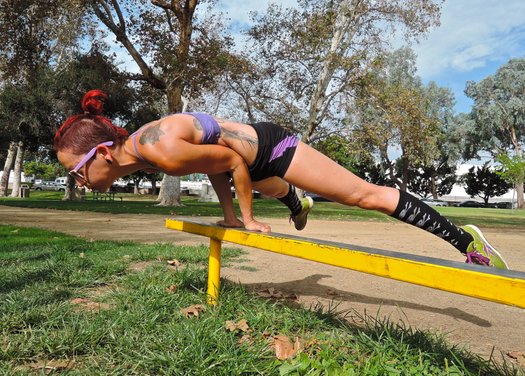
2 – Elevate Your Training
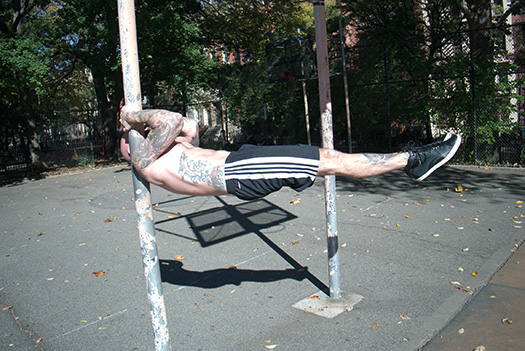
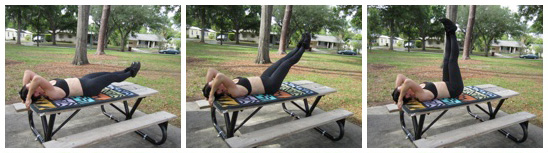
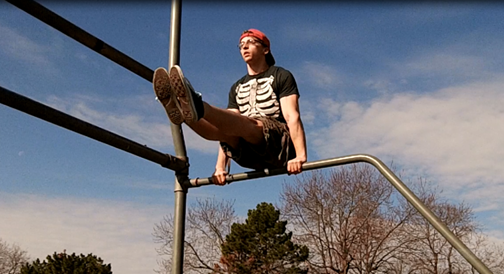
Practicing this move with your hands elevated on parallettes or yoga blocks can be helpful during your journey to the V-sit. Not only does holding onto something make it less brutal on your wrists, but it also gives you extra room for your hips and legs.

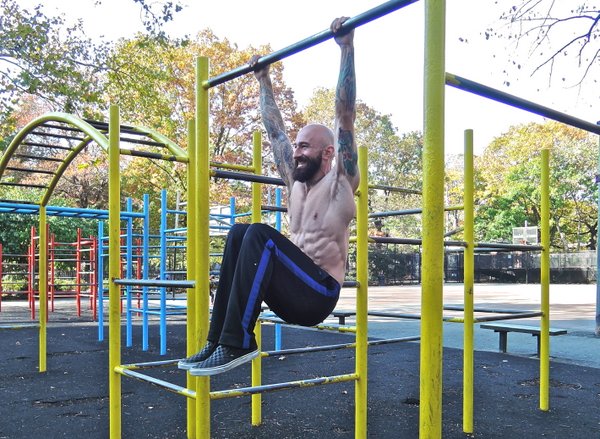
When I first started toying with the V-sit, I would begin by holding a bent-knee L-sit on my parallel bars. From there I started experimenting with sliding my hips forward in front of my hands. This helped me figure out that I needed to shift my weight back in order to move my hips into the proper position. From there I could practice leg extensions, gradually reaching my legs farther in the air each time.

3 – Stretch Your Way to Success
Though many people tend to skip this portion of their training, if a V-Sit is one of your goals then you will probably need to improve your hamstring flexibility.

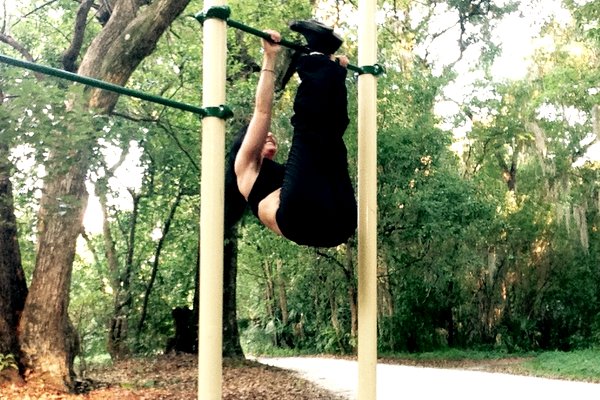
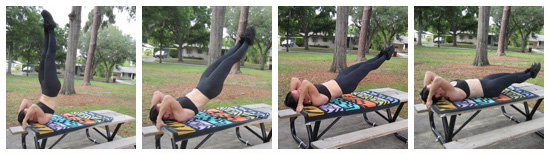
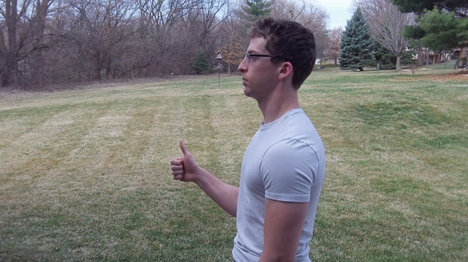
The classic toe touch or forward fold is a great way to loosen the backs of your legs in preparation for the V-sit, and there are several ways in which you can approach it: You can bend over from a standing position, practice the gym-class style “sit and reach” while on the ground, or even try it hanging with your legs raised and feet hooked beneath the bar. I recommend spending some time in all of these positions as a warm-up for your V-sit practice, as well as throughout the day.

In the beginning, these moves can be practiced with a slight bend in your knees, or with your legs slightly apart. As your flexibility increases (where you can touch your toes without overly rounding your back), you can start to slowly straighten your knees and/or bring your legs together until you are in the full expression of each pose. You may find it helpful to exhale fully as you fold forward. When you reach your “edge,” focus on drawing your abdominal muscles inward to go deeper. It may be helpful to repeat this process several times.

Forward Bend Collage

4 – Use Helping Hands
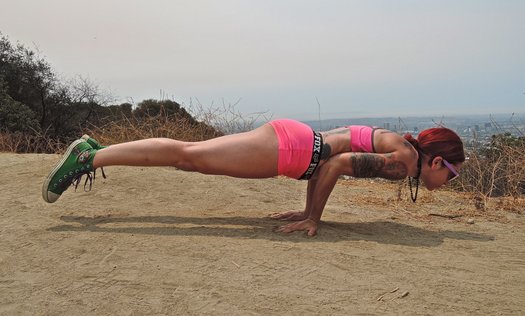
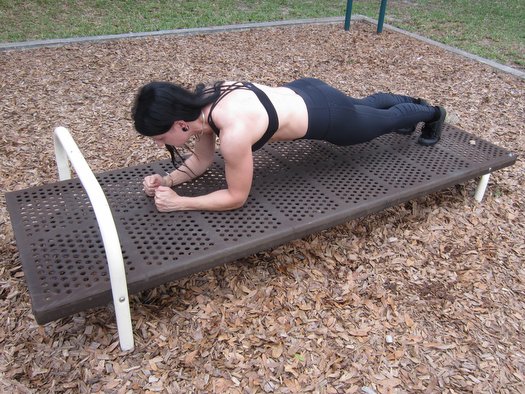
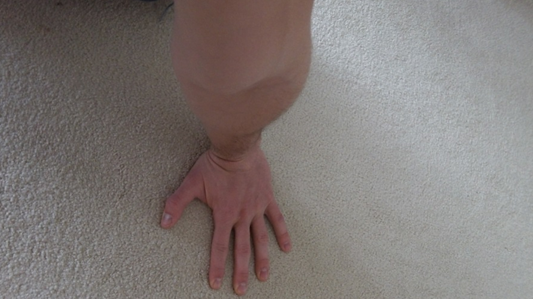
When performing this move, proper hand positioning is important for success. If your hands are placed too far away from your body it will be difficult to generate tension between your arms and your torso. Furthermore, turning your hands out and pointing your fingers to the sides (or behind you) can allow you better leverage to lean back farther without tipping over. You can also practice “tenting” your hands to help you find a little extra clearance when you begin practicing the V-sit on the floor.

5 – Don’t Forget to “Tri”
There is an immense amount of triceps strength needed in order to do any type of L or V-Sit. You also need strong lats, a powerful chest and iron forearms. One of the best pieces of advice I’m continually reminded of every time I’m at a PCC event is to “get great at the basics.”

This means you need to do your push-ups, pull-ups, squats and knee raises. Anytime you find yourself at a plateau with a new skill, you can always return to these foundational exercises. Yes, you need proper technique and training to conquer the V-sit, but that journey begins with perfecting the basics.

The V-sit takes practice and patience to achieve, but you’ll never get there if you don’t try!

****

Grace Kavadlo is a PCC Team Leader, personal trainer and group exercise instructor located in New York City. She is a columnist for Bodybuilding.com and can be seen in several Dragon Door books, including Al Kavadlo’s Zen Mind, Strong Body and Paul “Coach” Wade’s Explosive Calisthenics. For more information about Grace, check out her website, www.DieselGrace.com.

Filed Under: Progressive Calisthenics, Tutorial Tagged With: abs, abs exercise, calisthenics, Grace Kavadlo, L-sit, PCC, progressive calisthenics, tutorial, V-sit

Perfecting The Hanging Knee Raise

March 22, 2016 By Al Kavadlo 21 Comments

Al Kavadlo Hanging Knee RaiseI get a lot of questions from potential PCC candidates about our Century Test. It’s understandable that folks want to be prepared for the testing that comes at the end of the PCC weekend, and it’s often the same questions that come up:

Am I allowed to come off the bar during the pull-ups?

Am I allowed to rest in a “down dog” position during the push-ups?

Can I bribe the instructors in order to pass?

Do I really have to go all the way down on all 40 squats?!?

Hardly anyone asks about the hanging knee raises. And this is precisely the problem. (For the record, the answers to the other 4 questions are NO, NO, NO and YES.)

Though far more people have failed the Century during the pull-ups than during the hanging knee raises, I believe that many of those who couldn’t complete their pull-ups had trouble at least in part due to the knee raises having taken more effort than they anticipated. If you’re struggling by your tenth hanging knee raise, it does not bode well for the rest of the test, even if you manage to hang on long enough to finish the 20 required reps. This is why perfecting your hanging knee raise is a key part of training for the Century. It’s a great strategy to make sure you have gas left in the tank to complete the test, and the extra time spent hanging from the bar can only help your pull-up game in the long run.

PCC_UK-Stephen-Hughes-Landers-HangingKneeRaise2The first few times I taught the PCC workshop I was surprised by how many people could not perform a proper hanging knee raise upon entering. At this point, it no longer surprises me, but it still sometimes amazes me when otherwise solid candidates struggle with this exercise. It’s not the hardest move in the world, but it does take some practice. Particularly in the context of the Century, performing 20 clean reps in a row is a more difficult task than many expect it to be, yet it seems like lots of folks show up for the PCC having never even attempted more than a single rep. People either underestimate the hanging knee raise, or they’re too focused on all the pull-ups to even notice this relatively modest exercise.

As such, many PCC candidates end up getting “no-repped” on a lot of their hanging knee raises due to poor technique, which wastes both time and energy. If you wind up getting no-repped 6 or 7 times during the hanging knee raises, not only does that leave less time to rest before your pull-ups, it can also zap your strength and vitality.

If you want all of your reps to count, the biggest thing to watch out for is excessive swinging. This is especially true during the lowering phase of the movement. Though a slight degree of wavering may be unavoidable, anything more than that is unacceptable.

In order to facilitate a controlled descent, think about pointing your toes and reaching your feet slightly forward in the bottom position, almost like a gymnastic “hollow body” hold. This will help you avoid picking up excessive momentum. Also make sure to maintain tension in your abs, and don’t let your legs swing behind your body at the bottom of the rep.

Al Kavadlo Hanging Knee RaiseFocus on raising your knees with control as well. Avoid moving too quickly and aim to pause briefly at the top of each repetition to make sure that you remain steady.

Furthermore, it’s crucial to make sure you have a solid grip. Squeeze the bar tightly, keep your elbows locked, and actively pull your shoulder blades down and back to minimize any swinging.

Though range of motion is less often a concern on this exercise than the others that comprise the Century test, it is essential that your knees are raised above hip height for a rep to count. Focus on tilting your hips and pelvis forward at the top of each rep in order to fully engage your abs and ensure that your knees come up high enough.

It’s great to understand all of those concepts theoretically, but it’s another thing to actually put in the time to get a feel for the exercise physically. The key to perfecting your hanging knee raise is very simple: lots of practice. Do them before your pull-ups to warm up or do them afterwards to burn out. Just make sure you do them before you come to PCC.

***

Al Kavadlo is the lead instructor for Dragon Door’s Progressive Calisthenics Certification. Recognized worldwide for his amazing bodyweight feats of strength as well as his unique coaching style, Al is the author of five books, including Raising The Bar: The Definitive Guide to Pull-up Bar Calisthenics and Pushing The Limits! Total Body Strength With No Equipment. Read more about Al on his website:www.AlKavadlo.com.

Filed Under: Progressive Calisthenics, Tutorial Tagged With: abdominal training, abs, Al Kavadlo, Century Test, Hanging knee raises, hanging leg raises, HKR, HLR, PCC, PCC Workshop, progressive calisthenics, The Century Test

Cut to the Core

September 1, 2015 By Eric Buratty 14 Comments

Al Kavadlo Front Lever

It’s tempting to use the terms “core” and “abdominal” muscles interchangeably.

After all, having visible abs and sub-seven percent body fat gives us an automatic pass to forget training our core, right?

Not exactly.

You see, the truth is that the abdominal muscles are just a part of our core.

Why?

Because BROscience. And because I said so.

All joking aside, our entire core includes our upper back muscles, our lower back muscles, our psoas muscle and then our abdominal muscles.

That last area becomes especially important for earning our “beach body” card.

However, without a strong core, our “beach body” muscles are just there for show.

The good news is that Progressive Calisthenics happens to be the perfect way to wake these muscles up—even when they’re hidden beneath layers of fat.

What about abs being made in the kitchen (not the gym)? Yeah, yeah . . . we’ve all heard that one before.

We could just as easily counter that question with: What foods STRENGTHEN the core musculature?

So, instead of wasting time on semantics and dogmatic fitness debates, let’s cut to the core with more important matters.

Like WHEN and HOW to train the core for best results.

Who’s with me?

Al Kavadlo Beach Back Lever

WHEN to Train the Core

Ideally, we’ll train the core first thing during our workouts whenever we are:

  1. Making a comeback from a sports injury
  2. Combating some form of lagging or acute inflammation around a joint/tendon so that it doesn’t turn into chronic inflammation (i.e., performing an active recovery workout in place of a regular workout)
  3. Not feeling a solid muscle contraction where we need to on a given movement—which could lead to acute and/or chronic inflammation

Whenever we are feeling closer to 100 percent and beyond, we’ll train our core after emphasizing our lower body muscles.
This is because, when we target our largest muscles first, we elicit a favorable hormonal response that translates into greater energy expenditure from our core musculature.

What if we’re emphasizing our upper body muscles during our main workout?

Well, it’s still recommended to superset some lower body plyometrics and core moves during our warm-up to help get us get in the zone.

We could also consider throwing in some core moves as bonus work if we accomplish our desired training effect earlier than expected for a given workout day.

Just ‘cause, you know, that playing around stuff is good for us every so often.

HOW to Activate the Core

Now that we’re all on the same page with when we should train our core, I’m sure you’re dying to know how you can start applying this info . . . like yesterday.

Kavadlo Brothers Two Flags

In this capacity, here are some drills to help you feel what it’s like to activate the entire core musculature.
These are ordered from least to most challenging and should be practiced as such.

  1. Hollow Rock (Floor)
  2. Hollow/Reverse Hollow Sideways Roll (Floor)
  3. Reverse Hollow (Superman) Rock (Floor)
  4. Hollow/Reverse Hollow Swing (Start/Stop – Hanging)
  5. Sideways Hollow Swing (Start/Stop – Hanging)

Here’s what these moves look like in action in case you’re unfamiliar with the naming system I’ve used for them.

https://youtu.be/OjccrGGndGk

While it’s not necessary to structure your practice too much with these moves, it is recommended to just pick one or two at a time, and really focus on accentuating total body tension with them.

Implication or Application – You Decide!

As you’ll see and feel over time, a stronger core allows you to progress toward more advanced skills without fear of injury.

In particular, the similarities between the positions and transitions of these moves and those of front levers, kipping muscle-ups, and human (press) flags should be fairly noticeable.

Defying gravity rules!

Adrienne progression towards the human flag
Senior PCC, Adrienne Harvey working towards the full press flag with Step #6 Split Press Flag from Convict Conditioning Vol. 2

Now that you have further knowledge and tools to help you cut to the core, hopefully you will either imply other intelligent questions from this info, or apply greater integrity when using these muscles, moving forward.

In other words, knowledge is power, and the choice is yours in how you use it!

****

Eric Buratty brings six years of experience to the DC Metro Area as a Certified Personal Trainer, Progressive Calisthenics Instructor, Nutrition Consultant and Sports Injury Specialist. For more information about Eric check out his website, EricBurattyFitness.com.

Filed Under: Progressive Calisthenics, Tutorial Tagged With: abdominal training, abs, body control, calisthenics, core, core strength, core training, core training drills, Eric Buratty

Upgrade your Life and Looks with the Knee and Leg Raise Chain

May 5, 2015 By Adrienne Harvey 46 Comments

Adrienne Harvey Hanging Knee Raise

The humble but powerful knee and leg raise progressions featured in the PCC Workshop and Convict Conditioning don’t always get as much attention as some of the more visually intense exercises. Even though these moves might not be tailor-made for showing off online, don’t underestimate their importance. These progressions are the sort of “strong silent type” movements which build the muscles and coordination necessary to attempt many more advanced moves. In the context of the Century Test, the 20 knee raises also (along with the bodyweight squats) have the same requirements in the men’s and women’s tests. These 20 knee raises have sometimes been or directly led up to the make-or-break moment in a Century Test.

Testing aside, the hanging knee raise and leg raise progressions are not only great for working on your midsection, they’re a great reason to spend more time hanging on the bar and strengthening your grip. In the video at the end of this blog post, you’ll see just one of the many possible grip variations you can use when practicing hanging knee raises. Almost by accident I started doing a challenging fingertip variation—just because the available overhead support happened to be an I-beam. It was a fun challenge that really raised the difficulty of a few sets of 25 knee raises in my workout that day. Hanging knee and leg raises are also a great way to determine what you need to work on most. What “gives out” first? Your abs? Grip? Shoulder engagement? Start in on a max or near-max set of hanging knee or leg raises and you’ll soon find out!

In a crowded gym with people fighting over the more “traditional” or ab-specific items, all you’ll need to do is find a good overhead bar and you’re set. Out in the “the wild”—on a municipal fit trail (like the one in my video) or even a playground, you can easily get in some ab work, without having to lay on the ground that might be muddy. The powerful knee and leg raise drills leading up to the hanging bar work in Convict Conditioning are extremely valuable, can be practiced anywhere at all, and start at a level where literally anyone can begin and benefit. If you’re still “on the ground” with your knee and leg raise progressions, you can always still work on your strength and strategy with timed hangs on the bar.

To meet PCC standards, you shouldn’t be swinging around with your hanging knee raises. A quick but not-so-easy way to make sure you don’t swing is to really control your grip on that bar. RKC kettlebell enthusiasts will recognize the idea of trying to “bend” or “break” the bar (or in their case the kettlebell handle). In the video below I break some sticks to give you the idea. Thinking of bending the bar in this way will stabilize your upper body and give you a solid foundation for hanging knee raises, hanging leg raises and any number of twisting variations that would otherwise have you looking like an out of control set of human wind chimes. Keeping yourself in control on the bar is a great habit to start developing and to have in your personal toolkit.

Adrienne Harvey Hanging Pike Raise

You can use the hanging knee and leg raises to a work on your grip, and to strengthen your other moves. Really, any time spent working on the bar will have positive effects on your training, strength, and physique. While many of us don’t publically talk about this last item—our physical appearance—let’s get honest about it for a minute. It’s simply human nature for us to want to look our best (at least to our own definitions). While the real benefits of these hanging knee and leg raise progressions are increased usable strength, a great side effect is some muscular development in the midsection. Provided your nutrition is in line, this can result in the coveted six pack, or the “flat tummy” touted in women’s fitness marketing. While I personally think performance and strength are better long-term motivators, having those positive visual side effects certainly doesn’t hurt! I will say that most people seem to have better long term training commitment if outward appearances are not their ONLY motivator.

Having a strong, trained midsection really sets you up for success (and safety, since a strong abdomen protects your back) with all kinds of lifting and other fun activities. I could even go so far as to say that having a strong midsection can generally improve your quality of life. (You can do everything from lift everyday heavy objects without injury to holding your own while trying a new activity like stand-up paddleboarding.)

Once you’re comfortable doing a few hanging pike raises (the PCC term for a leg raise taken up to shins to the bar) and have a reasonable grasp on pull ups, you can also try a fun and useful move called the “rollover”. While some people like to kip into this move, if you have the requisite strength, you don’t have to! Perform about ½ of a pull up, then pull your straight legs up and slightly past the bar, you’ll easily roll right over and be on top of the bar. This is a great way to practice bar dips or negative muscle-ups without burning yourself out trying to get on top of the bar. It’s also a lot of fun and looks cool! Towards the end of the video below, I demonstrate the rollover somewhat slowly so you can see what’s happening. While I had the necessary strength to do this move for a very long time, figuring out the timing of it was the crucial key.

This video is a medley of hanging knee and leg raise tips, variations, and training ideas I’ve put together just for you:

How are you using the hanging leg raise chain in your training?

***

Adrienne Harvey, Senior PCC Instructor, RKC-II, CK-FMS, originally RKC Certified in 2010, and RKC Level 2 certified in 2011, kettlebell and bodyweight training have been crucial in Adrienne’s personal quest for fitness. A core member of the PCC team, Adrienne loves sharing her knowledge with small groups and individuals. She also loves to develop recipes and workout programs to further support performance, body composition, and of course—FUN. Go to http://www.giryagirl.com for more information about Adrienne!

Filed Under: Progressive Calisthenics, Tutorial Tagged With: abdominal training, abs, Adrienne Harvey, Century Test, Convict Conditioning, Hanging knee raises, Hanging leg raise, midsection, midsection training, PCC, PCC Workshop

DIAMOND-CUT ABS: Here It Is!

October 28, 2014 By Danny Kavadlo 42 Comments

Danny Kavadlo Diamond Cut Abs BookMy inbox has been overflowing.

People email me about abs more than anything else… more than tattoos or even human flag! It’s no surprise. Abs fascinate us on a cultural level. Always have. In fact, even those who don’t work out are often obsessed with abs. Abs are everywhere in pop culture, from billboards to music videos. Magazine covers to TV commercials. Abs all day, every day.

Danny Kavadlo Abs Diagram

The questions I get asked often require long answers. While I do my best to reply as detailed as possible, a subject like “what I eat” cannot be properly addressed in a Facebook message. That’s why I had to write Diamond-Cut Abs! It’s also why I included a chapter specifically titled What I Eat. People want to know what exercises they can start with. How to design a program. They want to know what workouts I did back in the day, as well as what I currently do now. It’s all here!

I also made sure to include exercises for men and women of all fitness levels and body types. This book has all my answers to these and many more questions. As a matter of fact, DCA is just about everything I have to say about abs. This is the raw uncut. The real deal. There is a lot of conflicting information out there. Read this book and find out exactly where I stand.

Danny Kavadlo Abs
Caption: Find out exactly where I stand on nutrition, training and cardio.

As much as it’s about exercise and nutrition, DIAMOND-CUT ABS is also a book about lifestyle, balance and harmony: a philosophical (as well as physical) approach to achieving the rock hard six-pack of your dreams. You have to buy this book!

Diamond-Cut Abs is also by far my most personal work to date. It meant a lot to me to be able to open up to you. I tell of my journey through life (and abs) starting as a kid in Brooklyn doing sit-ups and watching Incredible Hulk reruns, to who you see before you today (whatever that is!) I tell you how I trained every step of the way.

Al Kavadlo Danny Kavadlo Adrienne Harvey

Check out the book that Paul Wade calls “The best book on abs training ever written” and let me know what you think in the comments section below.

Keep the dream alive,
-DK

***

Danny Kavadlo is one of the world’s foremost authorities on calisthenics, nutrition and personal training. He is the author of the Dragon Door titles Diamond-Cut Abs and Everybody Needs Training. Danny is known for his minimalist philosophy, simple approach and motivational talents.

A true in-person experience, Danny is a Master Instructor for Dragon Door’s Progressive Calisthenics Certification. He has been featured in the NY Times, TRAIN, Men’s Fitness and is a regular contributor to Bodybuilding.com. Learn more about Danny at www.DannyTheTrainer.com

Filed Under: Progressive Calisthenics Tagged With: abdominal training, abs, Danny Kavadlo, Diamond-Cut Abs, fitness, midsection training, nutrition

Elbow Levers For Superhero Strength

August 5, 2014 By Grace Kavadlo 26 Comments

Grace Menendez One Arm Elbow Lever

Growing up, I was a scrawny, geeky kid who spent my free time reading comic books, fantasizing about having mutant powers and dreaming of looking shredded like my heroes in the stories. The first time I ever saw an elbow lever, the kid in me got excited. I’d always wanted to be a superhero, and this was the closest thing to flying that I’d ever seen. I had to try it myself!

Unfortunately on my first attempt, instead of flying I ended up face planting instead! After scarfing that slice of humble pie, I did what any intelligent athlete would do: I took a step back and started practicing foundational movements to help me earn my wings!

#1 – The Plank

As played out as this exercise may seem, it is the perfect place to start. The plank position puts you in the same plane of movement as a lever and helps you build the necessary core strength. Emphasize keeping an open chest while broadening through the collar and retracting the shoulder blades down and back. “Zip-up” your mid-section by squeezing your glutes, engaging your quads and evenly distributing the weight between the top and bottom of the body. Eventually when you can hold the pose for 2 minutes, experiment with gecko plank variations, which involve lifting a leg and/or arm.

Grace Menendez Gecko Plank

#2 – Back Bridge

In a culture where flexion is the norm (sitting for prolonged periods, driving, etc.) the bridge liberates the spine from excessive upper back arching, as well as from a variety of other back pathologies. How does this apply to levers? In order to hold the body upright, you need to have a flexible upper back and strong spinal muscles–and the bridge addresses both! Take your time with this movement as it can be very intense for beginners. There are less difficult variations you can practice like the straight or table bridge, neck bridge, etc.

Grace Menendez Bridge

#3 – Bound Eagle

One of the gnarliest sensations you need to get past when first practicing this move is getting used to having your elbows jammed in your guts! If you have never tried it before, go ahead and try! Not as easy or comfortable as you thought? No sweat! Master PCC Al Kavadlo, suggests in his book Stretching Your Boundaries (definitely a must-have for every regular calisthenics practitioner) a helpful preparatory pose could be the Bound Eagle. This pose can help you gradually develop the flexibility needed to turn your elbows inward.

Stretching Your Boundaries Bound Eagle

#4 – Midsection Holds

Speaking of jamming your elbows into your midsection, the L-Sit progressions are ideal to get your abdomen prepped to take all your bodyweight. These holds involve tensing almost every muscle in your body, specifically the abdominal region, much like you’ll need to in order to perform a successful elbow lever. Start with a tucked L-sit and progress from there. I also like to include the frog stand here as it emphasizes lifting the chest while balancing on the hands just like in the lever!

Grace Menendez L-Sit At Beach

Grace Menendez Fingertip Frog Stand

#5 – Elevate yourself

Start practicing your elbow lever on elevated surfaces like plyo boxes, tables, counters, park benches, paralletes, etc. Be creative; the sky’s the limit! Start by letting your legs hang over so your form will resemble less of a straight line and more of an arch. As you get stronger, just like in your midsection holds, you can work from a tuck to a straddle and eventually that perfect expression of the pose with long extended legs!

Grace Menendez Elevated Straddle Elbow Lever

Grace Menendez Elevated Elbow Lever

#6 – Get Grounded

If you’ve mastered step 5 and you’re ready to attempt the elbow lever on level ground, you may still find it difficult to completely clear your legs from the floor. It may be helpful at this point to use a wall-assisted regression, in which you press one or both feet into the wall to spot yourself. From there, it’s just a matter of taking a leap of faith and going for it. If you’ve done the work, it should come without too much of a struggle.

Grace Menendez Elbow Lever On Ground

#7 – Next Level Levers

What’s great about progressive calisthenics, is that even after you are finally able to perform the elbow lever, there are even more advanced variations to be conquered! You can try doing an elbow lever on your fingertips, or even just one arm. Be patient during the earlier steps and focus on form. It takes consistency and synergy for your body to learn this unique movement!

Elbow levers are truly the stuff of Superheroes. They take skill, courage, and strength to perform properly! Don’t be shy! Embrace your inner hero and get your lever on!

Grace_POW

***
Grace Menendez, PCC, HKC is a personal trainer, group exercise instructor and massage therapist located in Los Angeles. For more information about Grace, check out her website, www.DieselGrace.com

Filed Under: Progressive Calisthenics, Tutorial Tagged With: abdominal training, abs, Bound Eagle, bridge, crow stand, elbow lever, elbow lever progressions, Grace Menendez, how to, L-sit, midsection training, plank

Developing Powerful Abs with the Dragon Flag

April 22, 2014 By Adrienne Harvey 32 Comments

PCC Team Leader Adrienne Harvey Dragon Flag in Sweden

Anyone who’s familiar with extreme calisthenics already knows the infamous human flag exercise; the dragon flag variant, however, is an equally awesome move that fewer people are aware of. It looks cool, it’s commonly associated with Bruce Lee, and there’s so much that can be learned by working up to and practicing it. The other great thing about the dragon flag is that learning to do one means learning how to create an incredible amount of tension throughout your whole body—an essential skill for all advanced calisthenics. While there are many different paths to the dragon flag, the multi-faceted one shared below has worked well for a few clients and myself. Some of these drills led me to the dragon flag before I was ever really trying for it. Oddly enough, even though they require very maximal effort, I’ll usually leave dragon flags for the end of the workout, or focus on them at a separate time of day from my main workout. Regardless, it’s also a good idea to be warmed up. The Trifecta from Convict Conditioning 2 using the bridge, L-sit, and twist is a great sequence to practice before and after your calisthenics work, especially high tension moves like the dragon flag!

It seems like all forms of the flag require an extreme level of tension. Whenever I catch myself not properly respecting that fact on any flag progression, I remember watching Danny Kavadlo psych himself up for one of his human flag demonstrations—that fierce-looking (and sounding) process is nearly as impressive as the feat itself! But the good news is that since most serious bodyweight enthusiasts will naturally already have some of the requisite abdominal strength, the dragon flag may be a little bit “easier” to achieve than a full human flag. It certainly requires a little less skill since it’s usually performed on a solid bench, or from the ground with a low bar, instead of self-suspended in the air while gripping a pole!

Al Kavadlo performs a Dragon Flag on a pole
Al Kavadlo performs a dragon flag on a pole

The dragon flag can also be performed on a pole, but it requires a bit of pain tolerance (pick which trap you want to jam the side of the pole into) and extra time practicing the correct grip—plus you’ll also have to fight the rotation from that off-centered pole! For comfort and simplicity—especially at the beginning—using a bench, a well-secured very low bar, or similar set up is best for learning the dragon flag. Certain types of very simple ab stations on fit trails (look for a flat platform with a low bar attached at one end) can also be appropriate for flags, though I would recommend padding the surface under your shoulders.

Fit Trail ab bench

For safely make sure that whatever you are using, grabbing, and pushing against is sturdy and can support your entire body weight or more.

Alternately, on a flat bench, you can choose to place your hands on the sides of the bench (usually near the ears, but everyone’s placement will be slightly different) or behind your head as shown below:

Hand position choices for dragon flags on a bench

Since the dragon flag requires a lot of tension, proprioception and skill, I’ve used multiple steps and strategies to progress towards it. Many of these moves are good for warming up when you’re able to do the full flag too.

1. The “Hardstyle” plank: The ability to really own the full body tension in this intense version of the plank is crucial. To me the dragon flag feels like an extra serious, less unsupported Hardstyle plank. (Think of doing a plank on just your arms.) The Hardstyle plank differs from the regular variety because the whole body is tensed, the elbows are pulling towards the toes really engaging the abs, and the heels are pushing outwards as well. Similarly, the glutes are engaged too—as they are in the dragon flag!

Hardstyle Plank

2. Lying leg raises from the floor—while these are a LOT easier than a dragon flag, remaining tense with your legs just a few inches off the ground while fully engaging your abdominals will really help you towards the goal of the dragon flag.

Flat Leg Raises Demonstration

3. A yoga-like shoulder stand—learning to balance up on your shoulders and NOT your neck will help you get into the right position at the midpoint of the dragon flag, or the starting point of the negative version. Familiarity with the feeling at this position can help insure that you’re keeping the body in a straight line as you descend, and eventually ascend too. The more balanced you can be at this midpoint, the more chance you have for a little “rest” between the grueling ascent and descent of the full dragon flag.

Shoulder stand demonstration

4. Tuck-flags or roll-ups (I’m sure someone has a better name for this drill). As we know from many other bodyweight exercises (L-sits, front and back bar levers) if we shorten the length of our legs, then the more favorable leverage makes the move much easier. While in a tuck position, use your abs to slowly pull your tucked body up off the floor onto your shoulders while firmly gripping the bench or very low bar, slowly lower back down until your abs are almost screaming! This move is not to be done quickly, and is surprisingly difficult if performed correctly—especially for reps! Gradually straighten the legs more and more to increase difficulty.

Tuck raises demonstration

5. Negative dragon flags. Grasp the bench or very low bar and begin from the shoulder-stand-like top position. After making sure you’re resting on your shoulders, not your neck, tense the whole body (torso, glutes, legs, etc.) and try to lower yourself slowly, and under control without bending at the hips. You may feel like you’re supporting most of your body through your arms at first, but try to mitigate that feeling by really keeping the body tight during every second of your descent. This takes an amazing amount of tension. The closer your legs get to the ground, the more difficult the move becomes. Try to maintain the straight body position and the tension as long as you can without just dropping your legs at the bottom of the movement. The abs, glutes, legs and everything in between are strongly engaged (I’ve even managed to cramp up one or both feet while practicing these!)

Negative dragon flags

6. Full dragon flags up from the ground, towards the shoulder-stand-like position, then descending. It’s very easy to accidentally cheat these on the way up, as your hips will want to fold to help you out. Instead, think of maintaining a slightly flatter version of a hollow position while focusing on keeping the body as one solid plank. I think the most difficult part of this move is initiating the movement from the ground. The first few seconds feel nearly impossible on some days!

Steps 1-4 can be practiced together, but practicing the negative flags and full flags is incredibly taxing. I typically won’t do more than 1-2 per set for negatives, and only 1 full dragon flag per set, for a session total of 3-5 sets. That’s ten reps total for the day at most. You may be able to work up to more over time, but this move takes practice, patience, and long term dedication, so best to ease in gradually.

While some may dismiss moves like the dragon flag and human flag as “party tricks,” these very cool looking moves are rewarding to conquer as they challenge our patience along with building strength, skill, and control. Thankfully, these hard-won concepts will carry over directly and indirectly to many other bodyweight drills, skills and feats of strength.

 ***

About Adrienne Harvey, PCC Team Leader, RKCII, CK-FMS, Primal Move Nat’l Instructor: Originally RKC Certified in 2010, and RKC Level 2 certified in 2011, kettlebell and bodyweight training have been crucial in Adrienne’s personal quest for fitness. A core member of the PCC team, Adrienne loves sharing her knowledge with small groups and individuals. She also loves to develop recipes and workout programs to further support performance, body composition, and of course—FUN.  Go to http://www.giryagirl.com for more information about Adrienne!

Filed Under: Progressive Calisthenics, Tutorial Tagged With: abdominal training, abs, Adrienne Harvey, dragon flag, full body tension, human flag, tension, tutorial

The L-hold Tutorial

April 16, 2013 By Aleks Salkin 15 Comments

aleks1

The L-hold (also known as the L-sit) is one of the 7 static holds included in the PCC syllabus. Like all statics, L-holds are phenomenal for tendon strength and powerful, total-body co-ordination—but don’t expect to see them performed in gyms around America anytime soon.

My own recent exploration of the L-hold started off somewhat embarrassingly – with a locked-up lower back. After botching my first dance with heavy pullovers, my lower back felt like a piece of wood – stiff and immovable (note to interested parties: common sense would dictate not to arch your back while doing pullovers. My common sense was evidently on a smoke break at the time. Don’t arch your back if you do them). I couldn’t do anything. I couldn’t do pistols, I couldn’t do L-holds, I couldn’t even hinge at the hips without feeling like I was going to catapult face first into the ground.

I was in trouble with a capital “TROUB”.

Fortunately, I had a hunch that there was a simple solution to this sudden bout of inflexibility, and the answer lie in strengthening my low back’s next door neighbor: my abs.

I chose the L-hold because hanging leg raise variations were unbearable at the time, and because of the high promises made about L-holds in Convict Conditioning 2: “Cure bad hips and low back inside and out.” Could it really be that simple? Would the L-hold break its promise when I most needed it to deliver? There was only one way to find out, and fortunately the progression sequence Paul Wade laid out in Convict Conditioning 2 was just what the doctor ordered. I started with bent leg holds and found that pumping my legs between progressions increased the difficulty and skyrocketed my strength and blood flow to my low back all at the same time. To make a long story short, within a few short days my back was as good as new. In this post, I’m going show you how I approached mastery of the L-hold.

First and foremost, you are going to need two things: strength in the form of strong shoulders, lats, triceps, and (of course) abs. Be sure you’ve cut your teeth on dips, one-arm pushups and their progressions, handstands, pull-ups, and leg raises before you tackle this move. Second, you are going to need some good active flexibility, or as Coach Wade refers to it in CC2 “Tension flexibility”, in your hips and legs. Whereas passive flexibility is essentially yielding to the force of gravity to improve your range of motion, active flexibility uses muscle tension to kick gravity to the curb and move in an advanced range of motion against the Earth’s otherwise unforgiving pull.

L-hold domination

To begin with, start on some sort of raised surface rather than on the floor: paralettes, kettlebell handles (careful!), or a sturdy desk will do the trick. For the sake of variety, consider practicing them on all these surfaces. While I have no hard proof of it, getting good at a this or any skill in a variety of contexts may very well make you better at the movement overall.

To keep your shoulders happy, keep them pushed down as far away from the ears as possible, and keep your “elbow pits” forward for all the steps in each series. Let your shoulders round forward – flare your shoulder blades – and hold that position tight. Keep your gaze straight ahead.

aleks2

Nope! Chest is too wide and back is arched. You may not pass go.

aleks3

Bingo! Back is flexed, chest is sunken, abs are tight. You have redeemed yourself.

Aleks4

Make your elbow pit point the same direction as your fingers.

Your goal is to work up to 20 second holds on each progression before moving on. However, because you’ll achieve that goal by getting stronger before focusing on endurance, I’ll give you a tool to get a taste of the next progression in the series to help build your strength faster and work your way toward the advanced L-hold more time efficiently. Not only will you be building static strength, but you will also be building dynamic strength, thereby giving you some built-in variety and the ability to feel out the movement a bit better.

When your arms start shaking and you are making ugly faces and grunting to get through your sets, you’ve already gone too far. If you’re working yourself into the ground you’re building fatigue, not strength. Knock it off.

You’re going to start with the bent leg hold. Prop yourself up on your raised surface, bend your legs to about 90 degrees, and…well, hold it. Hold it for as long as you (semi) comfortably can, take a break, and repeat.

Your journey through the progressions will go in this order.

1) Bent leg holds

–>Bent leg-to-straight leg

2) Straight leg holds

–> straight leg-to-N-holds

3) N-holds

–> N-holds-to-L-hold

4) L-hold

And if you want to take the first small step toward V-holds, you can add in this gem

==> L-hold-to-advanced L-hold

5) Advanced L-hold

Check out the video for the deeper details to kicking gravity in the face L-hold style. Note that during the dynamic variations I’m controlling my leg movement, not letting it control me (i.e. bouncing around and losing balance). Don’t move on until you can do the same.


Programming will be different from person to person. If you’re a rank beginner, you can get by initially with just two days a week of work. I say “initially” because the L-hold is not as taxing as movements such as hanging leg raises and Dragon Flags, so practicing them daily should become your goal.

The following programs are examples. You may progress faster, you may progress slower. Use these programs as templates, not gospel, and you will find that you have a solid base to work from and progress should roll in faster than you can spell “transverse abdominis.”


Beginner program:

Week 1: Don’t overthink it – keep your effort level at around 50%-80%. No need to go balls-to-the-wall just yet.

Monday: Bent leg holds

Thursday: Bent leg holds to straight leg holds

Week 2:

Monday: sets of bent leg holds and bent leg-to-straight leg holds

Thursday: Straight leg holds


After this, three days a week should be no problem. If that’s still overdoing it, stick with two days a week and progress as slowly as you need to. You don’t get a medal for racing through the progressions.


Intermediate program:

Week 1:

Monday: straight leg holds + bent leg-to-straight leg holds

Wednesday: bent leg holds

Friday: straight leg-to-N-holds

Week 2:

Monday: N-holds + straight leg-to-N-holds

Wednesday: straight leg holds

Friday: N-holds to L-hold

And if you’re more advanced and want to work on these daily, here’s an advanced program.


Advanced program:

Week 1:

Monday: (warm up: bent and straight leg holds) N-holds + N-hold-to-L-hold

Tuesday: (warm up: bent and straight leg holds) N-holds

Wednesday: (warm up: bent-to-straight leg holds) N-holds-to-L-hold + L-holds

Thursday: (warm up: bent-to-straight leg holds) N-holds

Friday: (warm up: bent-to-straight leg holds) L-hold-to-advanced L-hold

Week 2:

Monday: (warm up: straight leg holds) N-hold-to-L-hold

Tuesday: (warm up: straight leg holds) L-holds

Wednesday: (warm up: straight leg holds and N-holds) L-holds + L-holds-to-advanced L-holds

Thursday: (warm up: straight leg holds to N-holds) L-holds

Friday: (warm up: N-holds) Advanced L-holds

Congratulations! You have just kicked the L-hold’s ass! And now your abs are punch proof. But they’re not punch proof enough – not if you’re reading this anyway. For the average exerciser a full L-hold is a laudable accomplishment. But you’re not average, otherwise you wouldn’t be here reading this. The time to go above and beyond is nigh. Stay tuned. The V-hold is calling your name. And it will soon be time to answer the call.

***

About Aleks Salkin: Aleks Salkin is a calisthenics and kettlebell fanatic and Primal Move Fundamentals instructor currently headquartered out of Haifa, Israel. In addition to his love of old school strength training, he is also a devotee of intelligent flexibility training and tension flexibility in particular. Aleks grew up scrawny and unathletic until he was exposed to Pavel and his training methodologies in his early 20s. He currently spends his time spreading the word of strength and health both in person to his clients and online via his website and Facebook page. He is available for online coaching for select, dedicated individuals, and enjoys crushing weakness wherever it tries to hide. Find him online at http://www.alekssalkin.com/

Filed Under: Progressive Calisthenics, Tutorial Tagged With: abdominal training, abs, Aleks Salkin, bodyweight, calisthenics, Convict Conditioning, L-hold, L-sit, Paul Wade, tutorial, workout

Primary Sidebar

Featured Products

previous arrow
GetStrongBookCover
ConvictConditioningBookCover
StreetWorkoutBookCover
ExplosiveCalisthenicsBookCover
StrengthRulesBookCover
next arrow

Categories

Progressive Calisthenics Certification Logo
Click here for more information or to register for the PCC workshop

Get Strong Workouts TriadXP App
Get Strong Workouts App

Recent Posts

  • Top 5 Reasons Why an In-Person Workshop is the Best Way to Supercharge Your Training
  • HYBRID STRENGTH TRAINING IS HERE!
  • My Calisthenics Journey to the PCC
  • The Handstand Press: Complete Control Through the Handstand
  • The Get Strong App is Here!

Dragon Door Publications

Dragon Door Publications

Recent Comments

  • bross dandon on The Case for Curved Handstands
  • Johnny Flewellen Jr. on Strength for Life
  • Dan Earthquake on The Pursuit of the Daily Minimum
  • Johnny Flewellen Jr. on The Pursuit of the Daily Minimum
  • Johnny Flewellen Jr. on Yoga, Calisthenics and the Journey of a Lifetime
FOLLOW US ON TWITTER!

Copyright © 2025

Dragon Door Publications / The author(s) and publisher of this material are not responsible in any manner whatsoever for any injury that may occur through following the instructions or opinions contained in this material. The activities, physical and otherwise, described herein for informational purposes only, may be too strenuous or dangerous for some people, and the reader(s) should consult a physician before engaging in them.