• Skip to main content
  • Skip to primary sidebar
  • Home
  • Contributors
  • Resources
    • Q&A with Paul “Coach” Wade
  • Workshops
  • Products
  • Forums
  • Articles
  • Blogs
    • RKC Blog
    • Strong Medicine Blog
  • Archives

PCC Blog

Progressive Calisthenics - The Official Blog for the PCC Community

ABSOLUTE BEGINNERS: 4 New Year Goals for Total Noobs

January 7, 2014 By Paul "Coach" Wade 132 Comments

 My bodyweight brothers and sisters!
My bodyweight brothers and sisters!

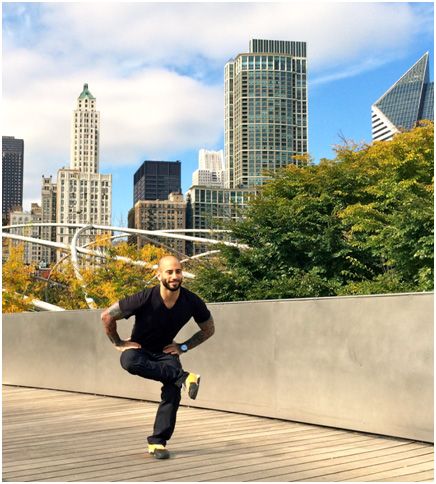
Welcome to the world’s finest bodyweight strength blog—and welcome to 2014! I really hope this year turns out to be something really special for all of ya.

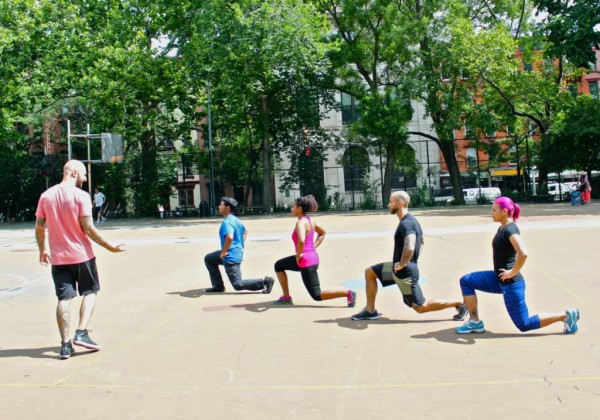
New Year means a time for new fitness and conditioning goals—at least for a lot of folks. A brand-spankin-shiny new year is a perfect time for a fresh start…and God knows, millions of people need it. Two-thirds of Americans are overweight or obese; only 20% get regular exercise; and, horrifically, it has been estimated that less than 10% of the population can perform a full pullup. That’s only one in ten! (I think.)

Many folks are so goddam outta shape, they just have no clue how to make a start in calisthenics. So they put it off…sometimes, forever.

If that’s you—or someone you care about—then this blog is my New Year challenge for YOU. I’m often guilty of writing for experts. Why? Coz the bodyweight community is a remarkable one; it’s typified by smart, mature, knowledgeable, advanced athletes. I love you all, but this post’s not for you. It’s for the noobs.

What’s a “noob”? Well, in terms of bodyweight training:

  • If you can barely do a handful (or less) of sloppy pushups;
  • If a strict, full pullup is outta the question;
  • If a full, deep squat is impossible or feels like it’s ripping your knees apart;
  • If getting up off the couch leaves you out of breath;
  • Or if any of the above apply to you;

…then yer a noob, kid. So if you are a desperate neophyte, an interested but confused lurker, or a collapsed ex-athlete—listen up!

Four Fundamentals in Strength Calisthenics

In this post I’m going to give you FOUR basic goals to get working on. You don’t need more than that—the more goals you set, the more your willpower gets spread around ‘em, so the less likely you are to meet any of them. Research also shows that the more inconvenient New Year goals are, the less likely they are to get met. So all these exercises, and their regressions (i.e., easier versions) can be performed in a tiny space, in the comfort of your own home. You don’t need jack s*** to start today. You don’t need to buy my book. You don’t need a pullup bar. You don’t need a gym membership or new sneakers. All you need is a little courage to accept my challenge, a few minutes time, and enough space to lay down. Everybody has that much, right?
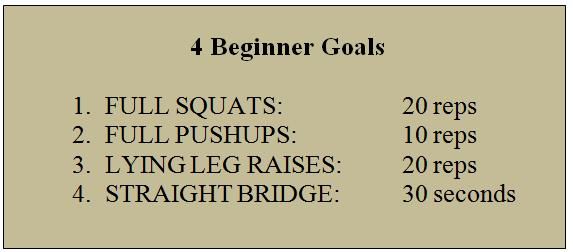
Here are the goals:

noobs_textbox1All techniques are to be executed with perfect form.

To a dedicated athlete, these four are modest goals; easy, in fact. But they are also incredibly important; the average de-conditioned American would be unable to meet these standards…amazingly, given the decline of fitness in our schools, even the average teen would struggle! So let’s get to work on these fundamentals. If these basics are beyond your reach, you stand zero hope in hell of going any further in strength or fitness. And if you really ARE new to strength training, don’t give me any of that “shouldn’t I be lifting weights?” bulls****. If you can’t do ten pushups perfectly, you got no business laying down on a bench press. Likewise, if full bodyweight squats are impossible, then perching under a loaded barbell or leg press for messy, incomplete reps is only going to wreck your knees.

Bodyweight comes first!

The Four Techniques

1. Full Squats:

Full squats generate strength in the entire lower body—quads, hamstrings, calves, glutes, shins, everything. They also build mobility in two areas that badly need it, the knees and ankles, while strengthening the lower back. To put it bluntly, they are essential, whether ya like it or not.

Full squats means all the way down until the hamstrings are resting on the calves!

You can’t do twenty full squats until you can do one full squat RIGHT. So begin by focusing on deep motion. I don’t care how weak or rusty your knees are—you can begin building motion using no weight on the knees at all. Lie on your back or shoulders, with your legs straight up, and bend your knees as fully as you can that way. (These are called shoulderstand squats.) As your mobility improves, try deep squats the right way up; use a partner or a sturdy object to help pull yourself out of the hole. Over time, use the assistance less…build to solo half-squats, and ¾ squats. Soon full squats won’t seem so tough. Once you can do your first set of 5-10 full squats, just add a perfect rep every so often. You’ll hit twenty reps real soon.
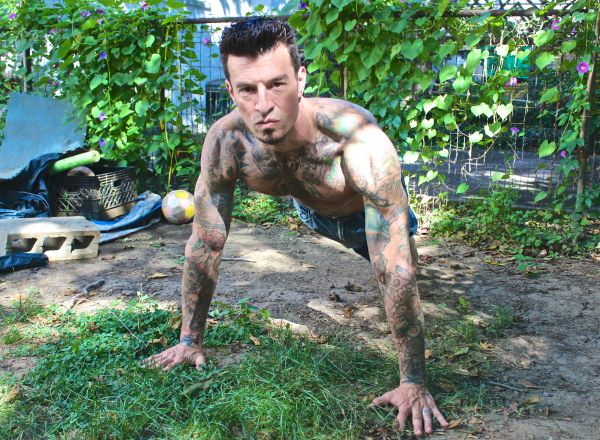
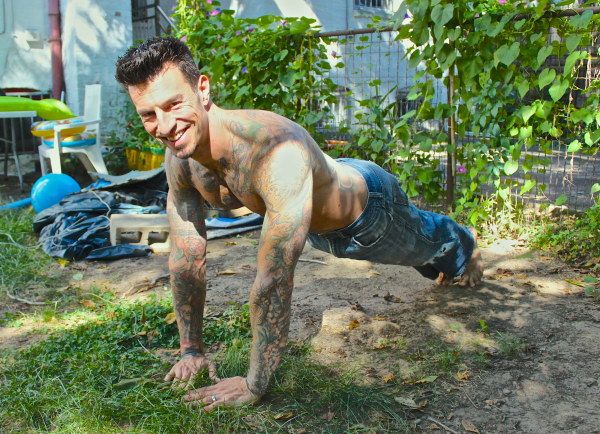
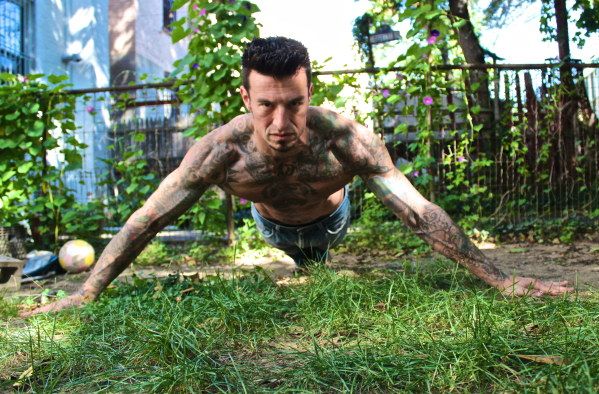
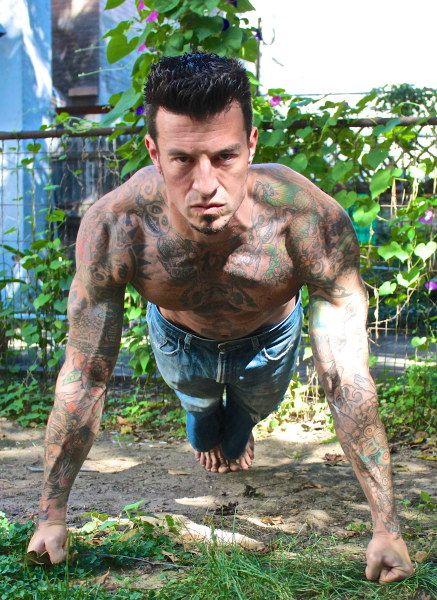
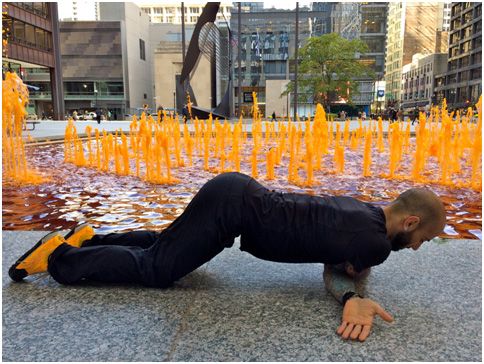
2. Full Pushups

Keep your back and legs straight and aligned—you’ll get all the benefits of planks, but without the boredom!

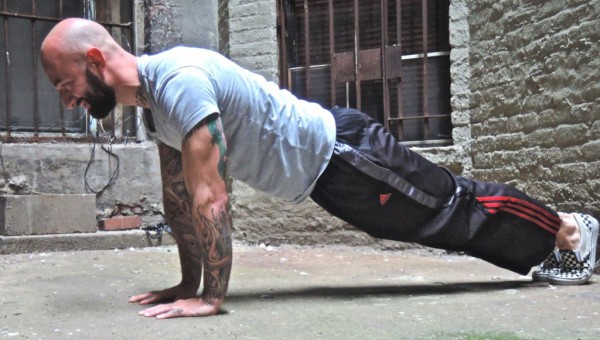
Hey, ten pushups is easy right? Everyone can do that, right?

Wrong.

Most people—even coaches who should know better—do them wrong. If you do them the right way—my way—they are tough as hell. For a start, most folks rush their pushups. I want you to eliminate ALL momentum (if momentum is doing the work, your muscles aren’t, right?). I want you to take two seconds up, two seconds down, with a moment’s pause at the bottom position. Secondly, you need to go deep—go down until your sternum is a fist’s width from the floor: no less. (Use books or an object like a softball to guide you, at first.) Third, don’t bounce! When you descend so that your sternum touches your books, it should touch them as lightly as you would kiss a baby on the forehead. This technique (“kiss-the-baby”) is murder, forcing you to control your body FULLY. What else is strength, but control?

Doing pushups this way makes them brutal and incredibly productive as an exercise. If they are too hard for ya, begin doing them on an incline, or even against a wall. Once you find a pushup technique you can perform five reps in, add a rep every workout or two until you can do ten, then make things harder.
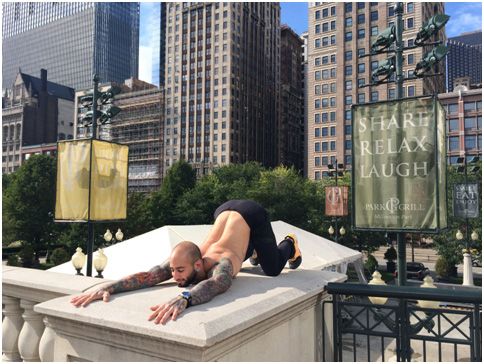
3. Leg Raises

Forget what you have probably been told about working “abs”…isolating the muscles, tensing, and performing lots of sets of teeny crunches or machine exercises. Real, functional strength—from hanging on a bar to picking up a fridge—requires not just strong abdominals, but an iron “anterior chain”—that means your hips, abs, intercostals, serratus, obliques and even the deep muscles of the quads. For strengthening your anterior chain perfectly, God gave you a gift—leg raises!

Isolation is for hermits, kid.

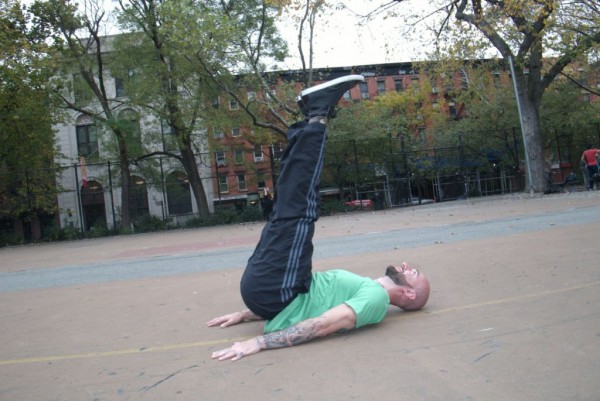
As usual, begin easy. Start with lying knee raises; build to twenty reps. Then extend the legs a little. Then you can try one–leg leg raises, with the knees locked. Pretty soon, twenty strict leg raises will be within reach, and your abs will be harder than those pathetic crunches could have ever got ‘em. Damn, you’ll be doing these suckers hanging in no time. Six-pack from Hell, here we come…
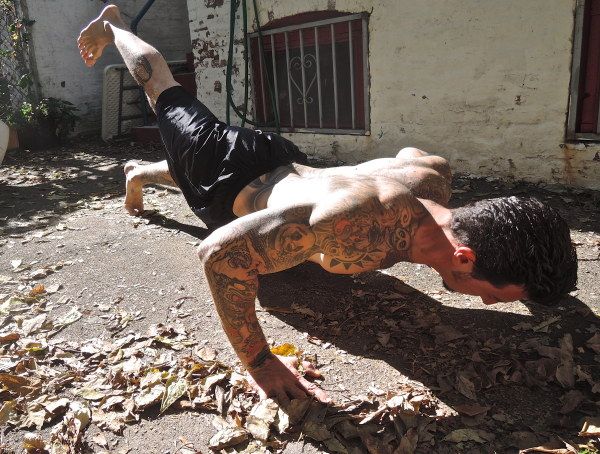
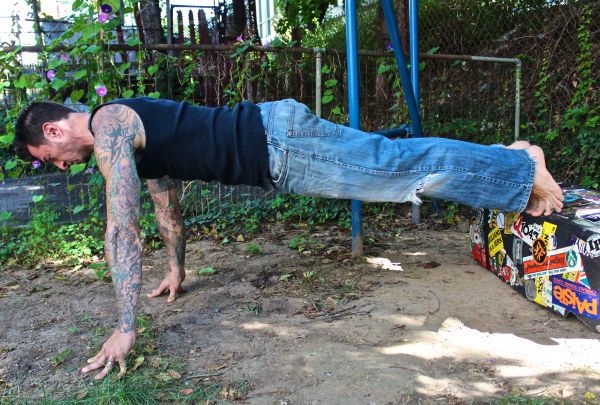
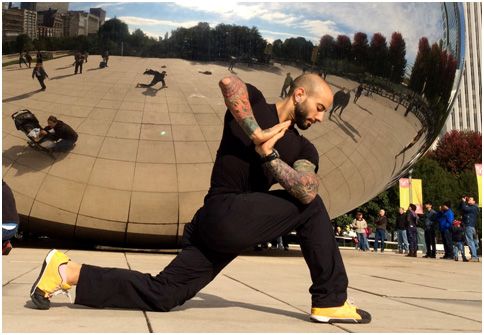
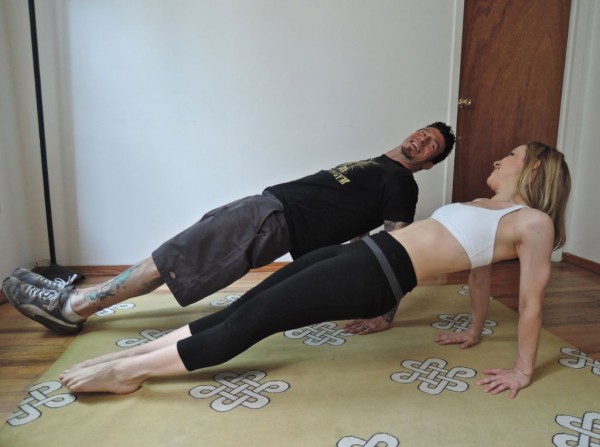
4. Straight Bridge

The straight bridge is a wonderful exercise for noobs to aspire to master. Whereas leg raises work the entire anterior chain—the muscles at the front of the bod—the straight bridge works the posterior chain. It builds the spinal erectors, reduces low back pain, bulletproofs the spine, trains the hamstrings, and helps heal bad knees. Because the arms are pushing behind the body, this type of bridge also strengthens the “lats” of the back, and the muscles around the shoulder blades—an awesome benefit for those who don’t have a pullup bar. Straight bridges also give ya triceps of steel kid—no more kickbacks necessary.

Once again, alignment is what’s up.  Athletes make the straight-body position look easy. It ain’t.
Once again, alignment is what’s up. Athletes make the straight-body position look easy. It ain’t.

Normally I wouldn’t advise beginners to perform bridges—I think the time and energy is better spent on pulling work, typically on a low horizontal bar. That said, if you don’t have access to a bar, straight bridges can be a good way to work the back muscles.

Bridging can be demanding—so start easy. Commence with short bridges (with the shoulders on the floor), then move to table bridges (straight bridges, but with the knees bent). When ten seconds of perfectly aligned form is easy, start adding seconds—build to 20 seconds, then move to something harder. If straight bridges are too easy, try them with one leg lifted off the floor. That will teach you what your hamstrings were made for.

How to Train for these Goals

How do you go about training to achieve these goals? For a start, if you are de-conditioned, you need to get an okay from a doc before you start training hard (that’s the legal s*** outta the way). When you start, start slow. This is absolutely key—never throw yourself full tilt into a new training program. Start with exercises that are about half your full ability, and add work s-l-o-w-ly—a rep here, better form there, a harder exercise somewhere else. This approach will allow your joints and soft tissues time to adapt and get stronger, preventing joint pain. (Joints adapt to stress slower than muscles.)

As a noob, you really need to keep your programming easy and simple at first. I advise performing two exercises per session, with a day off in-between. Warm up with a gentle, ten minute walk, and perform one set of a lighter version of each exercise you are doing, also as a warm up. (For example, if you are doing incline pushups, warm up with wall pushups; if you are doing flat pushups, warm up with incline pushups. Got it?) After the warm up, perform two hard “work” sets of each exercise. Don’t go til failure, keep your form as perfect as possible, and rest between sets long enough to get most of your strength back. Such a program would look like this:

noobs_textbox2
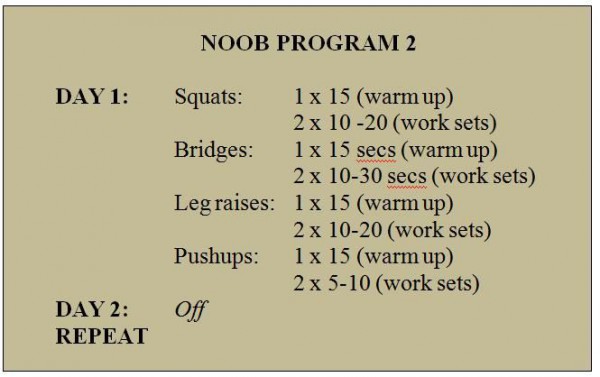
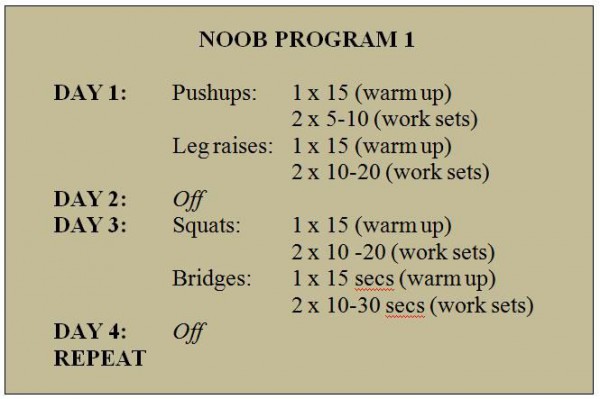
If you get sore, or stop making progress, add more rest days. If this seems easy, reduce rest days—but only if you keep making progress. If this seems like way too little, or you get fitter real fast, try the exercises all together:

noobs_textbox3Take a day off in between workouts, or more if you need to. Some will say this is not enough work. It is. Trust me, if your numbers are going up, if you are making progress weekly, you are doing better than 95% of those suckers with expensive gym memberships. More detailed programming info is included in Convict Conditioning. For motivation and to keep ya on the straight and narrow, try to write down your training sessions in a logbook, ‘kay?

I’m too fat for bodyweight workouts!

No, you aren’t. Obese would-be ninjas need bodyweight training as much or more than slimmer folks—they just need to start with easier exercises.

I’m going to tell ya a well-known “secret” now…calisthenics and weight-loss go together like love and marriage. Once your body recognizes it is regularly struggling to heft its own weight up and down, the subconscious mind kicks in and will help you shed those useless pounds. I’ve seen this happen hundreds of times, and it will work for you too if you give it a chance.

Yes, nutrition will play a role, of course. You gotta start dealing with your weight at the same time you start bodyweight training: it’s no goddam use saying; “I’ll work out when I get to such-and-such a weight”, or; “I’ll start eating right when my training gets off the ground”. Start training AND eating well right now.

The Next Step: Moving to Intermediate Level

Okay. Let’s say you have worked for a few weeks—or months—to meet these fundamental requirements. Congrats, kid! You did it. You are now stronger and more mobile than the average American! Well done.

Whazzat…? You feel better? You have added muscle, and firmed up? You are hungry for MORE? You want to know how to take the next step, and work towards becoming an intermediate bodyweight athlete?!

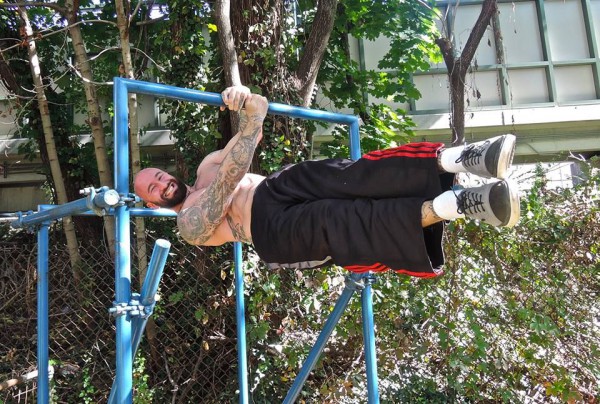
Now your arms, back, waist and legs are stronger, you’re qualified to begin studying at the ultimate bodyweight training college—the School of the Bar! You gotta get hanging. This article is too short to discuss bar training and techniques. Luckily, Al Kavadlo has got you covered. With John Du Cane, Al has put out the super-acclaimed Raising the Bar…the master text-book of hanging training techniques.

noob_RTB
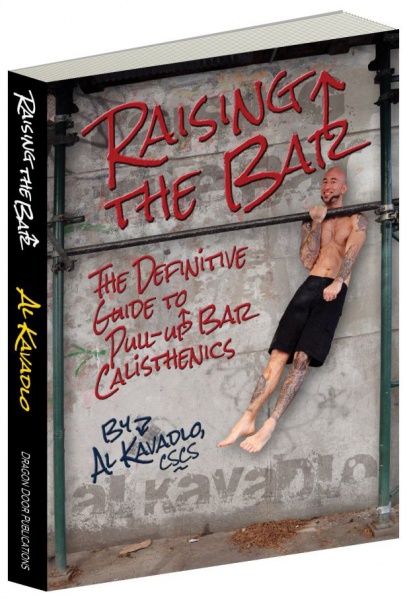
Despite what you might think, I’m not a Dragon Door “affiliate” or any of that crap, and I don’t get paid one cent for promoting Al’s book.  It’s just too damn good not to mention. Raising the Bar includes every bar calisthenics technique under the sun—from Australian pullups and archer pullups, to muscle-ups and Korean dips, plus bonus floor training and pressing methods. Best of all, Al’s system is designed for bar athletes of all capabilities; whether you can do a hundred pullups, or if you can barely hang on to the bar, this book will get you stronger, safely.

Anyhow, I hope that gives some of you new fish some food for thought. You know somebody who needs to get started training? Be a true friend and email them a link to this post TODAY, so we can start helping them as soon as possible.

***

Got questions? Just holler at me in the comments, and I’ll do what I can to answer ya. Any experienced athletes who have advice for noobs (we are ALL ex-noobs, remember!), I’d also love to hear what you got to say, so please make a comment.

I need you all to step up this year—bodyweight is rapidly becoming the biggest movement in fitness, and I need you hidden geniuses out there to support us, and help tip it over the edge. I want lotsa ideas, questions, tips and feedback. So get typing, Jack!

***

Paul “Coach” Wade is the author of five Convict Conditioning DVD/manual programs. Click here for more information about Paul Wade, and here for more information on Convict Conditioning DVD’s and books available for purchase from the publisher.

Print Friendly, PDF & Email

Filed Under: Motivation and Goals Tagged With: beginner, beginner goals, bridge, bridging, calisthenics, Convict Conditioning, fitness, how to start, leg raises, Paul Wade, push-ups, squats, straight bridge

The Top Ten PCC Blog Posts of 2013

December 31, 2013 By Al Kavadlo 8 Comments

Al_deep_squat

The Progressive Calisthenics Certification made its mark on the fitness world in 2013 and I am very excited to have been a part of it. It’s almost hard to believe that this blog has been up and running for an entire year, yet on the other hand, it’s amazing to think that in such a small amount of time, the PCC has already grown into an international phenomenon. Next year, we will be holding PCC workshops in a half dozen different countries!

I am proud of every one of the nearly 50 posts we shared this year on the PCC blog, so it was hard to assemble this list. With that in mind, let’s take a look back at my top ten PCC blog posts of 2013 (in no particular order):

We’ll start with the most popular post this blog has ever seen, Paul Wade’s Ten Commandments of Calisthenics Mass.

And let’s not forget my counterpoint to that piece: Building Strength Without Mass.

My brother and fellow PCC Master Instructor Danny Kavadlo shared his personal experiences with Bodyweight Training.

PCC Team Leader Adrienne Harvey gave us her unique perspective on PCC Sweden.

A fantastic motivational piece from Dragon Door Founder and CEO John Du Cane on How to Be Successful at Anything.

Another classic post from Coach Wade, this time discussing the Tao of PCC.

PCC Team Leader Logan Christopher made a case for Curved Handstands.

PCC Senior Instructor Steven Low gave us this great piece on the Marriage of Bodyweight Methods.

PCC Team Leader Angelo Gala shared his Journey to the Back Lever.

And last but not least, this touching father and son calisthenics story from Peter D’Epiro.

Thanks to all of you who read this blog and support the PCC movement! I can’t wait to see what next year has in store for the PCC and the entire bodyweight strength training community.

We’re Working Out!

Al

Al_one_hand

***

About Al Kavadlo: Al Kavadlo is the lead instructor for Dragon Door’s Progressive Calisthenics Certification. Recognized worldwide for his amazing bodyweight feats of strength as well as his unique coaching style, Al is the author of three books, including Raising The Bar: The Definitive Guide to Pull-up Bar Calisthenics and Pushing The Limits! Total Body Strength With No Equipment. Read more about Al on his website: www.AlKavadlo.com.


Print Friendly, PDF & Email

Filed Under: Progressive Calisthenics Tagged With: Adrienne Harvey, Al Kavadlo, Danny Kavadlo, John Du Cane, Logan Christopher, Paul Wade, PCC, Peter D'Epiro, progressive calisthenics, Steven Low, top ten of 2013

The Case of the Missing Pull-up Bar

December 17, 2013 By Al Kavadlo 19 Comments

pullup_bar1The day after Thanksgiving I showed up to work out at my number one training spot, the iconic jungle gym in the Northeast corner of Tompkins Square Park. I always like to get a serious workout in the day after Thanksgiving to offset the gluttonous amount of savory meats and sweet dessert treats that I’ve consumed during the previous day. Imagine my shock when I arrived at the jungle gym to find that my favorite pull-up bar had gone missing!

Well to be honest, I wasn’t that surprised. After all, the bar had gradually been getting loose over the course of the last several months. Since the park reopened in the early ‘90s following the infamous Tompkins Square Park Riot of ‘88, the jungle gym has gradually become one of the most popular outdoor training spots in the NYC area. Even on the coldest winter day, a handful of dedicated loyalists are still out there getting their reps in. Hundreds of pull-ups, muscle-ups and other exercises are performed on that bar every day. It’s taken a beating over the years!

Without my normal pull-up bar available I was forced to improvise a lot of my workout, which often winds up being a good thing. Instead of doing my typical overhand pull-ups, i used the bars on the big yellow monkey bar arch to do pull-ups, which places the hands into a neutral position.

I did muscle-ups on the low bar, which forced me to hold my legs in an “L” to avoid hitting my feet into the floor at the bottom of each rep, adding an extra challenge to an already difficult move.

I still did my handstand push-ups and pistol squats like I normally would. Exercises that require no equipment at all will forever be available to you no matter what!

pullup_bar2At the end of the workout, I was over my initial disappointment about the missing bar and I actually started to see the whole thing as a blessing in disguise (the endorphin rush from a good training session often gives me better perspective). I’ve always believed that the universe opens a window every time it closes a door. I was looking forward to seeing what other variations I might come up with in future workouts, as it appeared I would no longer have access to the high bar that facilitated so much of my training for so long.

Indeed, the next few times I trained at the park, I continued to work around the missing high bar. My L-Muscle-ups began to get a bit smoother. The neutral grip pull-ups quickly started to feel just as comfortable as the standard pronated grip. I almost forgot there was anything missing. Just when I had fully accepted the situation, things suddenly went back to normal just as quickly as they initially changed.

On Friday, December 13th I showed up to train at TSP and the high bar was back! The bar appears to have been reinforced and it feels more secure than it has in years. The low bar also appears to have been reinforced – an extra bonus! It felt great to muscle-up on that high bar again; it didn’t roll around or squeak at all.

pullup_bar3Though it appears to be the very same bar that went missing two weeks prior, the exact details of what happened remain a mystery to me. There are still questions that I may never know the answer to:
What was the final straw that brought it down? A plyo muscle-up? A giant rollover? A simple bar hang? Was anyone hurt?

.

Or was it just taken down by the NYC Park’s Department as a precaution until they could properly reinforce it?

And what brought it back? A crafty calisthenics practitioner with some welding prowess? My brother Danny’s phone call to 311? Or maybe it was just a Christmas miracle!

Whether it was the work of the NYC parks dept, a fellow bar athlete or the supernatural, I may never know. However, this much I can say for certain: Pull-up bar or not, it is always possible to have a great workout; our only limitations are the ones we place on ourselves.

And to whoever it was that fixed the pull-up bar at TSP: Thank you!

***

About Al Kavadlo: Al Kavadlo is the lead instructor for Dragon Door’s Progressive Calisthenics Certification. Recognized worldwide for his amazing bodyweight feats of strength as well as his unique coaching style, Al is the author of three books, including Raising The Bar: The Definitive Guide to Pull-up Bar Calisthenics and Pushing The Limits! Total Body Strength With No Equipment. Read more about Al on his website:www.AlKavadlo.com.

Print Friendly, PDF & Email

Filed Under: Progressive Calisthenics Tagged With: Al Kavadlo, bodyweight exercise, calisthenics, muscle-ups, New York City, pull-up bar, pull-up variations, pull-ups, Thompkins Square Park

The Week of a Thousand Push-ups

December 10, 2013 By Danny Kavadlo 23 Comments

dannykavadlo_air2

As 2013 winds down and I reflect on the days and months behind me, I find that it’s impossible for me to go a moment without mentally celebrating the launch of the Progressive Calisthenics Certification. From the United States to Sweden (and soon to Australia, Ireland and more), the energy and talent that fills these rooms is simply magnificent. It is almost becoming a common occurrence to witness amazing feats, such as a first ever muscle-up, back lever, or pistol squat. As mind-boggling as that seems, these spectacular displays of strength, balance, and sheer training ethic are becoming what could almost be considered “normal.”

But it isn’t. Not to most.

Danny.Kavadlo.1

The truth is that in the world of commercial fitness, these feats are about as far out as it comes. With machines comprised of shining stacks on sliding tracks have become the standard, our simplicity is bold like a ruby in a pile of rocks. We stand proud, defiantly deviating from product-based workouts encouraged by the man. Given the tightness of the calisthenics community, it is sometimes easy to forget how far we fall from the mainstream. We’re not looking for 7-minute abs and 21 day transformations. We seek something more. We are on the outskirts of physical culture, the edge of the norm. Dammit, we are the freaks and geeks of fitness!

Danny.Kavadlo.2

So, what does that have to do with the Week of a Thousand Push-ups? Well, quite a bit. Even though the noble push-up is one of the most popular—and best—upper body exercise of all time, like the room full of Personal Records at the PCC events, the thought of doing nothing but a thousand push-ups for a week would blow most people’s minds. But that is exactly what my personal training client Mike did recently. As you know by now, we are definitely not “most people.”

Mike’s Story

Mike was going out of town for a week and planned on continuing his training even though we would not be meeting. We have trained twice a week for years and he is serious. On this particular business trip, his time was limited and he was going to be without a gym, bicycle, or pull-up bar. Although my personal clients know better than to make excuses, they are sometimes uncertain of what to do without me. I am often asked some version of “what should I do while I’m out of town?”, to which I generally reply: “Keep it basic–squat, push-up, pull-up.”

But this time Mike already had an idea in mind… and it was more basic and brilliant than I could have imagined!

“The week of a thousand push-ups,” he said.

The way it came out of his mouth, I thought it was a movie title: Simple. Concise. Even catchy.

Mike had it figured like this. There are seven days in the week, therefor an average of over 143 per day would put him at a numeric advantage. He intended to keep his plan as simple as possible, doing his first set to failure every day, then doing recurring sets throughout the day until he surpassed his daily goal 143.

Danny.Kavadlo.3

Though it’s nice to start with a plan, like many activities in life, it’s often best to improvise. As I would have done under the same circumstances, Mike changed his intended plan throughout the week. Some days, he did indeed go til failure on his first set; others, he did multiple sets of twenty or thirty throughout the day. There were days of over 300 push-ups before noon. There were also days where he barely met his goal. There are many ways to skin a cat.

Needless, to say, my man Big Mike wound up doing way over the thousand push-ups he planned on! (The next time I saw him, we trained legs.)

Keepin’ It Real

Prior to his week of a thousand push-ups, Mike informed me that to “keep an even playing field’” he would be doing only push-ups of the classic variety—feet together, two handed, no incline. He explained that this method would eliminate the temptation to switch to easier variations if his goal of 1,000 proved too challenging. I respect his decision. The classic push-up is honest, strong and true. It’s a classic for a reason.

However, there’s also something to be said mixing it up, in push-ups and life.

Danny.Kavadlo.4

Mix-Master Mania

Any one who truly knows me is well aware of my passion for the push-up in all of its wonderful forms. From the fragility of knee push-ups, to the muscular methods of plyos, to me, every single type of push-up has an art and beauty intrinsic to it that makes it stand on its own.

We already discussed some training techniques and methods (Divide evenly, go until failure, multiple daily sets), but what about different kinds of push-ups?

Although some push-up varieties are more challenging than others, it can be fun to do a thousand push-ups of several variations. Have fun and be creative. Mix it up! Here are just a few of my favorites:

Danny.Kavadlo.5

The narrow grip push-up, shown here, places more emphasis on the arms.

Danny.Kavadlo.6

The wide push-up is also a great variation and is a precursor to archer push-up.

Danny.Kavadlo.7

Doing push-ups on your fists places a unique challenge on your hands, and extends the range of motion of your push-ups.

Danny.Kavadlo.8

Get creative. Employing inclines is an excellent way to step up your game. Combine this method with different grips (like fingertips) for an added challenge. Have fun with it. The sky’s the limit!

As with the Week of a Thousand Push-ups, Mike and I have continued to keep our training exciting and, of course, effective. That’s what it’s all about. As is often the case, the client inspired me!

***

Danny Kavadlo is one of the world’s most established and respected personal trainers. He is a Master Instructor of Progressive Calisthenics and the author of Everybody Needs Training: Proven Success Secrets for the Professional Fitness Trainer. A true in-person experience, Danny is known globally as a motivator and leader in the body-weight community. Learn more about Danny at: www.DannyTheTrainer.com.


Print Friendly, PDF & Email

Filed Under: Motivation and Goals Tagged With: calisthenics, Danny Kavadlo, feats of strength, freaks and geeks of fitness, goals, personal record, personal trainer, physical culture, PR, pull-ups, push-up progressions, push-up variations, push-ups, squats

The Case for Curved Handstands

December 3, 2013 By Logan Christopher 24 Comments

sig-klein-handstandAsk any gymnast or circus performer about doing handstands and they’re likely to tell you that a straight handstand is the only way to do it. It’s the perfect form, and anything else is wrong.

I disagree! Let me tell you why.

Recently on this site was an article all about the straight handstand and the benefits of doing them in that manner. I don’t disagree with those points, but wanted to give a different opinion on why the curved handstand is a viable option as well.

Are Curved Handstands Dangerous?

First off, let’s talk about the claim that doing a curved handstand is going to hurt your back. Just like anything else, it can happen, but if you’re smart about it, they’re completely safe.

I think this myth is simply a result of people doing straight handstands for other reasons, and then not knowing why that is the case.  To think that bending your spine is going to hurt you is ridiculous.

Push too far with bridging exercises and you can tweak your back, but doing them right you’ll develop more flexibility and strength.

When doing a handstand if you let gravity just pull your legs over without maintaining any core tightness, it can take you into a position that you’re not ready for. Doing too much of can certainly cause you to strain your back.

Instead maintain tightness, and build up what you do over time. Just like any other exercise.

Art2 - OHBalAre Straight Handstands Necessary for Higher Level Skills?

The straight handstand can help you do harder skills but it is not necessary.

I have heard people say that you need perfectly straight alignment to hold a one arm handstand. Tell that to Professor Paulinetti, the man who basically invented the one arm handstand.

You see, old school hand balancers, did all their handstands with curves in their backs. All of them! And they pulled of amazing skills.

They treated the straight handstand as an advanced variation of the handstand. This harder skill was something to practice later on after you could stand on your hands.

Over time, hand balancers transitioned away from the curve to the straight position you see commonly today. Part of this was for aesthetic reasons. It’s more pleasing to the eye, and for things like gymnastic competitions, you’re judged on this.

Another part is that a straight handstand does help you to achieve more difficult skills. By beginning with it you can build those habits from the beginning. This is a smart thing to do if you plan on taking your hand balancing skills far.

To prove this point, in the future, I’d like to build up to the one hand handstand in a curved position like the old timers did.

What About The Beginner or Recreational Athlete?

Don’t plan to be paid to do hand balancing professionally? Not a gymnast? Would you just like to be able to hold a freestanding handstand? If that’s the case I don’t think going for the straight handstand is necessarily for you.

If you ask anyone to hold a handstand that has never done it before, what will you see? When they kick up, before they fall down almost instantly, they’ll be in a curved position.

The curved handstand is a more natural position. It takes a lot of effort to get a perfect line in your handstand because it is unnatural. To tighten the muscles as needed to form a straight line is significantly more difficult, and not to mention, it takes additional shoulder flexibility, that many people don’t have.

If you choose, you can practice the curved handstand. You’re likely to gain the skill faster than someone going after a straight handstand. You’ll be freestanding in a shorter amount of time, which is of course dependent on how much you practice. Then from there you can practice other hand balancing skills and work on straightening out later if you choose.

Or you can practice a straight handstand from the beginning. It will take longer with more practice time. But once you have it you’ll be good to go onto other more advanced skills.

It is a choice you can make.

Sure, a straight handstand is better, in that it is more advanced. Just like a 315 lb. snatch is better than a 225 lb. one. But that doesn’t make the curved handstand wrong.

Reverse Handstand SideHow to Learn the  Straight or Curved Handstand

If you’re going to do handstands the starting place is against the wall. But depending on which of these two you want to go for you’re going to do them differently.

If you choose to go with the curved handstand then when doing wall handstands your back can face the wall. Kick-up into position then hold for time.

If you choose to go with a straight handstand you’ll want to face the other way. The reason for this is that this orientation forces you into a straighter position, especially as you inch your hands closer and closer to the wall.

In either style you build endurance by holding for time and maintaining your position. Then when it comes to freestanding handstands this skill set should be built in as you learn to balance out in the open.

So let’s take a poll. Do you do curved or straight handstands? Even if its just against the wall, what are you going for? Answer in the comments below.

***

About Logan Christopher: Logan Christopher has been called a physical culture renaissance man as he is accomplished in a wide range of strength skills from kettlebell juggling, performing strongman stunts, and bodyweight exercises. He is the author of numerous books including Secrets of the Handstand and The Master Keys to Strength & Fitness. In addition, he’s spent the last several years going deep into mental training to find out what it takes to really excel and tactics that can help people instantly improve their exercises. You can find out more about all this at http://www.legendarystrength.com/.

Print Friendly, PDF & Email

Filed Under: Progressive Calisthenics, Tutorial Tagged With: curved handstands, handstands, Logan Christopher, opposite handstands, straight handstands, tutorial

The PCC’s International Debut in Gothenburg, Sweden: Nothing Lost in Translation

November 26, 2013 By Adrienne Harvey 22 Comments

PCCSwedenGroupIntro

The fact of Going To Sweden hadn’t fully hit me until the plane landed in France for a connection, and I stopped hearing English. As soon as I stepped off the plane in Gothenburg, it was immediately evident that Sweden was different. I’d never been to Scandinavia and despite the jet lag and lack of sleep was incredibly impressed by the gorgeous and efficient little airport—it was obviously the product of many smart people thinking about how to make it gorgeous and efficient. Even baggage claim was impressive, with three organically shaped baggage claim belts next to full sized tree statues featuring carved “leaves” and a pair of electric plugs at the base for charging phones. The plugs were labeled to indicate the power was even from a green source. After exiting with no hassle or passport stamping—which was a little disappointing since I wanted a Sweden stamp—our host, Fredrik Högström with Al and Danny Kavadlo were waiting and ready to go!

Not even 10 feet outside the airport, we’re already back in our habit of scouting out found items for flags, l-sits, and adventurous pistols. Before we reached the parking lot, Danny did a great human flag on a cool sculpture/planter topped with ornamental cabbages. As Fredrik drove us to town, Al, Danny and I wondered at the landscape as it slipped by on our way to downtown Gothenburg. The trees were different, cars were different, the roads were different, and of course we asked Fredrik about all of it.

After checking in and dropping off our bags at the hotel, Fredrik took us to lunch. Our first meal in Sweden would be Thai and it was delicious. We asked how to say “please and thank you” in Swedish (tack), as well as the words for beef (biff) and chicken (kyckling—which is fun to say for some reason). Espresso is espresso in Swedish, and chocolate “choklad.” After learning please, thank you, beef, chicken, espresso, and chocolate I felt fairly confident.

The lunch had energized us all, and even though Al, Danny and myself had been traveling for hours (my journey involved 3 airplanes), we decided to walk around Gothenburg to adjust to the time change. Almost immediately, the Kavadlo brothers snapped into action and began scouting places for awesome feats of bodyweight strength. The sun was out and so were our cameras. We started in with human flags, L-sits, and dragon flags, taking advantage of the good lighting.

 DragonFlagGothenberg

It was amazing to see Al and Danny’s endurance was still strong after nearly no sleep and all the traveling. At the time it seemed a little crazy to do these things after so little rest, but it ended up being well timed since the sun wouldn’t be out for the rest of the trip and darkness descended very early. Thankfully the three of us had arrived a couple days early to adjust to the time change. We wanted to really be “on” to lead the physically and mentally demanding PCC Workshop, especially since this was the PCC’s international debut.

After coffee and some organizational planning, Fredrik took us on a tour of his gym, Kettlebell Center. We loved the giant pegboard, stall bars, pull up bars, kettlebells, giant battling rope—and of course we had to play with everything. A trainer named Hillevi was finishing up with her group class which involved a very serious circuit. I was excited to meet her as she was one of the women attending the workshop. So far, it’s been mostly men at the workshops, and I want to encourage more women to attend. The range of exercises covered at the PCC are fantastic for any and everybody as are the progressions. The women who do attend are often surprised at how well they can perform some of the progressions and master steps.

ChinhuaStandingonMalin

On Friday morning we could hardly wait to get started. The thing I first noticed about the participants was how excited they were and the variety of body types. Everyone looked very athletic, but it was obvious that there were a number of different specialists and athletes in attendance. This is something which can really bring a lot of value to workshops—a variety of athletic backgrounds and different skill and strength attributes. It’s a great opportunity to test out new cues, coaching and teaching approaches, and of course to learn from their experiences. Something I find fascinating are very mental cues. I wasn’t sure how many of these cues would be language dependent, so this would be very interesting.

We began the PCC in the classic Dragon Door way by gathering into a huge circle in the middle of the gym. After a greeting from John Du Cane, everyone in the circle introduced themselves. As expected, some of the best trainers in Sweden were in attendance along with accomplished trainers both in the RKC and new to Dragon Door who traveled from all over Europe. Amazingly, we also had someone attend from as far away as Kuwait!

Even though nearly everyone spoke perfect English, I still wondered how the nuances of our instruction would translate. But yet again, the universality of the strength and movement ideas we were teaching overcame any small language differences with ease. Since many of the attendees were accomplished fitness professionals from various fields (kettlebells, martial arts, calisthenics, yoga), this universal language of movement and strength was even more evident.

clutchflagcoaching

On the first day, when I was coaching someone with their clutch flag, I was reminded of a favorite “translation” between exercises. While helping someone at a previous PCC, I noticed exactly how much the clutch flag and the one arm elbow lever have in common. During a break in St. Paul, I played with the clutch flag and elbow lever together. Setting the angle of the bottom arm grasping the pole for a clutch flag, then keeping that same position, I came away from the pole and immediately tried the 1 arm elbow lever on the ground. For my particular build, the positioning was exactly the same, and have found it to be this way for some other people as well. Why mention this previous PCC realization/cue? Because it’s very easy to explain with just a few gestures and words. The way it translates itself will also depend on someone’s athletic background. Yoga practitioners tend to immediately grasp the idea because of how it relates to similar movements—even though the clutch flag might have previously given them some difficulty since being sideways while clinging onto a pole is incredibly strange at first. Pointing out the similarities between the two moves has been useful for coaching the clutch flag or the 1 arm elbow lever, whichever of the two they perform or understand best is the place to start.

Even though it’s incredibly rewarding to help people with the pull-up, I must admit to really enjoying coaching the flag. The attendees of the PCC in Sweden were very advanced with their own training, and while we love discussing how to help their clients progress with specific coaching methods, it’s incredibly fun to figure out just the right cue, combination of words, or exaggerated gesture to trigger their own success with a new move like the flag or clutch flag. While every attendee had a very solid grasp of the pull up, few people seemed to have given the clutch or press (human) flag much attention. Although it can be difficult to find an optimal place to practice flags, and because they’re sometimes dismissed as flashy “tricks”, I think the clutch flag and human flag have a lot to teach us. While it’s true that the human flag and clutch flag will always get attention when performed in public, the real value of the clutch and human flags are the proprioception, extreme tension, and control that they teach. The tension needed for the entire flag series translates into any full body drill, while really emphasizing lessons of body positioning and the extreme need for awareness of where all our “parts” are in space—while in a very unfamiliar plane!

PCC Team Leader, Adrienne Harvey coaching the human flag at the PCC Workshop in Gothenburg Sweden 2013

The human flag is such a maximal move that every muscle is involved, and at least for some of us, total concentration is required. It’s easy to forget this when Al or Danny demonstrates the flag. Their polished performances hide the fact that they worked, struggled, and practiced the flag for many years. Over a coffee break, I asked Danny to tell me how long he’s been working on his amazing human flags—and the answer (thankfully) was for a lot longer than I would have guessed. Another reason that it is so fun to coach the clutch and human flags at the PCC is the potential for troubleshooting. With the participant on his or her side and in the air, this is often a completely new experience even for seasoned instructors/coaches/athletes/enthusiasts. The flag series can’t be accomplished with brute strength alone, and while you must be strong to do the clutch flag, it’s not the whole story. The clutch flag is also very interesting since it is so body dependent—different builds need to adjust for their own situations.

It was great to see that everyone not only easily understood all of the instructors, but really seemed to excel with their movements and coaching while at the first European PCC Workshop. Paul Wade’s ideas were NOT lost in translation.

 ***

About Adrienne Harvey, PCC Team Leader, RKCII, CK-FMS, Primal Move Nat’l Instructor: Originally RKC Certified in 2010, and RKC Level 2 certified in 2011, kettlebell and bodyweight training have been crucial in Adrienne’s personal quest for fitness. A core member of the PCC team, Adrienne loves sharing her knowledge with small groups and individuals.  She also loves to develop recipes and workout programs to further support performance, body composition, and of course—FUN.  Go to http://www.giryagirl.com/ for more information about Adrienne!


Print Friendly, PDF & Email

Filed Under: Workshop Experiences Tagged With: Adrienne Harvey, clutch flag, Gothenburg, human flag, instructor, International Debut, PCC, skilled athletes, Sweden, women

The Straight Handstand—The Door to Amazing Strength Development

November 19, 2013 By Co-written by Lionel Ng and Bruce Dierl 9 Comments

ng1If you are reading this blog, chances are you are looking to make some physical improvements to yourself – e.g. you want to be able to run faster, or to jump higher, or to churn out amazing feats of strength, etc.

Being able to do and hold a straight handstand for one solid minute will aid in all-round athletic development.

But before we begin, let us first take a look at a couple of handstand photos.

ng2Even though there is no one “perfect” handstand form, so to speak, the straight handstand that we are talking about here should approximate the one shown in the picture on the left, as opposed to and contrasted with the handstand depicted in the picture on the right.

Essentially, a straight handstand should find the back flat, with no arch in the lower back. The major limbic joints of the body, i.e. the wrists, elbows, shoulders, hips, knees, and ankles should find themselves “stacked”.

The reason for the difference between a straight handstand and an arched one is also the reason why being able to do and hold the former is going to make you stronger and more coordinated.

The key word here is “tension”.

In order to perform a handstand, as with any other physical feat, one requires some level of bodily strength. If you are able to stand and balance using your arms, just imagine the kind of strength, coordination and body awareness that you will achieve.

In a straight handstand, the entire body is tensed in a coordinated manner, with the exception of the facial and neck muscles. We are talking about conscious muscle engagement (you are using it, not just training) to hold this unnatural position, it makes subsequent hand balancing elements ‘easier’ to learn. When one finds his or her lower back arching in a handstand, chances are that some parts of the body are not being engaged as needed to achieve the straight form, or some structural issues subsist that makes the straight form difficult to achieve.

The ability to generate and hold this muscular tension throughout the body such that a straight handstand is achieved comprises two key ingredients: coordinated strength and body awareness.

Our legs are strong not only because they make up a large part of our bodies; it is also because we tend to stand a lot. We are able to stand on our feet so well because we have been doing it since we were little. Using the concept of perceived effort level (PEL), over time as your musculature has been doing prolonged hours of work keeping you standing upright, you get so used to it that you stop perceiving this effort level as an undue strain or demand. Of course, we don’t remember much from when we were really little. Otherwise, you might have recalled that learning to stand was a real pain.

The same broad principles apply in the handstand. Because the handstand is a relatively new and somewhat unnatural position for those of you who are not acquainted with it, you are going to find it terribly difficult, at least initially, to tense your body in the requisite manner while trying to hold it in the air, on your hands. This is normal, and only to be expected.

And, make no mistake, the handstand, especially the straight handstand, is a powerful physical tool that unlocks many doors in the realm of physical fitness and culture.

You will get stronger from holding your handstand. This is because the tension that your body generates and maintains while you are performing a handstand is an exertion of strength.

Through the practice of handstands, we learn to generate muscular tension in some pretty challenging circumstances. Which means to say, the finer balance involved while you’re standing on your hands will compel you to tense your muscles harder than when you are standing on your feet. What this in turn means is that you are able to contract your muscles rather powerfully, and hold this contraction over a certain period of time.

Speak to any strong power lifter and he or she will tell you to brace your trunk while you are lifting. The act of bracing the musculature in the torso is a cornerstone of the ability to move some serious weight. Bracing is a requirement for a straight handstand and can be translated into the other athletic disciplines or types of movement that you may be interested in.

Since your hands are smaller than your feet (pardon my presumption if this isn’t true for you), and they lack a proper heel that would allow for effective balance in the direction away from your fingers, you will find that in holding a handstand you will be needing to perform many micro-adjustments in your musculature as a form of re-balancing exercise in order to continue staying on your hands.

When all is said and done, while the handstand is not going to make you as strong as the Hulk, or as finely-balanced and superbly-coordinated as Spiderman; but what it is going to give you is a sound foundation upon which these traits can be more readily built and refined.

Envisioning your body in space while holding an inverted position on your hands helps with development your body awareness, in terms of muscular effort and proprioception. For those of you dreaming of flags and front levers and the like, all these skills share a similar trait that requires full-body tension as in the handstand. Main point of difference – since in a flag or a front lever, or a back lever or a planche, your major limbic joints are not going to be as stacked under your bodyweight as in the handstand, they are going to require far greater and more specific arm and shoulder strength in varying scapular positions.

ng3For a novice, the tremendous arm and shoulder strength required for a proper planche or lever isn’t going to come as quickly as is hoped. Tensing the body while struggling to hold a desired position is often nigh on impossible. That is why one should start with the handstand if one aspires to these other skills – the handstand, by the law of simple physics, does not require the same staggering levels of arm and shoulder strength. Learning it will teach you the body tension that will then stand you in good stead as you pursue the other static strength holds.

Often, the exertion of the scapular complex to fight the pull of gravity in a lever or flag or planche is going to be rendered extremely challenging if the body is not tensed. A loose and sagging torso and legs represent far greater resistance by leverage than a torso and legs that are powerfully-tensed/engaged. Acquiring the ability and the capacity for this tension in the handstand will greatly expedite the learning process for the other, more strength-demanding, exercises.

On a side note, even if the freestanding handstand is not your goal, hand balancing training has benefits which should not be overlooked. Hand balancing training is more than just kicking up onto the wall and holding for time. The alignment and balance drills and flexibility training will help with many of the mobility issues faced by the individual on a daily basis.

Due to the nature of the practice, hand balancing training helps with shoulder health and strength. Strength and health should go hand in hand unlike today where the pursuit of one aspect (usually strength) solely results in poor long term health (joint problems, imbalances etc).

***

Post is Co-written by Lionel Ng and Bruce Dierl of Basic Training Academy.  Credit to Ling Qinghu, ex-acrobat from the Fujian Acrobatic Troupe, for teaching me (Bruce) the fundamental principles behind the handstand.  Credit to Yuval Ayalon, former gymnast and former Le Reve performer for his guidance in understanding the finer intricacies of hand balancing. Bruce and Lionel previously attended a workshop by Ido Portal.

Print Friendly, PDF & Email

Filed Under: Progressive Calisthenics Tagged With: basic training academy, Bruce Dierl, calisthenics, gymnast, handstand, handstand variations, Lionel Ng, straight handstand, strength training

When You Want to Succeed—Cut to the Essentials and Put Forth Supreme Effort

November 12, 2013 By John Du Cane, CEO and founder, Dragon Door 22 Comments

JDC-SWORD-10161305John Du Cane does his best to cut to the essentials and put forth a supreme effort, be it in Dragon Door business or his own health practices.

Michelangelo commented that sculpting his perfect statue was a matter of chipping away the extraneous stone until the perfect form revealed itself. He also commented that if people had any idea how hard he worked, they wouldn’t marvel so much at the results of his labor. And herein lie two of the secrets to great success in any endeavor: hone your skill at cutting to the essentials—and put forth an unremitting, focused, supreme effort.

As athletes, we are in the business of cultivating ourselves as ongoing works of art. We are physical culturists, dealing with one of the most malleable and frustratingly entropic materials imaginable: our own bodies. Nothing degrades like human flesh left to its own devices. Nothing falters and falls apart like a directionless, undisciplined spirit. The winds of impermanence are constantly blowing against the sand paintings we create of ourselves. Faced with such vulnerability and uncertainty, we continue to cultivate ourselves with pride and diligence, celebrating the transient beauty of our beings—or we disgrace ourselves and degrade into decrepitude.

Two entropic forces contribute to our decline—rather than our glory—as human works of art: Lack of focus and laziness. The road to lack of focus is paved with the baubles of variety. Laziness is a crisis of the spirit, best overcome by the inspiration of hero-figures and the connection to a group of mentors and motivating fellow-seekers.

Variety is a double-edged sword. We need variety to entertain us and to explore potentially rewarding new methods. Yet variety is the Great Distracter, pretending there’s a magic secret over the horizon, whose capture will finally reward us with success. When the real secret to progress is and always has been the diligent application of a few core, essential practices.

Al_gunPCC Lead Instructor Al Kavadlo is a hard-working practitioner of the essentials and a role model for the dedicated cultivation of the body as an ongoing work of art.

In many types of physical cultivation, success can be measured. You document heavier lifts for more reps. You run faster, you punch harder. You reduce body fat percentages. You increase muscle size. You pass physical tests, you enter competitions. You keep a log book (right now, I have set strength goals for myself with kettlebell practice—and a daily log has made a huge difference to my progress.)

For many other types of physical culture—like my own personal practice of Qigong and Tai Chi—progress and success is extremely hard to measure. How do you measure movement skill or internal energy levels? Not easily! Much of the measurement here stems from your own internal monitoring and gauging of your well-being. Cutting down to the essentials and committing to a daily, dedicated practice becomes all the more crucial.

How are you doing these days with your personal physical cultivation? How is the artwork coming along? What could you discard or do differently from now on, to progress as a fine piece of ongoing art?

Print Friendly, PDF & Email

Filed Under: Motivation and Goals Tagged With: Al Kavadlo, attitude, Convict Conditioning Logbook, goals, John Du Cane, mindset, motivation, strategy, success stories

Structuring a PCC Recovery Day

November 5, 2013 By Angelo Gala 5 Comments

angelo1Hey there! How is your training going? Are you making lots of progress on your pistol, handstand push-up and bridge progressions? That’s awesome! How is your body feeling? It’s about time we address the purple and pink striped elephant in the room. Do you take the time to work on skill/technique development and regressions rather than just focusing on cultivating specific strength? How often do you take a day off? Do you include some active recovery or are you inclined to just take it easy and catch up on some youtube or boobtube? Yep, lots of questions coming your way, I know. I’m not trying to poke or point fingers at what you may be or may not be doing. Lets talk recovery and building a happy body that wants nothing more than to rebuild and be better than ever!

I personally LOVE the PCC minimalist approach, especially when it comes to recovery days. But what exactly is a recovery day? Following a simplistic approach to fitness, to me a rest and recovery day incorporates more of what you typically do less of.

Try making a point to emphasize eating and sleeping. Food provides the nutrients and building blocks that support the demands we place on our bodies. When we sleep, are body’s little worker bees put on their hard hats and rebuild our foundation to be bigger and better, allowing our muscles to grow stronger and longer. Catching up with friends and family reminds us of what is important in our lives providing a necessary distraction from the mental grind of vigorous exercise. Light cardiovascular activity is a must. Yes, I said it. I know that High Intensity Interval Training is all the craze right now with plenty of scientific research to back it up but please don’t forget that we need to be easy on our bodies from time to time. 20+ minutes of easy-moderate steady state exercise is a very heart healthy activity to include. Lastly restoring range of motion to our body’s joints and increasing our flexibility will keep our physical body in balance.

If you are wondering where to fit this in, take a step back to look at your weekly training block. How many days in a row are you pushing your body? The acclimated body can go hard for up to three days in a row before it will be asking for a de-loading day. If you are a little more advanced in your age, or have less than 3-5 years of consistent vigorous exercise under your belt, your body may require a break every third day. At a minimum one should back off at least one day a week with a preference of two (maybe three) days depending on your training history. Again, this does not require a total day of nothing on the agenda, just enough of a change of pace to allow the battery to recharge.

Structuring a Recovery Day:

It can be next to impossible to recommend a routine for everyone who reads this article, but I can at least provide some guidelines to help structure a recovery day based on the demands these workouts place on the body.

Recovery can actually to be very intuitive. Many of us are goal oriented and have been working on obtaining certain skills like a back lever or freestanding handstand push-up. Along the journey to these benchmarks we stumble across tight backs, sore shoulders and wrists or maybe even creaky knees. These are all signs from our body telling us that it may require a little extra love and dedicated time where you give back to your self.

Looking specifically at the movements found in the PCC curriculum, we ask a lot out of our shoulders, chest, triceps, forearms and core musculature as we work to support our entire body weight practicing all the push-up, handstand and arm lever variations. Though the single leg squat progressions do not place a significant demand on the lower body compared to a 2x body weight barbell squat, we may find that limits in our mobility hinder our ability to achieve full range of motion in the pistol squat, or at least challenge our confidence in the movement’s execution. If the bottom position of the pistol is easy to obtain, compare it to the shrimp squat, or even the double shrimp? Most likely we will find some difficulty along that journey.

I always structure a recovery workout for my athletes to begin with 20-30 minutes of a steady cardiovascular activity. A few suggestions may be an easy 5k run on a mostly flat to rolling course, a bike ride on the smallest chain ring of your crankset, a steady swim or up to a 5k row focusing on mechanics, cadence and breathe work. The steady cardio is programmed first in our recovery for a few reasons. Most importantly it will generate body heat and prep your soft tissue for manipulation and stretching. Steady cardio creates a calming / meditative effect on the body and mind. It also promotes an environment of self-exploration where you may develop the intuition of what areas of your body may need a little extra attention when it is time to stretch.

After the heat-building phase of the cardio warm-up is complete, it’s time to address some binding in the soft tissue with self-myofascial release techniques (self-massage). For this you can purchase all sorts of tools to address every area of the body such as foam rollers, PVC piping, rumble rollers, tennis balls, a tiger tail and so on. I suggest picking up a lacrosse ball, as it is the most universal tool, you can easily take it anywhere and it can generally apply enough pressure on your trigger points to promote change.

Using the lacrosse ball or roller is theoretically very simple. Pick a muscle group to work on and lay your bodyweight over the tool. Initially you will scan around your soft tissue on the tool looking for any tender spots or pain spots. Once something jumps out at you, stop moving and isolate the discomfort. Try your hardest to not move off the spot, then apply a contract and relax activation with the muscle group you are rolling over. You can do this by either squeezing the muscles you are resting on or moving the stimulated joint through its natural range of motion over and over. This will most definitely cause a bit more discomfort but let me be upfront and completely honest with you. When it comes to restoring / improving mobility or flexibility, its going to be uncomfortable. The more discomfort you can tolerate (aside from sharp pain, which is always bad) the more change you will make. If its not uncomfortable, then you wont be making much if any progress. Your only other option to break up the binding is to get a deep tissue sports massage on a weekly or biweekly schedule. If your budget isn’t big enough to afford regular body work, then get comfortable with being uncomfortable on a lax ball 😛

Personally, I beat my body up enough that I can spend all day doing soft tissue work, so in order to keep ourselves within a reasonable time cap, pick an area on the front side and back side of the shoulders as well as an area both on the front side and back side of the hips. Spend about 5 minutes on each or at least until you feel a bit of the discomfort begin to subside.

Now that we have successfully built requisite body heat and prepped our soft tissues to make change, its time to focus on increasing our flexibility since many exercises in the PCC curriculum require a fair level of specific flexibility. To do this we will work from the ground up.

-Single leg squats require a significant amount of ankle mobility so here we can utilize a standard Standing Calf Stretch focusing on dorsi-flexing our ankle as much as possible. Don’t forget to practice this stretch with the knee straight as well as bent.

angelo2

-To get the outer hips, a Standing Figure 4 Stretch is achieved by crossing one ankle over the opposing knee. From this position, sit back as if you were sitting in a chair while simultaneously reaching your rib cage over the top shin. Do your best to keep your hips as neutral as possible rather than shifting them to help counter balance the posture.

angelo3

-Inner thighs are most accessibly stretched in the Bound Angle Pose. Here push your lower back up against a wall and pull your heels together as close to your inner thighs as possible. For the remainder of the stretch, place your hands on your knees with fingers pointed toward your midline and gradually apply pressure down into your legs as if you could press your knees all the way to the floor.

angelo4

-Stretch the backside of your legs with the traditional Head-to-Knee Pose. From a seated position, extend one leg forward and align the sole of your opposite foot against the inner thigh of your extended leg. From here, square the center of your chest with the knee of your extended leg and lean forward in an attempt to rest your bottom rib on your upper thigh bringing your nose-to-knee.

angelo5

-Half Kneeling Hip Flexor Stretch with a side bend will open the front of the hips as well as prep the spine to bend and twist. Set up in a lunge position with the back knee on the floor. Bind your fingers and stretch both arms over head. From here slide your hips forward until you feel a significant stretch in the hip flexor muscle of the down knee then begin to side bend over the front leg focusing on a long stretch sensation from the top of the hip all the way to the bottom of your armpit.

angelo6

-You are only as young as the mobility of your spine so to improve this, hang tight in the half kneeling position while you twist your opposite elbow over the front knee. Place your hands in a prayer position with fingertips facing forward then press your hands together to engage and deepen the twist.

angelo7

-Heart Opener’s Pose is a great stretch for the mid to lower back, it improves your overhead position and acts as a great prep for bridging. Find your way into this posture by setting up in a quadruped position (kneeling on all fours). Prioritize the stretch in your middle back first by pressing your belly button down towards the floor, arching your spine. Finally, to stretch your shoulders and deepen the back bend, keep your hips stacked on top of your knees while you walk your hands forward until you can rest your forehead or even your chin on the ground.

angelo8

-Address your shoulders with a Butterfly Shoulder Stretch. Again starting in a quadruped position, cross your elbows in front of your shoulders with the tops of your hands pressed against the ground. Stretch your arms away from each other, shrug your shoulders down away from your ears then slowly begin to rock forward until your chest aligns in front of your elbows and you feel a stretch on the outside of the shoulder that is stacked in front.

angelo9

Following this blueprint may not cure all or any of your ailments, but it will certainly aid in your weekly workout recovery. It is easy to get consumed by the exercises that build strength and conditioning while losing sight of benefits gained by slightly backing off the intensity. Try adding this to your program at least once a week and let me know how it affects your progress.

***

About Angelo Gala, RKC / PCC Team Leader: Angelo Gala has been a fitness professional in the Boston area for greater than 11 years. He is a Certified Strength and Conditioning Specialist through the NCSA, and has studied the Pranavayu system of yoga under David Magone.  He is a Dharma friend at the Sakya Center of Buddhist Studies in Cambridge, MA where he completed a 1 year intensive study of Mangalam Yantra Yoga under the guidance of Lama Migmar Tseten. Go to http://www.dragondoor.com/angelo-gala/ for more info.

Print Friendly, PDF & Email

Filed Under: Flexibility, Progressive Calisthenics Tagged With: active recovery, calisthenics, meditation, PCC, recovery, skill training, strength, stretches, technique, yoga

Building Strength Without Mass

October 29, 2013 By Al Kavadlo 53 Comments

al1 I’ve been getting at least one almost every single day for a while now. In the beginning they were annoying, but after the first few times I actually started to get a kick out of them. I even came to find them flattering. After all, the people who send them are generally well intentioned and often don’t realize they are being rude. Some of them are actually very polite. I’m talking, of course, about emails like this one:

al2_emailIf I had seen the me of today when I was a teen, I probably would have wondered the same thing. After all, the main reason I got into strength training was because I was a scrawny kid who wanted to build some muscle. Fourteen-year-old Al would be very disappointed that after 20+ years of working out I still wasn’t as massive as the Incredible Hulk.

In fact, even though I’m about 30 pounds heavier now than I was at age fourteen (in spite of not growing an inch taller since then), I’m still a fairly small guy. And though my bodyfat percentage sits comfortably in the 8-12% range (I tend to naturally lean out in the summer), at a height of 5’11’’, I’m incredibly small by bodybuilding standards. Good thing I’m not interested in becoming a bodybuilder!
al3 As a kid, however, I desperately wanted to bulk up. Though I managed to beef up to 190 pounds by my early twenties, I eventually came to find that I felt and performed better when I wasn’t carrying so much mass. Though bulky muscle-men seemed ubiquitous to me in my youth, as an adult I soon discovered that to people who weren’t fans of pro wrestling and Arnold movies (which, shockingly, is most people), being overly bulky is a turn-off. It took me a long time to change my perspective, but I’ve since learned to embrace my physique and take advantage of its benefits.

Though there are a few notable exceptions, most advanced bodyweight practitioners tend not to have huge, imposing physiques. Instead, high level calisthenics athletes usually have more of a lean, athletic build. After all, if pound-for-pound strength is the goal, it helps to be relatively light. The higher your muscle to weight ratio, the better off you’re going to be in regard to bodyweight training. Though you definitely need some muscle mass to achieve high levels of strength, it’s more pragmatic to make a little muscle go a long way. At a certain point having too much mass becomes cumbersome. It’s weighs you down more than it helps.

Build Your Foundation

Regardless of whether your aim is to add muscle mass or simply get strong, the first thing you need to do when you begin training calisthenics is build a solid foundation. Though everyone starts at a different place, building to at least 40 bodyweight squats, 30 push-ups, 20 hanging knee raises and 10 pull-ups (those numbers might look familiar) is a prerequisite that should be achievable within a few months (or a few years, depending on where you’re starting).

Women should aim for the same numbers, but with knee push-ups and Australian pull-ups in place of the full ones. This is not an issue of sexism. Biologically, women have a lower propensity for upper-body strength as compared to men. Of course with proper training, women have the potential to develop serious upper-body strength!

al4-adrienne Once you’ve established that baseline of fitness, you’ll have likely built a bit of strength, stamina and muscle along the way. If you aren’t looking to grow your muscles past this point, however, it’s time to start training more advanced exercises and leave the high reps to your warm-ups.

Skill Out

It is often said that strength is a skill, and like any skill, the way that you get better is consistent practice. The goal of a strength workout is not to focus on the quantity of reps, but instead the quality. I recommend sticking with sets of 3-5 reps. However, it is helpful to add additional sets to offset the low rep range and allow for adequate volume. For this reason, I suggest performing 3-5 sets of each movement in a given workout when strength is the primary goal. Remember, you don’t need to do the same amount of volume as you would in a hypertrophy workout. The most you’ll probably ever need to do of a single exercise is 25 reps per workout. We’re not necessarily looking to get a pump, either. In fact, you’ll want to take longer breaks in between sets when you’re doing pure strength work than when the goal is mass-building. I recommend anywhere between 2-5 minutes of rest between sets.

It’s important to understand that strength is as much neurological as it is physical. Whenever you try to get your body to do something that it isn’t used to doing, it has to build a new neurological pathway to make it happen. Even when you ask your body to perform a familiar movement pattern, it will have a hard time if the leverage has been made less favorable than what it’s become accustomed to. Your brain has never had to send that specific message to your muscle before, so it must work very hard in order to arrive there. The message often comes in fuzzy.

Imagine using a machete to chop your way through the thick vines of a jungle. This is how hard your brain must work to get your body to do something for the first time. Now imagine you’ve lived in that jungle for ten years and walked the same few routes over and over, gradually clearing away the brush little by little. Eventually the path would be easy to walk and you’d arrive on the other side much more quickly, and with much less effort.

al-5 The same thing happens in your brain with consistent training. Over time, the pathway becomes clearer and the message arrives faster. The body adapts to whatever stimuli it is consistently exposed to. A body that is regularly called upon to apply force against resistance will get better at doing so.

Lean Machine

Diet may be the single biggest factor that determines whether or not you will increase or decrease in size. If you want to grow, you’ve got to eat a lot. Conversely, if you’re not interested in gaining weight, you shouldn’t be overeating. Though nutrition is a bit more complex than a simple calories-in minus calories-out equation, nobody ever gained significant bulk without the calories to back it up. Conversely, you can’t lose fat without being in a caloric deficit.

Personally, I follow a very simple diet: I eat when I am hungry and stop when I am full. I avoid mindless snacking and stay away from processed foods. I’m not trying to gain mass, but I’m not trying to lose it either. People love to ask me how many grams of protein I consume each day or how I time my carbohydrate intake, but the truth is I don’t concern myself with such trivialities. There is no need for the average person to possess a profound knowledge of nutrition in order to have a lean, strong physique. One need not understand how free radicals and antioxidants work in order to know that eating blueberries is healthy.

al6 Regardless of your ambitions, the most important thing is being consistent with your training. Focus on making regular exercise a part of your lifestyle. Don’t over-analyze the details, especially if you aren’t doing the work physically. Of course if nutritional science is of genuine interest to you, there’s no reason to ignore that yearning.

Just don’t make your life any more complicated than it has to be. When all is said and done, the most important thing is to respect and appreciate the body you have. It’s great to strive for physical perfection, but the journey matters more than the destination.

***

About Al Kavadlo: Al Kavadlo is the lead instructor for Dragon Door’s Progressive Calisthenics Certification. Recognized worldwide for his amazing bodyweight feats of strength as well as his unique coaching style, Al is the author of three books, including Raising The Bar: The Definitive Guide to Pull-up Bar Calisthenics and Pushing The Limits! Total Body Strength With No Equipment. Read lots more about Al on his website:www.AlKavadlo.com.

Print Friendly, PDF & Email

Filed Under: Progressive Calisthenics Tagged With: Al Kavadlo, Century Test, consistency, diet, muscle mass, skill training, strength, strength training, weight gain, weight loss

  • « Go to Previous Page
  • Page 1
  • Interim pages omitted …
  • Page 19
  • Page 20
  • Page 21
  • Page 22
  • Page 23
  • Interim pages omitted …
  • Page 26
  • Go to Next Page »

Primary Sidebar

Featured Products

previous arrow
GetStrongBookCover
ConvictConditioningBookCover
StreetWorkoutBookCover
ExplosiveCalisthenicsBookCover
StrengthRulesBookCover
next arrow

Categories

Progressive Calisthenics Certification Logo
Click here for more information or to register for the PCC workshop

Get Strong Workouts TriadXP App
Get Strong Workouts App

Recent Posts

  • Top 5 Reasons Why an In-Person Workshop is the Best Way to Supercharge Your Training
  • HYBRID STRENGTH TRAINING IS HERE!
  • My Calisthenics Journey to the PCC
  • The Handstand Press: Complete Control Through the Handstand
  • The Get Strong App is Here!

Dragon Door Publications

Dragon Door Publications

Recent Comments

  • bross dandon on The Case for Curved Handstands
  • Johnny Flewellen Jr. on Strength for Life
  • Dan Earthquake on The Pursuit of the Daily Minimum
  • Johnny Flewellen Jr. on The Pursuit of the Daily Minimum
  • Johnny Flewellen Jr. on Yoga, Calisthenics and the Journey of a Lifetime
FOLLOW US ON TWITTER!

Copyright © 2025

Dragon Door Publications / The author(s) and publisher of this material are not responsible in any manner whatsoever for any injury that may occur through following the instructions or opinions contained in this material. The activities, physical and otherwise, described herein for informational purposes only, may be too strenuous or dangerous for some people, and the reader(s) should consult a physician before engaging in them.