• Skip to main content
  • Skip to primary sidebar
  • Home
  • Contributors
  • Resources
    • Q&A with Paul “Coach” Wade
  • Workshops
  • Products
  • Forums
  • Articles
  • Blogs
    • RKC Blog
    • Strong Medicine Blog
  • Archives

PCC Blog

Progressive Calisthenics - The Official Blog for the PCC Community

tutorial

Increasing Frequency: How to Work Out More Without Overtraining

February 5, 2015 By Silvio Bauer 26 Comments

Silvio Blauer Pistol

If you are anything like me (which means people call you crazy, but that’s another story) you love to work out. You cannot go a day without training and you feel itchy when you miss a workout.

I’ve certainly been there while traveling or when I was stretched thin from work and social commitments. I get a bit moody and my feet start trembling. You may call me addicted.

But all this name calling is total nonsense, because there is a sound way to develop the resilience necessary to work out daily. The good news: I’m gonna tell you about it.

Ready? Good, let’s get to it then.

Why Go High Frequency?

So, let’s first consider the why before we delve into the how. There’s a good number of reasons why it’s pretty neat to be able to work out daily.

  • Habit building: People who struggle working out consistently might find it harder to collect enough will power 3 times a week compared to working out daily. But how can working out less often be harder? Because that way, it’s not a habit. When I come home after work, I change into my workout clothes, find a pull-up bar and do my workout. I don’t ponder about this, I just do it. It’s automatic. By working out only 3 times a week, it’s tempting to postpone a workout because every time, it’s a decision that has to be made.
  • More practice time: If your main goal is mere strength, a high frequency (HF) program is what you need. The more often you practice a certain skill, the faster your progress. And if you, like me, have a long wish list of feats of strength you want to accomplish, that additional practice time gives you room to sneak in one or two more moves you can practice.
  • Plateau busting: When you’re stuck with a progression, say, pistol squats, what can you do? Well, do a lot of pistols or pistol regressions. Do them every day. I dare you to not get better at a move by doing this.
  • Toughening up: When you finally buy into the HF training method, you forget about your excuses. It’s not a big deal anymore when you feel a bit stiff or sense a light muscle soreness. You’ll also learn to really listen to your body, how a good warm-up can do wonders and you will enjoy an enhanced ability to recover from your workouts.

If these are not good reasons to train more often, I don’t know what is.

However, here is what an HF program is not:

  • An ideal bodybuilding method: Most of the Monday-Wednesday-Friday routines come from the bodybuilding community. And if all you want is bigger guns, HF training as described here is not your best bet. I’m not saying you cannot build muscle with this (in fact I gained visible mass from doing pistols every day). It just might not be optimal for mass gaining.
  • A very structured routine: I’ll describe this in detail below, but to implement HF, you have to learn to go with the flow. Therefore, I recommend this only for strength trainees who A) know exactly what they want from their training and B) have enough experience to scale their workouts.

Now, if you want everything from the first list and can manage to miss out on the second one, here is what you need to do.

How to Implement High Frequency Training

Silvio Blauer

I came across the idea of HF training first by reading Squat Everyday by Matt Perryman. It’s an awesome read and, though it’s geared towards weightlifters, really useful for every fitness enthusiast because it’s about much more than just squats. It’s about questioning sport’s “science” and challenging your belief system from time to time.

I never thought I could train that often because I got really sore from my workouts. I was a big fan of the High Intensity Training (HIT) Method and therefore destroyed myself with every workout.

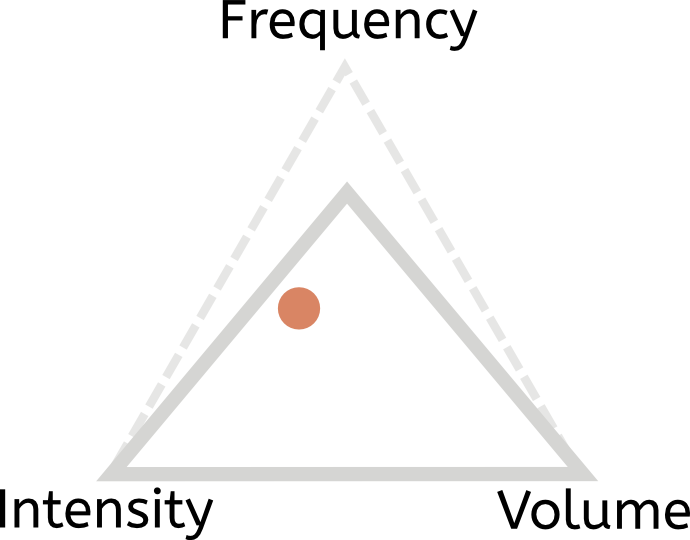
Now, my dentist told me that this won’t work if I wanted to work out almost every day. Here’s a diagram that illustrates why this is the case.

FIV_triangle

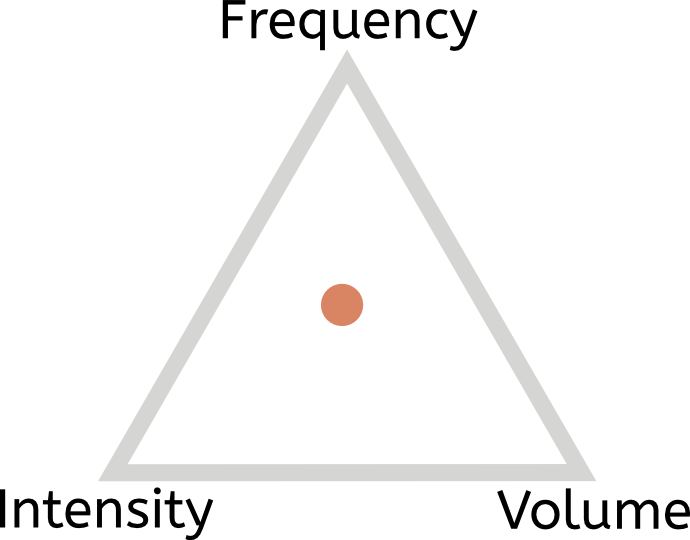
I call this the FIV triangle (I’m actually not the first person to come up with this diagram. I first saw this in an article by Alex Zinchenko). The orange dot in the middle is metaphorical you. You can be everywhere inside the triangle. The nearer you are to one corner, the more distant you are from the other two.

Now, when you want to work out very often, the first thing you have to do is do lower intensity and lower volume workouts (volume meaning the total number of sets you do each week, for every muscle respectively).

frequency-FIV

This is an extreme case and probably resembles something like working out 2 times a day, every day. If that’s you, I envy you for your spare time.

A useful method to implement higher frequency training would work with two things:

  1. Scale every workout so that the dot does not come near the lower corners of the FIV triangle (intensity and volume).
  2. Skew the FIV triangle so that a higher frequency is possible with intensity and volume being the same.

The skewed triangle below would resemble a good case of strength focused HF training.

high-frequency-FIV

This means we’re doing HF, medium high intensity and low volume.

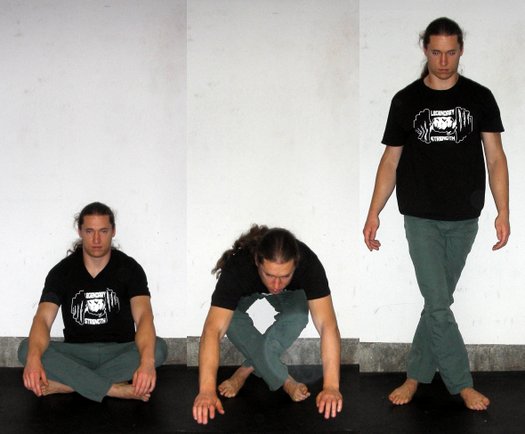
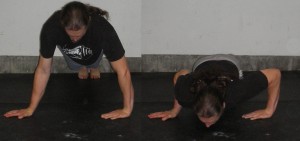
To produce this kind of training regimen, you need to learn the Art of Going with the Flow and to push through some light discomfort. To elaborate this further, let’s take the pistol as an example.

Say you want to get really good at pistols and you therefore try to do them every day. Depending on your level of strength, the pistol can be a very demanding and therefore intense exercise. So doing 5 sets of 5 pistols (5×5) every day might be too much.

That’s exactly when you need to listen to your body: If you did a few intense sets of pistols on Monday, scale down on Tuesday. Maybe do a couple of sets of light bodyweight squats followed by one good set of pistols.

Maybe Wednesday and Thursday are medium intensity and you feel good to go again on Friday for a higher intensity workout. I plotted an exemplary weekly course of intensity in the diagram below.

intensity_curve

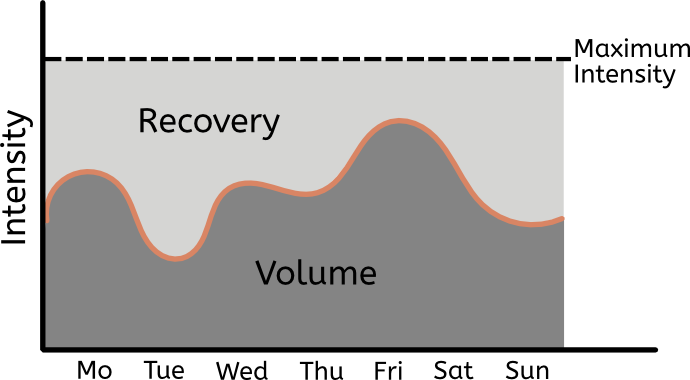
As you see, the intensity (the orange line) throughout the week varies significantly. This is to keep the balance between volume (dark grey area under the curve) and recovery (light grey area between curve and maximum intensity line).

Now we can see why the FIV triangle makes sense: If you keep intensity at maximum every day, there is no recovery. You can go high intensity, but therefore you need to have rest days (so intensity zero).

The low intensity days are nothing more than active recovery. In fact, doing lighter regressions of an exercise helps promote blood flow to your muscles and your joints, which in turn speeds up recovery and prevents injury. Spiffy!

There is no exact method how to scale each and every workout, because everybody is at a different level, both in strength and recovery ability. That’s something you need to experiment with yourself.

The neat thing about adopting this varied intensity scaling and HF training is that it makes you more resilient. You will get sore less often and will enjoy faster recovery. That’s mighty useful if you want to participate in a PCC Workshop, by the way. You won’t be beat up so much after the three days and can take The Century Test like a breeze.

So once you get the hang of taming your inner beast during your workouts, you can work on skewing the FIV triangle so that you can take more frequency with the same intensity and volume.

But do yourself a favor and be deliberate about your workouts. That means, keep a workout log and write out your workout beforehand on that specific day, based on how you feel. You can correct your plan during the workout but try to keep this at a minimum.

For the first few HF weeks, plan out your workouts lighter than you think you can handle. If after a week you think your workouts have been a joke, scale them up a notch.

Maintaining High Frequency Training

Silvio Blauer L-Sit

There are a couple of things to keep in mind when riding the HF horse. Firstly, warm-up properly with dynamic stretches, mobility drills or very light regressions of your target skill. After your workouts, I recommend some good old-fashioned stretching. Specifically stretch the muscles involved in your HF training.

After about 2 weeks of experimenting with pistols every day, I felt that my legs got really tense and stiff. It wasn’t soreness, just a slight tiredness. So I took a day off, did a nice recovery routine, had a couple of beers (I’m German, that’s how I recover 😉 ) and jumped on the pistol wagon again the next day.

So yes, you can take a day off once in a while. Just know that you won’t die from working out with slightly sore muscles. There have been so many times when I felt like I didn’t have enough energy for a productive workout, but after a good warm-up, it usually turned out great.

You also don’t have to implement this for all your skills and moves (but you could, I guess). I did this with pistols to finally master them with ease. But you could incorporate this for just about any skill like one-arm push-ups, elbow levers or dragon flags.

So there it is. All you need to know to toughen up and practice as often as possible without burning out. Happy tricking!

-Silvio

***

Silvio is a full time medical engineer who loves to practice and teach calisthenics in his free time. He enjoys creating workout plans for his friends and spreads the word about PCC over at his blog, NeatStrength.com. He writes about minimalist fitness and can also be reached through his Facebook page: facebook.com/neatstrength.

Filed Under: Progressive Calisthenics, Tutorial Tagged With: high frequency training, high intensity training, how to, neat strength, programming your training, progressive calisthenics, Silvio Bauer, tutorial

Back to Basics: 6 Moves to Master Before Moving Forward

November 4, 2014 By Eric Buratty 35 Comments

Kavadlo Brothers Squat

Everybody wants to go straight to the advanced moves, but ain’t nobody want to make time for getting better at the basics!

Here at PCC, we get it. Your mind was just blown away from someone’s Facebook picture or YouTube video performing some sexy, ninja-like move that you want to try, too. This simply means you’ve been inspired to either try a calisthenics move (which is cool), or convert your training efforts exclusively toward calisthenics all together (even cooler).

But, like everything else people are good at in life, such graceful displays of strength, control and power require a considerable amount of time and practice to master. Not to mention the patience involved will humble anyone who might already have a strong fitness background from other disciplines (e.g., weight training, dancing and yoga).

That said, before moving on to some of the more advanced variations of calisthenics moves, EVERYONE needs to become proficient in the following basic positions.

1. Full-Depth Squat

Eric Buratty Squat

Also known as an “ass-to-grass” squat, this is a basic human resting position that involves maximal bending of your hips and knees. NO ONE has any business loading this movement pattern until they can achieve full range-of-motion with their own bodyweight, and still remain upright from a postural perspective.

Calisthenics Transition: Foundation for Progressing the Squat Chain (i.e., working up towards pistol and shrimp squat variations)
Recommended Practice: Sit in this position for 5-10 minutes daily. The more favorable times to do so are upon waking for the day, before bed, whenever on a rest day and before or after a tough workout. Feel free to shake up social conformity any time you have the opportunity to squat—especially when waiting in line or shopping out in public.

2. Supine Hollow Body

Eric Buratty Supine Hollow Position

The hollow body is the ultimate educator on the principle of whole body tension. A challenging core workout on its own, this position teaches you the principles of progression in all of calisthenics. More specifically, it allows you to feel the effect of lengthening or shortening the body as a lever for resistance, so you can adapt your training on a given day accordingly. Without understanding the principles of progression in calisthenics, you will only be setting yourself up for failure—and even injury.

Calisthenics Transition: Foundation for Precision and Control Required in Handstand, Front/Side/Back Levers
Recommended Practice: Maintain this position for a total of 2 minutes on training days involving handstands, front/back levers and human flags. Use as part of a warm-up, or superset with the aforementioned moves as active recovery during a workout (e.g., 8 sets of 15 seconds, 6 sets of 20 seconds, 4 sets of 30 seconds).

3. Hollow Body Leaning Push-Up Plank

EricBuratty Hollow Leaning Plank PushUp

By “leaning” into a standard push-up position, you’ll reach a higher level of total body tension that forces you to have greater balance and control over your body. The ability to achieve this position also serves as an excellent confidence booster for when you start experimenting with moves that involve less point(s)-of-contact with the ground.

Calisthenics Transition: Foundation for Progressing Midsection Floor Holds (e.g., N/L/V-Sits, Side Planks, Planche, Manna), Inversions and Elbow Levers
Recommended Practice: Use as part of a warm-up on workout days involving midsection floor holds, as a “finisher” on workout days involving push-ups or as active recovery on workout days involving vertical and horizontal pull-ups. Work up to holding this position for a solid 2 minutes without form breakdown.

4. Hollow Body Backbend

Eric Buratty Hollow Body Backbend

When it comes to improving overall mobility, look no further than backwards bending (AKA “bridging”). Insert “do you even backbend?” parody for “do you even lift?” here. Known for its extremely therapeutic benefits on the muscles and tendons of the entire body, you can further enhance the quality of this position by putting the lower body into as much extension as possible and concentrating on pushing the shoulders past the hands. What you’re left with is a more “hollowed” version in the basic family of bridging that opens new doors for achieving stronger three-limb holds, geckos, stand-to-stands, walkovers and eventually, arched “Mexican” handstands.

Calisthenics Transition: Foundation for Progressing Handstands
Recommended Practice: Work up to holding this position for at least a solid minute after every workout you do. Given the powerful stretch that occurs in common problem areas for Americans from performing this movement (i.e., spine, shoulders and hips), you might even want to start devoting an entire training session to bridging throughout the week.

5. Hollow Body Dead Bar Hang

Eric Buratty Dead Hang Hollow

Similar to the full-depth squat mentioned above, passive hanging is another type of human resting position. When you take the passive hang one step further and connect the scapular muscles with the rest of the body, you’re left with this active hang that’s visually appealing and graceful. This happens to be one of the best positions for activating the core, as it decompresses the entire spine and puts the shoulders into a healthy stretched position with straight arms. With consistent practice of this deceptively challenging hang, you might “accidentally” become stronger at pull-ups AND start revealing your Diamond-Cut Abs.

Calisthenics Transition: Foundation for Progressing Pull-Up Chain & Leg Raise Chain
Recommended Practice: Hang from any straight bar (or any freestanding object for that matter) that allows you to put your body into a fully extended, hollow position, and maintain the position for a total of 1-2 minutes daily. This can either be done before or after a workout to facilitate warm-ups and cool downs—or as a nice complement to an active recovery day away from your regular training.

6. Hollow Body Bar Support

Eric Buratty Hollow Bar Support

As with the other “hollow” positions above, you’re pretty much forced into a state of total body tension with the bar support—which will lead to stronger reps on any related movement you’re preparing to train. In this instance, the ability to support yourself over a bar in a straight arms, locked out, elbows forward position is definitely a good indicator that you’re ready to reach the top of the dipping chain and beyond. Who ELSE is ready to work towards their first straight-bar muscle-up?!

Calisthenics Transition: Foundation for Progressing Straight Bar Dips & Top of Dipping Chain (i.e., Muscle-Up)
Recommended Practice: Use as part of a warm-up on workout days involving the dipping chain—or as active recovery on workout days involving vertical and horizontal pull-ups. Work up to holding this position for a solid minute at a time without form breakdown.

In no particular order, there you have six positions to master before you get slammed in the face with a serious slice of humble pie.

Why do we want to emphasize these isometric positions before worrying about reps and transitions anyway?

Simply put, it’s so we know where our body is in free space and when its position changes. That way, when we reflect on those workout days where our bodies felt ginormously heavier, we might be able to identify which positions felt strong and which ones felt stronger, so we know where to improve on next time.

I’ll end with one of my favorite training-related quotes which comes from Gymnastics Coach Christopher Sommer: “Save the nonsense. Bad form simply means bad attitude. Plain and simple. It means that you did not care enough to do it right.”

To acknowledge this quote from a PCC standpoint, always focus on becoming stronger than yesterday but not as strong as tomorrow! 😉

***
Eric Buratty brings five years of experience to the DC Metro Area as a Certified Personal Trainer, Progressive Calisthenics Instructor, Nutrition Consultant and Sports Injury Specialist.
For more information about Eric, check out his website, EricBurattyFitness.com.

Filed Under: Progressive Calisthenics, Tutorial Tagged With: bodyweight exercise, bridge, calisthenics basics, calisthenics positions, Eric Buratty, foundation calisthenics, hanging hollow position, hollow position, skills training, squats, tutorial

The Forearm Stand: A PCC Hidden Step

October 7, 2014 By Grace Kavadlo 29 Comments

Grace Menendez Forearm Stand

Are you frustrated with conquering the freestanding handstand?

We all want to progress quickly, but the jump from a wall handstand to a free-balancing one can be a huge hurdle! Enter the Forearm Stand – a relatively unknown movement in the PCC world – and a great “hidden step” on your way to the handstand!

When one of my clients recently told me her goal was to nail the forearm stand, I naturally turned to my PCC Instructor Manual, searching for a regression. At over 600 pages, the PCC manual is by far the most comprehensive guide to calisthenics I’ve ever seen, so I was surprised to find barely any mention of the forearm stand!  Luckily, I had plenty of experience with this move from my Yoga training.

Take A Stand

The forearm stand is a great intermediate step between a beginner’s headstand and a freestanding handstand. Known as Pincha Mayurasana (Peacock Pose) in Yoga, this move is great for strengthening your arms and shoulders while also stretching your neck, chest, abdomen and back.

Inversions are also beneficial for improving circulation throughout the body, as well as challenging the practitioner’s balance. Though a difficult move in its own right, the forearm stand is more accessible than a handstand because you have more points of contact to assist in balancing.

Here’s how to nail this move in just 3 easy steps!

#1 Dolphin Pose

This pose is similar to Downward Facing Dog from Yoga but it is practiced on the forearms rather than the hands. Start in a plank position with your forearms shoulder-width apart, then spread your fingers and align your shoulders over your elbows as you gaze between your hands. Slowly begin to walk your feet in towards your hands as you raise your hips towards the sky. If you are new to this pose, you may only be able to walk a few steps before stopping. Your body should resemble as close to an inverted V as possible. Actively press through your hands and forearms to lift your head further off the ground and hold this position for time.

Grace Menendez Dolphin Pose

#2 The Kick-Up

Begin in Dolphin pose and extend one leg up towards the sky. The closer you can walk your feet to your elbows, the more aligned your spine becomes. This alignment allows you to “float” into this pose rather than having to rely on a significant jump. The more mobility you have in your hips and hamstrings, the less difficult this becomes. Push off the base leg as you kick upward with the extended leg. If you are unable to hold the balance at first, I suggest practicing this variation against a wall or other sturdy object until you build the confidence to try it freestanding.

Grace Menendez Dolphin Kick Up

#3 Forearm Stand

Once you are able to kick up and hold for a few breaths, you’re golden! Keep increasing your hold times by simultaneously squeezing your inner thighs and ankles together and pointing your toes towards the sky to create stability throughout your body. The key to finding the “sweet spot” is to grip the ground with your fingers while “wrapping” your triceps around the arm bones and pressing through your elbows as you balance.

Al Kavadlo Danny Kavadlo Forearm Stand

Scorpion Pose and Beyond

Initially when I began practicing forearm stands, I found it easier to hold the pose by bending my knees and allowing my heels to drop as a counterbalance. This is also known as Scorpion Pose. I must warn you this is an intense back bend, however! If you are having difficulty balancing in a regular forearm stand and want to try the scorpion variation, be sure to fit in some preparatory bridge work to warm up your spine.

Al Kavadlo Scorpion Pose

Be patient with yourself and prepare to put in some work if you want to nail this move. You might experience a “crash-landing” when first attempting freestanding forearm stands but by learning to safely fall out, you’ll gain the confidence to keep trying again. If you have the flexibility you can transition into a bridge if you feel yourself tipping over. If not, try to turn your hips and fall to the side. Stay the course and eventually this move will be yours!

Watch the video for more:

***
Grace Menendez, PCC, HKC is a personal trainer and group exercise instructor located in New York City. For more information about Grace, check out her website, www.DieselGrace.com

Filed Under: Flexibility, Tutorial Tagged With: dolphin pose, flexibility, Forearm stand, Grace Menendez, handstand, handstand regression, headstand, hidden step, how to, tutorial, yoga

Building an Indestructible Body with “Outside the Box” Exercises

August 12, 2014 By Logan Christopher 32 Comments

Al Kavadlo Back Of The Wrists Push-Ups

Push-ups. You move in one plane of motion, up and down.

Squats. The same thing. Pull-ups too.

Everyone here will agree that bodyweight exercises are great, but it’s important to realize that there are many, many different ways of doing them.

If all you ever do are one dimensional exercises, even if you build a lot of strength in them, your overall fitness and athleticism will remain one dimensional.

It’s a sad fact that one of the biggest things holding people back from hitting their training goals are injuries. Yet, with smart training these can largely be avoided. And if you do suffer from pain currently, there are always things you can do to work to improve your situation.

Whether you are rehabbing or pre-habbing (doing work that aims to prevent injuries), these exercises generally are the same.

So, what makes one of these exercises different than a regular exercise?

The focus on building flexibility and/or mobility along with a strength component.

The more mobile you are (up to a point), the more likely you can fully exert the strength of that joint and the surrounding tissue.

The more flexible you are (once again up to a point), the more likely you can fully exert the strength of that joint and the surrounding tissue.

When you recognize that strength must be used in combination with mobility and flexibility, then you see why you need to do more than just “straight line” and conventional exercises. The effects of this type of training help you to build an indestructible body.

Before we begin it is important that you move into these exercises slowly. While they will help strengthen your weak points, remember that you are still working on weak points! The difference between something that is good for you and something that is not, can be separated by very little intensity or volume, so you must ease in slowly. Be smart!

Cross Leg Squats

The knee is a simple hinge joint. As such, so many personal trainers and coaches become deathly afraid if it ever does anything outside of that ability. “If the knees go past the toes in a squat you’re going to wreck yourself!” they say.

But here’s the truth: If your body can move in a way, that ability can be strengthened. And if it is strengthened then you’ll have less of a chance for injury. Not only do cross leg squats work the knees, they stressing them in a plane of movement they don’t normally go—and the ankles get worked too.

Begin by sitting with your legs crossed, then rock your weight forwards and press on the sides of your feet, extending your legs until you come to a standing position. Make sure to try it with your legs crossed both ways.

For assistance you can grab onto a doorknob or other solid object to help. You don’t need to do a lot of reps, but instead work to make this an easy way you can get up from the ground at any time.

Logan Christopher Demonstrates the Cross Leg Squat

Sit to Cossack Squat

Was that last one too easy for you? I’m guessing that’s the case for many people reading here. So try this challenge.

Do a Cossack squat to one side while keeping the heel flat on the floor. Once at the bottom, sit back until your butt is sitting on the floor. Now rock back up to Cossack squat, switch sides and repeat.

If you need assistance use your hands to get back up, but the challenge is to do it without them, while trying to use as little momentum as possible. This takes some deep flexibility, and you may notice that your knees don’t necessarily track your toes.

This video shows it in action as well as the secret I found to performing it after much frustration and failure to do it.

One Arm Twisting Bridge

Let’s move onto the upper body. This is a fairly advanced move that I covered before here on the PCC Blog: One Arm Bridge, Twists, and the Valdez.

It’s so useful I’m bringing it up again. The twist in particular builds shoulder stability and strength in an extended range of motion. It even works the wrists in a flexible manner.

At the same time the spine is in full flexion and then twists. A big “no-no” that I say yes to!

If you can do this, there’s a good chance you don’t have issues with any of the joints mentioned above. If you can’t do it right now, but take the time to build up to it, your body will be that much more indestructible from your work.

Back of the Wrist Pushups

An important thing to realize when doing these “outside the box” exercises is that you can still follow the same rules of progress as you would in all your other training.

Back of the wrist push-ups are a great complement to doing lots of push-ups and handstands. In regular push-ups and handstands, your wrist is extended back. But here, you flex your wrist fully and put the weight on the back of the hand. This builds strength and toughness in the wrists, but also works the elbow joints in a big way.

Start slowly with these, as in kneeling push-ups. You can hold for time or rep them out. Progress to regular push-ups when you’re able to. Remember to go slow.

I decided to see just how far I could progress with this and worked my way up to a back of wrist handstand push-ups.

Adding Indestructible Exercises to Your Program

Here’s the great part about these exercises and the hundred, if not thousands, of other moves like them. You don’t need a whole lot to get the benefits.

Doing a few of these exercises, like a few reps in a single set, will be enough to get better at them, and reap the benefits.

Any of the following will work:

  • Add them to your warm-up.
  • Add them to your cool down.
  • Add them to your stretching program.
  • Add them to your mobility work.
  • Do a few on your off days.
  • Do them as part of a morning wake up routine.

You can work through your entire body or just focus on one area at a time.

If you enjoyed this article let me know in the comments section below. I’d love to share more exercises with you in the future!

***

About Logan Christopher: Logan Christopher has been called a physical culture renaissance man as he is accomplished in a wide range of strength skills from kettlebell juggling, performing strongman stunts, and bodyweight exercises. He is the author of numerous books including Secrets of the Handstand and The Master Keys to Strength & Fitness. In addition, he’s spent the last several years going deep into mental training to find out what it takes to really excel and tactics that can help people instantly improve their exercises. You can find out more about all this at http://www.legendarystrength.com/.

Filed Under: Flexibility, Progressive Calisthenics, Tutorial Tagged With: advanced variations, ankles, back of the wrist push-ups, Cossack squat, flexibility, hips, how to, Logan Christopher, mobility, shoulder mobility, tutorial, unconventional exercises, wrist training

My Journey Towards the One Arm Pull Up

July 1, 2014 By David Mace 36 Comments

Al Kavadlo performs a One Arm Pull-Up at the PCC in Sweden

I have a confession to make; I’m obsessed with the one arm pull-up! It wasn’t always this way; three years ago I was a skinny runner, who weighed less than 60kg. In April 2012, I stumbled across a book that would change all this – Convict Conditioning by Paul Wade. After reading it, I decided then and there that in my lifetime I would perform a dead hanging one arm pull-up.

Note that this is simply the progressions I have made. The more you train calisthenics, the more you realize there are many different paths to progression, and what may work for one individual may not work for another.

At the beginning of my training, I could perform a handful of full range pull-ups, so I skipped the first few levels (sorry Coach) and went straight into full pull-ups, followed by close hand and then uneven pull-ups. It took me about 3 months to perform 2 sets of 10 strict full range pull-ups; by full range I mean a straight arm at the bottom and my chin over the bar at the top.

David Mace Perfoming Standard Pull-ups
Your arms should be straight at the bottom, with your chin over the bar at the top.
David Mace Performs Close Pull-ups
This time bring your hands next to each other.

After training uneven pull-ups for a few months I hit my first road block; I could perform 2 sets of 9 uneven each arm, but any attempt at half one arm pull-ups was met with failure. Knowing what I know now I would have built in some extra progressions and gradually moved my non-working hand further down my arm.

David Mace Performs Uneven Pull-ups
The uneven pull-up can be made more difficult by moving the non-working hand further down the arm.

Instead of this I found an alternative progression upon the purchase of a set of rings; whereby one arm is on the top ring, with the other arm on a lower ring. This way you can easily increase the distance between arms over time. As both arms are on the rings, your head can go between them, which makes it slightly easier than with one arm on the bar.

David Mace Uneven Ring Pull-ups
Start with your working arm straight; at the top position your chin should be above the hand of your working arm.

My training for this had gone on for a few months when I read a couple of articles from Coach Wade and Al Kavadlo, here on the PCC blog about training for mass and training for strength. I had been toying around with the idea of moving away from strict Convict Conditioning style progressions for a while and this proved to be the catalyst. I split my main training plan into 2 different groups of sets; the first being the hard set, consisting of 2 sets of up to 5 reps, and being the most difficult exercise you can do in the progression whilst you are fresh. After this I perform my working sets, consisting of 4 sets of 5 reps. This new plan allowed me to switch to 2 separate progressions in the same workout, which I’ve found to be extremely effective towards reaching my goal.

For my hard sets I added one-arm negatives. Simply pull yourself up to the bar with both arms, then gradually take one arm off the bar and lower yourself with as much control as possible. Starting with fewer fingers is a good way to progress to this, otherwise the most likely initial outcome will be you dropping straight down. The working sets were made up of my uneven ring pull-ups.

David Mace Performs One Arm Pull-up Negatives
Start at the top position of a one arm pull-up, then lower yourself with as much control as possible.

With uneven ring pull-ups you eventually reach a point where your lower arm is performing a pushing motion, rather than a pull in the top position. This is where it starts to become easier and means it is time to change to a new progression. In this instance I moved my pulling arm back to the bar, then used just the one ring to assist. It’s really important with this exercise that your head follows the path of your pulling arm; this means that your working arm is taking most of the weight and replicates the path you would take for a one arm pull-up. Note that this exercise could easily be performed with a towel or the post of your pull-up bar, if you do not have access to rings.

David Mace Performs Ring-Assisted One Arm Pull-ups
Your chin follows the path of your working arm; whilst your other arm is just assisting.

By this time I had been teaching calisthenics to some of my work mates for around a year. For those who can’t yet perform a full range pull-up, they start with negatives for their hard sets and band assisted pull-ups for their working sets. Exercise bands have some good advantages in that you don’t need anyone to help you, and you know exactly how much assistance you’re getting. They’re very easy to progress with as they have different levels of assistance. Having said that, they have a major weakness in that they assist you a lot at the bottom but not as much at the top. This has worked for a number of people to get full pull-ups though, so I was keen to see how the band would work for the one arm pull-up.

When attempting this you will find that your body naturally wants to twist. Squeeze your core and obliques tightly to help prevent this, but you may need to reset yourself every few reps. What I particularly like about this exercise is it allows me to use just one arm, with no assistance from the other. I now train this exercise in my hard sets and the assisted one arm pull-ups in the working sets.

David Mace Performs Band-Assisted One-Arm Pull-ups
The bottom position your arm should be straight; you haven’t reached full range until your chin is over the bar.

Finally, below is my latest attempt at a jump assisted one arm pull-up. As you can see my left arm is quite a lot weaker than my right, this I’m trying to resolve by only moving onto the next progression once both arms can do it, but my right arm will always be stronger.

Though I forgot to do it when pulling with my left, you may have noticed that both in my video and the picture above, I squeeze my non-working hand as tightly as possible. This is a technique to create extra tension in the working arm, there is a link between the 2 – the more full body tension you can get, the more power you will have. For this reason you should squeeze your non-working arm, core, glutes, and in fact pretty much every muscle in your body as tightly as you can.

I will achieve a dead-hanging one arm pull-up eventually, look out for a video and an update then.

***

David Mace is a full time programmer and a part time calisthenics enthusiast and loves to teach PCC to friends and co-workers. Success for him is measured in helping others (and himself) to achieve their maximum potential and doing things that you once thought were impossible. He can be contacted through his website at www.mpcalisthenics.com, where you can also read his blog, get advice on nutrition, training and life philosophy.

Filed Under: Progressive Calisthenics, Tutorial Tagged With: advanced progressions, Convict Conditioning, David Mace, OAPU, one-arm pull-up, pull-ups, tutorial

Developing Powerful Abs with the Dragon Flag

April 22, 2014 By Adrienne Harvey 32 Comments

PCC Team Leader Adrienne Harvey Dragon Flag in Sweden

Anyone who’s familiar with extreme calisthenics already knows the infamous human flag exercise; the dragon flag variant, however, is an equally awesome move that fewer people are aware of. It looks cool, it’s commonly associated with Bruce Lee, and there’s so much that can be learned by working up to and practicing it. The other great thing about the dragon flag is that learning to do one means learning how to create an incredible amount of tension throughout your whole body—an essential skill for all advanced calisthenics. While there are many different paths to the dragon flag, the multi-faceted one shared below has worked well for a few clients and myself. Some of these drills led me to the dragon flag before I was ever really trying for it. Oddly enough, even though they require very maximal effort, I’ll usually leave dragon flags for the end of the workout, or focus on them at a separate time of day from my main workout. Regardless, it’s also a good idea to be warmed up. The Trifecta from Convict Conditioning 2 using the bridge, L-sit, and twist is a great sequence to practice before and after your calisthenics work, especially high tension moves like the dragon flag!

It seems like all forms of the flag require an extreme level of tension. Whenever I catch myself not properly respecting that fact on any flag progression, I remember watching Danny Kavadlo psych himself up for one of his human flag demonstrations—that fierce-looking (and sounding) process is nearly as impressive as the feat itself! But the good news is that since most serious bodyweight enthusiasts will naturally already have some of the requisite abdominal strength, the dragon flag may be a little bit “easier” to achieve than a full human flag. It certainly requires a little less skill since it’s usually performed on a solid bench, or from the ground with a low bar, instead of self-suspended in the air while gripping a pole!

Al Kavadlo performs a Dragon Flag on a pole
Al Kavadlo performs a dragon flag on a pole

The dragon flag can also be performed on a pole, but it requires a bit of pain tolerance (pick which trap you want to jam the side of the pole into) and extra time practicing the correct grip—plus you’ll also have to fight the rotation from that off-centered pole! For comfort and simplicity—especially at the beginning—using a bench, a well-secured very low bar, or similar set up is best for learning the dragon flag. Certain types of very simple ab stations on fit trails (look for a flat platform with a low bar attached at one end) can also be appropriate for flags, though I would recommend padding the surface under your shoulders.

Fit Trail ab bench

For safely make sure that whatever you are using, grabbing, and pushing against is sturdy and can support your entire body weight or more.

Alternately, on a flat bench, you can choose to place your hands on the sides of the bench (usually near the ears, but everyone’s placement will be slightly different) or behind your head as shown below:

Hand position choices for dragon flags on a bench

Since the dragon flag requires a lot of tension, proprioception and skill, I’ve used multiple steps and strategies to progress towards it. Many of these moves are good for warming up when you’re able to do the full flag too.

1. The “Hardstyle” plank: The ability to really own the full body tension in this intense version of the plank is crucial. To me the dragon flag feels like an extra serious, less unsupported Hardstyle plank. (Think of doing a plank on just your arms.) The Hardstyle plank differs from the regular variety because the whole body is tensed, the elbows are pulling towards the toes really engaging the abs, and the heels are pushing outwards as well. Similarly, the glutes are engaged too—as they are in the dragon flag!

Hardstyle Plank

2. Lying leg raises from the floor—while these are a LOT easier than a dragon flag, remaining tense with your legs just a few inches off the ground while fully engaging your abdominals will really help you towards the goal of the dragon flag.

Flat Leg Raises Demonstration

3. A yoga-like shoulder stand—learning to balance up on your shoulders and NOT your neck will help you get into the right position at the midpoint of the dragon flag, or the starting point of the negative version. Familiarity with the feeling at this position can help insure that you’re keeping the body in a straight line as you descend, and eventually ascend too. The more balanced you can be at this midpoint, the more chance you have for a little “rest” between the grueling ascent and descent of the full dragon flag.

Shoulder stand demonstration

4. Tuck-flags or roll-ups (I’m sure someone has a better name for this drill). As we know from many other bodyweight exercises (L-sits, front and back bar levers) if we shorten the length of our legs, then the more favorable leverage makes the move much easier. While in a tuck position, use your abs to slowly pull your tucked body up off the floor onto your shoulders while firmly gripping the bench or very low bar, slowly lower back down until your abs are almost screaming! This move is not to be done quickly, and is surprisingly difficult if performed correctly—especially for reps! Gradually straighten the legs more and more to increase difficulty.

Tuck raises demonstration

5. Negative dragon flags. Grasp the bench or very low bar and begin from the shoulder-stand-like top position. After making sure you’re resting on your shoulders, not your neck, tense the whole body (torso, glutes, legs, etc.) and try to lower yourself slowly, and under control without bending at the hips. You may feel like you’re supporting most of your body through your arms at first, but try to mitigate that feeling by really keeping the body tight during every second of your descent. This takes an amazing amount of tension. The closer your legs get to the ground, the more difficult the move becomes. Try to maintain the straight body position and the tension as long as you can without just dropping your legs at the bottom of the movement. The abs, glutes, legs and everything in between are strongly engaged (I’ve even managed to cramp up one or both feet while practicing these!)

Negative dragon flags

6. Full dragon flags up from the ground, towards the shoulder-stand-like position, then descending. It’s very easy to accidentally cheat these on the way up, as your hips will want to fold to help you out. Instead, think of maintaining a slightly flatter version of a hollow position while focusing on keeping the body as one solid plank. I think the most difficult part of this move is initiating the movement from the ground. The first few seconds feel nearly impossible on some days!

Steps 1-4 can be practiced together, but practicing the negative flags and full flags is incredibly taxing. I typically won’t do more than 1-2 per set for negatives, and only 1 full dragon flag per set, for a session total of 3-5 sets. That’s ten reps total for the day at most. You may be able to work up to more over time, but this move takes practice, patience, and long term dedication, so best to ease in gradually.

While some may dismiss moves like the dragon flag and human flag as “party tricks,” these very cool looking moves are rewarding to conquer as they challenge our patience along with building strength, skill, and control. Thankfully, these hard-won concepts will carry over directly and indirectly to many other bodyweight drills, skills and feats of strength.

 ***

About Adrienne Harvey, PCC Team Leader, RKCII, CK-FMS, Primal Move Nat’l Instructor: Originally RKC Certified in 2010, and RKC Level 2 certified in 2011, kettlebell and bodyweight training have been crucial in Adrienne’s personal quest for fitness. A core member of the PCC team, Adrienne loves sharing her knowledge with small groups and individuals. She also loves to develop recipes and workout programs to further support performance, body composition, and of course—FUN.  Go to http://www.giryagirl.com for more information about Adrienne!

Filed Under: Progressive Calisthenics, Tutorial Tagged With: abdominal training, abs, Adrienne Harvey, dragon flag, full body tension, human flag, tension, tutorial

The Case for Curved Handstands

December 3, 2013 By Logan Christopher 24 Comments

sig-klein-handstandAsk any gymnast or circus performer about doing handstands and they’re likely to tell you that a straight handstand is the only way to do it. It’s the perfect form, and anything else is wrong.

I disagree! Let me tell you why.

Recently on this site was an article all about the straight handstand and the benefits of doing them in that manner. I don’t disagree with those points, but wanted to give a different opinion on why the curved handstand is a viable option as well.

Are Curved Handstands Dangerous?

First off, let’s talk about the claim that doing a curved handstand is going to hurt your back. Just like anything else, it can happen, but if you’re smart about it, they’re completely safe.

I think this myth is simply a result of people doing straight handstands for other reasons, and then not knowing why that is the case.  To think that bending your spine is going to hurt you is ridiculous.

Push too far with bridging exercises and you can tweak your back, but doing them right you’ll develop more flexibility and strength.

When doing a handstand if you let gravity just pull your legs over without maintaining any core tightness, it can take you into a position that you’re not ready for. Doing too much of can certainly cause you to strain your back.

Instead maintain tightness, and build up what you do over time. Just like any other exercise.

Art2 - OHBalAre Straight Handstands Necessary for Higher Level Skills?

The straight handstand can help you do harder skills but it is not necessary.

I have heard people say that you need perfectly straight alignment to hold a one arm handstand. Tell that to Professor Paulinetti, the man who basically invented the one arm handstand.

You see, old school hand balancers, did all their handstands with curves in their backs. All of them! And they pulled of amazing skills.

They treated the straight handstand as an advanced variation of the handstand. This harder skill was something to practice later on after you could stand on your hands.

Over time, hand balancers transitioned away from the curve to the straight position you see commonly today. Part of this was for aesthetic reasons. It’s more pleasing to the eye, and for things like gymnastic competitions, you’re judged on this.

Another part is that a straight handstand does help you to achieve more difficult skills. By beginning with it you can build those habits from the beginning. This is a smart thing to do if you plan on taking your hand balancing skills far.

To prove this point, in the future, I’d like to build up to the one hand handstand in a curved position like the old timers did.

What About The Beginner or Recreational Athlete?

Don’t plan to be paid to do hand balancing professionally? Not a gymnast? Would you just like to be able to hold a freestanding handstand? If that’s the case I don’t think going for the straight handstand is necessarily for you.

If you ask anyone to hold a handstand that has never done it before, what will you see? When they kick up, before they fall down almost instantly, they’ll be in a curved position.

The curved handstand is a more natural position. It takes a lot of effort to get a perfect line in your handstand because it is unnatural. To tighten the muscles as needed to form a straight line is significantly more difficult, and not to mention, it takes additional shoulder flexibility, that many people don’t have.

If you choose, you can practice the curved handstand. You’re likely to gain the skill faster than someone going after a straight handstand. You’ll be freestanding in a shorter amount of time, which is of course dependent on how much you practice. Then from there you can practice other hand balancing skills and work on straightening out later if you choose.

Or you can practice a straight handstand from the beginning. It will take longer with more practice time. But once you have it you’ll be good to go onto other more advanced skills.

It is a choice you can make.

Sure, a straight handstand is better, in that it is more advanced. Just like a 315 lb. snatch is better than a 225 lb. one. But that doesn’t make the curved handstand wrong.

Reverse Handstand SideHow to Learn the  Straight or Curved Handstand

If you’re going to do handstands the starting place is against the wall. But depending on which of these two you want to go for you’re going to do them differently.

If you choose to go with the curved handstand then when doing wall handstands your back can face the wall. Kick-up into position then hold for time.

If you choose to go with a straight handstand you’ll want to face the other way. The reason for this is that this orientation forces you into a straighter position, especially as you inch your hands closer and closer to the wall.

In either style you build endurance by holding for time and maintaining your position. Then when it comes to freestanding handstands this skill set should be built in as you learn to balance out in the open.

So let’s take a poll. Do you do curved or straight handstands? Even if its just against the wall, what are you going for? Answer in the comments below.

***

About Logan Christopher: Logan Christopher has been called a physical culture renaissance man as he is accomplished in a wide range of strength skills from kettlebell juggling, performing strongman stunts, and bodyweight exercises. He is the author of numerous books including Secrets of the Handstand and The Master Keys to Strength & Fitness. In addition, he’s spent the last several years going deep into mental training to find out what it takes to really excel and tactics that can help people instantly improve their exercises. You can find out more about all this at http://www.legendarystrength.com/.

Filed Under: Progressive Calisthenics, Tutorial Tagged With: curved handstands, handstands, Logan Christopher, opposite handstands, straight handstands, tutorial

A Look at the 3 Way Kick

October 1, 2013 By Matt Schifferle 8 Comments

matt_shifferle1There is nothing like a strong pair of legs.

You can keep your strong core, wide shoulders and massive arms. My experience has taught me that all of the strength and conditioning in the world is practically worthless without a strong set of legs.

But hold the phone, strong muscles alone won’t build strong legs. True strength for the field, court or mountain requires much more than a lot of horsepower in the engine. In order to fully unleash your lower body strength you must also possess the following:

– Balance and control

Strong muscles without balance and control is like putting a massive engine in a car with bald tires and worn out brakes. Either you’ll never use all of that power or you’ll end up crashing. Control ensures you can use all of the power you have and use it in the most effective way.

– Flexibility

For every muscle you contract there is one that must lengthen. When the muscles are tight and resist lengthening you’re literally fighting your own tension. Becoming even a little more flexible ensures that you’ll have less resistance holding you back in everything you do.

– Strength and stamina in supporting muscles

When it comes to leg strength, we tend to focus on the bigger muscles in the legs like the quads, hamstrings, glutes and calves. These are important for sure, but what about some of the smaller and more subtle muscle groups like the ones in the feet and hips? While not the biggest or most powerful lower body muscles, weakness in these smaller muscles can greatly handicap the bigger muscles.

Calisthenics is a very effective way to condition all three of these characteristics. It’s impossible to even attempt moves like lunges and single leg squats without developing balance, flexibility and strength in the supporting muscles.

That being said, it doesn’t hurt to further develop those weak links in the lower body chain. Doing so can make your weakest link so strong that your entire body can reach new levels of performance.

The following video showcases an exercise which is great at developing your balance, flexibility and strength.

This exercise does wonders at unlocking some of the lower body strength that’s been dormant in your lower body. Just running through this routine a few times before each leg workout will leave your legs and hips feeling brand new within a few weeks. It’s also a great cool down afterward to refocus your mind.

***

Matt Schifferle a.k.a The Fit Rebel made a switch to calisthenics training 5 years ago in an effort to rehab his weight lifting injuries. Since then he’s been on a personal quest to discover and teach the immense benefits of advanced body weight training.  You can find some of his unique bodyweight training methods at www.RedDeltaProject.com.

Filed Under: Flexibility, Progressive Calisthenics, Tutorial Tagged With: 3 way kick, calisthenics, Fit Rebel, leg training, lower body strength, Matt Schifferle, power, tutorial, video

My Journey to the Back Lever

August 13, 2013 By Angelo Gala 10 Comments

Photo1
It frequently catches me off guard when budding fitness enthusiasts ask me to teach them flashy drills such as kettlebell juggling, physio-ball air squats and kipping butterfly pull-ups. Sure these exercises may look impressive, however each complex movement pattern requires a level of physical competency and advanced coordination that isn’t just given away. All too often, these requests come from the same people who struggle with executing ten standard push-ups. Very rarely do people care about the benefits provided, they’re simply romanced by the “fun factor.” Demonstrate to the same person a back lever and you may see a pair of glazed eyes appreciating the skill, but not quite aware of the work required to get there.

If you are unfamiliar with the back lever, picture hanging from a pull-up bar, pulling your feet all the way to the bar, then sliding them in between your hands and rotating backwards until your chest is parallel to the floor below. The back lever finishes with a hip and knee extension that suspends your body into a plank formation while hanging from your hands. Sound fun? I thought so! But it can also do wonders for your strength, mobility and proprioception.

Working through the progressions will open up your shoulders, stretch your chest and strengthen the supporting musculature of your scapulae like no other. Once you are mobile enough to rotate your chest to parallel, the real core training begins. The back lever will simultaneously develop unbelievable amounts of strength and stability on both sides of your body. You can say goodbye to those weighted back extensions since this version of the lever will hit both your lower back and upper back musculature all while developing the awareness to align your spine in vertical, inverted and horizontal positions.

I was lucky enough to have some decent shoulder mobility and a very supportive baseline of strength when I began training this calisthenic. Here is the progression that worked for me:

Static Hang:
Starting from absolute scratch, you should develop the hand strength to hang from a pull-up bar for 30-60 seconds. If you can’t hang for that long, trying to support yourself as you flip upside down isn’t a great idea. You can practice hanging from both hands and eventually one hand at a time to develop your grip strength evenly on both sides.

Hanging Leg Raise (HLR):
To execute this requisite core exercise, pull down on the pull-up bar with both hands while simultaneously lifting your legs as straight as possible up toward the bar. Shoot for at least ten reps before you move on from here.

Skin the Cat / German Hang:
After developing strength from the HLR, it’s time to wiggle your feet in-between your hands and rotate backwards until you can look straight ahead. The finish position, known as the German hang, should look similar to your hanging start position with your legs dropping towards the ground, except your arms will be stretched behind your body. Initially you may find that you do not have the shoulder mobility to come around full circle or the fear factor may be just too great – that’s ok! Try performing a few rotations at a time, gradually increasing the amount of rotation on each attempt. Static holds in your deepest expression of the exercise as well as dynamic repetitions of the move will help loosen up tight muscles. Be sure to keep your shoulders active (squeeze the shoulder blades together and down towards your bum) as it will keep your arms attached to your body. Trust me, this is a good thing.

Photo2
Here we see a German hang and a standard bar hang side by side.

Tuck Back Lever:
Using the skin the cat technique, roll through your arms attempting to align your chest to parallel with the ground. After you pull through, tuck your knees tightly to your chest and lift your upper back to spot the ground ahead of your body. Your target here is to work up to a 20-30 second hold before you move on. Progressing your tuck lever is as simple as pushing your upper thighs away from your chest in an attempt to align your knees under your hips. Understand that this will increase the difficulty of the move exponentially. If aligning your knees under your hips feels sketchy and unmanageable, then slowly pull your knees only a few inches from the tuck position at a time. Be patient and work up to thirty second holds a few inches at a time.

Congratulations!  You are well on your way to getting the move under your belt and by now I’m sure that many people have stopped to stare at the insanity of your acrobatics!

Photo3
Single Leg Tuck Back Lever:
Once you can hold a tuck position with your knees stacked directly under your hips, you can alternate extending one leg at a time. In the beginning, it’s perfectly alright to send one leg back with the knee significantly bent. Soon enough you will be able to lock out your leg in its entirety. Keep in mind that your legs hold a significant chunk of your body weight so move slow or you might find yourself unexpectedly falling into a German hang. Don’t forget to work both sides evenly as preventing imbalance should be a goal in any fitness program. Thirty seconds per leg should be your target range of proficiency here as well.

Photo4
Full Back Lever:
We made it! It’s time to work on the full expression! Using leverage to your advantage will be the key to your success when practicing the full back lever. To execute, skin your cat until you can align your torso to about 45 degrees with your head angled towards the ground. From here, keep your knees tucked and begin to extend your hips. Once you feel stable, slowly straighten your knees until your body is fully extended into one long line angled roughly forty-five degrees from the ground. Keep your entire body as tight as possible. If you can hang here without too much issue, lift your chest to help drop your hips, moving your body position closer to parallel to the floor. The more parallel you become, the more you will feel gravity’s pull and the harder you will have to work.

All in all, I learned the progressions to this move and bagged it after almost exactly one month of work. I can’t promise the same rate of success as everyone’s starting strength and mobility will be different. As for programming, I practiced my back lever progressions three or four days a week. At least two workouts were specifically geared towards building volume in the different tuck positions with a target of three to seven attempts per workout. I worked up to owning each position for thirty seconds but started many of the holds with barely the ability to tolerate ten seconds. Other days I would skin the cat as a dynamic warm-up or finish my workouts with several sets in the German hang position so I consistently worked on improving requisite shoulder mobility and got comfortable going upside down. Keep practicing and be patient. Continued exposure to the demands of the back lever will get you there as soon as your body is ready for it

Give this a go, good luck and keep me posted on your progress!

Photo5

***

About Angelo Gala, RKC / PCC Team Leader: Angelo Gala has been a fitness professional in the Boston area for greater than 11 years. He is a Certified Strength and Conditioning Specialist through the NCSA, and has studied the Pranavayu system of yoga under David Magone.  He is a Dharma friend at the Sakya Center of Buddhist Studies in Cambridge, MA where he completed a 1 year intensive study of Mangalam Yantra Yoga under the guidance of Lama Migmar Tseten. Go to http://www.dragondoor.com/angelo-gala/ for more info.

Filed Under: Progressive Calisthenics, Tutorial Tagged With: Angelo Gala, back lever, bar lever, calisthenics, instructor, journey, PCC, progressive calisthenics, shoulder mobility, tutorial, yoga

Odd Object Training with Bodyweight?

July 23, 2013 By Logan Christopher 12 Comments

There’s a method of training with weights called odd object lifting. While a barbell is made to be lifted, with its small diameter handle that is easy to grip, and the weight being perfectly balanced, most of what is encountered in the real world is not.

If you’ve ever moved furniture you know this to be true. While an item may not be all that heavy, its size and shape can prove very difficult to maneuver.

Thus if you want to become strong the use of odd objects is suggested. This means lifting things that are harder to lift like rocks, stones, barrels and the like. The idea being that this will force your stabilizing muscles to work much harder. Often your grip is taxed much more. Plus your form in lifting these odd objects will be different than how you’d handle a barbell.

But what does this have to do with bodyweight training? Can we take this idea of odd object training and apply it to bodyweight exercises?

Well, I was reading Raising the Bar by Al Kavadlo the other day. There’s a single sentence in there that got me thinking.

“Training on odd objects can sometimes offer unique challenges and benefits.”

This sparked my thinking about this more so in this article I’m going to go deeper on how to use odd objects in your bodyweight training.

Most pull-up bars are just like the barbell. Its perfectly straight and has a thin handle to make the exercise as easy as possible. So what happens when you do your pull-ups on things besides a normal pull-up bar?

Try it on a tree branch. The thicker grip will make it harder to do. Plus here you won’t be able to wrap the thumbs around. Depending on the strength of the branch there may be some sway as you do the exercise (of course you’ll want to make sure the branch can easily support your weight before you jump on it).

Tree Branch Pullup
The thicker grip will make chin-ups more challenging.

You could modify this even more with a tree. What if one hand hangs on a branch while the other is closer to the base of the tree, where the branch comes out. This will be an uneven pull-up and depending on how wide your hands are apart could also be an archer pull-up.

This same thing can be done on many monkey bars. Look around at the thick bars and the angles you can use.

Uneven Pullup
An uneven chin-up with one hand on the thick bar and one on a chain.
Not only is the grip tough here on two chains, but I was forced to straddle the legs.

And don’t just think pull-ups. Levers, hanging leg raises and dips can be done on different bar setups too.

Wide Dip
Feel the stretch with wide dips.

Here you’ll gain some similar benefits as those odd objects can bring. The exercise will become harder as certain parts of your body will need to work more. The great thing is if you spend some time working on the odd bars when you go back to a regular bar its going to feel that much easier.

Bars aren’t the only way you can get this effect. What about pushups? Although you could use a variety of pushup handles you may be able to find objects to do pushups on too.

This pushup is done with offset hands at different heights.

Plus this same effect can be accomplished on the flat floor just as well. Instead of always doing pushups in your perfect, ideal form, change them up.

Alter hand placement. Go closer, go wider, go offset. Turn one or both hands out to the side. Turn one hand backwards as you keep on forwards. Try this while they’re both wide.

No objects are necessary. Try this pushup with both hands pointing in the same direction.

The great hand balancer Professor E.M. Orlick taught handstands just like this. Don’t just keep trying to add time to holding a normal handstand. Instead alter your hand position (among many other things). Once again go closer, go wider, or offset.

Doing an open fist handstand. Harder than flat hands but easier than fully on the fists.

When you train in this manner, since almost all of it will be harder than the normal version, when you get back to that regular pushup or handstand it will be that much easier.

While consistency with the basics is necessary and a good thing to do, one of the best ways to improve that is to “complexify” what you’re doing. This “odd object” like training will allow you to do just that. Sometimes you need to go outside the normal and play around with as many variations as you can.

***

About Logan Christopher: Logan Christopher has been called a physical culture renaissance man as he is accomplished in a wide range of strength skills from kettlebell juggling, performing strongman stunts, and bodyweight exercises. He is the author of numerous books including Secrets of the Handstand and The Master Keys to Strength & Fitness. In addition, he’s spent the last several years going deep into mental training to find out what it takes to really excel and tactics that can help people instantly improve their exercises. You can find out more about all this at http://www.legendarystrength.com/.

Filed Under: Progressive Calisthenics, Tutorial Tagged With: bodyweight exercise, Logan Christopher, odd object training, pull-up variations, Raising the Bar, strength training, tutorial

  • « Go to Previous Page
  • Go to page 1
  • Go to page 2
  • Go to page 3
  • Go to page 4
  • Go to Next Page »

Primary Sidebar

Featured Products

previous arrow
GetStrongBookCover
ConvictConditioningBookCover
StreetWorkoutBookCover
ExplosiveCalisthenicsBookCover
StrengthRulesBookCover
next arrow

Categories

Progressive Calisthenics Certification Logo
Click here for more information or to register for the PCC workshop

Get Strong Workouts TriadXP App
Get Strong Workouts App

Recent Posts

  • Top 5 Reasons Why an In-Person Workshop is the Best Way to Supercharge Your Training
  • HYBRID STRENGTH TRAINING IS HERE!
  • My Calisthenics Journey to the PCC
  • The Handstand Press: Complete Control Through the Handstand
  • The Get Strong App is Here!

Dragon Door Publications

Dragon Door Publications

Recent Comments

  • bross dandon on The Case for Curved Handstands
  • Johnny Flewellen Jr. on Strength for Life
  • Dan Earthquake on The Pursuit of the Daily Minimum
  • Johnny Flewellen Jr. on The Pursuit of the Daily Minimum
  • Johnny Flewellen Jr. on Yoga, Calisthenics and the Journey of a Lifetime
FOLLOW US ON TWITTER!

Copyright © 2023

Dragon Door Publications / The author(s) and publisher of this material are not responsible in any manner whatsoever for any injury that may occur through following the instructions or opinions contained in this material. The activities, physical and otherwise, described herein for informational purposes only, may be too strenuous or dangerous for some people, and the reader(s) should consult a physician before engaging in them.